Proficy Logic Developer PLC GE
Bạn đang xem bản rút gọn của tài liệu. Xem và tải ngay bản đầy đủ của tài liệu tại đây (2.85 MB, 158 trang )
Proficy
Logic Developer - PLC
2
All rights reserved. No part of this publication may be reproduced in any form or by any electronic or mechanical means,
including photocopying and recording, without permission in writing from GE Fanuc Automation Americas, Inc.
Disclaimer of Warranties and Liability
The information contained in this manual is believed to be accurate and reliable. However, GE Fanuc Automation Americas,
Inc. assumes no responsibilities for any errors, omissions or inaccuracies whatsoever. Without limiting the foregoing, GE Fanuc
Automation Americas, Inc. disclaims any and all warranties, expressed or implied, including the warranty of merchantability
and fitness for a particular purpose, with respect to the information contained in this manual and the equipment or software
described herein. The entire risk as to the quality and performance of such information, equipment and software, is upon the
buyer or user. GE Fanuc Automation Americas, Inc. shall not be liable for any damages, including special or consequential
damages, arising out of the use of such information, equipment and software, even if GE Fanuc Automation Americas, Inc. has
been advised in advance of the possibility of such damages. The use of the information contained in the manual and the
software described herein is subject to GE Fanuc Automation Americas, Inc. standard license agreement, which must be
executed by the buyer or user before the use of such information, equipment or software.
Notice
GE Fanuc Automation Americas, Inc. reserves the right to make improvements to the products described in this publication at
any time and without notice.
© 2007 GE Fanuc Automation Americas, Inc. All rights reserved. Proficy is a trademark of GE Fanuc Automation. Any other
trademarks referenced herein are used solely for purposes of identifying compatibility with the products of GE Fanuc
Automation Americas, Inc.
We want to hear from you. If you have any comments, questions, or suggestions about our documentation, send them to the
following e-mail address:
Proficy™ Logic Developer - PLC 5.70 i
Contents
1 Welcome 1
System Requirements . . . . . . . . . . . . . . . . . . . . . . . . . . . . . . . . . . .3
Installation . . . . . . . . . . . . . . . . . . . . . . . . . . . . . . . . . . . . . . . . . . .4
Product Authorization . . . . . . . . . . . . . . . . . . . . . . . . . . . . . . . . . . .5
Hardware Key Authorization . . . . . . . . . . . . . . . . . . . . . . . . . . .5
Software Key . . . . . . . . . . . . . . . . . . . . . . . . . . . . . . . . . . . . . . .6
Technical Support . . . . . . . . . . . . . . . . . . . . . . . . . . . . . . . . . . . . . .8
2 Proficy™ Machine Edition 11
Quick Start . . . . . . . . . . . . . . . . . . . . . . . . . . . . . . . . . . . . . . . . . .12
Projects . . . . . . . . . . . . . . . . . . . . . . . . . . . . . . . . . . . . . . . . . . . . .14
Tools . . . . . . . . . . . . . . . . . . . . . . . . . . . . . . . . . . . . . . . . . . . . . . .16
Using docking markers . . . . . . . . . . . . . . . . . . . . . . . . . . . . . .17
Variables . . . . . . . . . . . . . . . . . . . . . . . . . . . . . . . . . . . . . . . . . . . .18
Options . . . . . . . . . . . . . . . . . . . . . . . . . . . . . . . . . . . . . . . . . . . . .22
Machine Edition Help . . . . . . . . . . . . . . . . . . . . . . . . . . . . . . . . . .23
Companion Help . . . . . . . . . . . . . . . . . . . . . . . . . . . . . . . . . . .23
InfoViewer Help . . . . . . . . . . . . . . . . . . . . . . . . . . . . . . . . . . .23
3 GE Fanuc Targets 29
Adding, Configuring and Converting Targets . . . . . . . . . . . . . . . . .30
Adding Targets . . . . . . . . . . . . . . . . . . . . . . . . . . . . . . . . . . . .30
Configuring Controller Targets . . . . . . . . . . . . . . . . . . . . . . . .31
Converting Targets . . . . . . . . . . . . . . . . . . . . . . . . . . . . . . . . . .32
Configuring Communication . . . . . . . . . . . . . . . . . . . . . . . . . . . .34
Interacting with a Controller . . . . . . . . . . . . . . . . . . . . . . . . . . . . .39
Validating a Target . . . . . . . . . . . . . . . . . . . . . . . . . . . . . . . . .39
Offline, Online: monitor mode, programmer mode . . . . . . . . .39
Upload/Download . . . . . . . . . . . . . . . . . . . . . . . . . . . . . . . . . .41
Run/Stop . . . . . . . . . . . . . . . . . . . . . . . . . . . . . . . . . . . . . . . . .43
Fault Tables . . . . . . . . . . . . . . . . . . . . . . . . . . . . . . . . . . . . . . .44
Reference View Tables . . . . . . . . . . . . . . . . . . . . . . . . . . . . . .46
Reports . . . . . . . . . . . . . . . . . . . . . . . . . . . . . . . . . . . . . . . . . .47
ii Proficy™ Logic Developer - PLC 5.70
4 Hardware Configuration 49
PACSystems™ RX7i . . . . . . . . . . . . . . . . . . . . . . . . . . . . . . . . . . . 49
Configuring PACSystems™ RX7i Hardware . . . . . . . . . . . . . . 50
PACSystems™ RX3i . . . . . . . . . . . . . . . . . . . . . . . . . . . . . . . . . . . 51
Configuring PACSystems™ RX3i Hardware . . . . . . . . . . . . . . 52
Configuring Controller Hardware . . . . . . . . . . . . . . . . . . . . . . . . . 53
I/O variables . . . . . . . . . . . . . . . . . . . . . . . . . . . . . . . . . . . . . . . . 59
Hot Redundancy Systems . . . . . . . . . . . . . . . . . . . . . . . . . . . . . . . 61
Configuring Hot Redundancy Systems . . . . . . . . . . . . . . . . . . 63
PACSystems™ RX3i and Series 90™-30: DSM324i and Motion Mate
DSM314 Motion Modules . . . . . . . . . . . . . . . . . . . . . . . . . . . . . . 67
Remote I/O . . . . . . . . . . . . . . . . . . . . . . . . . . . . . . . . . . . . . . . . . 69
Series 90™-70 Genius Remote I/O Scanner . . . . . . . . . . . . . . 69
VersaMax Remote I/O . . . . . . . . . . . . . . . . . . . . . . . . . . . . . . . 71
5 Logic Programs and Blocks 75
Program Types . . . . . . . . . . . . . . . . . . . . . . . . . . . . . . . . . . . . 75
Number of Blocks in the Main Program . . . . . . . . . . . . . . . . . 78
Scheduling Programs . . . . . . . . . . . . . . . . . . . . . . . . . . . . . . . 78
Indirect References . . . . . . . . . . . . . . . . . . . . . . . . . . . . . . . . . 81
LD Editor . . . . . . . . . . . . . . . . . . . . . . . . . . . . . . . . . . . . . . . . . . . 83
Working with the LD Editor Offline . . . . . . . . . . . . . . . . . . . . 84
Editing Logic as Text . . . . . . . . . . . . . . . . . . . . . . . . . . . . . . . . 87
Working with the LD Editor Online . . . . . . . . . . . . . . . . . . . . 89
Test Edit (PACSystems only) . . . . . . . . . . . . . . . . . . . . . . . . . . 90
Word-for-Word Changes . . . . . . . . . . . . . . . . . . . . . . . . . . . . 91
Go not equal, keep working, and download changes . . . . . . . 92
Affecting BOOL variables . . . . . . . . . . . . . . . . . . . . . . . . . . . . 92
LD Instructions . . . . . . . . . . . . . . . . . . . . . . . . . . . . . . . . . . . . 93
FBD Editor . . . . . . . . . . . . . . . . . . . . . . . . . . . . . . . . . . . . . . . . . . 97
Working with the FBD Editor Offline . . . . . . . . . . . . . . . . . . . 98
Working with the FBD Editor Online . . . . . . . . . . . . . . . . . . 105
FBD Instructions, Functions, and Function Blocks . . . . . . . . . 106
IL Editor . . . . . . . . . . . . . . . . . . . . . . . . . . . . . . . . . . . . . . . . . . . 108
Working with the IL Editor Offline . . . . . . . . . . . . . . . . . . . . 109
Working with the IL Editor Online . . . . . . . . . . . . . . . . . . . . 111
Downloading Online Changes to a GE Fanuc Controller . . . 112
IL Instructions . . . . . . . . . . . . . . . . . . . . . . . . . . . . . . . . . . . . 113
ST Editor . . . . . . . . . . . . . . . . . . . . . . . . . . . . . . . . . . . . . . . . . . 115
Working with the ST Editor Offline . . . . . . . . . . . . . . . . . . . . 116
Proficy™ Logic Developer - PLC 5.70 iii
Working with the ST Editor Online . . . . . . . . . . . . . . . . . . . .119
ST Statements, Functions, and Function Blocks . . . . . . . . . . .121
C Blocks . . . . . . . . . . . . . . . . . . . . . . . . . . . . . . . . . . . . . . . . . . .123
Working with C blocks . . . . . . . . . . . . . . . . . . . . . . . . . . . . .123
C Programs . . . . . . . . . . . . . . . . . . . . . . . . . . . . . . . . . . . . . . . . .125
Working with C Programs . . . . . . . . . . . . . . . . . . . . . . . . . . .126
6 Ethernet Global Data (EGD) 127
Exchanges vs. Pages . . . . . . . . . . . . . . . . . . . . . . . . . . . . . . .127
Integration with the EGD Configuration Server . . . . . . . . . . .127
Integration with the EGD Management Tool (EMT) . . . . . . . .128
Logic Developer - PLC implementation of EGD: The EGD
component . . . . . . . . . . . . . . . . . . . . . . . . . . . . . . . . . . . . . .129
7 Motion Programming 133
Motion Editor . . . . . . . . . . . . . . . . . . . . . . . . . . . . . . . . . . . . . . .134
Working with the Motion Editor . . . . . . . . . . . . . . . . . . . . . .135
Motion Commands . . . . . . . . . . . . . . . . . . . . . . . . . . . . . . . .136
Local Logic . . . . . . . . . . . . . . . . . . . . . . . . . . . . . . . . . . . . . . . . .137
Working with the Local Logic Editor . . . . . . . . . . . . . . . . . . .138
Local Logic Variables . . . . . . . . . . . . . . . . . . . . . . . . . . . . . .139
Local Logic Commands and Operators . . . . . . . . . . . . . . . . .141
CAM Editor . . . . . . . . . . . . . . . . . . . . . . . . . . . . . . . . . . . . . . . . .142
Working with the CAM Editor . . . . . . . . . . . . . . . . . . . . . . . .143
Index 145
1
Welcome
Congratulations on your purchase of Logic Developer - PLC, the
PACSystems™ Series 90™, and VersaMax™ Controller programming component
of
Machine Edition automation software.
This software package provides all the tools necessary to create powerful control
applications. Logic Developer - PLC provides a way to configure your Controller
hardware or remote I/O, create and edit logic, upload and download projects, and
monitor and debug the execution of control programs. Projects can be imported
from Logicmaster, VersaPro, and Control folders.
Hosted in the Machine Edition environment, Logic Developer - PLC takes
advantage of a powerful set of common programming tools (see page 16). The
same tools can be applied to Logic Developer - PC (PC Control), Logic Developer -
State, View, and Motion components, providing a single programming
environment. The Machine Edition environment unites and organizes components,
providing data sharing and networked operation.
The following features are included in this version of Logic Developer - PLC:
■
Hardware Configuration. See page 49.
■
LD Editor. See page 83.
■
FBD Editor. See page 97.
■
IL Editor. See page 108.
■
ST Editor. See page 115.
■
C Blocks. See page 123.
■
C Programs. See page 125.
■
Motion Editor. See page 133.
■
Local Logic Editor. See page 137.
■
CAM Editor. See page 142.
Welcome
2 Proficy™ Logic Developer - PLC 5.70 GFK- 1918J
1
Welcome
System Requirements
GFK- 1918J Proficy™ Logic Developer - PLC 5.70 3
SYSTEM REQUIREMENTS
To use Logic Developer - PLC and its tools, you require the following:
■
Windows XP Professional Service Pack 2 or Windows 2000 Professional Service
Pack 4.
Note: Windows Vista, Windows XP Tablet PC Edition, and Windows XP
Embedded are not supported.
■
Internet Explorer version 7.0, Internet Explorer version 6.0 Service Pack 1 or
later, or Internet Explorer version 5.5 with Service Pack 2 Q810847 or later.
Note: You must install Internet Explorer before installing Machine Edition.
■
TCP/IP network protocol-based workstation (if you use an Ethernet connection).
■
Requirements for processor speed and memory are as follows:
Minimum: 1 GHz Pentium
-based processor with 256 MB RAM
Recommended: 2 GHz Pentium-based processor with 512 MB RAM
Note: For projects with more than 75,000 variables or variable elements, at
least 1 GB RAM is strongly recommended.
■
150-750 MB hard disk space, depending on the installed products.
■
280 MB additional hard disk space for x86, 610 MB for 64-bit processors, plus
40 MB during installation, for Microsoft .NET Framework 2.0. This space is not
needed if .NET Framework 2.0 is already installed.
Note: If the Microsoft .NET Framework v2.0 is not yet installed, it is
automatically included during installation of Machine Edition.
■
200 MB hard disk space for sample projects (optional).
■
Additional hard disk space for projects and temporary files.
Welcome
Installation
4 Proficy™ Logic Developer - PLC 5.70 GFK- 1918J
1
INSTALLATION
For last-minute information, release notes, and supported hardware lists for
Machine Edition products, see the Important Product Information (IPI) document
on the CD. There are several ways to view this document
■
When installing Machine Edition, select Important Product Information on the
initial Launcher screen.
■
When running Machine Edition, from the Help menu, choose Important
Product Information.
If you have a previous version of Machine Edition installed on your computer, you
must uninstall it before installing the latest version. You can do so by selecting the
“Uninstall Machine Edition” option from the Machine Edition Start menu group.
All of your existing projects, settings, and authorizations are preserved following
an uninstall operation.
To install Logic Developer - PLC
1. Insert the Machine Edition CD into your CD-ROM drive.
By default, the setup program automatically starts. If the setup program does not
automatically start, run Setup.exe in the root directory of the CD.
2. Click Install to start the install process.
3. Follow the instructions as they appear on the screen.
Note: See the IPI Release Notes for information on troubleshooting installation
problems.
Welcome
Product Authorization
GFK- 1918J Proficy™ Logic Developer - PLC 5.70 5
PRODUCT AUTHORIZATION
Before you can start developing projects in with Logic Developer - PLC, you must
authorize the software. If you do not do so, you will have unrestricted use of the
software’s features only for a short trial period. The authorization process takes
only a few moments and enables you to take advantage of any product support for
which you qualify.
There are two types of authorization available: software key authorization and
hardware key authorization. Machine Edition products can use a mixture of
authorization types on a single computer.
To see which products you are currently authorized for, on the Machine Edition
Help menu, point to Product Authorization and choose Authorize Software. This
displays the Product Authorization dialog box. If you have a hardware key plugged
in a USB port, you can select the Show Hardware Keys check box to view the
authorizations provided by that key.
Hardware Key Authorization
Hardware key authorization requires a special USB hardware key. This key
contains settings that allow use of specific Machine Edition products. Hardware
keys can be used to authorize Machine Edition development and runtime software.
Hardware key authorization is available only for Windows 2000 or Windows XP
and requires a free USB port on your computer.
To authorize Machine Edition products with a Hardware key
1. Locate a free USB port on your computer.
Typically, the USB port is located on the front or back of your tower case, or in the
side of a laptop computer. In some cases, a USB port can be found on your
computer’s monitor.
2. Plug the hardware key into the USB port.
The first time you plug the key into a USB port, a progress dialog box indicates that
Windows has detected new hardware and is updating its system settings. After the
dialog box disappears, the settings stored in the hardware key are active and you
can use the Machine Edition products that it authorizes.
You must leave the hardware key in the port while using Machine Edition. If you
remove the key from the port, authorization for those products vanishes, though
you can still use products previously authorized by means of a software key.
Welcome
Product Authorization
6 Proficy™ Logic Developer - PLC 5.70 GFK- 1918J
1
To move authorization to another computer, simply remove the hardware key from
the source computer and plug it into a USB port on the destination computer.
Software Key
When authorizing Machine Edition products with a software key, you need to
contact us by telephone, fax, or e-mail. If you want to authorize your software by
telephone, note that authorization personnel are available only during regular
business hours (between 6 a.m. and 6 p.m. MST).
Software key authorization is specific to a single computer. If you want to work
with Machine Edition on a different computer, you must move the authorization to
that second computer (see page 7).
To authorize a copy of Machine Edition with a software key
1. Have your serial numbers ready.
The serial numbers can be found on the License Key sheet that came with your
product.
2. Run the Product Authorization program from the Start menu > Programs > GE Fanuc > Proficy Machine
Edition > Product Authorization.
The Product Authorization dialog box appears.
3. Click Add.
4. In the dialog box that appears, select the means by which you are authorizing: Internet, Phone/Fax/E-mail, or
Floppy Disk Transfer. Click Next.
If you choose the Internet option, follow the instructions on the web site.
If you choose the Phone/Fax/E-mail option, proceed to step 5.
If you choose the Floppy Disk Transfer option, ensure you have an authorization
disk before proceeding.
5. Fill in the fields in the dialog box.
Fields that are identified with an asterisk (*) must be filled in.
6. If authorizing by:
■
Phone, click Phone/Fax and call the number on the screen to receive one or
more new key codes.
■
Fax, click Phone/Fax. In the dialog box that appears, click Print FAX. Fax the
Product Authorization Request to us, using our fax number on the printout. We
will reply by fax with your new key code(s).
■
E-mail, click Send E-mail. In the dialog box that appears, click Authorize to e-
mail us. We will reply by e-mail with your new key code(s).
Welcome
Product Authorization
GFK- 1918J Proficy™ Logic Developer - PLC 5.70 7
Product Authorization is complete after you enter the new key code and it has
been accepted. Depending on the products you have purchased, you may need to
run the Product Authorization program a number of times.
To move the software key authorization to another computer
You can run the software only on the computer that has Product Authorization. To
develop your projects on a different computer, you need to complete the following
steps to move the software key authorization from one computer to another.
1. Install Logic Developer - PLC on the computer that the authorization will be moved to. Run the Product Authorization
program: Start menu > Programs > GE Fanuc > Proficy Machine Edition > Product Authorization.
The Product Authorization dialog box appears.
2. Click Move, and then click OK.
There is a Target Site Code on the top right hand side of the screen. Write down
this site code carefully. It must be correct for the move to work. You need the Target
Site Code when you move the authorized software from the source computer.
3. Click Authorize by disk.
At this point, you need to go to the source computer that has the authorized
software, and move the authorization to a disk.
4. From the source computer, run the Product Authorization program.
5. Click Move and then click OK. Enter the Target Site Code that you wrote down at step 2 and click Next. Verify that
the site code is correct and click OK.
6. Insert a blank formatted floppy disk into the floppy drive and click Next.
The authorization code is moved to the disk and a message box appears telling you
it was successful.
7. Click OK.
8. Go back to the computer to which you are moving the authorization and insert the floppy disk.
The dialog box that is asking for an authorization disk is displayed.
9. Click Next, and then click Finish.
A dialog box appears telling you the move was successful.
10. Click OK.
The authorization has now been moved to the new computer.
To upgrade a software key authorization to a hardware key authorization
1. Order a hardware key.
Your software authorization remains valid until you complete the following steps.
2. When you receive the hardware key, locate a free USB port on your computer.
3. Plug the hardware key into the USB port.
Welcome
Technical Support
8 Proficy™ Logic Developer - PLC 5.70 GFK- 1918J
1
TECHNICAL SUPPORT
Support is available to registered users at no charge for 90 days after purchase. A
support agreement can be purchased from your local GE Fanuc distributor if
extended support is required.
If problems arise that cannot be solved by using the information in your product
manual, online Help system, or the
GlobalCare knowledge base, contact
us by telephone, fax, or e-mail.
When contacting us, call from a telephone near your computer and have your
Machine Edition software running. Have the following information handy to help
us assist you as quickly as possible:
■
The serial number from your installation License Key sheet, and the Product
name and version number from the Help>About dialog box.
■
The brand and model of any hardware in your system.
■
Operating system and version number.
■
The steps you performed prior to the problem occurring.
North America
Support Hotline: 1-800-GEFANUC (1-800-433-2682) Fax: (780) 420-2049
Internet: E-mail:
Comments about our manuals and help:
Mailing Address: GE Fanuc
2700 Oxford Tower, 10235 - 101 St.
Edmonton, AB, Canada, T5J 3G1
South America
Telephone: +58 (261) 760 2862 Fax: +58 (261) 765 0909
Internet:
E-mail:
Mailing Address: GE Fanuc Automation Latin America
Calle 120 con Av. 17, Los Haticos -GE Turbimeca
Maracaibo, Venezuela
Welcome
Technical Support
GFK- 1918J Proficy™ Logic Developer - PLC 5.70 9
Europe, the Middle East, and Africa (EMEA)
Telephone: 00 800 1 GE FANUC
Internet: For up-to-date contact information, visit www.gefanuc-europe.com and click “Offices and Services”.
For up-to-date technical information visit www.gefanuc.com/support.
E-mail:
Asia Pacific
Telephone: +86-400-820-8208
Internet:
E-mail: (for China customers)
(for Japan customers)
(for India & the rest of Asia customers)
GFK- 1918J Proficy™ Logic Developer - PLC 5.70 11
2
Proficy™
Machine Edition
Proficy™ Machine Edition offers you a complete solution for the development of
automation applications, in one package. Machine Edition features an integrated
development environment and tools that enable you to spend more time building
applications and less time learning the software. All Machine Edition products are
fully integrated into the environment and interact with each other.
■
They share the same set of tools providing a consistent interface throughout the
development process.
■
They feature full drag-and-drop capabilities between tools and editors.
■
They feature a true scalable solution. You have the choice of what type of
Controller your projects run on.
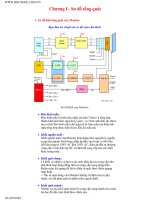
The following illustrates a Machine Edition project:
Navigator
Inspector
Companion
Data Watch
Toolchest
InfoViewer
Help Index
Feedback Zone
Proficy™ Machine Edition
Quick Start
12 Proficy™ Logic Developer - PLC 5.70 GFK- 1918J
2
QUICK START
Machine Edition makes it easy to get started developing a project.
To start Machine Edition
1. Click , point to Programs, point to GE Fanuc, point to Proficy Machine Edition, and then choose
Proficy Machine Edition.
After Machine Edition initializes, the Environment Themes dialog box appears.
Note: The Environment Themes dialog box appears automatically the first time you
start Machine Edition. To change the theme later, choose Apply Theme from the
Windows menu.
2. Choose the Logic Developer - PLC theme.
3. Click OK.
When you open a project, the appearance of your Machine Edition screen matches
the preview displayed in the Environment Themes dialog box.
Proficy™ Machine Edition
Quick Start
GFK- 1918J Proficy™ Logic Developer - PLC 5.70 13
The Machine Edition dialog box appears.
4. Select the appropriate option to open a project. The Open an existing project option is selected by default.
Notes:
■
If you select either the Empty project option or the Machine Edition template
option, the New Project dialog box appears and you can continue creating a
new project (see page 14).
■
If you select the Open an existing project option, you can also select either the
Recent Projects option or the All Projects option. The Recent Projects option is
selected by default.
5. If you selected the Open an existing project option, select from the list the project that you want to open.
6. If you want, select the Don’t show this dialog box on startup option.
7. Click OK.
Your project opens in the Machine Edition environment that you specified in the
Environment Themes dialog box.
Select this option if you
want to create a new project
from scratch.
Select this option if you want to use
a template to create your project.
Select this option if you want
to choose an existing project.
Select this option to display only
the projects that have been
used recently.
Select this option to display
all projects stored on your computer.
Proficy™ Machine Edition
Projects
14 Proficy™ Logic Developer - PLC 5.70 GFK- 1918J
2
PROJECTS
You can create and edit Machine Edition projects by using products such as View,
Logic Developer - PC, Motion, Logic Developer - State, and Logic Developer -
PLC. These products share Machine Edition tools to provide a high level of
integration between the various parts of your project.
You can import folders created with Logicmaster, Control, or VersaPro.
With Logic Developer - PLC, you can build multiple projects to suit your specific
requirements.
To create a new project using a template
Before creating a project, there are some things you should know:
■
The primary components your project will contain.
■
The GE Fanuc Controller your project will run on.
1. From the File menu, choose New Project, or click on the File toolbar.
The New Project dialog box appears.
2. Choose a Project Template that suits your needs.
3. Enter a descriptive Project Name.
4. Click OK.
Your project opens in the Machine Edition environment.
Enter the name of
your project in the
Project Name box.
Choose your project
template from the
Project Template
list.
You can set the selected
project template as the
default template by
clicking the Set as default
button.
A sample description of the
project appears on the
screen.
Proficy™ Machine Edition
Projects
GFK- 1918J Proficy™ Logic Developer - PLC 5.70 15
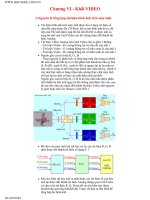
To open an existing project for editing
1. Open the Navigator and select the Manager tab.
A list of projects appears.
2. Do one of the following:
■
Right-click a project and choose Open.
- or -
■
Double-click a project.
Your project loads and is ready for editing.
To import a folder
1. Open the Navigator and select the Project tab.
2. Select the target that you want to import the folder into.
3. Right-click the target, point to Import, and choose the folder type.
4. In the dialog box that appears, navigate to and double-click the folder you want to import.
Want to know more?
In the online help index, look up “Projects”.
Want to know more?
In the online help index, look up “importing Control folders”, “importing
Logicmaster folders”, or “importing VersaPro folders”.
Navigator: Manager tab
Proficy™ Machine Edition
Tools
16 Proficy™ Logic Developer - PLC 5.70 GFK- 1918J
2
TOOLS
Project development is supported by the Machine Edition tools. Each tool is
opened by means of a button on the Tools toolbar.
A description of each tool’s function is provided below.
The Navigator is a docking tool window containing a set of tabs. Each tab displays
information about your development system in a hierarchical tree structure similar
to Windows Explorer. The available tabs depend on which Machine Edition
products you have installed and what kind of work you are developing or
managing. The Project tab shows the overall organization of your application.
The Feedback Zone window is a docking window used to display several types of
output information generated by Machine Edition components. This interactive
window uses category tabs to organize the output generated from the Machine
Edition products you have installed.
The Inspector lists the properties and current settings for a selected object or
element. You can edit these properties directly in the Inspector. When you select
several objects, the Inspector window lists the properties common to all of them.
The Inspector window provides a simple method of viewing and setting properties
for all Machine Edition objects.
The Data Watch tool is a run-time debugging tool that enables you to monitor and
edit the values of variables. This tool is useful while working online to a target.
With the Data Watch tool, you can monitor individual variables or user-defined
lists of variables. Data Watch lists can be imported, exported, or saved with a
project.
The Toolchest is a powerful storehouse of objects you can add to your project. You
can drag most items directly from the Toolchest into Machine Edition editors. You
can choose from predefined objects or create your own reusable fxClasses. The
Toolchest adds true object-oriented capability to Machine Edition.
Navigator
Feedback Zone
Data Watch
Toolchest
Companion
InfoViewer
Inspector
Navigator
Feedback Zone
Inspector
Data Watch
Toolchest
Proficy™ Machine Edition
Tools
GFK- 1918J Proficy™ Logic Developer - PLC 5.70 17
The Companion provides useful tips and information while you work. While the
Companion is open, it tracks your moves and displays help on whatever item is
currently selected in the Machine Edition environment. It is context-sensitive and
displays a description of whatever you click in Machine Edition.
The InfoViewer is an embedded Web browser used mainly to display the
following:
■
Machine Edition help.
■
Machine Edition reports.
■
The documentation associated with a project or target.
If you are familiar with Internet Explorer or Netscape Navigator, then you are
already familiar with the basic InfoViewer interface. Like the Companion, the
InfoViewer is context-sensitive. Press F1 to get help on any item you select in the
Machine Edition environment.
A table of contents is found in the InfoView tab of the Navigator.
Using docking markers
If the Show Docking Markers option is enabled, you can use docking markers to
help dock a tool window to a desired location.
As you drag a dockable window, a series of docking markers appear, indicating
valid docking locations. Docking markers appear as a series of blue arrows. Move
the mouse over a docking marker to preview how the window would be docked
when using that marker. Release the mouse button while hovering over a marker to
use that location.
Want to know more?
In the online help index, look up “Tools: an Overview”.
These markers dock tools to the edge of an existing tool or to the
Machine Edition Environment window.
This marker “stacks” the tool overtop an existing tool window,
forming a series of tab-docked windows. You can then
switch between tab-docked tools by clicking the tabs that
appear at the bottom of the tab-docked windows.
InfoViewer
Companion
Proficy™ Machine Edition
Variables
18 Proficy™ Logic Developer - PLC 5.70 GFK- 1918J
2
VARIABLES
A variable is a named storage space for data. That is, the variable name represents
a memory location in the target Controller. The way in which the variable
represents a memory location is determined by the value of the variable’s Ref
Address property. A variable's Ref Address property can be set to any of the
following:
■
A reference address, for example, %R00001. This is the GE Fanuc Controller
memory location that contains the variable's value. This can be an I/O register
or an internal memory register on the Controller.
■
A blank. On a PACSystems, if you leave a variable's Ref Address property blank,
the variable is a symbolic variable. Machine Edition handles the mapping for
you in a special portion of PACSystems™ user memory space. On Series 90 and
VersaMax Controllers, you cannot leave the Ref Address property blank.
■
An I/O variable address, for example %IX0.6.0.1. (PACSystems only.) This
represents the PACSystems Hardware Configuration terminal that contains an
I/O variable's value. For example, this can be a physical discrete or analog I/O
point on a module or Genius device, a discrete or analog status returned by the
module, or global data.
■
A name. This makes the current variable an alias variable of the name, that is, a
variable that points to the same memory location as the name. The following
names may be valid:
✐
The name of a parameterized LD block parameter (provided the alias
variable is local to the same block)
✐
The name and index of an array element, for example,
MyComplexArray[255,3]
✐
The name of a structure element, for example, MyStructure.MyElement
✐
The name of another variable that is not used as an alias variable.
Want to know more?
In the online help index, look up “Reference Address (GE Fanuc
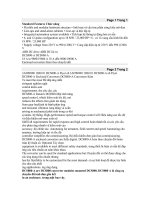
Controllers)”, “Symbolic Variables”, “I/O Variables”, and ”Alias Variables”.
Navigator: Variables tab. This tab
displays all the variables used in a
project.
Proficy™ Machine Edition
Variables
GFK- 1918J Proficy™ Logic Developer - PLC 5.70 19
Arrays and compound structure variables are supported by Machine Edition.
Variable definitions can be imported from and exported to a variety of file types.
You can edit your variables in a spreadsheet and then import them. Variables used
on PACSystems™ targets must be externally published in order to be viewed in
Proficy View.
The Ref Address and other properties of a variable, such as Data Type, are
configured in the Inspector. The following is an illustration of the Inspector
displaying a typical set of variable properties.
Want to know more?
In the online help index, look up “Arrays in GE Fanuc Controller
targets”, “Structure Data Types”, “Importing variables from a file”, and ”Publishing PACSystems
variables”.