Toyota land cruiser 1998 2007 SRS hệ thống túi khí an toàn trên xe land cruiser đời 1998 2007
Bạn đang xem bản rút gọn của tài liệu. Xem và tải ngay bản đầy đủ của tài liệu tại đây (1.68 MB, 109 trang )
RS0BK-08
H20939
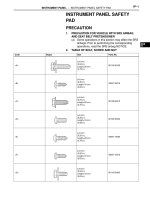
Center Lower Cluster Finish Panel
17.5 (178, 13)
Airbag Sensor Assembly
Front Console Box
Transfer Shift Lever Knob
Front Seat LH
Upper Console Panel
Rear Console Box
Front Seat RH
N·m (kgf·cm, ft·lbf) : Specified torque
17.5 (178, 13)
-SUPPLEMENTAL RESTRAINT SYSTEM AIRBAG SENSOR ASSEMBLY
RS-69
2344Author: Date:
2004 LAND CRUISER (RM1071U)
AIRBAG SENSOR ASSEMBLY
COMPONENTS
RS0BM-03
-SUPPLEMENTAL RESTRAINT SYSTEM AIRBAG SENSOR ASSEMBLY
RS-71
2346Author: Date:
2004 LAND CRUISER (RM1071U)
INSPECTION
1. Vehicle not involved in collision:
INSPECT SUPPLEMENTAL RESTRAINT SYSTEM
Do a diagnostic system check (See page DI-692 ).
2. Vehicle involved in collision and airbag is not deployed:
INSPECT SUPPLEMENTAL RESTRAINT SYSTEM
Do a diagnostic system check (See page DI-692 ).
3. Vehicle involved in collision and airbag is deployed:
INSPECT SUPPLEMENTAL RESTRAINT SYSTEM
Replace the airbag sensor assembly (See page RS-69 ).
RS0BO-08
H20940
-SUPPLEMENTAL RESTRAINT SYSTEM AIRBAG SENSOR ASSEMBLY
RS-73
2348Author: Date:
2004 LAND CRUISER (RM1071U)
INSTALLATION
NOTICE:
F Never use SRS parts from another vehicle. When re-
placing parts, replace them with new parts.
F Never reuse the airbag sensor assembly involved in
a collision when the airbag has deployed.
F Never repair a sensor in order to reuse it.
HINT:
For step 2 to 6, refer to page BO-91 .
1. INSTALL AIRBAG SENSOR ASSEMBLY
(a) Install the airbag sensor assembly with the 3 bolts.
Torque: 17.5 N·m (178 kgf·cm, 13 ft·lbf)
(b) Connect the airbag sensor connectors.
NOTICE:
F Connection of the connector is done after the sensor
assembly has been installed.
F Make sure the sensor assembly is installed with the
specified torque.
F If the sensor assembly has been dropped, or there are
cracks, dents or other defects in the case, bracket or
connector, replace the sensor assembly with a new
one.
F When installing the sensor assembly, take care that
the SRS wiring does not interfere with other parts and
is not pinched between other parts.
F After installing, shake the sensor assembly to check
that there is no looseness.
2. INSTALL CENTER LOWER INSTRUMENT CLUSTER
FINISH PANEL ASSEMBLY
3. INSTALL FRONT CONSOLE BOX
4. INSTALL REAR CONSOLE BOX WITH CONSOLE
REAR END PANEL
5. INSTALL UPPER CONSOLE PANEL
6. INSTALL TRANSFER SHIFT LEVER KNOB
7. INSTALL FRONT SEAT (See page BO-1 17)
8. INSPECT SRS WARNING LIGHT (See page DI-692 )
RS0BL-08
H20940
RS-70
-SUPPLEMENTAL RESTRAINT SYSTEM AIRBAG SENSOR ASSEMBLY
2345Author: Date:
2004 LAND CRUISER (RM1071U)
REMOVAL
NOTICE:
Do not open the cover or the case of the ECU and various
electrical devices unless absolutely necessary.
(If the IC terminals are touched, the IC may be destroyed by
static electricity.)
HINT:
For step 2 to 6, refer to page BO-84 .
1. REMOVE FRONT SEAT (See page BO-105 )
2. REMOVE TRANSFER SHIFT LEVER KNOB
3. REMOVE UPPER CONSOLE PANEL
4. REMOVE REAR CONSOLE BOX WITH CONSOLE
REAR END PANEL
5. REMOVE FRONT CONSOLE BOX
6. REMOVE CENTER LOWER CLUSTER FINISH PANEL
ASSEMBLY
7. REMOVE AIRBAG SENSOR ASSEMBLY
(a) Disconnect the airbag sensor connectors.
NOTICE:
Disconnect the connectors with the airbag sensor assem-
bly installed.
(b) Remove the 3 bolts and the airbag sensor assembly.
RS0BN-01
RS-72
-SUPPLEMENTAL RESTRAINT SYSTEM AIRBAG SENSOR ASSEMBLY
2347Author: Date:
2004 LAND CRUISER (RM1071U)
REPLACEMENT
REPLACEMENT REQUIREMENTS
In the following cases, replace the airbag sensor assembly.
F If the SRS has been deployed in a collision.
F If the airbag sensor assembly has been found to be faulty in troubleshooting.
F If the airbag sensor assembly has been dropped.
CAUTION:
For removal and installation of the airbag sensor assembly, see page RS-70 and RS-73 . Be sure to
follow the correct procedure.
RS0N2-11
H20928
Curtain Shield
Airbag Assembly
9.8 (100, 86 in.·lbf)
9.8 (100, 86 in.·lbf)
9.8 (100, 86 in.·lbf)
N·m (kgf·cm, ft·lbf)
: Specified torque
RS-58
-SUPPLEMENTAL RESTRAINT SYSTEM CURTAIN SHIELD AIRBAG ASSEMBLY
2333A uthor: Date:
2004 LAND CRUISER (RM1071U)
CURTAIN SHIELD AIRBAG ASSEMBLY
COMPONENTS
RS0VO-01
AB0152
SST
AB0158
Battery
SST
-SUPPLEMENTAL RESTRAINT SYSTEM CURTAIN SHIELD AIRBAG ASSEMBLY
RS-61
2336A uthor: Date:
2004 LAND CRUISER (RM1071U)
DISPOSAL
HINT:
When scrapping vehicles equipped with an SRS or disposing
of the side airbag assembly always first deploy the airbag in ac-
cordance with the procedure described below. If any abnormal-
ity occurs with the airbag deployment, contact the SERVICE
DEPT. of TOYOTA MOTOR SALES,.U.S.A., INC.
CAUTION:
F Never dispose of a curtain shield airbag assembly of
which airbag has not been deployed.
F The airbag produces a sizeable exploding sound
when it deploys, so perform the operation out-of-
doors and where it will not create a nuisance to
nearby residents.
F When deploying the airbag, always use the specified
SST (SRS Airbag Deployment Tool), perform the op-
eration in a place away from electrical noise.
SST 09082-00700
F When deploying an airbag, perform the operation at
least 10 m (33 ft) away from the airbag assembly.
F The side airbag assembly is very hot when the airbag
is deployed, so leave it alone for at least 30 minutes
after deployment.
F Use gloves and safety glasses when handling side
airbag assembly with the deployed airbag.
F Always wash your hands with water after completing
the operation.
F Do not apply water, etc. to a side airbag assembly with
the deployed airbag.
1. AIRBAG DEPLOYMENT WHEN SCRAPPING VE-
HICLE
HINT:
Have a battery ready as the power source to deploy the airbag.
(a) Check the function of the SST (See step 1-(a) on page
RS-20 ).
SST 09082-00700
H20933
SST
SST
R13455
10 m (33 ft) or more
SST
Battery
RS-62
-SUPPLEMENTAL RESTRAINT SYSTEM CURTAIN SHIELD AIRBAG ASSEMBLY
2337A uthor: Date:
2004 LAND CRUISER (RM1071U)
(b) Disconnect the curtain shield airbag connector.
NOTICE:
When handling the airbag connector, take care not to dam-
age the airbag wire harness.
(c) Install the SST.
(1) Connect the connectors of the SST to the airbag
connector.
SST 09082-00700, 09082-00760
NOTICE:
To avoid damaging the SST connector and wire harness,
do not lock the secondary lock of the twin lock.
(2) Move the SST at least 10 m (33 ft) away from the
front of the vehicle.
(3) Close all the doors and windows of the vehicle.
NOTICE:
Take care not to damage the SST wire harness.
(4) Connect the SST red clip to the battery positive (+)
terminal and the black clip to the battery negative
(-) terminal.
(d) Deploy the airbag.
(1) Check that no one is inside the vehicle or within 10
m (33 ft) area around the vehicle.
(2) Press the SST activation switch and deploy the air-
bag.
CAUTION:
F The curtain shield airbag assembly is very hot when
the airbag is deployed, so leave it alone for at least 30
minutes after deployment.
F Use gloves and safety glasses when handling the cur-
tain shield airbag assembly with the deployed airbag.
F Do not apply water, etc. to the curtain shield airbag as-
sembly with the deployed airbag.
F Always wash your hands with water after completing
the operation.
F When scrapping a vehicle, deploy the airbag and
scrap the vehicle with the curtain shield airbag as-
sembly still installed.
HINT:
The airbag deploys as the LED of the SST activation switch
comes on.
AB0163
Wire Harness
Diameter
Stripped Wire Harness Section
H20934
-SUPPLEMENTAL RESTRAINT SYSTEM CURTAIN SHIELD AIRBAG ASSEMBLY
RS-63
2338A uthor: Date:
2004 LAND CRUISER (RM1071U)
2. DEPLOYMENT WHEN DISPOSING OF CURTAIN
SHIELD AIRBAG ASSEMBLY
NOTICE:
F When disposing of the curtain shield airbag assem-
bly only, never use the customer’s vehicle to deploy
the airbag.
F Be sure to follow the procedure given below when de-
ploying the airbag.
HINT:
Have a battery ready as the power source to deploy the airbag.
(a) Remove the curtain shield airbag assembly (See page
RS-59 ).
(b) Cut off the deployment section in airbag from inflator.
(c) Using a service-purpose wire harness, tie down the cur-
tain shield airbag assembly to the tire.
Wire harness: Stripped wire harness section
1.25 mm
2
or more (0.0019 in
2
. or more)
CAUTION:
If a wire harness which is too thin or some other thing is
used to tie down the curtain shield airbag assembly, it may
be snapped by the shock when the airbag is deployed. This
is highly dangerous. Always use a wire harness for vehicle
use which is at least 1.25 mm
2
(0.0019 in
2
.).
HINT:
To calculate the square of the stripped wire harness section-
Square = 3.14 x (Diameter)
2
divided by 4
(1) Passing the wire harness through the installation
holes as shown in the illustration.
H20935
Width
Inner Diam.
AB0158
SST
Battery
H20936
Tires
(5 or More)
R05403
RS-64
-SUPPLEMENTAL RESTRAINT SYSTEM CURTAIN SHIELD AIRBAG ASSEMBLY
2339A uthor: Date:
2004 LAND CRUISER (RM1071U)
(2) Position the curtain shield airbag assembly inside
the tire with the airbag deployment direction facing
inside.
Tire size: Must exceed the following dimensions-
Width: 185 mm (7.28 in.)
Inner diameter: 360 mm (14.17 in.)
CAUTION:
Make sure that the wire harness is tight. It is very danger-
ous when a loose wire harness results in the curtain shield
airbag assembly coming free due to the shock from the air-
bag deploying.
NOTICE:
The tire will be marked by the airbag deployment, so when
disposing of the airbag use a redundant tire.
(d) Check the function of the SST (See step 1-(a) on page
RS-20 ).
SST 09082-00700
(e) Place the tires.
CAUTION:
Place the tire so that the deployment direction of the cur-
tain shield airbag will be downward.
(1) Place at least 2 tires under the tire to which the side
airbag assembly is tied.
(2) Place at least 2 tires over the tire to which the side
airbag assembly is tied. The top tire should have the
wheel installed.
(3) Tie the tires together with 2 wire harnesses.
CAUTION:
Make sure that the wire harnesses are tight. It is very dan-
gerous when loose wire harness results in the tires coming
free due to the shock from the airbag deploying.
HINT:
Place the SST connector and wire harness inside tires. Secure
at least 1 m (3 ft) of slack for the wire harness.
H20937
10 m (33 ft) or more
SST
Battery
H20938
-SUPPLEMENTAL RESTRAINT SYSTEM CURTAIN SHIELD AIRBAG ASSEMBLY
RS-65
2340A uthor: Date:
2004 LAND CRUISER (RM1071U)
(f) Install the SST.
Connect the connectors of the SST to the curtain shield
airbag assembly connector.
SST 09082-00700, 09082-00760
NOTICE:
To avoid damaging the SST connector and wire harness,
do not lock the secondary lock of the twin lock. Also, se-
cure some slack for the SST wire harness inside the tire.
(g) Deploy the airbag.
(1) Connect the SST red clip to the battery positive (+)
terminal and the black clip to the battery negative
(-) terminal.
(2) Check that no one is within 10 m (33 ft) area around
the tire which the side airbag assembly is tied to.
(3) Press the SST activation switch and deploy the air-
bag.
HINT:
The airbag deploys as the LED of the SST activation switch
comes on.
(h) Dispose of the curtain shield airbag assembly.
CAUTION:
F The curtain shield airbag assembly is very hot when
the airbag is deployed, so leave it alone for at least 30
minutes after deployment.
F Use gloves and safety glasses when handling a cur-
tain shield airbag assembly with the deployed airbag.
F Do not apply water etc. to a curtain shield airbag as-
sembly with the deployed airbag.
F Always wash your hands with water after completing
the operation.
(1) Remove the curtain shield airbag assembly from
the tire.
(2) Place the curtain shield airbag assembly in a plastic
bag, tie the end tightly and dispose of it as the other
general parts disposal.
H20938
RS-66
-SUPPLEMENTAL RESTRAINT SYSTEM CURTAIN SHIELD AIRBAG ASSEMBLY
2341A uthor: Date:
2004 LAND CRUISER (RM1071U)
3. DEPLOYMENT WHEN DISPOSING OF CURTAIN
SHIELD AIRBAG ASSEMBLY WITH AIRBAG
DEPLOYED IN COLLISION
Dispose of the curtain shield airbag assembly.
CAUTION:
F The curtain shield airbag assembly is very hot when
the airbag is deployed, so leave it alone for at least 30
minutes after deployment.
F Use gloves and safety glasses when handling a cur-
tain shield airbag assembly with the deployed airbag.
F Do not apply water etc. to a curtain shield airbag as-
sembly with the deployed airbag.
F Always wash your hands with water after completing
the operation.
(1) Remove the curtain shield airbag assembly (See
page RS-59 ).
(2) Place the curtain shield airbag assembly in a plastic
bag, tie the end tightly and dispose of it as the other
general parts disposal.
RS0N4-09
H20931
H20932
RS-60
-SUPPLEMENTAL RESTRAINT SYSTEM CURTAIN SHIELD AIRBAG ASSEMBLY
2335A uthor: Date:
2004 LAND CRUISER (RM1071U)
INSPECTION
1. Vehicle not involved in collision:
INSPECT SUPPLEMENTAL RESTRAINT SYSTEM
(a) Do a diagnostic system check (See page DI-692 ).
(b) Do a visual check which includes the following items with
the curtain shield airbag assembly installed in the vehicle.
Check cuts, minute cracks or marked discoloration on the
front pillar garnish and roof headlining.
2. Vehicle involved in a collision and airbag is not
deployed:
INSPECT SUPPLEMENTAL RESTRAINT SYSTEM
(a) Do a diagnostic system check (See page DI-692 ).
(b) Do a visual check which includes the following items with
the curtain shield airbag assembly removed from the ve-
hicle.
F Check cuts, tears and cracks, or marked discolor-
ation of the curtain shield airbag assembly.
F Check cuts and cracks in wire harness, and chip-
ping in connectors.
CAUTION:
For removal and installation of the curtain shield airbag as-
sembly, see page RS-59 and RS-68 . Be sure to follow the
correct procedure.
3. Vehicle involved in a collision and airbag is deployed:
INSPECT SUPPLEMENTAL RESTRAINT SYSTEM
(a) Do a diagnostic system check (See page DI-692 ).
(b) Do a visual check which includes the following items with
the curtain shield airbag assembly removed from the ve-
hicle.
F Check the deformation or cracks on the body that
the curtain shield airbag installed on.
F Check the damage to the connector and wire har-
ness.
HINT:
If the body that the curtain shield airbag was installed on is de-
formed or cracked, replace it.
RS0TH-03
H20929
(1)
(3)
(2)
(3)
(3)
RS-68
-SUPPLEMENTAL RESTRAINT SYSTEM CURTAIN SHIELD AIRBAG ASSEMBLY
2343A uthor: Date:
2004 LAND CRUISER (RM1071U)
INSTALLATION
NOTICE:
Never use airbag parts from another vehicle. When replac-
ing parts, replace them with new parts.
1. INSTALL CURTAIN SHIELD AIRBAG ASSEMBLY
(a) In the order shown in the illustration, install the curtain
shield airbag with the 8 bolts.
Torque: 9.8 N·m (100 kgf·cm, 86 in.·lbf)
CAUTION:
Pay due attention not to twist the deployment section of the
curtain shield airbag assembly.
NOTICE:
F Make sure that the curtain shield airbag assembly is
installed to the specified torque.
F If the curtain shield airbag assembly has been
dropped, or there are cracks, dents or other defects
in the case or connector, replace the curtain shield
airbag assembly with a new one.
F When installing the curtain shield airbag assembly,
take care it is not pinched between other parts.
(b) Connect the connector of the curtain shield airbag as-
sembly.
2. INSTALL ROOF HEADLINING (See page BO-101 )
3. INSPECT SRS WARNING LIGHT (See page DI-692 )
RS0TG-03
H20929
(1)
(1)
(3)
(2)
(1)
H20930
-SUPPLEMENTAL RESTRAINT SYSTEM CURTAIN SHIELD AIRBAG ASSEMBLY
RS-59
2334A uthor: Date:
2004 LAND CRUISER (RM1071U)
REMOVAL
NOTICE:
F If the wiring connector of the SRS is disconnected
and the ignition switch is at ON position, DTCs will be
recorded.
F Never use the airbag parts from another vehicle.
When replacing parts, replace them with new parts.
1. REMOVE ROOF HEADLINING (See page BO-97 )
2. REMOVE CURTAIN SHIELD AIRBAG ASSEMBLY
(a) Disconnect the curtain shield airbag connector.
NOTICE:
When handling the airbag connector, take care not to dam-
age the airbag wire harness.
(b) In the order shown in the illustration, remove the bolts and
curtain shield airbag assembly.
HINT:
F Loosen the bolt (3) before removing the bolt (2).
F Bind the front and rear parts of the curtain shield airbag
assembly before removing the bolt (3).
(c) Put the removed curtain shield airbag in a clear plastic
bag and keep it in a safe place.
CAUTION:
Never disassemble the curtain shield airbag assembly.
NOTICE:
Plastic bag is not reusable.
RS0N6-06
-SUPPLEMENTAL RESTRAINT SYSTEM CURTAIN SHIELD AIRBAG ASSEMBLY
RS-67
2342A uthor: Date:
2004 LAND CRUISER (RM1071U)
REPLACEMENT
REPLACEMENT REQUIREMENTS
In the following cases, replace the curtain shield airbag assembly or curtain shield airbag cover.
Case Replacing part
If the curtain shield airbag has been deployed. Curtain shield airbag assembly
If the curtain shield airbag assembly has been found to be faulty in trouble-
shooting.
Curtain shield airbag assembly
If the curtain shield airbag assembly has been found to be faulty during
checking items (See page RS-60 ).
Curtain shield airbag assembly
If the front pillar garnish has been found to be faulty during checking items
(See page RS-60 ).
Front pillar garnish
If the roof headlining has been found to be faulty during checking items
(See page RS-60 ).
Roof headlining
If the curtain shield airbag assembly has been dropped. Curtain shield airbag assembly
CAUTION:
For removal and installation of the curtain shield airbag assembly, see page RS-59 and RS-68 . Be
sure to follow the correct procedure.
RS0SH-04
H20947
N·m (kgf·cm, ft·lbf) : Specified torque
17.5 (178, 13)
42 (428, 31)
Striker Plate
Rear Mat Set Plate
Quarter Trim Panel
Rear Door Scuff Plate
Rear No. 2 Seat
Rear Door Opening Trim Weatherstrip
Rear Seat Belt Anchor
Curtain Shield Airbag Sensor Assembly
Striker Plate
-SUPPLEMENTAL RESTRAINT SYSTEM CURTAIN SHIELD AIRBAG SENSOR ASSEMBLY
RS-85
2360Author: Date:
2004 LAND CRUISER (RM1071U)
CURTAIN SHIELD AIRBAG SENSOR ASSEMBLY
COMPONENTS
RS0SJ-03
-SUPPLEMENTAL RESTRAINT SYSTEM CURTAIN SHIELD AIRBAG SENSOR ASSEMBLY
RS-87
2362Author: Date:
2004 LAND CRUISER (RM1071U)
INSPECTION
1. Vehicle not involved in collision:
INSPECT SUPPLEMENTAL RESTRAINT SYSTEM
Do a diagnostic system check (See page DI-692 ).
2. Vehicle involved in collision and airbag is not deployed:
INSPECT SUPPLEMENTAL RESTRAINT SYSTEM
Do a diagnostic system check (See page DI-692 ).
3. Vehicle involved in collision and airbag is deployed:
INSPECT SUPPLEMENTAL RESTRAINT SYSTEM
Replace the curtain shield airbag sensor assembly (See page RS-85 ).
RS0SL-04
H20948
-SUPPLEMENTAL RESTRAINT SYSTEM CURTAIN SHIELD AIRBAG SENSOR ASSEMBLY
RS-89
2364Author: Date:
2004 LAND CRUISER (RM1071U)
INSTALLATION
NOTICE:
F Never use SRS parts from another vehicle. When re-
placing parts, replace them with new ones.
F Never reuse the curtain shield airbag sensor assem-
bly involved in a collision when the airbag has
deployed.
F Never repair a sensor in order to reuse it.
HINT:
For step 2 to 8, refer to page BO-101 .
1. INSTALL CURTAIN SHIELD AIRBAG SENSOR AS-
SEMBLY
(a) Install the curtain shield airbag sensor assembly with the
2 bolts.
Torque: 17.5 N·m (178 kgf·cm, 13 ft·lbf)
(b) Connect the connector.
NOTICE:
F Connection of the connector is done after the sensor
assembly has been installed.
F Make sure that the sensor assembly is installed with
the specified torque.
F If the sensor assembly has been dropped, or there are
cracks, dents or other defects in the case, bracket or
connector, replace the sensor assembly with a new
one.
F When installing the sensor assembly, take care that
the SRS wiring does not interfere with other parts and
is not pinched between other parts.
F After installation, shake the sensor assembly to
check that there is no looseness.
2. INSTALL QUARTER TRIM PANEL
3. INSTALL STRIKER PLATES
4. INSTALL REAR NO. 2 SEAT
5. INSTALL REAR MAT SET PLATE
6. INSTALL REAR SEAT BELT ANCHOR
7. INSTALL REAR DOOR OPENING TRIM
8. INSTALL REAR DOOR SCUFF PLATE
9. INSPECT SRS WARNING LIGHT (See page DI-692 )
RS0SI-04
H20948
RS-86
-SUPPLEMENTAL RESTRAINT SYSTEM CURTAIN SHIELD AIRBAG SENSOR ASSEMBLY
2361Author: Date:
2004 LAND CRUISER (RM1071U)
REMOVAL
NOTICE:
F Do not open the cover or the case of the ECU and vari-
ous electrical devices unless absolutely necessary.
(If the IC terminals are touched, the IC may be de-
stroyed by static electricity.)
F If the wiring connector of the SRS is disconnected
and the ignition switch is at ON position, DTCs will be
recorded.
HINT:
For the step 1 to 7, refer to page BO-97 .
1. REMOVE REAR DOOR SCUFF PLATE
2. REMOVE REAR DOOR OPENING TRIM
3. REMOVE REAR SEAT BELT ANCHOR
4. REMOVE REAR MAT SET PLATE
5. REMOVE REAR NO. 2 SEAT
6. REMOVE STRIKER PLATES
7. REMOVE QUARTER TRIM PANEL
8. REMOVE CURTAIN SHIELD AIRBAG SENSOR AS-
SEMBLY
(a) Disconnect the connector.
NOTICE:
Disconnect the connector with the sensor assembly
installed.
(b) Remove the 2 bolts and curtain shield airbag sensor as-
sembly.
RS0SK-02
RS-88
-SUPPLEMENTAL RESTRAINT SYSTEM CURTAIN SHIELD AIRBAG SENSOR ASSEMBLY
2363Author: Date:
2004 LAND CRUISER (RM1071U)
REPLACEMENT
REPLACEMENT REQUIREMENTS
In the following cases, replace the curtain shield airbag sensor assembly.
F If the curtain shield airbag sensor assembly has been deployed in a collision.
F If the curtain shield airbag sensor assembly has been found to be faulty in troubleshooting.
F If the curtain shield airbag sensor assembly has been dropped.
CAUTION:
For removal and installation of the curtain shield airbag sensor assembly, see page RS-86 and
RS-89 . Be sure to follow the correct procedure.
RS0BP-08
H20941
Battery Carrier
Battery
Front Airbag Sensor LH
Front Airbag Sensor RH
7.5 (76, 66 in.·lbf)
N·m (kgf·cm, ft·lbf) : Specified torque
7.5 (76, 66 in.·lbf)
RS-74
-SUPPLEMENTAL RESTRAINT SYSTEM FRONT AIRBAG SENSOR
2349Author: Date:
2004 LAND CRUISER (RM1071U)
FRONT AIRBAG SENSOR
COMPONENTS
RS0BR-08
H20918
H20944
LH:
RH:
Front
Front
RS-76
-SUPPLEMENTAL RESTRAINT SYSTEM FRONT AIRBAG SENSOR
2351Author: Date:
2004 LAND CRUISER (RM1071U)
INSPECTION
1. Vehicle not involved in collision:
INSPECT SUPPLEMENTAL RESTRAINT SYSTEM
Do a diagnostic system check (See page DI-692 ).
2. Vehicle involved in collision:
INSPECT SUPPLEMENTAL RESTRAINT SYSTEM
(a) Do a diagnostic system check (See page DI-692 ).
(b) If the front fender of the vehicle or its periphery is dam-
aged, do a visual check for damage to the front airbag
sensor, which includes the following items even if the air-
bag was not deployed:
F Bracket deformation.
F Paint peeling off the bracket.
F Cracks, dents or chips in the case.
F Cracks, dents, chipping and scratches in the con-
nector.
F Peeling off of the label or damage to the serial num-
ber.
RS0BT-06
H20944
LH:
RH:
Front
Front
RS-78
-SUPPLEMENTAL RESTRAINT SYSTEM FRONT AIRBAG SENSOR
2353Author: Date:
2004 LAND CRUISER (RM1071U)
INSTALLATION
NOTICE:
F Never use SRS parts from another vehicle. When re-
placing parts, replace them with new parts.
F Never reuse the sensor involved in a collision when
the SRS has deployed.
F Never repair a sensor in order to reuse it.
1. INSTALL FRONT AIRBAG SENSOR
(a) Install the front airbag sensor with the arrow on the sensor
facing toward the front of the vehicle.
Torque: 7.5 N·m (76 kgf·cm, 66 in.·lbf)
NOTICE:
F Make sure that the sensor is installed with the speci-
fied torque.
F If the sensor has been dropped, or there are cracks,
dents or other defects in the case, brackets or con-
nector, replace the removed sensor with a new one.
F The front sensor is equipped with an electrical con-
nection check mechanism. Be sure to lock this mech-
anism securely when connecting the connector. If the
connector is not securely locked, a malfunction code
will be detected by the diagnostic system.
(b) Connect the front airbag sensor connector.
2. INSTALL BATTERY AND BATTERY CARRIER
3. INSPECT SRS WARNING LIGHT (See page DI-692 )
RS0BQ-07
H20942
LH:
H20943
RH:
-SUPPLEMENTAL RESTRAINT SYSTEM FRONT AIRBAG SENSOR
RS-75
2350Author: Date:
2004 LAND CRUISER (RM1071U)
REMOVAL
NOTICE:
F If the wiring connector of the SRS is disconnected
and the ignition switch is at ON position, DTCs will be
recorded.
F Never use SRS parts from another vehicle. When re-
placing parts, replace them with new parts.
F Never reuse the sensor involved in a collision when
the SRS has deployed.
F Never repair a sensor in order to reuse it.
1. REMOVE FRONT AIRBAG SENSOR LH
(a) Remove the battery carrier and battery.
(b) Disconnect the front airbag sensor connector.
NOTICE:
Disconnect the connector with sensor assembly installed.
(c) Pull the windshield washer tank opening as shown in the
illustration.
(d) Remove the 2 bolts and front airbag sensor LH.
2. REMOVE FRONT AIRBAG SENSOR RH
(a) Disconnect the front airbag sensor connector.
NOTICE:
Disconnect the connector with sensor assembly installed.
(b) Remove the 2 bolts and front airbag sensor RH.