Toyota RAV4 1994 2000 body hệ thống thân xe trên xe RAV4 đời 1994 2000
Bạn đang xem bản rút gọn của tài liệu. Xem và tải ngay bản đầy đủ của tài liệu tại đây (1.37 MB, 61 trang )
BO0ZO−01
V00005
Shape (Example)
Removal / Installation
Clip Remover
Pliers
Screwdriver
Scraper
−BODY CLIP
BO−1
1996 RAV4 (RM447U)
CLIP
REPLACEMENT
The removal and installation methods of typical clips used in body parts are shown in the table below.
HINT:
If the clip is damaged during the operation, always replace it with a new clip.
V00012
Shape (Example)
Removal / Installation
Removal
Installation
Installation
Removal
BO−2
−BODY CLIP
1996 RAV4 (RM447U)
BO0ZQ−15
Z17567
BO−4
−BODY FRONT BUMPER
1996 RAV4 (RM447U)
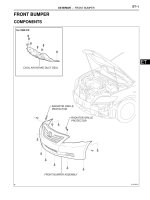
FRONT BUMPER
COMPONENTS
BO481−01
N11455
N11456
−BODY FRONT BUMPER
BO−5
1996 RAV4 (RM447U)
REMOVAL
1. REMOVE FRONT FENDER MOULDING
2. REMOVE FENDER LINER
3. REMOVE FRONT BUMPER COVER
Remove the 4 bolts, 3 clips, 2 screws and the bumper cover.
4. REMOVE HEADLIGHT UNDER COVER
5. REMOVE HEADLIGHT
6. REMOVE UPPER REINFORCEMENT
Torque: 4.9 N·m (50 kgf·cm, 43 in.·lbf)
7. REMOVE BUMPER STAY
Torque: 4.9 N·m (50 kgf·cm, 43 in.·lbf)
BO482−01
BO−6
−BODY FRONT BUMPER
1996 RAV4 (RM447U)
INSTALLATION
Installation is in the reverse order of removal procedure (See page BO−5).
BO3D3−02
N17305
−BODY REAR BUMPER
BO−7
1996 RAV4 (RM447U)
REAR BUMPER
COMPONENTS
H01976
Centering Bolt
Standard Bolt
BO0ZS−01
N11408
N11409
N11458
BO−8
−BODY HOOD
1996 RAV4 (RM447U)
HOOD
ADJUSTMENT
HINT:
Since the centering bolt is used as the hood hinge and lock set
bolt, the hood and lock cannot be adjusted with it on. Substitute
the bolt with washer for the centering bolt.
1. ADJUST HOOD IN FORWARD/REARWARD AND
LEFT/RIGHT DIRECTIONS
Adjust the hood by loosening the hood side hinge bolts.
Torque: 13 N·m (130 kgf·cm, 9 ft·lbf)
2. ADJUST FRONT EDGE OF HOOD IN VERTICAL
DIRECTIONS
Adjust the hood by turning the cushions.
3. ADJUST HOOD LOCK
Adjust the lock by loosening the 2 bolts and nut.
Torque:
7.5 N·m (75 kgf·cm, 65 in.·lbf) for bolt
8.5 N·m (85 kgf·cm, 74 in.·lbf) for nut
BO0ZT−14
N17928
−BODY FRONT DOOR
BO−9
1996 RAV4 (RM447U)
FRONT DOOR
COMPONENTS
BO483−01
BO0020
N11412
N11473
N17924
BO−10
−BODY FRONT DOOR
1996 RAV4 (RM447U)
DISASSEMBLY
HINT:
Tape the screwdriver tip before using to pry parts.
1. w/o Power Window:
REMOVE REGULATOR HANDLE
Pull off the snap ring with a shop rag and remove the regulator
handle and plate.
2. REMOVE INSIDE HANDLE BEZEL
(a) Remove the screw.
(b) Using a screwdriver, pry out the bezel.
3. REMOVE OUTSIDE REAR VIEW MIRROR COVER
4. REMOVE DOOR PULL HANDLE
5. w/ Power window:
REMOVE POWER WINDOW SWITCH
6. REMOVE DOOR TRIM
(a) Remove the 3 screws.
(b) Insert a screwdriver between the door and door trim to pry
out the door trim.
(c) Pull the trim upwards to remove it.
7. REMOVE DOOR INSIDE HANDLE
(a) Disconnect the link and door lock cable.
(b) Remove the 2 screws and inside handle.
8. REMOVE SERVICE HOLE COVER
HINT:
At the time of reassembly, bring out the links through the service
hole cover.
9. REMOVE OUTSIDE REAR VIEW MIRROR
10. REMOVE DOOR GLASS RUN
11. REMOVE DOOR BELT MOULDING
12. REMOVE DOOR SPEAKER
N11460
N17925
N11568
N17926
−BODY FRONT DOOR
BO−11
1996 RAV4 (RM447U)
13. REMOVE DOOR GLASS
(a) Open the door glass until the bolts appear in the service
hole.
(b) Remove the 2 bolts.
NOTICE:
Be careful not to drop the door glass.
(c) Pull up the door glass upwards to remove it.
14. REMOVE WINDOW REGULATOR
(a) Remove the door lock cable from the window regulator.
(b) Remove the 6 nuts.
(c) Disconnect the connector.
(d) Remove the regulator through the service hole.
HINT:
At the time of reassembly, apply MP grease to the window regu-
lator rollers.
15. REMOVE DOOR LOCK
(a) Remove the clip.
(b) Disconnect the link from the door lock.
(c) Remove the 3 screws.
Torque: 5.4 N·m (55 kgf·cm, 48 in.·lbf)
HINT:
At the time of reassembly, apply adhesive to the 3 screws.
Part No. 08833−00070, THREE BOND 1324 or equiva-
lent
(d) w/ Power door lock:
Disconnect the connector.
(e) Remove the door lock through the service hole.
N17927
BO−12
−BODY FRONT DOOR
1996 RAV4 (RM447U)
HINT:
At the time of reassembly, apply MP grease to the sliding sur-
face of the door lock.
16. REMOVE OUTSIDE HANDLE
17. REMOVE DOOR LOCK CYLINDER
Remove the snap ring and door lock cylinder from the outside
handle.
BO0ZV−01
N11553
N11554
BO2556
−BODY FRONT DOOR
BO−13
1996 RAV4 (RM447U)
ADJUSTMENT
1. ADJUST DOOR IN FORWARD/REARWARD AND VER-
TICAL DIRECTIONS
Using SST, adjust the door by loosening the body side hinge
bolts.
SST 09812−00010
Torque: 23 N·m (230 kgf·cm, 17 ft·lbf)
2. ADJUST DOOR IN LEFT/RIGHT AND VERTICAL
DIRECTIONS
Loosen the door side hinge bolts to adjust.
HINT:
Substitute the standard bolt for the centering bolt (See page
BO−8).
Torque: 25 N·m (260 kgf·cm, 19 ft·lbf)
3. ADJUST DOOR LOCK STRIKER
(a) Check that the door fits and door lock linkages are ad-
justed correctly.
(b) Loosen the striker mounting screws to adjust.
(c) Using a plastic hammer, tap the striker to adjust it.
BO484−01
BO−14
−BODY FRONT DOOR
1996 RAV4 (RM447U)
REASSEMBLY
Reassembly is in the reverse order of disassembly procedure (See page BO−10).
BO0ZX−14
Z17568
−BODY REAR DOOR
BO−15
1996 RAV4 (RM447U)
REAR DOOR
COMPONENTS
BO485−01
BO0020
H03781
H03807
: 7 Clips
H03783
BO2455
Panel
Cover
Cotton Tape
BO−16
−BODY REAR DOOR
1996 RAV4 (RM447U)
DISASSEMBLY
HINT:
Tape the screwdriver tip before using to pry the parts.
1. w/o Power Window:
REMOVE REGULATOR HANDLE
Pull off the snap ring with a shop rag and remove the regulator
handle and plate.
2. REMOVE DOOR INSIDE HANDLE BEZEL
(a) Remove the screw.
(b) Using a screwdriver, pry out the bezel.
3. REMOVE DOOR TRIM
(a) Remove the 2 screws from the armrest.
(b) Insert a screwdriver between the retainer and door trim
board to pry the door trim loose.
(c) Remove the door trim.
4. REMOVE ARMREST
Remove the 2 screws and armrest from the door trim.
5. REMOVE POWER WINDOW SWITCH
(a) Disconnect the connector.
(b) Using a screwdriver, remove the switch.
6. REMOVE DOOR INSIDE HANDLE
(a) Remove the 2 bolts.
(b) Disconnect the control link and remove door inside han-
dle.
7. REMOVE SERVICE HOLE COVER
Remove the 2 grommets and service hole cover.
HINT:
At the time of reassembly, bring out the connector though the
service hole cover.
H03784
: 5 Clips
H03785
N14554
−BODY REAR DOOR
BO−17
1996 RAV4 (RM447U)
8. REMOVE DOOR BELT MOULDING
9. REMOVE DOOR GLASS RUN
10. REMOVE DIVISION BAR
11. REMOVE REAR DOOR QUARTER WINDOW WEATH-
ERSTRIP
12. REMOVE REAR DOOR QUARTER WINDOW GLASS
13. REMOVE DOOR GLASS AND WINDOW REGULATOR
ASSEMBLY
(a) Disconnect the connector.
(b) Remove the 3 bolts and nut from the window regulator.
(c) w/o Power Window:
Remove the 3 bolts from the window regulator.
(d) Remove the 2 nuts and glass channel from the window
regulator lift arm bracket, then remove the door glass.
(e) Remove the window regulator through the service hole.
HINT:
At the time of reassembly, apply MP grease to the window regu-
lator rollers.
14. REMOVE DOOR LOCK ASSEMBLY
(a) w/ Power door Lock:
Disconnect the connector.
(b) Disconnect the 2 links from the outside handle.
(c) Remove the 3 screws and door lock assembly.
Torque: 5.4 N·m (55 kgf·cm, 48 in.·lbf)
HINT:
At the time of reassembly, refer to following procedure.
S Apply adhesive to the 3 screws.
N14555
BO−18
−BODY REAR DOOR
1996 RAV4 (RM447U)
Part No. 08833−00070, THREE BOND 1324 or equiva-
lent.
S Apply MP grease to the sliding and rotating parts of the
door lock assembly.
15. REMOVE DOOR OUTSIDE HANDLE
Remove the 2 bolts and door outside handle.
BO0ZZ−01
H03786
H03787
BO2556
−BODY REAR DOOR
BO−19
1996 RAV4 (RM447U)
ADJUSTMENT
1. ADJUST DOOR IN FORWARD/REARWARD AND VER-
TICAL DIRECTIONS
Using SST, adjust the door by loosening the body side hinge
bolts.
Torque: 25 N·m (260 kgf·cm, 19 ft·lbf)
2. ADJUST DOOR IN LEFT/RIGHT AND VERTICAL
DIRECTIONS
Loosen the door side hinge bolts to adjust.
HINT:
Substitute the standard bolt for the centering bolt (See page
BO−8).
Torque: 12N·m (122 kgf·cm, 9 ft·lbf)
3. ADJUST DOOR LOCK STRIKER
(a) Check that the door fits and door lock linkages are ad-
justed correctly.
(b) Loosen the striker mounting screws to adjust.
(c) Using a plastic hammer, tap the striker to adjust it.
BO486−01
BO−20
−BODY REAR DOOR
1996 RAV4 (RM447U)
REASSEMBLY
Reassembly is in the reverse order of disassembly procedure (See page BO−16).
BO101−09
Z17570
−BODY BACK DOOR
BO−21
1996 RAV4 (RM447U)
BACK DOOR
COMPONENTS
BO487−01
N11413
BO2455
Panel
Cover
Cotton Tape
N11427
N11556
N11463
BO−22
−BODY BACK DOOR
1996 RAV4 (RM447U)
DISASSEMBLY
HINT:
Tape the screwdriver tip before using to pry parts.
1. REMOVE BACK DOOR UPPER COVER
2. REMOVE BACK DOOR TRIM BOARD
3. REMOVE SERVICE HOLE COVER
HINT:
At the time of reassembly, bring out the links through the service
hole cover.
4. REMOVE BACK SPARE TIRE BRACKET
5. REMOVE REAR WIPER ARM
6. REMOVE WIPER MOTOR
7. REMOVE DOOR LOCK ASSEMBLY
(a) Remove the 4 plug hole covers and 3 screws.
Torque: 5.4 N·m (55 kgf·cm, 48 in.·lbf)
HINT:
S Apply adhesive to the 3 screws.
Part No. 08833−00070, THREE BOND 1324 or equiva-
lent.
S Apply MP grease to the sliding surface of the door lock
control.
(b) Disconnect the connector.
(c) Disconnect the 2 links.
8. REMOVE BACK DOOR OUTSIDE HANDLE
(a) Remove the 4 plug hole covers.
(b) Remove the 4 screws, door lock and back door outside
handle.
H04262
: 12 Clips
N11440
−BODY BACK DOOR
BO−23
1996 RAV4 (RM447U)
9. REMOVE DOOR OUTSIDE GARNISH
(a) Remove the 4 plug hole covers.
(b) Insert a screwdriver between the door outside garnish
and back door to remove the door outside garnish.
(c) Disconnect the license plate light connector.
10. REMOVE STOP LIGHT COVER
11. REMOVE UPPER GARNISHES
12. REMOVE UPPER SIDE GARNISHES
13. REMOVE STOP LIGHT
BO103−02
N11422
N11428
BO−24
−BODY BACK DOOR
1996 RAV4 (RM447U)
ADJUSTMENT
1. ADJUST DOOR IN FORWARD / REARWARD AND
VERTICAL DIRECTIONS
Adjust the door by slightly loosening the hinge nuts on the body
side.
Torque: 27 N·m (270 kgf·cm, 19 ft·lbf)
2. ADJUST DOOR LOCK STRIKER
(a) Loosen the striker mounting screws.
(b) Using a plastic hammer, tap the striker to adjust it.
BO488−01
−BODY BACK DOOR
BO−25
1996 RAV4 (RM447U)
REASSEMBLY
Reassembly is in the reverse order of disassembly procedure (See page BO−22).
BO105−01
H03762
Cowl Top Ventilator Louver
Wiper Arm
Wiper Arm
Cover
Wiper Motor
Wiper Motor Link
Wiper Arm
Wiper Arm Cover
20 (200, 15)
20 (200, 15)
N·m (kgf·cm, ft·lbf) : Specified torque
5.4 (55, 48 in.·lbf)
5.4 (55, 48 in.·lbf)
BO−26
−BODY FRONT WIPER AND WASHER
1996 RAV4 (RM447U)
FRONT WIPER AND WASHER
COMPONENTS