Photoshop cs5 missing manual_8 pdf
Bạn đang xem bản rút gọn của tài liệu. Xem và tải ngay bản đầy đủ của tài liệu tại đây (2.43 MB, 78 trang )
683
:
Printing on an Inkjet
Printer
16. Turn on the Gamut Warning checkbox to make any out-of-gamut pixels
appear gray in the preview area of your Print dialog box.
You can ask Photoshop to show you a proof of any colors in your image that
are out of gamut (meaning they’re unprintable) for the printer and paper you’ve
selected. When you’re printing to expanded-gamut printers, you’ll encounter
far fewer out-of-gamut colors than you would with a standard CMYK printing
press. Adobe improved Photoshop’s soft-proofing accuracy in CS4, so the pre-
view should give you a good sense of what your print will look like. Of course,
none of this means diddly unless you’ve calibrated your monitor so you see reli-
able results (see page 667).
17. Glance over your settings in the Print dialog box one last time and, if they’re
okay, click the Print button.
After all that hard work, you see the fruit of your labors in the form of a glori-
ously accurate, high-quality print. Yippee!
Note: In CS4 and earlier, you encountered the Print Settings dialog box after clicking the Print button. In
CS5, the settings from the Page Setup dialog box and the Print Settings dialog box have been combined
into the Print dialog box, meaning you’ve got one less dialog box to deal with before hearing the pitter
patter of your printer actually printing.
poWeR USeRS’ CLINIC
Printing Vectors and 16-bit Images
If your image contains vectors or 16-bit images (page 45),
the Print dialog box contains yet another set of printing op-
tions you need to worry about:
• Include Vector Data. Choose Output from the pop-
up menu at the top right of the Print dialog box and
you’ll see this checkbox. If your image contains vec-
tor artwork (Chapter 13) or Type layers (Chapter 14),
you need to print them with a PostScript printer (like
some laser and inkjet printers). If you’re printing to a
non-PostScript printer (like most inkjets), you should
rasterize (page 110) your vectors first so you can see
how they’ll look before you actually print them. (If you
don’t know whether your printer supports PostScript,
check your owner’s manual or print a specification
or diagnostic page that lists which technologies the
printer works with.) If your printer is a PostScript
printer, you can preserve the wonderfully crisp edges
of your vectors by turning on this checkbox. If it’s
grayed out, your image doesn’t include any vector
info so you don’t have to worry about it.
• Send 16-bit Data. In CS4 this option was one of the
Output settings discussed above, but in CS5 it lives
beneath the Print Settings button (see Figure 16-6,
top). If your image contains 16-bit pixel info, Pho-
toshop lets you print all 16 bits of it; that is, if your
printer can handle it (the checkbox is grayed out if
it can’t). To make sure the extra info is sent to your
printer, turn on this checkbox.
684
P : T M M
Printing on a
Commercial Offset
Press
Printing on a Commercial Offset Press
If you prepare artwork for stuff that’s printed using a commercial offset printing
press (magazines, product packaging, newspapers, and so on), you’ve got loads more
to worry about than if you’re sending your image to an inkjet printer. Unlike printing
to an inkjet printer, where your images gets converted from RGB to CMYK during
the printing process, a commercial offset press usually requires you to convert your
image to CMYK before it’s printed. In this section, you’ll learn the very specific steps
you need to follow to preserve your image’s color when you convert it to CMYK. But
before you dive too deeply into color-mode conversion, you need to understand a bit
more about how offset presses work.
Note: Inkjet printers spray their ink from a print head directly onto a page. An offset press, however,
transfers, or offsets, ink from an image on a plate onto a rubber blanket and then onto a page—which is
why commercial printing presses are called “offset presses.”
Commercial offset presses are huge, noisy, ink-filled metal beasts. As you learned
back in Chapter 5 (page 195), they split your image’s four CMYK channels into indi-
vidual color separations, which are loaded onto big cylinders aligned so that all four
colors are printed, one on top of another, to form your final image. If the cylinders
aren’t aligned properly, you’ll see faint traces of one or more colors peeking outside
the edges of your image, making it look blurry (this blurriness is called being “out
of registration”).
Instead of the dyes used by inkjet printers, commercial offset presses use two types of
ink: process and spot. Process inks include cyan, magenta, yellow, and black (CMYK),
and they’re printed as overlapping patterns of halftone dots (Figure 16-9, left) that
let you economically reproduce the wide range of colors found in continuous-tone
images like photos (Figure 16-9, right).
Spot inks, on the other hand, are used to match very specific color requirements
(like a color in a corporate logo—the official UPS brown, for example), and they’re
printed on a separate cylinder on the press. More spot colors mean more cylinders
and therefore more separations, which translates into higher printing costs. Since it’s
easy to get hit with unexpected costs when you’re sending out a print job, you need
to make darn sure you know exactly how many colors it’ll take to print your image
(most print jobs involving color photos use only the four process colors). You’ll learn
all about spot colors later in this chapter.
685
:
Printing on a
Commercial Offset
Press
Figure 16-9:
Left: If you look
closely at an image
printed on a press,
you can see the dots
it’s made from. The
next time you pick
up a magazine or
newspaper, stick it
right up to your nose
and you’ll see ’em. To
keep the dots from
printing on top of
each other, they’re
printed at specific
angles according to
ink color.
Right: Images that
contain a wide range
of smooth colors are
called continuous-
tone images, like this
beautiful photo by
Taz Tally (www.taz
tallyphotography.
com).
Finally, unlike sending an image straight from Photoshop to your inkjet printer,
you’ll rarely (if ever) send a single image to an offset press. Instead, you place your
image in a page-layout document (like one made with Adobe InDesign) that con-
tains other images, along with text (referred to in geek circles as copy), and that’s
what you send to the printing company. You need to make sure your images have
the right print dimensions and resolution (discussed on page 669) and that they’re in
the right color mode before you place your image in InDesign. The following pages
explain how to do that as painlessly as possible.
Converting RGB Images to CMYK Using Built-In Profiles
First and foremost, you need to know who’s handling the conversion from RGB to
CMYK. Historically, printing companies have requested (required!) you to convert
images yourself but this is slowly changing, particularly with the increased use of
digital presses (see page 705).
If you have no idea whether you’re supposed to convert the RGB to CMYK yourself
or if you want to know whether the printing company has a custom profile you can
use for the conversion, pick up the phone. Communication is crucial in situations like
this because if your print job hits the press at 2:00 a.m., it’ll be your phone that rings
if there’s a problem. This is one call you’re better off making than receiving.
686
P : T M M
Printing on a
Commercial Offset
Press
If you have to convert the color mode yourself, it’s important to choose the proper
CMYK color printer and paper profile. You can do it in a couple of ways, but the fol-
lowing steps will lead you down a simple and foolproof path:
1. Open your RGB image and duplicate it.
Choose Image➝Duplicate to create a new copy of your image to guarantee that
you won’t accidentally save over your original RGB image.
2. Name your new image and save it as a TIFF file.
Choose File➝Save or press �-S (Ctrl+S on a PC) and then give it a name. (It’s a
good idea to include the file’s color mode in the name so you can see at a glance
which mode it’s in.) Choose TIFF from the Format pop-up menu at the bottom
of the Save dialog box and then click Save.
3. Choose Edit➝“Convert to Profile”.
In the Conversion Options section of the dialog box that appears (see Figure 16-10),
set the Engine menu to “Adobe (ACE)” and the Intent menu to Perceptual. Also,
turn on the Use Black Point Compensation checkbox.
Figure 16-10:
Don’t panic when you see the Profile pop-up menu.
These super funky names are simply the various color
profiles you can use to convert RGB to CMYK. As you
learned at the beginning of this chapter, there are a
bazillion printers, papers, and colorants (inks, dyes,
toners) out there, so this long list merely reflects that
diversity.
4. From the Destination Space’s Profile pop-up menu (Figure 16-10), choose a
profile that reflects the type of ink, press, and paper your printing company
will use to print the image.
You can think of this menu as a printer profile menu. If you can’t find a custom
profile (see the next section), hunt for a profile that matches the ink, press, and
paper for your current print job. If your image is being printed in North Amer-
ica on a sheetfed printing press using coated paper stock, for example, you can
pick the tried-and-true “U.S. Sheetfed Coated v2” profile. A newer commercial
sheetfed profile that also might work is “Coated GRACoL 2006”. But before you
guess, ask your printing company what profile it wants you to use.
687
:
Printing on a
Commercial Offset
Press
5. Click OK to complete the color conversion process and save your image.
Press �-S (Ctrl+S) to save your image in the new color mode.
After you save your CMYK image, you’re ready to place it in your page-layout docu-
ment. Because you wisely duplicated your image in step 1, you’ve still got the original,
full-color RGB image to go back to if you ever need to edit it. Sweet!
Custom RGB to CMYK Profile Conversions
If your printing company has painstakingly created its own custom color profile,
you’re much better off using it than one of the built-ins. The process is similar to
the one explained in the previous section, but you need to install the custom profile
(as explained on page 667) before you can use it. Once you’ve downloaded it, follow
these steps to put it to use:
1. Locate the appropriate profile folder on your hard drive.
Figuring out where to store the profile is your biggest challenge since different
operating systems and different versions of Photoshop store profiles in different
places. On a Mac running OS X 10.5 or later, you can find the main color pro-
files folder in Computer/Library/Application Support/Adobe/Color/Profiles. If
you have a Windows computer, look in Users\Profiles and Windows\System32\
Spool\Drivers\Color. However, you can always search for a folder named pro-
files, or better yet, call your printing company and ask them where the folder for
your particular operating system lives.
Note: If your computer uses Windows, you can use the Color Management Control Panel to add and
remove profiles.
2. Copy the custom profile to the Profiles folder described in the previous step.
Figure 16-11 shows a profile named “MwHwkCC98_28#txt_CMYK_o_PCG.
icc”. The name indicates that this profile was made using a 28-pound Mohawk
text stock paper. Printing companies that have embraced color management
have CMYK color profiles for a variety of paper stocks, so be sure you load the
one for the paper you’re printing on by dragging the file into the folder.
3. Open your image, duplicate it, and save it as a TIFF file.
To duplicate your image, choose Image➝Duplicate and then choose File➝Save
or press �-S (Ctrl+S on a PC) and give the copy a name. Pick TIFF from the
Format pop-up menu at the bottom of the Save dialog box and then click Save.
688
P : T M M
Printing on a
Commercial Offset
Press
Figure 16-11:
Top: The toughest part of
using a custom profile is
figuring out where the heck to
put it! Fortunately, on a Mac,
the folder is named Profiles
(shown here).
Bottom: If you’re using a
custom profile, the printing
company may also want you
to change other settings in the
Print dialog box. For example,
they might have you select
Relative Colorimetric rather
than Perceptual from the
Intent menu. But you won’t
know unless you ask ’em.
4. Choose Edit➝“Convert to Profile” and, in the resulting dialog box, choose
your new profile from the Profile pop-up menu.
If you don’t see the right profile in the list, you may need to restart Photoshop.
In that case, press �-Q (Ctrl+Q) to quit the program and then double-click your
image file to relaunch the program.
5. Change the Conversion Options settings if you need to.
Ask the printing company if you need to adjust any settings in the Conversion
Options section of the “Convert to Profile” dialog box.
6. To save your image, click OK and then press �-S (Ctrl+S).
You’ve just completed your first custom CMYK conversion.
Using Spot Color
As mentioned earlier, commercial printing presses sometimes use special premixed
custom inks called spot colors. If you’re a graphic designer working in prepress (the
department that preps files for printing), the info that lies ahead is really important.
If you’re a photographer or Web designer, save your brainpower and skip this part.
Really.
689
:
Printing on a
Commercial Offset
Press
Photoshop wizard Ben Willmore (www.DigitalMastery.com) has come up with a
great analogy to explain spot colors. Remember the box of crayons you used as a
kid? A small box had 8 basic colors like blue, orange, and yellow. And then there was
the big box of 64—with a sharpener on the back!—that had special colors like corn-
flower, melon, and thistle. No matter how hard you tried, you couldn’t reproduce the
special colors with a box of 8 crayons. In Photoshop, you can think of those special
colors as spot colors and the box of 8 crayons as the CMYK color mode.
Because of the impurity and variety of CMYK inks, they can’t produce all the col-
ors you see in RGB mode (just like you can’t reproduce, say, cornflower from those
original 8 crayons). If you happen to be tooling around in the Color Picker (page
493) and choose a color that can’t be produced in CMYK, Photoshop places a little
gray warning triangle next to it (see Figure 16-12). This triangle is known as an out-
of-gamut warning (gamut, as you learned earlier, means the full range of colors).
If you click the triangle (or the tiny, square color swatch below it), Photoshop will
change your color to the closest possible match that can be printed with CMYK inks.
Figure 16-12:
Top: If you pick a color that can’t be
produced with CMYK inks, a little warning
triangle appears next to the color swatch
(circled). Click the triangle or the tiny
square of color below it to make Photoshop
pick the next best color.
Bottom: In most cases, you can’t see any
difference between the original color and
the new one, but if you check your cursor’s
location in the color field (circled), you can
see that Photoshop moved it slightly.
690
P : T M M
Printing on a
Commercial Offset
Press
In some cases, the closest color match is close enough, but spot-color ink comes in
handy in certain situations, like when you need:
• To reduce printing costs. As you learned earlier, the more colors you use, the
more cylinders and separations you need and the more the job will cost. If you
print an image in black and one or two spot colors, you can reduce your print-
ing costs because you’ll be using two or three separations instead of four. This
technique is commonly used with line art (illustrations or outline drawings like
those in a coloring book), though you can also use it for photos (see page 684).
• To ensure color accuracy. If your paycheck depends on color accuracy, you
have to use spot-color ink. For example, if UPS hires you to design a flyer for
their company party, you want to make sure that your version of brown matches
their official brown. Unless you use a spot color (which is consistent because it’s
premixed), your brown will be printed using a mix of CMYK inks and may end
up looking maroon.
• To use specialty inks. If you want to add a bit of pizzazz to your printed image,
you can use specialty inks like metallics or a varnish that looks glossy when it’s
printed. You can also add a vibrant spot color to a particular area to make that
part stand out. However, if you use specialty inks on a CMYK document, you’re
adding color separations to your job, which will increase the cost.
The most popular brand of spot-color ink is Pantone (www.pantone.com), and be-
fore you can use it, you have to create a special channel for it called a spot channel.
Each spot color you use needs its very own spot channel. (See Chapter 5 for more
on channels.)
Note: You’ll also hear Pantone colors called PMS colors, which stands for “Pantone Matching System.”
Let’s say you’re preparing the cover photo for the next issue of Cutting Horse maga-
zine, and, to reduce printing costs, the magazine has decided to use a grayscale image
with one spot color for visual interest. (That way, they’re paying for two separa-
tions instead of four.) Your mission is to make the horse’s bridle Pantone Red. No
problemo! Just make a selection of the bridle and then create a spot channel for the
special ink (see Figure 16-13).
691
:
Printing on a
Commercial Offset
Press
Figure 16-13:
Top: Once you’ve selected
the area you need to color-
ize, you can add a new
spot channel by choosing
New Spot Channel from
the Channels panel’s menu
(circled, top).
Bottom: Click the little color
swatch (circled) in the New
Spot Channel dialog box to
open the “Select spot color”
dialog box, and then click
the Color Libraries button
to see the oh-so-helpful
list of Pantone presets
shown here. Photoshop will
automatically add the ink
you choose here to your
selection.
Here’s how to add a spot channel:
1. Use one of the methods described in Chapter 4 to select the area you want to
colorize.
If you’re lucky enough to start with the full-color version of the photo, you can
easily select the horse’s bridle by using Color Range (page 154). See page 323
for the scoop on converting a color image to black and white and page 329 for
changing your image’s color mode to Grayscale.
692
P : T M M
Printing on a
Commercial Offset
Press
2. From the Channels panel’s menu (see Figure 16-13, top), choose New Spot
Channel.
Photoshop opens a dialog box where you can name your new channel and pick
a color. You can also add a new spot channel by �-clicking (Ctrl-clicking on a
PC) the New Channel icon at the bottom of the Channels panel.
3. In the New Spot Channel dialog box, click the color swatch to open the “Select
spot color” dialog box and choose an ink color.
To see a list of Pantone presets, click the Color Libraries button. In the resulting
dialog box, choose a spot color (see Figure 16-13, bottom). From the pop-up
menu at the top of the Color Libraries dialog box, choose a color book (if you’re
preparing a photo for a magazine, for example, pick “Pantone solid coated” be-
cause magazines print on glossy paper). If you know the number of the ink you
want (like 032), you can type the number and Photoshop will flip to that color
in the list for you, or you can drag the triangles along the vertical scroll bar to
find the one you want (you can also use the arrow keys to move through the list
of ink swatches). Click the color’s swatch to select it and then click OK to close
the Color Libraries dialog box.
Note: By picking a color from the Color Library, you don’t have to worry about naming your new spot
channel—Photoshop names it automatically.
4. Back in the New Spot Channel dialog box, leave Solidity set to 0% and click
OK to close the dialog box.
You can think of Solidity as ink opacity, though it affects only the onscreen
image and not the printed version. Depending on the image you’re working
with, increasing the ink’s opacity so it appears solid and not see-through may
be helpful (it’s a personal preference). When you click OK, you’ll see a new spot
channel appear in the Channels panel as shown in Figure 16-14.
Editing a spot channel
Once you’ve created a spot channel, you can change its ink color by double-clicking
it in your Channels panel. You can also add or remove color by painting with the
Brush tool (or by using any other selection tool and filling it with color, as described
on page 181). Since Photoshop shows channel information in grayscale, you can edit
a spot channel just like a layer mask (page 113)—by painting with black, white, or
shades of gray:
• To add color at 100 percent opacity, grab the Brush tool by pressing B and set
your foreground color chip to black. Then mouse over to your image and paint
where you want to add color.
693
:
Printing on a
Commercial Offset
Press
Figure 16-14:
Here’s the final cover shot for
your magazine. If you peek at the
Channels panel, you can see that
there are just two channels (and
thus two separations). If you send
this Photoshop grayscale document
straight to InDesign, that program
adds a new color swatch for the
spot color, and makes sure that the
new color prints on top of the black
(a technique called overprinting).
• To remove color at 100 percent opacity, set your foreground color chip to
white before you begin to paint.
• To add or remove color at any other opacity, set your foreground color chip to
a shade of gray before you paint.
Saving a document with spot channels
To keep your spot channels intact, you need to save the document in a format that
works with spot channels: as a DCS, PSD , or PDF file. So which one do you pick? It
depends on what you’re going to do with the file.
If you’re the hired Photoshop gun and you’ll be handing the file off to someone else
for further fluffing, save it as a PSD file, get your motor runnin’, and head out on
the highway (insert guitar riff here). If you’re importing the image into InDesign or
QuarkXPress 6.5 or later, you’ll also want to save your image as a PSD file.
694
P : T M M
Printing on a
Commercial Offset
Press
If you’re using the file in QuarkXPress 6 or earlier, you need to save it as a DCS 2.0 or
PDF file (see page 695). DCS is a special format that lets you save color separations if
your image will be printed on a printing press. To save your document as a DCS file,
make sure your document is in either Grayscale or CMYK color mode (page 46) and
then choose File➝Save As and pick Photoshop DCS 2.0 from the Format pop-up
menu. When you click Save, you’ll see the DCS 2.0 Format dialog box (Figure 16-15)
where you can fine-tune the following settings:
• Preview. This setting controls which kind of image preview you see in your
page-layout software. If your image is headed for a Mac and you want a 256-col-
or preview, for example, choose “Macintosh (8 bits/pixel)” or “Macintosh
(JPEG)” (the second choice gives you a slightly nicer preview). If it’s headed for
a Windows computer, choose “TIFF (8 bits/pixel)”. See the box on page 45 to
learn what the term “8 bits” is all about.
• DCS. You’ll want to leave this one set at “Single File DCS, No Composite” so
Photoshop doesn’t generate all kinds of files that only the printing press peeps
know what to do with.
• Encoding. This menu lets you control how Photoshop encodes (represents and
stores) the print information in your file. If you’re on a Mac, choose Binary.
If you’re on a Windows computer, choose ASCII or, for a more compact file,
ASCII85.
Note: In case you’re wondering, DCS stands for “Desktop Color Separation” and ASCI I stands for
“American Standard Code for Information Interchange.” ASCII was developed as a way to convert binary
(computer) information into text, and ASCII85 is the newest version. This stuff is great bar-bet trivia.
Figure 16-15:
The DCS 2.0 Format dialog box. DCS 2.0 is
one of three formats you can use to save
spot channels intact. While most page-layout
programs can read DCS files, you may find
that using a PDF is easier, as discussed on
page 693.
695
:
Printing on a
Commercial Offset
Press
Leave the checkboxes at the bottom of the dialog box (Include Halftone Screen, In-
clude Transfer Function, Include Vector Data, and Image Interpolation) turned off
and then click OK. You’re now ready to import the DCS file into QuarkXPress 6 or
earlier. Party on!
Saving Spot Colors in PDF Format
While DCS 2.0 has long been the standard format for saving documents with spot
colors, PDF format is simpler. To see for yourself, follow these steps:
1. Open an image with a spot color and press �-Shift-S (Ctrl+Shift+ S on a PC)
or choose File➝Save As.
Figure 16-16 shows a file named “Autumn Art_CMYK” that contains the Digi-
tal Gypsies logo with an assigned spot color of 810C (the C indicates the coated
version of the color).
2. Choose Photoshop PDF from the Format pop-up menu.
If your document has layers, turn off the Layers checkbox to flatten the image.
3. Turn on the Spot Colors checkbox.
Turning on this checkbox ensures that Photoshop includes your spot colors in
your image, along with process colors (CMYK).
4. Rename your image to indicate that it harbors a spot color.
For example, rename the image “Autumn Art_CMYK_Spot” and then click Save
to summon the Save Adobe PDF dialog box.
5. In the General settings, choose Acrobat 5 (PDF 1.4) from the Compatibility
pop-up menu.
WoRKARoUNd WoRKSHop
Printing Spot-Channel Proofs
Since spot channels are used only by commercial print-
ing presses, getting them to print on your own printer for
proofing can be…exciting. The solution is to pop into RGB
mode temporarily and merge the spot channels.
To safeguard your original document, save it and open
a copy by choosing Image➝Duplicate. Next, choose
Image➝Mode➝RGB Color and then, in your Channels
panel, Shift-click to select each spot channel you’ve cre-
ated. Then open the Channels panel’s menu and choose
Merge Spot Channel.
When Photoshop asks if it’s okay to flatten the layers, click
OK. Each spot channel is instantly swallowed up by the
closest matching RGB equivalent.
At this point, you can fire it off to your printer without a
fuss. The colors won’t be exact, but you’ll get a decent ap-
proximation of what your image will look like when you fin-
ish editing it. After you print it, you can toss the temporary
RGB document and continue editing the original.
696
P : T M M
Printing on a
Commercial Offset
Press
Figure 16-16:
Left: You might consider
adding the spot color’s
name (like Pantone
810C) to your document’s
name to help maintain
color-naming consistency
as you move your image
from one program to an-
other (for example, from
Photoshop to InDesign).
Right: If you think you
might use these settings
again, click the Save
Preset button (not shown
here; it’s at the bottom
left of the dialog box)
before you click the Save
PDF button. Give your
preset a name (like “Print
Image PDF”) so you can
access it again later from
the Adobe PDF Preset
pop-up menu at the
dialog box’s top left. It’ll
come in handy when you
learn about duotones
later in this chapter.
6. In the Compression settings (click Compression on the left side of the dialog
box to see them), choose Do Not Downsample and pick Maximum Quality
JPEG or None from the Compression pop-up menu.
Picking either compression option should leave you with a high-quality image
because Maximum Quality JPEG essentially leaves your images uncompressed.
If you aren’t comfortable using a compression format that can reduce your im-
age’s quality, choose None instead.
7. In the Output settings, check to make sure the Color Conversion pop-up
menu is set to No Conversion.
8. Click Save PDF.
You’re now free to send the PDF file to the page-layout program of your choice.
If you save the settings you entered as a preset, this method is much faster than sav-
ing your file in DCS 2.0 format. However, be sure to ask your printing company if
they’ll accept a PDF file with spot colors. Some companies using older equipment
may not be familiar with PDFs or may not be able to use them just yet (change is
hard, you know!).
697
:
Printing on a
Commercial Offset
Press
Printing Duotone (Multitonal) Images
One of the advantages of printing with a commercial printer is that you can print
duotones and other multitonal images (see the box below) by adding a second ink to
your grayscale images. You can add a spot color, another gray ink, or even process
colors—great news if you want to colorize a grayscale image, add some tonal depth
and richness, or both. Either way, you can create some amazingly beautiful effects
as discussed back in Chapter 8. However, it’s really easy to add too much ink, which
makes your image way too dark once it’s printed. If that happens, you lose details in
the shadows and your contrast goes down the tubes.
To produce a truly amazing duotone or multitone image, you need to start with a
good quality grayscale image—one that has high contrast and isn’t overly dark. Once
you’ve settled on an image, convert it to Grayscale mode (page 46) and then follow
these steps:
1. Duplicate your image.
Choose Image➝Duplicate and then give the copy a name. To get descriptive
with your image name, consider incorporating the word “duotone,” as in “Red
Mtn_Duotone”.
2. Choose Image➝Mode➝Duotone.
If this option is grayed out, you’re not in Grayscale mode. In that case, choose
Grayscale mode first and then switch to Duotone. When the Duotone Options
dialog box opens, it reports that your image is a monotone image made from
nothing but black ink.
Up to Speed
Defining Duotones
The term duotone generally refers to a grayscale image
that has had additional inks added to it: Technically, if you
add one ink, it’s a duotone; two inks make it a tritone; and
three inks make it a quadtone, so the correct general term
is multitonal images. But most folks use the term duotone
to describe all these alternatives, which can get confusing.
So why add other inks to grayscale images to begin with? A
couple of reasons: Some folks use duotones to add color to
an image inexpensively—as you learned on page 684, reduc-
ing the number of colors in your image can mean a cheaper
print job. However, duotone (or multitone) aficionados will
tell you the additional inks add tonal range and depth to an
image (and they’re right!). In fact, you can add a second gray
ink to enhance tonality without adding any color at all.
The two keys to creating high-quality duotones are:
• Start with a high-quality grayscale image with a good
tonal range and high contrast.
• Substitute your second ink for part of the original
black ink—rather than just adding it (see page 698).
This prevents your image from becoming too dark
and flat because it’s drowning in ink.
With a bit of practice, you’ll gain confidence in creating
duotones and enjoy doing it. However, it’s always a good
idea to plan extra time in your production schedule to print
some tests. Since you can’t trust your monitor or proof your
own nonprocess duotones (see page 699), a test print is
worth its weight in gold.
698
P : T M M
Printing on a
Commercial Offset
Press
3. Click the Curve icon to the left of the Black Ink (see Figure 16-17).
Clicking this icon opens the Duotone Curve dialog box, where you can peek at
how the ink will be applied in your image. For this particular ink, you have a
straight 45-degree curve from the highlight to shadow areas, and it’s being ap-
plied at 100 percent. Click OK to close the Duotone Curve dialog box.
Figure 16-17:
Duotone Curves are just like the Curves you
learned about back in Chapter 9 (page 406,)
except that here they let you know how much
ink will be applied to your image’s shadows,
midtones, and highlights. The percentages
tell you how much ink is being added.
4. Choose Duotone from the Type pop-up menu.
This menu gives you a choice of various kinds of multitonal images. If you
choose Duotone, Photoshop activates two inks in the dialog box (choosing Tri-
tone activate three inks, and so on). However—and this is key—both inks have
straight, 45-degree highlight-to-shadow curve lines, which means they print
with the same amount of ink in the same color range. That’s not good! If you
click on the “Ink 2:” color swatch and load a new color, you’ll add too much ink
for the image to print decently. So instead of editing the Duotone Curves your-
self, use one of the many presets as described in the next step.
5. Click the Preset pop-up menu and choose one of the Duotone presets from
the list (see Figure 16-18, top).
Feel free to experiment with the wide variety of choices in the Preset menu.
Some of the selections, like the true duotones, offer anywhere from one to four
options, which represent substitutions for the second ink ranging from stronger
to weaker. These are excellent starting points for your creations. There’s nothing
wrong with tweaking the Duotone Curves to fine-tune your results, but you’ll
want to print some tests first to make sure you’re not adding too much ink.
699
:
Printing on a
Commercial Offset
Press
Testing duotones is tough because you can’t proof them unless you’ve made a
duotone out of process colors (which really makes it a quadtone). If you select a
preset with inks not available on your printer, you won’t get an accurate proof.
The best you can do is contact your printing company and see if they’ll print
you a test on the paper they’ll use for the final image. If you don’t need the proof
right away, they may be able to hold onto it and slide it in with another job that
uses a similar ink-and-paper combo.
Figure 16-18:
Top: Once you pick a pre-
set, peek at the curves for
each new ink. Notice the
curve for the black ink is
reduced to make room for
the other inks, which have
straight, full-ink curves.
Bottom: If you choose
Quadtone from the Type
menu and “CMYK wm”
from the Preset menu
(wm stands for “warm”),
you can add a nice warm
tone to your image (as
shown on page 700). If
you’re working with a
CMYK image, this is a fine
choice; however, if you’re
working with a grayscale
document and you don’t
want to add many differ-
ent inks, go for one of the
Duotone options, which
will add one ink instead
of three.
6. Save your document as an EPS or PDF file.
Here’s yet another opportunity to chat with your printing company! Give 'em
a ring and ask if they prefer EPS or PDF format for duotones or multitones. If
they say EPS, ask them which settings they prefer, choose File➝Save As, and
then pick Photoshop EPS from the Format pop-up menu. In the EPS Options
dialog box (Figure 16-19, bottom), choose an 8-bit option from the Preview
pop-up menu and pick Binary from the Encoding pop-up menu. Unless your
printing company tells you otherwise, leave the rest of the options turned off
and click OK.
700
P : T M M
Printing on a
Commercial Offset
Press
To save your duotone as a PDF file instead, you can use the same settings you
used to save a spot-color image in the previous section (page 695).
Figure 16-19:
As you can see, the difference
between a grayscale image (top)
and a quadtone (bottom) can be
impressive.
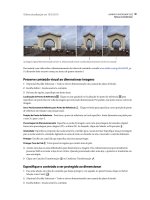
Proofing Images Onscreen
When it comes to sending images out for printing, it’d be nice to peek into the fu-
ture and see what they’ll look like. Happily, Photoshop can create an onscreen proof
simulation known as a soft-proof, a straightforward process using the same color
profiles you learned about in the previous sections. Here’s how to do it:
701
:
Printing on a
Commercial Offset
Press
1. Calibrate your monitor using the tools described earlier (page 667).
If you haven’t calibrated your monitor, soft-proofing is a galactic waste of time.
2. Open an RGB image you intend to print.
You can soft-proof either RGB or CMYK images, but it’s especially cool to proof
an RGB image and see what it will print like in CMYK without having to color-
convert it first.
3. Choose Window➝Arrange➝“New Window for” to create a second window
showing a copy of your image.
Position the windows so they’re side by side by choosing the 2-Up display from
the Application bar’s Arrange Documents menu.
4. Click the right-hand window to activate it and then choose View➝Proof
Setup➝Custom.
5. In the resulting Customize Proof Condition dialog box, turn on the Preview
checkbox (Figure 16-20, top).
6. From the “Device to Simulate” menu, choose the profile for your final printer.
If your image is headed to a printing press, for example, pick your old profile
friend, “U.S. Sheetfed v2”.
7. Choose Perceptual from the Rendering Intent menu and turn on the Black
Point Compensation checkbox.
Perceptual takes into account how humans see color. The Black Point Compen-
sation option makes sure that Photoshop maps your black values and converts
them to blacks in your final print, which helps preserve the contrast of your
original.
8. In the “Display Options (On-Screen)” area, turn on the Simulate Paper Color
checkbox.
Watch your onscreen proof change as you turn this option on and off.
9. Sit back and examine the differences between your left and right windows.
You can apply soft-proofing to other printers like your inkjet printer or a digital
press (see page 705). All you need to achieve good results is a calibrated monitor, an
accurate printer, and a paper-specific profile. That said, soft-proofing isn’t 100 per-
cent accurate, but it’s better than nothing and you’ll almost always find it useful. It’s
also a good tool to help control your client’s expectations, especially when the client
is printing on cheap, low-quality paper.
702
P : T M M
Printing on a
Commercial Offset
Press
Figure 16-20:
Top: Turning on Preview
lets you see the results of
your proof settings without
clicking the OK button.
Bottom: Notice that the
image on the right is
slightly less saturated and
has lower overall contrast
than the original image on
the left (which looks kind
of flat). You can also select
other profiles and see how
they affect the soft-proofing
results.
Printing Color Separations
To avoid running into unexpected printing costs, it’s a good idea to print your
separations (called seps around the water cooler) to make sure another color hasn’t
sneaked its way into your document—especially if you’ve toyed with some spot col-
ors that you’re not going to use. Honestly, though, you probably won’t use Photoshop
to print separations at all—in most cases, you’ll place an RGB or CMYK image in
a page-layout program (like InDesign), along with text and other images, and let
it print the separations. The page-layout program does the final printing using its
print dialog box. However, just in case you ever do need to print separations from
Photoshop, you can visit this book’s Missing CD page at www.missingmanuals.com/
cds for step-by-step instructions.
703
:
Printing on a
Commercial Offset
Press
Printing Proofs
If you’re working in a prepress environment—and especially if you’re not printing
to a digital press (covered in the next section)—you’re often proofing on a different
printer than the one that will print your final document. For example, you might
print a proof using an inkjet, but your final image will print on a commercial offset
printing press. In that situation, your proof printer can print a simulation of what
will happen on the printing press. Simulating an image involves reining in the proof
printer’s much larger color gamut to include only the colors that the printing press
can reproduce. You can prepare a simulation in Photoshop using profiles, along with
the proofing function you learned about in the previous section. Here’s how to do it:
1. Pop open an image and then choose File➝Print.
2. Pick your proofing printer from the Printer pop-up menu.
For this example, choose Epson Stylus Photo R2400.
3. Click the Print Settings button and deactivate the printer’s color management.
In the resulting dialog box, pick your paper dimensions and then be sure to
turn Color Settings off to keep the printer driver from interfering with the col-
or management voodoo you’ve got going on in Photoshop. If you pick Printer
Manages Color from the Color Handling menu in the Print dialog box (dis-
cussed in a moment in step 6), you can manage the color through your printer
driver or RIP (see the box on page 705).
4. Click Save to return to the Print dialog box.
5. Choose Color Management from the pop-up menu at the top right of the
Print dialog box and turn on the Proof option.
This setting lets Photoshop know you intend to print a proof on one printer
(your inkjet printer) and simulate it on another printer, which you can choose
from the Profile pop-up menu shown in Figure 16-21, left.
6. From the Color Handling menu, choose Photoshop Manages Color.
Note: If you choose Printer Manages Color, which you might do if your color-conversion tool is a special
RIP set up for proofing (see the box on page 705 for more on RIPs), Photoshop has zero effect on your
color—all the color conversion occurs at the RIP. You can’t soft-proof your image using the Print dialog
box, but you can still do it using the Proofing tools in the View menu (see the previous section on soft-
proofing).
704
P : T M M
Printing on a
Commercial Offset
Press
Figure 16-21:
Left: Choose Proof in the Color Manage-
ment section to tell Photoshop that you
want to print on one printer as it if were
another.
Right: Turn on the Gamut Warning
checkbox beneath the preview to see
colors that may not print correctly on the
printing press (they appear in gray).
7. From the Printer Profile menu, choose the printer/paper/quality profile for
the printer you’ll use to print the proof.
For this example, choose “SPR2400 on Premium Luster Paper” using the Best
Printer setting.
8. From the Proof Setup menu, pick either Working CMYK or Current Custom
Setup as the proof profile for the print simulation.
Pick the Current Custom Setup (in this case, the “Coated GRACoL 2006” pro-
file mentioned earlier on page 686) to use the Custom soft-proofing profile you
set up in the previous section.
9. Turn on Simulate Paper Color for the best simulation.
10. On the left side of the Print dialog box, turn on all three checkboxes: Match
Print Colors, Gamut Warning, and Show Paper White.
These options let you see an onscreen view of your image that indicates which,
if any, colors might not print on the simulated printer because they’re out-of-
gamut on your GRACoL press (Figure 16-21, right). For the fun of it, test the
Gamut Warning results using both coated and uncoated paper stock to see how
the paper affects the printed image.
11. Click Print and wait eagerly to see what your proof looks like.
Isn’t it amazing what you can do with color profiles? Quick, go tell everyone you
know how cool this stuff is and watch their eyes glaze over.
705
:
Printing on a Digital
Press
Printing on a Digital Press
In the past, when you prepared a document for a commercial printer, you would—
and in many case still do—convert your images to the CMYK color mode (see the
previous section on commercial offset printing) before you inserted them in a page-
layout document and certainly before you fired them off to the printing company.
However, that process is changing because an increasing number of printers also use
digital presses.
Digital presses work just like laser printers or copiers; they use electrostatic charges
to transfer images from cylinders to the print surface. Like commercial offset presses,
digital presses are primarily CMYK printers, but they use toners instead of inks
(which is why they can’t print spot-color inks). Some digital presses, like the Kodak
NexPress, offer additional toner spot-color printing but they’re limited to very spe-
cific colors like red, green, or blue. Rather than being used for special objects like
logos, these additional spot colors typically expand the gamut of the CMYK toners,
much like light cyan and light magenta in inkjet printers. The following sections
explain how to prepare various types of images for a run on a digital press.
Printing RGB Images on a Digital Press
Digital presses handle images much like expanded-gamut inkjet printers (see page
677). Because the RGB to CMYK-Plus conversion occurs at the printing press’s pro-
cessing RIP (see the box below) by using a built-in profile specific to that press and
the paper you’re using, you’ll be dealing with RGB images the whole time instead of
converting them to CMYK. That’s great news because, as you learned at the begin-
ning of this (exhausting!) chapter, RGB mode provides you with the widest range of
printable colors. So if your image is already in RGB mode, you’re good to go.
FReQUeNtLY ASKed QUeStIoN
Meet the RIP
I thought RIP meant “rest in peace.” What the heck does
that have to do with printing?
Quite a lot actually, and it has nothing to do with a funeral
blessing.
The acronym RIP refers to a device known as a Raster Im-
age Processor. It’s a term you’ll often hear tossed around at
commercial printing services (also called service bureaus).
RIPs are processors that convert your image and docu-
ment info into print-ready formats that specific printers and
other output devices understand. You can think of them
as sophisticated and powerful printer drivers (the little
programs that power your home printer). Some RIPs can
convert RGB color-mode files to CMYK, but others prefer
to receive CMYK images. Ask your printing company which
color mode it wants before you send your file.
706
P : T M M
Printing Several
Images on a Page
Printing CMYK Images on a Digital Press
If your images are already in CMYK mode, it’s okay to leave them that way. Most
digital presses recognize CMYK values and print them well enough. That said, you
might want to confirm with your printing company that the press will use your current
CMYK values rather than converting your image to another color mode and then back
to CMYK on the press. (This type of color-shuffling can lead to unpredictable—and
usually terrible—results.) And keep in mind that your CMYK images will be darker
and more saturated if they’re printed on a digital press than if they’re printed on a
conventional, ink-based printing press.
Printing Spot Colors on a Digital Press
Since digital presses don’t print conventional spot-color inks, any spot colors you’ve
assigned in Photoshop or a page-layout program get converted into CMYK or
CMYK-Plus colors, depending on the toners the press uses. This conversion hap-
pens automatically using a built-in spot-to-process color lookup table. Basically,
you’ve got two choices for handling spot colors on a digital press:
• Leave the spot color in Photoshop and let the RIP automatically convert it to
process color.
• Convert the spot color to process color yourself.
Because RIP uses expanded-gamut color lookup tables customized for that printer,
letting it convert the spot color typically yields better results, especially if the digital
press is using one of its additional, digital, spot-color toners to simulate the original
spot-color ink (talk about a tongue-twister).
If you plan on leaving the spot color in your image, be sure you use the name pro-
vided by Photoshop when you created the color. For example, “Pantone 810C” is a
proper color name, whereas “Logo spot color” isn’t. Since the digital press can’t print
standard spot colors, it converts them to CMYK or CMYK-Plus process colors. For
the RIP on the digital press to identify the spot color properly and produce the best
simulation of that color, your spot color needs a standard color name that the RIP
can use to find that color in its little black conversion book (er, color lookup table).
Since these toner-based digital presses are becoming more common in commercial
printing companies, it’s important to know which kind of press your image or docu-
ment will end up on. If it’s destined for one that uses gamut-expanding digital spot
toners, leave your images in RGB mode to take full advantage of the press’s expanded
color gamut.
Printing Several Images on a Page
Sometimes you’ll want to print multiple images on a single page, like if you want
to review them and proof the content or if you’re printing family reunion photos.
707
:
Recap: Stress-Free
Printing Tips
Photoshop used to have three very handy tools to help you quickly and easily orga-
nize, format, and print multiple images on a single page: PDF Presentation, Picture
Package, and Contact Sheet. They were wildly useful, and nary a one of ’em made it
into Photoshop CS4 (much less CS5) though a crippled version of Contact Sheet is
available in Bridge (see Appendix C, online at www.missingmanuals.com/cds).
The good news is that you can download and use CS3 versions of Picture Package
and Contact Sheet as explained in this section. For PDF files, you can use Bridge’s
“Output to PDF” option, explained in Appendix C.
Using Picture Package and Contact Sheet
You can fetch the Picture Package and Contact Sheet plug-ins from Adobe’s web-
site (www.adobe.com) or copy one or both from Photoshop CS3 (if it’s still hanging
around on your hard drive) or CS4 if you’ve done this dance before. If you go the
“snag from a previous version” route, you need to grab a couple of files to make the
plug-ins work. Here’s what you do:
1. Find the Contact Sheet plug-in in the Photoshop CS3 (or CS4)/Plug-Ins/Au-
tomate folder and copy it into the same folder in Photoshop CS5, as shown in
Figure 16-22, top.
2. Copy the entire Layouts folder from Adobe Photoshop CS3➝Presets into
Photoshop CS5’s Presets folder.
Photoshop stores the template presets for both Contact Sheet and Picture Pack-
age in the Layout folder, so you need to grab the whole thing (there’s no Layouts
folder in CS4 or CS5).
3. Restart Photoshop CS5 and then choose File➝Automate➝Contact Sheet II
or Picture Package.
4. In the resulting dialog box, configure either Contact Sheet II or Picture Pack-
age to your heart’s desire.
5. Preview your handiwork, grin smugly at your cleverness, and click Print.
Who knows, maybe Adobe will buckle under the public outcry and include these
two popular tools in some future version! One can always hope, although so far the
old plug-ins work just fine.
Recap: Stress-Free Printing Tips
Congratulations! You’ve just waded through a ton of dense information. Some of it
you’ll remember and some of it you won’t; but, no matter what, it’s here whenever
you need to refer to it. To recap, here’s a quick list of some of the most important tips:
• Calibrate your monitor with an external calibration tool. These tools are the
only way you can accurately view and proof your images onscreen.