Laser Welding Part 4 pot
Bạn đang xem bản rút gọn của tài liệu. Xem và tải ngay bản đầy đủ của tài liệu tại đây (3.22 MB, 20 trang )
Laser Welding54
A 3x beam expander is used in combination with the 100.1 mm triplet lens to obtain a
minimum focus spot size of 12.0 µm. Equation 1 shows how to calculate the minimum spot
size.
Spot size
Lens Focal Lengt
h
Collimator Optics Focal Length* Beam Expantion Factor
* Fiber Diameter
100.1 mm
25 m
m
* 3
* 9
m 12.01
m
(1)
The laser beam is centered with respect to the beam expander and the laser head. The laser
head contains the focusing triplet and can be adjusted using the outer ring. At the bottom of
the cutting head there is a chamber that allows for shielding to flow out through the
welding nozzle. This chamber is sealed by a special cover glass and a rubber gasket.
The determination of the laser beam's focusing position was done by using a laser drilling
technique. One of the fiber laser's particular characteristics is that when a laser pulse is
released, there is an approximately 1,500 W power spike that is output for about 1 µs before
it drops to the steady-state power value of 300 W. By pulsing the laser for a very short time,
approximately 3 µs, we can take advantage of this power spike and create a very high power
density at the focus plane. This enables us to perform laser ablation to form a crater into a
stainless steel plate. The focusing technique utilizes this process, by creating spot welds or
holes at different z-positions, every 10 µm. A picture is taken of each group of welds/holes
and using special calibrated software, the radii are measured and plotted versus the z-focus
position.
Fig. 2. Spot welds or holes at different focusing locations
Since the laser spot size is very different at different focusing positions, the pulsing will
either create very small holes, approximately on the order of the focused beam spot size, or
larger spot welds. When all the radii are plotted, the minimum of the resulting curve shows
the approximate location of the focusing plane. This is a relatively quick and effective way
to find the location of the focus. This technique can be further expanded to obtain the beam
profile along its propagation axis (Harp et al, 2008).
3. Low Speed Laser Welding of Aluminium
3.1 Modeling of an Idealized Welding Process
A 2-D heat conduction model for laser welding is reported in Lankalapalli, Tu, and Gartner
(1996). This model makes several assumptions which significantly reduce its complexity.
The general idea of the model is to calculate the heat conduction over an infinitesimally thin
layer of thickness (depth) dz at a specific distance from the top of the surface (Figure 3).
One of the assumptions made, is that the walls of the keyhole within this layer are
perpendicular to the surface and that heat conducted in the z-direction is much less than the
heat conducted in the radial direction. Therefore, a conical keyhole can be divided into an
infinite number of such infinitesimally thin layers and the depth can be approximated by
cylindrical heat sources of varying radii, moving together at a constant speed in each of
these thin layers. Another assumption made is that there is a quasi-steady state environment
in which a cylindrical surface of radius a, at uniform temperature T
V
, is moving with a
constant speed, v, along the x direction, in an infinite medium initially at constant
temperature, T
0
. Finally, assuming that the thermal properties of the medium are constant
and that the axis of the cylindrical surface passes through the origin of the coordinate
system, the governing differential equations and boundary conditions for the temperature
distribution can be written as:
0
2
2
2
2
x
Tv
y
T
x
T
(2)
222
at ayxTT
V
(3)
y and as ,
0
xTyxT
(4)
where x and y are the surface coordinates, z is the depth coordinate, a is the keyhole radius,
v is the welding speed, is the thermal diffusivity, T
0
is the initial temperature and
V
T
is
the vaporization temperature of the material (Carslaw and Jaeger, 1962).
Fig. 3. Keyhole and the resulting weld profile, in which a work piece is sliced to many thin
layers (Lankalapalli, Tu, and Gartner, 1996)
Low speed laser welding of aluminium alloys using single-mode ber lasers 55
A 3x beam expander is used in combination with the 100.1 mm triplet lens to obtain a
minimum focus spot size of 12.0 µm. Equation 1 shows how to calculate the minimum spot
size.
Spot size
Lens Focal Lengt
h
Collimator Optics Focal Length* Beam Expantion Factor
* Fiber Diameter
100.1 mm
25 m
m
* 3
* 9
m 12.01
m
(1)
The laser beam is centered with respect to the beam expander and the laser head. The laser
head contains the focusing triplet and can be adjusted using the outer ring. At the bottom of
the cutting head there is a chamber that allows for shielding to flow out through the
welding nozzle. This chamber is sealed by a special cover glass and a rubber gasket.
The determination of the laser beam's focusing position was done by using a laser drilling
technique. One of the fiber laser's particular characteristics is that when a laser pulse is
released, there is an approximately 1,500 W power spike that is output for about 1 µs before
it drops to the steady-state power value of 300 W. By pulsing the laser for a very short time,
approximately 3 µs, we can take advantage of this power spike and create a very high power
density at the focus plane. This enables us to perform laser ablation to form a crater into a
stainless steel plate. The focusing technique utilizes this process, by creating spot welds or
holes at different z-positions, every 10 µm. A picture is taken of each group of welds/holes
and using special calibrated software, the radii are measured and plotted versus the z-focus
position.
Fig. 2. Spot welds or holes at different focusing locations
Since the laser spot size is very different at different focusing positions, the pulsing will
either create very small holes, approximately on the order of the focused beam spot size, or
larger spot welds. When all the radii are plotted, the minimum of the resulting curve shows
the approximate location of the focusing plane. This is a relatively quick and effective way
to find the location of the focus. This technique can be further expanded to obtain the beam
profile along its propagation axis (Harp et al, 2008).
3. Low Speed Laser Welding of Aluminium
3.1 Modeling of an Idealized Welding Process
A 2-D heat conduction model for laser welding is reported in Lankalapalli, Tu, and Gartner
(1996). This model makes several assumptions which significantly reduce its complexity.
The general idea of the model is to calculate the heat conduction over an infinitesimally thin
layer of thickness (depth) dz at a specific distance from the top of the surface (Figure 3).
One of the assumptions made, is that the walls of the keyhole within this layer are
perpendicular to the surface and that heat conducted in the z-direction is much less than the
heat conducted in the radial direction. Therefore, a conical keyhole can be divided into an
infinite number of such infinitesimally thin layers and the depth can be approximated by
cylindrical heat sources of varying radii, moving together at a constant speed in each of
these thin layers. Another assumption made is that there is a quasi-steady state environment
in which a cylindrical surface of radius a, at uniform temperature T
V
, is moving with a
constant speed, v, along the x direction, in an infinite medium initially at constant
temperature, T
0
. Finally, assuming that the thermal properties of the medium are constant
and that the axis of the cylindrical surface passes through the origin of the coordinate
system, the governing differential equations and boundary conditions for the temperature
distribution can be written as:
0
2
2
2
2
x
Tv
y
T
x
T
(2)
222
at ayxTT
V
(3)
y and as ,
0
xTyxT
(4)
where x and y are the surface coordinates, z is the depth coordinate, a is the keyhole radius,
v is the welding speed, is the thermal diffusivity, T
0
is the initial temperature and
V
T
is
the vaporization temperature of the material (Carslaw and Jaeger, 1962).
Fig. 3. Keyhole and the resulting weld profile, in which a work piece is sliced to many thin
layers (Lankalapalli, Tu, and Gartner, 1996)
Laser Welding56
After several derivations, the following equation which estimates penetration was found as
(Lankalapalli, Tu, and Gartner, 1996)
6
1
1
0
0
)(
1
)(
i
i
i
V
i
Pe
i
c
TTk
P
d
(5)
where k is the thermal conductivity of the material and c
i
are coefficients to a polynomial fit
to the equation that was evaluated numerically for 100 different values of Pe in the
operating range of 0 - 0.025:
5
6
4
5
3
4
2
321
2
0
),()( PeCPeCPeCPeCPeCCdPeGPeg
(6)
where
1r
0V
V
*
0n
n
1n
nn
)cosPe(
*
TT
TT
r
cos
)Pe(K
)Pe(K
Pe
n
)ncos()Pe(I*e*Pe)Pe,(G
=
=
+
=
=
∑
∞
θθεθ
θ
(7)
0
*)cos*(
0
)cos()*(
)(
)(
*1
*
n
n
n
n
n
rPe
V
V
nrPeK
PeK
PeI
e
TT
TT
(8)
is the closed-form solution in polar coordinates (r,) of the aforementioned governing
differential equation with the specified boundary conditions for the temperature
distribution, where Pe = v*a / (2) is the Péclet number, r
*
= r/a is the normalized radial
coordinate,
n
= 1 for n = 0 and 2 for n 1, I
n
is a modified Bessel function of the first kind, of
order n and K
n
is a modified Bessel function of the second kind of order n. Note that the
above model is not material specific. With proper material parameters and process
parameters incorporated, this model allows for very rapid simulation of the temperature
field at the top surface (Equation 8) and for an estimation of penetration depth (Equation 5).
This model has been validated over a wide range of speed and laser power, different
materials, and different lasers (Lankalapalli, Tu, and Gartner, 1996; Paleocrassas and Tu,
2007), as shown in the next section.
3.2 Model Validation through High Speed Welding of SUS 304
Several SUS 304 specimens, 300 microns thick, were welded at relatively high speeds (200—
1000 mm/s) (Miyamoto, et al., 2003). In order to determine the operating Péclet number,
apart from the welding speed and the thermal diffusivity, the keyhole radius is also
required. Determining the keyhole radius is not trivial. There exists a method (Lankalapalli,
Tu, and Gartner, 1996) to estimate the Péclet number from the weld width. The idea is that a
contour plot of isotherms can be generated for specific Péclet numbers for the top surface
using Equation 8 , and by measuring the width of the curve corresponding to the melting
temperature range, the normalized weld width (w/a) and Péclet number can be correlated.
The normalized weld width is obtained by taking twice the maximum y value (due to
symmetry) of the melting temperature isotherm curve. Therefore, an equation can be
calculated numerically which can be used to determine the Péclet number at the surface of
the specimen, for a corresponding weld width.
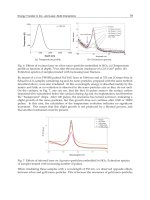
Figure 4 shows the model prediction compared to the experimental results from Miyamoto
et al (2003). The model predicts a satisfactory trend of penetration change versus the Péclet
number for different laser powers. However, the data of a specific laser power usually
match the predictions of a lower laser power. For example, the data of 170 W laser power
match the predictions of 130 W laser power, data of 130 W match better with prediction at
90 W, etc. Based on this observation, it can be stated that approximately 70-80% of laser
power is absorbed. This absorption is relatively low, likely due to the very high welding
speed.
Fig. 4. Theoretical estimate vs. experimentally measured penetration depth in SUS 304.
3.3 Model validation using low speed welding of AA 7075-T6
Figure 5 presents the data/simulation comparison based on the same model for low speed
welding of AA7075-T6. As in Figure 4, the model predicts a satisfactory trend of penetration
versus the Péclet number. The laser beam absorption is about 90% for welding speeds from
2 mm/s to 10 mm/s. Note that Figures 4 and 5 cover a wide range of Péclet numbers (from
0.5 to 2.5 in Figure 4 and 0.001 to 0.08 in Figure 5). The absorption in Figure 5 is higher than
those in Figure 4, likely due to slower welding speed and deeper penetration even though
stainless steel is used in Figure 4, while aluminium is used in Figure 5. Once keyhole is
formed, the laser beam is absorbed efficiently. For those conditions in Figure 4 with very
high welding speeds, the keyhole is shallower and likely tilted to reflect beam power
(Fabbro and Chouf, 2000).
However, the point corresponding to 1 mm/s shows a significant decrease in penetration,
with its absorbed power being only 68% of the input power. Also, by observing the cross-
Low speed laser welding of aluminium alloys using single-mode ber lasers 57
After several derivations, the following equation which estimates penetration was found as
(Lankalapalli, Tu, and Gartner, 1996)
6
1
1
0
0
)(
1
)(
i
i
i
V
i
Pe
i
c
TTk
P
d
(5)
where k is the thermal conductivity of the material and c
i
are coefficients to a polynomial fit
to the equation that was evaluated numerically for 100 different values of Pe in the
operating range of 0 - 0.025:
5
6
4
5
3
4
2
321
2
0
),()( PeCPeCPeCPeCPeCCdPeGPeg
(6)
where
1r
0V
V
*
0n
n
1n
nn
)cosPe(
*
TT
TT
r
cos
)Pe(K
)Pe(K
Pe
n
)ncos()Pe(I*e*Pe)Pe,(G
=
=
+
=
=
∑
∞
θθεθ
θ
(7)
0
*)cos*(
0
)cos()*(
)(
)(
*1
*
n
n
n
n
n
rPe
V
V
nrPeK
PeK
PeI
e
TT
TT
(8)
is the closed-form solution in polar coordinates (r,) of the aforementioned governing
differential equation with the specified boundary conditions for the temperature
distribution, where Pe = v*a / (2) is the Péclet number, r
*
= r/a is the normalized radial
coordinate,
n
= 1 for n = 0 and 2 for n 1, I
n
is a modified Bessel function of the first kind, of
order n and K
n
is a modified Bessel function of the second kind of order n. Note that the
above model is not material specific. With proper material parameters and process
parameters incorporated, this model allows for very rapid simulation of the temperature
field at the top surface (Equation 8) and for an estimation of penetration depth (Equation 5).
This model has been validated over a wide range of speed and laser power, different
materials, and different lasers (Lankalapalli, Tu, and Gartner, 1996; Paleocrassas and Tu,
2007), as shown in the next section.
3.2 Model Validation through High Speed Welding of SUS 304
Several SUS 304 specimens, 300 microns thick, were welded at relatively high speeds (200—
1000 mm/s) (Miyamoto, et al., 2003). In order to determine the operating Péclet number,
apart from the welding speed and the thermal diffusivity, the keyhole radius is also
required. Determining the keyhole radius is not trivial. There exists a method (Lankalapalli,
Tu, and Gartner, 1996) to estimate the Péclet number from the weld width. The idea is that a
contour plot of isotherms can be generated for specific Péclet numbers for the top surface
using Equation 8 , and by measuring the width of the curve corresponding to the melting
temperature range, the normalized weld width (w/a) and Péclet number can be correlated.
The normalized weld width is obtained by taking twice the maximum y value (due to
symmetry) of the melting temperature isotherm curve. Therefore, an equation can be
calculated numerically which can be used to determine the Péclet number at the surface of
the specimen, for a corresponding weld width.
Figure 4 shows the model prediction compared to the experimental results from Miyamoto
et al (2003). The model predicts a satisfactory trend of penetration change versus the Péclet
number for different laser powers. However, the data of a specific laser power usually
match the predictions of a lower laser power. For example, the data of 170 W laser power
match the predictions of 130 W laser power, data of 130 W match better with prediction at
90 W, etc. Based on this observation, it can be stated that approximately 70-80% of laser
power is absorbed. This absorption is relatively low, likely due to the very high welding
speed.
Fig. 4. Theoretical estimate vs. experimentally measured penetration depth in SUS 304.
3.3 Model validation using low speed welding of AA 7075-T6
Figure 5 presents the data/simulation comparison based on the same model for low speed
welding of AA7075-T6. As in Figure 4, the model predicts a satisfactory trend of penetration
versus the Péclet number. The laser beam absorption is about 90% for welding speeds from
2 mm/s to 10 mm/s. Note that Figures 4 and 5 cover a wide range of Péclet numbers (from
0.5 to 2.5 in Figure 4 and 0.001 to 0.08 in Figure 5). The absorption in Figure 5 is higher than
those in Figure 4, likely due to slower welding speed and deeper penetration even though
stainless steel is used in Figure 4, while aluminium is used in Figure 5. Once keyhole is
formed, the laser beam is absorbed efficiently. For those conditions in Figure 4 with very
high welding speeds, the keyhole is shallower and likely tilted to reflect beam power
(Fabbro and Chouf, 2000).
However, the point corresponding to 1 mm/s shows a significant decrease in penetration,
with its absorbed power being only 68% of the input power. Also, by observing the cross-
Laser Welding58
sections of the welds at three different processing speeds, it can be seen that the 1 mm/s
weld is significantly different from the other two. The 1 mm/s weld shows a significant
decrease in aspect ratio. In some cross-sections, large blowholes and porosities were present.
The other two welds show more of a conical shaped cross-section, a higher aspect ratio and
the absence of any major defects.
Fig. 5. Model validation for low speed welding of AA 7075-T6
This observation leads to the suspicion that at extremely low speeds the process breaks
down and the laser energy is not coupled as efficiently. If this is the case, the model no
longer applies to speeds below 2 mm/s.
3.4 Effect of Focusing Positions on Low Speed Welding
Figure 6 shows the change in weld penetration as the focusing position changes (positive
indicating the beam is focused into the workpiece).
The general trend is that the best focus position corresponds with the maximum weld depth.
This goes along with the recommendation for most welding processes, which is that the
focus should be positioned at the desired weld depth (Steen, 2003). Another observation that
can be made is that, as the beam is focused past the maximum depth location, the
penetration drops at a much higher rate, with the exception of the 10 mm/s condition. This
is an indication that the slower speeds are much more sensitive to focusing changes, which
means that higher focusing is required to produce adequate and repeatable weld
penetrations.
Specifically, for the 10 mm/s processing speed, the maximum weld penetration is
approximately both ~ 0.8 mm and this occurs when the focus is approximately 0.9 mm into
the workpiece. For the 2 and 4 mm/s speeds the weld penetration is deepest (~ 1 mm) when
the beam is focused approximately 1 mm into the workpiece. The difference in weld
penetration (~ 0.8 mm) between these two speeds is not much, with the 4 mm/s weld being
slightly deeper. However, the 1 mm/s welds show a significant drop in penetration.
Fig. 6. Effects of focusing position on penetration for different welding speeds.
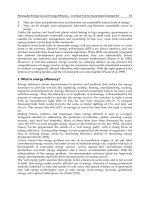
3.5 Energy-Based Process Characterization
Paleocrassas and Tu (2007) proposed metrics to characterize welding process efficiency. One
such metric was defined as keyhole fluence per weld length (KF) which has since been
slightly modified and is redefined as follows:
vA
P
lv
l
A
P
b
i
w
w
b
i
1
KF
(9)
where
i
P
is total incident power,
b
A
is the outer surface area of the immersed laser beam
(as calculated from the beam profile approximation, also shown in Figure 8.7),
w
l
is the
length of the weld and
v
is the processing velocity. This metric represents the total
irradiated energy density per weld length.
As mentioned before, due to different types of power losses during welding, the total
irradiated energy density per weld length (KF) from the laser is not going to be completely
absorbed by the material. Therefore it is of interest to determine the “weld efficiency” by
looking at the total energy used to create the weld and how “well” it is used; for example,
the same amount of absorbed weld energy could translate into a shallow and wide weld, or
a deep and narrow weld.
Specific weld energy per weld length was also defined by Equation 10 to define how well
the amount of energy that used to created the weld was used. In this paper, this metric is
denoted as Effective Weld Energy (EWE):
Low speed laser welding of aluminium alloys using single-mode ber lasers 59
sections of the welds at three different processing speeds, it can be seen that the 1 mm/s
weld is significantly different from the other two. The 1 mm/s weld shows a significant
decrease in aspect ratio. In some cross-sections, large blowholes and porosities were present.
The other two welds show more of a conical shaped cross-section, a higher aspect ratio and
the absence of any major defects.
Fig. 5. Model validation for low speed welding of AA 7075-T6
This observation leads to the suspicion that at extremely low speeds the process breaks
down and the laser energy is not coupled as efficiently. If this is the case, the model no
longer applies to speeds below 2 mm/s.
3.4 Effect of Focusing Positions on Low Speed Welding
Figure 6 shows the change in weld penetration as the focusing position changes (positive
indicating the beam is focused into the workpiece).
The general trend is that the best focus position corresponds with the maximum weld depth.
This goes along with the recommendation for most welding processes, which is that the
focus should be positioned at the desired weld depth (Steen, 2003). Another observation that
can be made is that, as the beam is focused past the maximum depth location, the
penetration drops at a much higher rate, with the exception of the 10 mm/s condition. This
is an indication that the slower speeds are much more sensitive to focusing changes, which
means that higher focusing is required to produce adequate and repeatable weld
penetrations.
Specifically, for the 10 mm/s processing speed, the maximum weld penetration is
approximately both ~ 0.8 mm and this occurs when the focus is approximately 0.9 mm into
the workpiece. For the 2 and 4 mm/s speeds the weld penetration is deepest (~ 1 mm) when
the beam is focused approximately 1 mm into the workpiece. The difference in weld
penetration (~ 0.8 mm) between these two speeds is not much, with the 4 mm/s weld being
slightly deeper. However, the 1 mm/s welds show a significant drop in penetration.
Fig. 6. Effects of focusing position on penetration for different welding speeds.
3.5 Energy-Based Process Characterization
Paleocrassas and Tu (2007) proposed metrics to characterize welding process efficiency. One
such metric was defined as keyhole fluence per weld length (KF) which has since been
slightly modified and is redefined as follows:
vA
P
lv
l
A
P
b
i
w
w
b
i
1
KF
(9)
where
i
P
is total incident power,
b
A
is the outer surface area of the immersed laser beam
(as calculated from the beam profile approximation, also shown in Figure 8.7),
w
l
is the
length of the weld and
v
is the processing velocity. This metric represents the total
irradiated energy density per weld length.
As mentioned before, due to different types of power losses during welding, the total
irradiated energy density per weld length (KF) from the laser is not going to be completely
absorbed by the material. Therefore it is of interest to determine the “weld efficiency” by
looking at the total energy used to create the weld and how “well” it is used; for example,
the same amount of absorbed weld energy could translate into a shallow and wide weld, or
a deep and narrow weld.
Specific weld energy per weld length was also defined by Equation 10 to define how well
the amount of energy that used to created the weld was used. In this paper, this metric is
denoted as Effective Weld Energy (EWE):
Laser Welding60
222
E
profile
weld
profile
weld
profile
weld
r
A
r
V
r
m
WE
(10)
where m
weld
, V
weld
, A
weld
, and r
profile
are the mass, volume and radius of the top profile (or half
of the weld width) of the weld (Figure 7), respectively, ρ is the density and ζ is the specific
energy of AA 7075-T6, which is determined by
Fusion ofHeat Latent TC
p
(11)
where
p
C
is the specific heat capacity and
T
is the temperature change between ambient
temperature and the melting point.
Figure 8 was generated by applying the above energy based process characterization to the
experimental data. The EWE of each data point is plotted with respect to the input KF. There
are four sets of data and each set is connected by a different colored line, corresponding to a
different processing speed. The 1, 2, 4 and 10 mm/s data are shown in red, green, black and
cyan, respectively. Each data point in each set corresponds to a weld created with a different
focusing position. The number next to each data point represents how deep the beam is
focused into the workpiece, in thousands of an inch. The first observation that can be made
is that for each processing speed, the point that has the highest EWE is the one where the
beam was focused at approximately 1 mm (.040 in.) into the workpiece, which indicates that
it is the focusing condition that produces the best energy coupling. This is the case because
the majority of the vapor pressure used to maintain a certain depth is created at the bottom
of the keyhole.
Fig. 7. Schematics showing the submerged beam surface area (A
b
), the weld’s cross-sectional
area (A
w
) and the profile radius (r
profile
)
Therefore, placing the focus at the desired weld depth ensures that the maximum power
density will be at the bottom of the keyhole, creating the majority of the metal vapor.
However, focusing too deep can have an adverse effect on EWE because a minimum power
density at the surface is required to create and maintain vaporization of the metal. This
explains why the EWE decreases when the laser beam is focused too deep.
By examining the processing speed trend, it was observed that as the speed decreases, the
EWE increases, until the speed drops below 2 mm/s. It can therefore be seen that the
process is not only dependent on the amount of KF, but also in the manner it is deposited
into the workpiece. This leads to the examination of the efficiency of the process.
Global Efficiency: One of the primary concerns in any process involving energy exchange is
how efficient it is; in this case, that is, how much of the irradiated energy density per weld
length was translated into a desirable, high aspect ratio weld. This is where we can define
the “global efficiency” of the process. It is simply the ratio between EWE and KF, as stated in
Equation 12.
Global Efficiency
EWE
KF
(12)
With this metric, we can determine the efficiency at each speed and at each focusing
position. If we look at the actual percentages, we will see that the highest efficiency does not
exceed 3 percent of the total KF. This might seem extremely low at first, but it is important
to remember that this number corresponds only to the energy used to create the weld itself.
Fig. 8. Variation of effective weld energy with respect to keyhole fluence
Higher
Efficien
Lower
Efficienc
y
Global
Efficien
Local
Efficiency
Low speed laser welding of aluminium alloys using single-mode ber lasers 61
222
E
profile
weld
profile
weld
profile
weld
r
A
r
V
r
m
WE
(10)
where m
weld
, V
weld
, A
weld
, and r
profile
are the mass, volume and radius of the top profile (or half
of the weld width) of the weld (Figure 7), respectively, ρ is the density and ζ is the specific
energy of AA 7075-T6, which is determined by
Fusion ofHeat Latent
TC
p
(11)
where
p
C
is the specific heat capacity and
T
is the temperature change between ambient
temperature and the melting point.
Figure 8 was generated by applying the above energy based process characterization to the
experimental data. The EWE of each data point is plotted with respect to the input KF. There
are four sets of data and each set is connected by a different colored line, corresponding to a
different processing speed. The 1, 2, 4 and 10 mm/s data are shown in red, green, black and
cyan, respectively. Each data point in each set corresponds to a weld created with a different
focusing position. The number next to each data point represents how deep the beam is
focused into the workpiece, in thousands of an inch. The first observation that can be made
is that for each processing speed, the point that has the highest EWE is the one where the
beam was focused at approximately 1 mm (.040 in.) into the workpiece, which indicates that
it is the focusing condition that produces the best energy coupling. This is the case because
the majority of the vapor pressure used to maintain a certain depth is created at the bottom
of the keyhole.
Fig. 7. Schematics showing the submerged beam surface area (A
b
), the weld’s cross-sectional
area (A
w
) and the profile radius (r
profile
)
Therefore, placing the focus at the desired weld depth ensures that the maximum power
density will be at the bottom of the keyhole, creating the majority of the metal vapor.
However, focusing too deep can have an adverse effect on EWE because a minimum power
density at the surface is required to create and maintain vaporization of the metal. This
explains why the EWE decreases when the laser beam is focused too deep.
By examining the processing speed trend, it was observed that as the speed decreases, the
EWE increases, until the speed drops below 2 mm/s. It can therefore be seen that the
process is not only dependent on the amount of KF, but also in the manner it is deposited
into the workpiece. This leads to the examination of the efficiency of the process.
Global Efficiency: One of the primary concerns in any process involving energy exchange is
how efficient it is; in this case, that is, how much of the irradiated energy density per weld
length was translated into a desirable, high aspect ratio weld. This is where we can define
the “global efficiency” of the process. It is simply the ratio between EWE and KF, as stated in
Equation 12.
Global Efficiency
EWE
KF
(12)
With this metric, we can determine the efficiency at each speed and at each focusing
position. If we look at the actual percentages, we will see that the highest efficiency does not
exceed 3 percent of the total KF. This might seem extremely low at first, but it is important
to remember that this number corresponds only to the energy used to create the weld itself.
Fig. 8. Variation of effective weld energy with respect to keyhole fluence
Higher
Efficien
Lower
Efficienc
y
Global
Efficien
Local
Efficiency
Laser Welding62
During the process, a substantial portion of the absorbed power is conducted away.
Therefore the relative change in global efficiency is of more interest than the actual number
itself. Looking at the four speeds we observe that the global efficiency decreases slightly
from the 10 mm/s data to the 4 mm/s and then slightly lower to 2 mm/s, but drops
significantly at the 1 mm/s data. This is another indication that even though there is an
increase in KF, the energy is not used as effectively to create a deep and narrow weld. This
phenomenon, i.e. the process breakdown of laser welding at extremely low speeds, requires
further investigation to explain the reasons behind this drastic change.
Local Efficiency: Another metric we can define to measure the efficiency between different
focusing points for a specific processing speed is the “local efficiency.” The slopes of these
lines can be defined as a “local efficiency” which signifies how efficient the process is, as the
focusing changes and the KF increases. In other words it is the ratio of the change in EWE
and the change in KF for a particular processing speed (Equation 13).
dKF
dEWE
Efficiency Local
(13)
It is apparent that the local efficiency is only positive between the weld with the best
focusing position and the one that is focused slightly deeper. Again, this is evidence that
increasing the KF is not enough to create a good weld, it has to be deposited correctly. It
seems that this happens because, when the beam is focused too deep, the incident power
density at the surface of the workpiece is not sufficient to create enough vaporization to
sustain a keyhole. The process, therefore, switches to conduction welding mode, where a
weld is created solely from melting, resulting in a shallow and wide weld. Conversely, if the
focus is too close to the surface of the workpiece, the process is again inefficient because the
power density at the bottom of the keyhole is too low and cannot sustain the vaporization
required for a deeper keyhole.
4. Inherent Process Instability
Table (2) lists the EWEs, global efficiencies, and power efficiencies for the data shown in
Figure (8). They clearly showed that the welding became less efficient (from 2.25 % to 0.25 %
as the speed drops from 10 mm/s to 1 mm/s) and the quality and aspect ratio of the weld
started deteriorating after the processing speed was decreased below 2 mm/s. Large
porosities were observed in these very low speed welds in aluminium. This phenomenon is
denoted as inherent process instability. In the following sections, the potential contributors
of this instability are examined.
Speed (mm/s) EWE (J/mm
3
) Power Efficiency “Global” Efficiency
10 312.0 ~ 90 % ~ 2.25 %
4 385.0 ~ 90 % ~ 1.19 %
2 403.4 ~ 90 % ~ 0.62 %
1 340.0 ~ 68 % ~ 0.25 %
Table 2. Decrease in EWE and efficiency when speed drops to 1 mm/s.
4.1 Laser Power Distribution
Assuming the laser welding process reaches a quasi-steady state condition, the power
distribution, rather than energy distribution, is used to break down the laser power into
several components:
scatplasmavaprefevapcondweldin
PPPPPPP
/
)1(
(14)
where
in
P
is the input power from the laser radiation,
weld
P
is the power used to form the
weld similar to the definition of EWE,
cond
P
is the power absorbed by the workpiece and
then conducted away into the bulk material,
evap
P
is the power absorbed to produce
vapor/plasma,
ref
P
is the power reflected away by the workpiece,
/vap plasma
P
is the power
absorbed by the vapor/plasma plume hovering above the workpiece,
scat
P
is the power
which is scattered away by the vapor/plasma, and
is the fraction of the power absorbed
by the vapor/plasma that is re-radiated on the workpiece and absorbed by the workpiece.
All six terms on the right hand side of Equation 14 are unknown. No attempt is made to
solve this equation or to measure each of these unknowns precisely. Dividing both sides
by
in
P
, Equation 14 becomes
in
scat
in
plasma/vap
in
ref
in
evap
in
cond
in
weld
P
P
P
P)1(
P
P
P
P
P
P
P
P
1 +++++=
- α
(15)
Each term on the right-hand side of Equation 15 represents the respective percentage of the
laser input power. Based on Table (2), it has been confirmed that
inweld
P/P
drops
significantly, which should result in changes in some of the rest of the five terms. Therefore,
instead of determining the precise value of each term in Equation 15, the attempt is made to
determine how the rest of the five terms change as the welding speed drops from 10 mm/s
to 1 mm/s.
4.2 Laser Beam Reflectivity Measurements
Among those losses in Equation 14, we first investigate the reflective loss,
ref
P
, to determine
if it is a major factor to cause process instability.
Figure (9) shows the reflected laser beam measured by a photodiode at different welding
speeds. For each test, the laser beam is first irradiated at the target, remaining stationary for
5 seconds, before actual welding started at speeds from 10 mm/s to 1 mm/s. In every plot,
during this 5 second duration in the beginning of the process, there is a large, sudden
increase in intensity which gradually dies off to almost a zero state. The substantial reflected
laser radiation in the beginning is due to the beam being reflected by the flat surface of the
workpiece. As a keyhole forms, the laser beam penetrates deeper into the workpiece and
eventually is absorbed by multiple reflections by the keyhole wall. As a deep keyhole acts
like a black body, trapping nearly 100 percent of the laser beam, no reflected laser radiation
is detected after about 2 seconds, when the keyhole becomes deep enough. After 5 seconds
have passed, the workpiece is then translated at the specified welding speed.
When the workpiece begins to move, the reflected signal appears, again, as a series of high
frequency spikes, but with a low average intensity, between 0.25 and 0.4 (a.u.). This is pretty
Low speed laser welding of aluminium alloys using single-mode ber lasers 63
During the process, a substantial portion of the absorbed power is conducted away.
Therefore the relative change in global efficiency is of more interest than the actual number
itself. Looking at the four speeds we observe that the global efficiency decreases slightly
from the 10 mm/s data to the 4 mm/s and then slightly lower to 2 mm/s, but drops
significantly at the 1 mm/s data. This is another indication that even though there is an
increase in KF, the energy is not used as effectively to create a deep and narrow weld. This
phenomenon, i.e. the process breakdown of laser welding at extremely low speeds, requires
further investigation to explain the reasons behind this drastic change.
Local Efficiency: Another metric we can define to measure the efficiency between different
focusing points for a specific processing speed is the “local efficiency.” The slopes of these
lines can be defined as a “local efficiency” which signifies how efficient the process is, as the
focusing changes and the KF increases. In other words it is the ratio of the change in EWE
and the change in KF for a particular processing speed (Equation 13).
dKF
dEWE
Efficiency Local
(13)
It is apparent that the local efficiency is only positive between the weld with the best
focusing position and the one that is focused slightly deeper. Again, this is evidence that
increasing the KF is not enough to create a good weld, it has to be deposited correctly. It
seems that this happens because, when the beam is focused too deep, the incident power
density at the surface of the workpiece is not sufficient to create enough vaporization to
sustain a keyhole. The process, therefore, switches to conduction welding mode, where a
weld is created solely from melting, resulting in a shallow and wide weld. Conversely, if the
focus is too close to the surface of the workpiece, the process is again inefficient because the
power density at the bottom of the keyhole is too low and cannot sustain the vaporization
required for a deeper keyhole.
4. Inherent Process Instability
Table (2) lists the EWEs, global efficiencies, and power efficiencies for the data shown in
Figure (8). They clearly showed that the welding became less efficient (from 2.25 % to 0.25 %
as the speed drops from 10 mm/s to 1 mm/s) and the quality and aspect ratio of the weld
started deteriorating after the processing speed was decreased below 2 mm/s. Large
porosities were observed in these very low speed welds in aluminium. This phenomenon is
denoted as inherent process instability. In the following sections, the potential contributors
of this instability are examined.
Speed (mm/s) EWE (J/mm
3
) Power Efficiency “Global” Efficiency
10 312.0 ~ 90 % ~ 2.25 %
4 385.0 ~ 90 % ~ 1.19 %
2 403.4 ~ 90 % ~ 0.62 %
1 340.0 ~ 68 % ~ 0.25 %
Table 2. Decrease in EWE and efficiency when speed drops to 1 mm/s.
4.1 Laser Power Distribution
Assuming the laser welding process reaches a quasi-steady state condition, the power
distribution, rather than energy distribution, is used to break down the laser power into
several components:
scatplasmavaprefevapcondweldin
PPPPPPP
/
)1(
(14)
where
in
P
is the input power from the laser radiation,
weld
P
is the power used to form the
weld similar to the definition of EWE,
cond
P
is the power absorbed by the workpiece and
then conducted away into the bulk material,
evap
P
is the power absorbed to produce
vapor/plasma,
ref
P
is the power reflected away by the workpiece,
/vap plasma
P
is the power
absorbed by the vapor/plasma plume hovering above the workpiece,
scat
P
is the power
which is scattered away by the vapor/plasma, and
is the fraction of the power absorbed
by the vapor/plasma that is re-radiated on the workpiece and absorbed by the workpiece.
All six terms on the right hand side of Equation 14 are unknown. No attempt is made to
solve this equation or to measure each of these unknowns precisely. Dividing both sides
by
in
P
, Equation 14 becomes
in
scat
in
plasma/vap
in
ref
in
evap
in
cond
in
weld
P
P
P
P)1(
P
P
P
P
P
P
P
P
1 +++++=
- α
(15)
Each term on the right-hand side of Equation 15 represents the respective percentage of the
laser input power. Based on Table (2), it has been confirmed that
inweld
P/P
drops
significantly, which should result in changes in some of the rest of the five terms. Therefore,
instead of determining the precise value of each term in Equation 15, the attempt is made to
determine how the rest of the five terms change as the welding speed drops from 10 mm/s
to 1 mm/s.
4.2 Laser Beam Reflectivity Measurements
Among those losses in Equation 14, we first investigate the reflective loss,
ref
P
, to determine
if it is a major factor to cause process instability.
Figure (9) shows the reflected laser beam measured by a photodiode at different welding
speeds. For each test, the laser beam is first irradiated at the target, remaining stationary for
5 seconds, before actual welding started at speeds from 10 mm/s to 1 mm/s. In every plot,
during this 5 second duration in the beginning of the process, there is a large, sudden
increase in intensity which gradually dies off to almost a zero state. The substantial reflected
laser radiation in the beginning is due to the beam being reflected by the flat surface of the
workpiece. As a keyhole forms, the laser beam penetrates deeper into the workpiece and
eventually is absorbed by multiple reflections by the keyhole wall. As a deep keyhole acts
like a black body, trapping nearly 100 percent of the laser beam, no reflected laser radiation
is detected after about 2 seconds, when the keyhole becomes deep enough. After 5 seconds
have passed, the workpiece is then translated at the specified welding speed.
When the workpiece begins to move, the reflected signal appears, again, as a series of high
frequency spikes, but with a low average intensity, between 0.25 and 0.4 (a.u.). This is pretty
Laser Welding64
common for processing speeds 10, 4 and 2 mm/s. The spikes in the signals can be attributed
to the fact that when the laser beam moves over a solid front, the reflectivity suddenly
increases; as soon as that happens, the keyhole is created and it absorbs the beam
completely, which causes a decrease in measured intensity. This pattern repeats at a
frequency of approximately 30 Hz.
The 1 mm/s processing speed shows a significantly different type of reflected signal, where
the spikes are not as strong, but the average intensity of its signal was significantly larger
than the other processing conditions’ signals, namely approximately 1.4 (a.u.).
On the other hand, when the processing speed is 1 mm/s, the beam does not necessarily
move over a solid front, since the molten pool is large. This causes a reduction in the
strength of the spikes, because the molten metal has a higher absorptivity than the solid. The
increase in average intensity can be explained by the fact that the keyhole is much shallower
and wider. Therefore, much more of the laser beam is reflected back, due to the inability of
the shallow keyhole to “trap” the laser beam entirely through multiple reflections.
Fig. 9. Measured reflected laser radiations at an angle above the workpiece at different
welding speeds.
From Figure (9) it is concluded that the power loss due to reflectivity increases significantly
when the speed is lowered down to 1 mm/s. Therefore, the term,
inref
P/P
, in Equation 15
increases. However, this does not necessarily prove that this increase in reflectivity is the
cause of the reduction of
inweld
P/P
in Equation 15.
4.3 Vapor/Plasma Characterization
We conducted a spectroscopic analysis to identify the vapor/plasma effect on the
distribution of laser power. The key question is to find out if the vapor/plasma plume,
which hovers over the keyhole, is optically “thick” enough to absorb or scatter the laser
beam, resulting in reduced laser radiation to reach the work piece. In order to have
sufficient signal to noise ratio, we conducted spot welding with a peak power of 1,500 W,
which is five times higher than the normal CW welding at 300 W. Even with this much
higher peak power, only three Cr I lines (Figure 10) could be detected in the spectroscopic
experiment using the Ocean Optics HR4000 spectrometer. Even so, it was deemed
worthwhile to come up with an electron temperature estimation using the Boltzmann plot
method. Based on the slope of the fitted line, the resulting temperature estimation is
approximately 1,200 degrees Kelvin. This value is well below the vaporization temperature
of aluminium (~ 3,275 Kelvin), which indicates that the calculation is not valid. This is
probably because the upper energy levels of the measured chromium lines are very close to
each other, thus introducing significant errors. Nevertheless, based on this calculation and
the fact that the rest of the Cr I lines with higher upper energy levels could not be detected,
it is likely that the temperature of the vapor/plasma is fairly low.
To confirm the above finding, we reviewed available literature on the vapor/plasma
temperature for Nd:YAG (similar wavelength as fiber laser) laser welding of aluminium
alloys. Kim and Matsunawa (1996) used a pulse shapeable YAG laser with irradiations of up
to 1 MW/cm
2
on 5000 series aluminium alloys and determined that the vapor/plasma
plume was very weakly ionized, with approximate temperatures around 3280 K (barely
above the vaporization temperature of aluminium) and electron densities of approximately
1.85
.
10
13
cm
-3
. Kim et al. (2004) did a similar study and found similar results for even higher
irradiations (~ 32 MW/ cm
2
), namely the vapor/plasma temperature was very close to the
boiling point of aluminium.
Fig. 10. Aluminium vapor/plasma spectrum for 1 ms pulsing at 100 % power (peak power ~
1,500 W).
Another group (Lenk et al., 1996) experimented with a Q-switched Nd:YAG laser, operating at
power densities of 300 MW/ cm
2
, determined electron temperatures of approximately 14,000 K
and electron densities of 3
.
10
16
cm
-3
, and concluded that they “are not high enough for significant
absorption by inverse bremsstrahlung.” There have been several other studies (Barthélemy et al.,
2005, Lu et al., 1999, Knudtson et al., 1987) that have found electron temperatures ranging from
5,000-15,000 K and electron densities up to the order of 10
18
cm
-3
, all reaching the same
conclusion, namely that IB absorption is not significant. Therefore, it is reasonable to say that the
vapor/plasma can be considered to be optically thin. This leads to the conclusion that the last
two terms of Equation 15 are of low values and, therefore, their changes, if any, should not be a
major factor in the reduction of
inweld
P/P
. This conclusion is different from CO
2
laser welding in
which vapor/plasma can grow larger and hotter, and becomes optically thick for the CO
2
laser
beam (Tu et al., 2002 and 2003).
The remaining two terms in Equation 15,
incond
P/P
and
inevap
P/P
, cannot be identified separately.
Their changes are considered in the next section.
Low speed laser welding of aluminium alloys using single-mode ber lasers 65
common for processing speeds 10, 4 and 2 mm/s. The spikes in the signals can be attributed
to the fact that when the laser beam moves over a solid front, the reflectivity suddenly
increases; as soon as that happens, the keyhole is created and it absorbs the beam
completely, which causes a decrease in measured intensity. This pattern repeats at a
frequency of approximately 30 Hz.
The 1 mm/s processing speed shows a significantly different type of reflected signal, where
the spikes are not as strong, but the average intensity of its signal was significantly larger
than the other processing conditions’ signals, namely approximately 1.4 (a.u.).
On the other hand, when the processing speed is 1 mm/s, the beam does not necessarily
move over a solid front, since the molten pool is large. This causes a reduction in the
strength of the spikes, because the molten metal has a higher absorptivity than the solid. The
increase in average intensity can be explained by the fact that the keyhole is much shallower
and wider. Therefore, much more of the laser beam is reflected back, due to the inability of
the shallow keyhole to “trap” the laser beam entirely through multiple reflections.
Fig. 9. Measured reflected laser radiations at an angle above the workpiece at different
welding speeds.
From Figure (9) it is concluded that the power loss due to reflectivity increases significantly
when the speed is lowered down to 1 mm/s. Therefore, the term,
inref
P/P
, in Equation 15
increases. However, this does not necessarily prove that this increase in reflectivity is the
cause of the reduction of
inweld
P/P
in Equation 15.
4.3 Vapor/Plasma Characterization
We conducted a spectroscopic analysis to identify the vapor/plasma effect on the
distribution of laser power. The key question is to find out if the vapor/plasma plume,
which hovers over the keyhole, is optically “thick” enough to absorb or scatter the laser
beam, resulting in reduced laser radiation to reach the work piece. In order to have
sufficient signal to noise ratio, we conducted spot welding with a peak power of 1,500 W,
which is five times higher than the normal CW welding at 300 W. Even with this much
higher peak power, only three Cr I lines (Figure 10) could be detected in the spectroscopic
experiment using the Ocean Optics HR4000 spectrometer. Even so, it was deemed
worthwhile to come up with an electron temperature estimation using the Boltzmann plot
method. Based on the slope of the fitted line, the resulting temperature estimation is
approximately 1,200 degrees Kelvin. This value is well below the vaporization temperature
of aluminium (~ 3,275 Kelvin), which indicates that the calculation is not valid. This is
probably because the upper energy levels of the measured chromium lines are very close to
each other, thus introducing significant errors. Nevertheless, based on this calculation and
the fact that the rest of the Cr I lines with higher upper energy levels could not be detected,
it is likely that the temperature of the vapor/plasma is fairly low.
To confirm the above finding, we reviewed available literature on the vapor/plasma
temperature for Nd:YAG (similar wavelength as fiber laser) laser welding of aluminium
alloys. Kim and Matsunawa (1996) used a pulse shapeable YAG laser with irradiations of up
to 1 MW/cm
2
on 5000 series aluminium alloys and determined that the vapor/plasma
plume was very weakly ionized, with approximate temperatures around 3280 K (barely
above the vaporization temperature of aluminium) and electron densities of approximately
1.85
.
10
13
cm
-3
. Kim et al. (2004) did a similar study and found similar results for even higher
irradiations (~ 32 MW/ cm
2
), namely the vapor/plasma temperature was very close to the
boiling point of aluminium.
Fig. 10. Aluminium vapor/plasma spectrum for 1 ms pulsing at 100 % power (peak power ~
1,500 W).
Another group (Lenk et al., 1996) experimented with a Q-switched Nd:YAG laser, operating at
power densities of 300 MW/ cm
2
, determined electron temperatures of approximately 14,000 K
and electron densities of 3
.
10
16
cm
-3
, and concluded that they “are not high enough for significant
absorption by inverse bremsstrahlung.” There have been several other studies (Barthélemy et al.,
2005, Lu et al., 1999, Knudtson et al., 1987) that have found electron temperatures ranging from
5,000-15,000 K and electron densities up to the order of 10
18
cm
-3
, all reaching the same
conclusion, namely that IB absorption is not significant. Therefore, it is reasonable to say that the
vapor/plasma can be considered to be optically thin. This leads to the conclusion that the last
two terms of Equation 15 are of low values and, therefore, their changes, if any, should not be a
major factor in the reduction of
inweld
P/P
. This conclusion is different from CO
2
laser welding in
which vapor/plasma can grow larger and hotter, and becomes optically thick for the CO
2
laser
beam (Tu et al., 2002 and 2003).
The remaining two terms in Equation 15,
incond
P/P
and
inevap
P/P
, cannot be identified separately.
Their changes are considered in the next section.
Laser Welding66
4.4 The Probable Cause of Process Instability
One probable cause of the process instability which can contribute to increase in
incond
P/P
and
inevap
P/P
, resulting in the increase in
inref
P/P
, is if the laser beam mainly irradiates at the molten
pool at very low speeds. The molten pool absorbs a large portion of the beam energy near the
surface, subsequently transferring the energy into the bulk material via convection, conduction,
and evaporation, increasing both
incond
P/P
and
inevap
P/P
in Equation 15. Thus, this energy is
wasted, as it is not used to create keyhole. As a result, the keyhole may become unstable, leading
to un-quasi-static behaviors of the welding process (as seen in the top view of the weld in Figure
(1)). Consequently, the welding process becomes inefficient and the welds become shallow,
uneven, and wide (Figure (5) and Table (2)). As the weld becomes shallow, the laser beam is
more easily reflected, resulting in the increase of
inref
P/P
in Equation 15. As the speed is further
reduced, the excessive energy absorbed by the molten pool can also lead to boiling, resulting in
large porosities. Readers are referred to Paleocrassas and Tu (2010) for additional tests to
investigate this probable cause of instability.
4.5 Significance of the 1 mm/s Threshold
The above analysis helps explain the phenomenon that occurs when the laser welding processing
speed drops below a certain low speed threshold. However, a valid question still remains: “why
does the laser welding process break down at the particular speed range of about 1 mm/s?”
When the laser beam first irradiates the solid aluminium, it starts to melt and propagate outward
with a certain speed. If the welding speed is less than this melting front speed, the laser would
fall behind and irradiate on the molten pool. This speed will decrease non-linearly as the surface
area surrounding the molten pool also increases non-linearly and therefore the change in molten
pool volume.
Fig. 11. Change in average melt front speed, as pulse duration is increased
An experiment was conducted to determine the melting front speed. Stationary laser pulses
at 100% power, were shot at a AA7075-T6 target with pulse durations ranging from 80 ms to
2000 ms. Figure (11) shows the resulting plot of the melt front speed along with the original
data (spot weld radii) for each pulse duration condition.
These melt front speeds are estimated using Equation 16:
v
melt front, i
r
i
r
i 1
t
p ,i
t
p ,i 1
(16)
where r
i
is the radius of the spot weld corresponding to the pulse duration t
p,i
. The first
velocity point was calculated by dividing the first spot weld by the corresponding pulse
duration. The first spot weld was observed after a laser pulse of 80 ms was irradiated. This
was the minimum pulse duration required to produce a spot weld at 300 W (100 %) input
power. The speed at which the spot weld formed and propagated was just over 1.4 mm/s.
The experimental results show that from 80 – 90 ms, the melt front speed is estimated to be
1.1 mm/s and for higher pulse durations it drops significantly. The melt front speed at the
early stages of molten pool propagation is clearly higher than the 1 mm/s processing speed,
which indicates that it initially advances faster than the processing speed. The melt front
speed will gradually slow down to a speed below 0.1 mm/s which means that the laser
beam will eventually surpass the molten front and irradiate on the solid.
This observation further confirms the fact that at speeds of 1 mm/s or lower, the laser will
irradiate directly over the molten pool for a certain period of time, as opposed to the faster
processing speeds, which will typically stay slightly ahead of the molten front the whole
time. By irradiating over the molten pool the energy will be absorbed more efficiently,
further increasing its size and reducing the amount of energy used to maintain keyhole
welding.
5. Applications to Aluminium Fatigue Crack Repair
In this section, the low speed laser welding of aluminium is applied to fuse fatigue cracks.
There is a serious concern in the aviation industry because airplanes’ lifting surfaces
undergo millions of cyclic loads throughout their lifetime. After a certain amount of cycles,
cracks start to form in the high stress concentration areas. Initially cracks propagate in a
stable and predictable manner. After the crack exceeds a certain critical length, it will start
growing much faster, in an unstable manner, eventually leading to brittle fracture and
catastrophic failure (Sanford, 2003).
Currently, cracks are monitored between flights until they exceed a certain length well
below the critical length, after which the cracked part is replaced. This method is very costly
due to the loss of flight operation time of the aircraft, as well as the part replacement labor
costs.
Reinforcing cracked aluminium structures with composite patches has been recognized as
an efficient and economical method to extend the service life of cracked aluminium
components (Baker and Jones, 1988; Sun et al, 1996; Daghyani et al, 2003). To further
enhance the effectiveness of composite patches, it is envisioned that the crack can be first
fused by laser welding to remove the high stress concentration at the crack front before
Low speed laser welding of aluminium alloys using single-mode ber lasers 67
4.4 The Probable Cause of Process Instability
One probable cause of the process instability which can contribute to increase in
incond
P/P
and
inevap
P/P
, resulting in the increase in
inref
P/P
, is if the laser beam mainly irradiates at the molten
pool at very low speeds. The molten pool absorbs a large portion of the beam energy near the
surface, subsequently transferring the energy into the bulk material via convection, conduction,
and evaporation, increasing both
incond
P/P
and
inevap
P/P
in Equation 15. Thus, this energy is
wasted, as it is not used to create keyhole. As a result, the keyhole may become unstable, leading
to un-quasi-static behaviors of the welding process (as seen in the top view of the weld in Figure
(1)). Consequently, the welding process becomes inefficient and the welds become shallow,
uneven, and wide (Figure (5) and Table (2)). As the weld becomes shallow, the laser beam is
more easily reflected, resulting in the increase of
inref
P/P
in Equation 15. As the speed is further
reduced, the excessive energy absorbed by the molten pool can also lead to boiling, resulting in
large porosities. Readers are referred to Paleocrassas and Tu (2010) for additional tests to
investigate this probable cause of instability.
4.5 Significance of the 1 mm/s Threshold
The above analysis helps explain the phenomenon that occurs when the laser welding processing
speed drops below a certain low speed threshold. However, a valid question still remains: “why
does the laser welding process break down at the particular speed range of about 1 mm/s?”
When the laser beam first irradiates the solid aluminium, it starts to melt and propagate outward
with a certain speed. If the welding speed is less than this melting front speed, the laser would
fall behind and irradiate on the molten pool. This speed will decrease non-linearly as the surface
area surrounding the molten pool also increases non-linearly and therefore the change in molten
pool volume.
Fig. 11. Change in average melt front speed, as pulse duration is increased
An experiment was conducted to determine the melting front speed. Stationary laser pulses
at 100% power, were shot at a AA7075-T6 target with pulse durations ranging from 80 ms to
2000 ms. Figure (11) shows the resulting plot of the melt front speed along with the original
data (spot weld radii) for each pulse duration condition.
These melt front speeds are estimated using Equation 16:
v
melt front, i
r
i
r
i 1
t
p ,i
t
p ,i 1
(16)
where r
i
is the radius of the spot weld corresponding to the pulse duration t
p,i
. The first
velocity point was calculated by dividing the first spot weld by the corresponding pulse
duration. The first spot weld was observed after a laser pulse of 80 ms was irradiated. This
was the minimum pulse duration required to produce a spot weld at 300 W (100 %) input
power. The speed at which the spot weld formed and propagated was just over 1.4 mm/s.
The experimental results show that from 80 – 90 ms, the melt front speed is estimated to be
1.1 mm/s and for higher pulse durations it drops significantly. The melt front speed at the
early stages of molten pool propagation is clearly higher than the 1 mm/s processing speed,
which indicates that it initially advances faster than the processing speed. The melt front
speed will gradually slow down to a speed below 0.1 mm/s which means that the laser
beam will eventually surpass the molten front and irradiate on the solid.
This observation further confirms the fact that at speeds of 1 mm/s or lower, the laser will
irradiate directly over the molten pool for a certain period of time, as opposed to the faster
processing speeds, which will typically stay slightly ahead of the molten front the whole
time. By irradiating over the molten pool the energy will be absorbed more efficiently,
further increasing its size and reducing the amount of energy used to maintain keyhole
welding.
5. Applications to Aluminium Fatigue Crack Repair
In this section, the low speed laser welding of aluminium is applied to fuse fatigue cracks.
There is a serious concern in the aviation industry because airplanes’ lifting surfaces
undergo millions of cyclic loads throughout their lifetime. After a certain amount of cycles,
cracks start to form in the high stress concentration areas. Initially cracks propagate in a
stable and predictable manner. After the crack exceeds a certain critical length, it will start
growing much faster, in an unstable manner, eventually leading to brittle fracture and
catastrophic failure (Sanford, 2003).
Currently, cracks are monitored between flights until they exceed a certain length well
below the critical length, after which the cracked part is replaced. This method is very costly
due to the loss of flight operation time of the aircraft, as well as the part replacement labor
costs.
Reinforcing cracked aluminium structures with composite patches has been recognized as
an efficient and economical method to extend the service life of cracked aluminium
components (Baker and Jones, 1988; Sun et al, 1996; Daghyani et al, 2003). To further
enhance the effectiveness of composite patches, it is envisioned that the crack can be first
fused by laser welding to remove the high stress concentration at the crack front before
Laser Welding68
applying the composite patch (Sun, 2008). The stress intensity factor could be reduced
significantly if the fusion is sound.
One challenge is that cracks never propagate in straight lines. This means that the welding
speed needs to be reduced and changed in order to trace the crack. Attempts to operate high
speed welding would require changing directions abruptly, which will require high
accelerations and decelerations. This “jerky” motion in laser welding could lead to
inconsistencies in weld width and penetration, thereby compromising the integrity of the
weld.
Also, as most of the laser welding experience focused on thick-sheet partial penetration
welding, the experience cannot be directly transferred to thin-sheet full penetration welding.
In addition, the crack may be skewed across the cross-section of the plate, making it
different from welding prepared butt joints.
In this section, the feasibility of the envisioned fusion repair is investigated.
5.1 Cracked Sample Preparation
Fatigue cracks were generated in 2”x 10” thin aluminium sheets (AA7075-T6) with 800 µm
thickness using an MTS tensile testing machine. A notch was first machined on one side and
then cyclic loads were applied to produce hairline cracks. Depending on the loading, it
usually took about 2-3 hours to generate one sample with a 1-1.5” long hairline crack. Care
had to taken so that the sample will not crack through and break. Due to the high cost, a
total of 20 samples were generated for this study. These hairline cracks were not in straight
lines and many of them are skewed across the cross-section as described above.
5.2 Focusing and Workpiece Flatness
Focusing Position: The accepted practice for focusing in thick-sheet partial penetration
welding is to focus the beam into the workpiece, without exceeding the maximum
penetration that can be achieved for the corresponding power. This is because power
density is highest at the focusing plane of the laser beam and by focusing it deep into the
material, we can ensure that it will help keep drilling into the molten pool through
evaporation of the metal. In the meantime, the power density at the surface of the workpiece
should be maintained above the threshold required to melt the solid.
For thin-sheet full penetration conditions, focusing becomes more complicated. If the focus
is placed at the bottom surface of the workpiece, violent evaporation may occur, due to the
absence of surrounding material to conduct the excess heat away. This may result in a
severe disruption of the molten pool, where molten metal gets ejected out of both sides of
the workpiece, leading to crude laser cutting rather than laser welding. A similar result will
occur if the focus is placed at the top surface of the workpiece. In this case, the best way to
focus the laser beam is to create a power density, at the top of the surface, that is just high
enough to sustain melting. This will shift the focus to some distance below the workpiece,
thereby reducing the power density at the lower surface enough to prevent this violent
ejection of the molten pool as well as drop-out.
Flatness Requirement: Because thin sheet aluminium welding is highly sensitive to focusing
changes, it is essential to have tight control over the plate’s flatness and its position with respect
to the laser head. A dial gage was used to check the flatness and the height of the workpiece and
a fixture was designed to prevent warping due to thermal distortion during welding.
For thick-sheet, partial penetration welding, changes in focus of about 25-50 µm do not yield
significantly different penetration results because the majority of the energy is conducted
away and therefore a slight change in power density will not translate into a big percentage
of penetration loss.
However, when welding thin-sheets, the slightest increase or decrease in power density
could mean the difference between a very violent welding process containing many defects
or a weld with insufficient penetration.
Fig. 12. Top and cross-sectional views of insufficient flatness, thin-sheet, full penetration
welds
For example, Figure (12) shows two thin-sheet welds, 1.5 mm apart, on a workpiece with
insufficient fixturing. This caused poor flatness, which was about 25 µm for a span of about
50 mm. The resulting welds did not have the desired weld characteristics from beginning to
end; namely, consistent width, smooth top and bottom beads and minimal underfill. The
welds would start out having the desired consistency and shape and after 20 or 30
millimeters would transition into a violent, unstable process. The welds in Figure (12) show
some undesirable characteristics. For both welds, the widths are inconsistent. In Figure (12a)
the weld shows a cross-section with minor underfill and drop-out, whereas in Figure (12b)
the cross-section reveals significant drop-out and underfill.
Because of this high focusing sensitivity, it is very important that extra care is taken to
ensure the flatness of the workpiece is within a tolerance of 10 µm. Also, the relative height
between each workpiece needs to be checked to ensure that the focus will lie in the same
location. Variations in thickness between workpieces could also interfere with process
repeatability if they are larger than the aforementioned tolerance. Due to this high focusing
sensitivity, for practical implementation of fusion repair, auto-focusing technology must be
used because the structure component may not be flat.
5.3 Crack Tracing
As cracks are not in straight lines, the laser beam must trace the crack precisely. In this
study, an off-line method is used for crack tracing. First, the crack sample to be repaired is
mounted onto the fixture and a guide beam is used to determine the position coordinates of
many points on the crack. A line is then fitted by connecting these points. Usually about 20
Low speed laser welding of aluminium alloys using single-mode ber lasers 69
applying the composite patch (Sun, 2008). The stress intensity factor could be reduced
significantly if the fusion is sound.
One challenge is that cracks never propagate in straight lines. This means that the welding
speed needs to be reduced and changed in order to trace the crack. Attempts to operate high
speed welding would require changing directions abruptly, which will require high
accelerations and decelerations. This “jerky” motion in laser welding could lead to
inconsistencies in weld width and penetration, thereby compromising the integrity of the
weld.
Also, as most of the laser welding experience focused on thick-sheet partial penetration
welding, the experience cannot be directly transferred to thin-sheet full penetration welding.
In addition, the crack may be skewed across the cross-section of the plate, making it
different from welding prepared butt joints.
In this section, the feasibility of the envisioned fusion repair is investigated.
5.1 Cracked Sample Preparation
Fatigue cracks were generated in 2”x 10” thin aluminium sheets (AA7075-T6) with 800 µm
thickness using an MTS tensile testing machine. A notch was first machined on one side and
then cyclic loads were applied to produce hairline cracks. Depending on the loading, it
usually took about 2-3 hours to generate one sample with a 1-1.5” long hairline crack. Care
had to taken so that the sample will not crack through and break. Due to the high cost, a
total of 20 samples were generated for this study. These hairline cracks were not in straight
lines and many of them are skewed across the cross-section as described above.
5.2 Focusing and Workpiece Flatness
Focusing Position: The accepted practice for focusing in thick-sheet partial penetration
welding is to focus the beam into the workpiece, without exceeding the maximum
penetration that can be achieved for the corresponding power. This is because power
density is highest at the focusing plane of the laser beam and by focusing it deep into the
material, we can ensure that it will help keep drilling into the molten pool through
evaporation of the metal. In the meantime, the power density at the surface of the workpiece
should be maintained above the threshold required to melt the solid.
For thin-sheet full penetration conditions, focusing becomes more complicated. If the focus
is placed at the bottom surface of the workpiece, violent evaporation may occur, due to the
absence of surrounding material to conduct the excess heat away. This may result in a
severe disruption of the molten pool, where molten metal gets ejected out of both sides of
the workpiece, leading to crude laser cutting rather than laser welding. A similar result will
occur if the focus is placed at the top surface of the workpiece. In this case, the best way to
focus the laser beam is to create a power density, at the top of the surface, that is just high
enough to sustain melting. This will shift the focus to some distance below the workpiece,
thereby reducing the power density at the lower surface enough to prevent this violent
ejection of the molten pool as well as drop-out.
Flatness Requirement: Because thin sheet aluminium welding is highly sensitive to focusing
changes, it is essential to have tight control over the plate’s flatness and its position with respect
to the laser head. A dial gage was used to check the flatness and the height of the workpiece and
a fixture was designed to prevent warping due to thermal distortion during welding.
For thick-sheet, partial penetration welding, changes in focus of about 25-50 µm do not yield
significantly different penetration results because the majority of the energy is conducted
away and therefore a slight change in power density will not translate into a big percentage
of penetration loss.
However, when welding thin-sheets, the slightest increase or decrease in power density
could mean the difference between a very violent welding process containing many defects
or a weld with insufficient penetration.
Fig. 12. Top and cross-sectional views of insufficient flatness, thin-sheet, full penetration
welds
For example, Figure (12) shows two thin-sheet welds, 1.5 mm apart, on a workpiece with
insufficient fixturing. This caused poor flatness, which was about 25 µm for a span of about
50 mm. The resulting welds did not have the desired weld characteristics from beginning to
end; namely, consistent width, smooth top and bottom beads and minimal underfill. The
welds would start out having the desired consistency and shape and after 20 or 30
millimeters would transition into a violent, unstable process. The welds in Figure (12) show
some undesirable characteristics. For both welds, the widths are inconsistent. In Figure (12a)
the weld shows a cross-section with minor underfill and drop-out, whereas in Figure (12b)
the cross-section reveals significant drop-out and underfill.
Because of this high focusing sensitivity, it is very important that extra care is taken to
ensure the flatness of the workpiece is within a tolerance of 10 µm. Also, the relative height
between each workpiece needs to be checked to ensure that the focus will lie in the same
location. Variations in thickness between workpieces could also interfere with process
repeatability if they are larger than the aforementioned tolerance. Due to this high focusing
sensitivity, for practical implementation of fusion repair, auto-focusing technology must be
used because the structure component may not be flat.
5.3 Crack Tracing
As cracks are not in straight lines, the laser beam must trace the crack precisely. In this
study, an off-line method is used for crack tracing. First, the crack sample to be repaired is
mounted onto the fixture and a guide beam is used to determine the position coordinates of
many points on the crack. A line is then fitted by connecting these points. Usually about 20
Laser Welding70
to 30 points are identified to trace a crack of 1-1.5” length. This fitted line is then uploaded
to the controller of the x-y table for position and welding speed control. Linear motors are
used as the driving motors for the x-y table. Figure (13) shows the variation of speed of the
x-y table as the crack is being traced.
Once they are finished tracing the crack, the linear motors return to their original positions.
We can compare the smoothness of the speed during crack tracing with that of the return,
which follows a straight line. The average speed during the crack tracing is 9.34 mm/s and
the standard deviation is approximately 2.4 % of the average value. In comparison, during
the straight line return the average speed is 9.76 mm/s and the standard deviation is less
than 1 % from the average value. Therefore, we can be assured that at 10 mm/s the
processing speed stays relatively consistent, without having large deviations during the
changes in direction.
Fig. 13. Variation of the linear motor speed as it traces the crack; comparison with the return
of the linear motor to its original position by following a straight line.
5.4 Process Parameter Modification for Thin-Sheet Welding
The first step in transitioning from thick-sheet, partial penetration, bead-on-plate laser
welding to thin-sheet, full penetration crack repair, is to find out what parameters
combination will yield the best weld results. Several bead-on-plate experiments were
performed with the topics discussed in Section 5.2 in mind. The final process parameters are
summarized in Table 3.
Initially, the partial penetration welding process parameters were selected as a starting
point. Since the transferred welding conditions yielded results resembling laser cutting, it
made the most sense to first increase the distance between the nozzle and the workpiece.
Doing so, would decrease the pressure exerted on the molten pool by the nitrogen gas. This
changed the process from resembling laser cutting to laser welding. By raising the nozzle (3
mm from the surface of the workpiece), the pressure applied by the nitrogen gas to the
molten pool was reduced significantly, while still maintaining its shielding from the
atmosphere.
Also, the inconsistent results (shown in Figure 2) confirmed that thin-sheet, full penetration
welding is very sensitive to small changes in flatness and workpiece height. Therefore, the
fixturing method had to be adjusted to improve the flatness tolerance. Since workpiece
warping was also a concern, the workpiece was ”sandwiched” between two thicker
aluminium plates, containing a rectangular slot in the area where the workpiece was to be
welded. Not only did this prevent warping, but it also significantly improved the flatness of
the workpiece.
Thick-Sheet,
Partial
Penetration
Thin-Sheet, Full
Penetration
Output mode,
Power (Watts)
CW, 300 CW, 300
Focus position from top surface (mm)
1 1.2
Speed (mm/s)
4 10
Nozzle position from top surface (mm)
1 3
Flatness tolerance per 50 mm span
(µm)
> 25 > 10
Table 3. Process parameter comparison between thick-sheet, partial penetration and
thin-sheet, full penetration laser welding conditions
By ensuring the flatness to be within 10 µm and adjusting the focusing based on the relative
height of the workpiece, the resulting welds turned out to be much more consistent from
beginning to end and at the ideal focusing position (1.2 mm from the top surface of the
workpiece). The ideal focusing position, as opposed to thick-sheet welding, resulted in
deeper than the desired weld penetration (800 µm), which would be at the bottom surface of
the workpiece. When focused at the bottom surface, the power densities were too high at
both, the top and bottom surfaces, causing a violent process and severe underfill.
The speed also had to be changed, because the excess energy led to a larger molten pool,
causing larger drop-out. At 10 mm/s, full penetration was achieved with minimal drop-out.
5.5 Crack Repair by Fusion
A single-pass laser welded crack is shown in Figure (14). The weld was created with
minimal underfill and drop-out and with a consistent width and defect free weld bead.
Double pass crack repairs, offset by 600 µm (center to center), were used to repair
significantly skewed cracks that required larger weld width.
5.6 Mechanical Testing for Determining Repaired Crack Strength
Tensile tests were conducted for single and double pass welds, as well as unwelded
(baseline) AA 7075-T6 sheets. Both the ductility and the ultimate strength were recorded.
The results are shown in Figure (15). Four samples for each condition were tested due to
limited numbers of crack samples and due to the fact that the results were highly repeatable
(see below).
Low speed laser welding of aluminium alloys using single-mode ber lasers 71
to 30 points are identified to trace a crack of 1-1.5” length. This fitted line is then uploaded
to the controller of the x-y table for position and welding speed control. Linear motors are
used as the driving motors for the x-y table. Figure (13) shows the variation of speed of the
x-y table as the crack is being traced.
Once they are finished tracing the crack, the linear motors return to their original positions.
We can compare the smoothness of the speed during crack tracing with that of the return,
which follows a straight line. The average speed during the crack tracing is 9.34 mm/s and
the standard deviation is approximately 2.4 % of the average value. In comparison, during
the straight line return the average speed is 9.76 mm/s and the standard deviation is less
than 1 % from the average value. Therefore, we can be assured that at 10 mm/s the
processing speed stays relatively consistent, without having large deviations during the
changes in direction.
Fig. 13. Variation of the linear motor speed as it traces the crack; comparison with the return
of the linear motor to its original position by following a straight line.
5.4 Process Parameter Modification for Thin-Sheet Welding
The first step in transitioning from thick-sheet, partial penetration, bead-on-plate laser
welding to thin-sheet, full penetration crack repair, is to find out what parameters
combination will yield the best weld results. Several bead-on-plate experiments were
performed with the topics discussed in Section 5.2 in mind. The final process parameters are
summarized in Table 3.
Initially, the partial penetration welding process parameters were selected as a starting
point. Since the transferred welding conditions yielded results resembling laser cutting, it
made the most sense to first increase the distance between the nozzle and the workpiece.
Doing so, would decrease the pressure exerted on the molten pool by the nitrogen gas. This
changed the process from resembling laser cutting to laser welding. By raising the nozzle (3
mm from the surface of the workpiece), the pressure applied by the nitrogen gas to the
molten pool was reduced significantly, while still maintaining its shielding from the
atmosphere.
Also, the inconsistent results (shown in Figure 2) confirmed that thin-sheet, full penetration
welding is very sensitive to small changes in flatness and workpiece height. Therefore, the
fixturing method had to be adjusted to improve the flatness tolerance. Since workpiece
warping was also a concern, the workpiece was ”sandwiched” between two thicker
aluminium plates, containing a rectangular slot in the area where the workpiece was to be
welded. Not only did this prevent warping, but it also significantly improved the flatness of
the workpiece.
Thick-Sheet,
Partial
Penetration
Thin-Sheet, Full
Penetration
Output mode,
Power (Watts)
CW, 300 CW, 300
Focus position from top surface (mm)
1 1.2
Speed (mm/s)
4 10
Nozzle position from top surface (mm)
1 3
Flatness tolerance per 50 mm span
(µm)
> 25 > 10
Table 3. Process parameter comparison between thick-sheet, partial penetration and
thin-sheet, full penetration laser welding conditions
By ensuring the flatness to be within 10 µm and adjusting the focusing based on the relative
height of the workpiece, the resulting welds turned out to be much more consistent from
beginning to end and at the ideal focusing position (1.2 mm from the top surface of the
workpiece). The ideal focusing position, as opposed to thick-sheet welding, resulted in
deeper than the desired weld penetration (800 µm), which would be at the bottom surface of
the workpiece. When focused at the bottom surface, the power densities were too high at
both, the top and bottom surfaces, causing a violent process and severe underfill.
The speed also had to be changed, because the excess energy led to a larger molten pool,
causing larger drop-out. At 10 mm/s, full penetration was achieved with minimal drop-out.
5.5 Crack Repair by Fusion
A single-pass laser welded crack is shown in Figure (14). The weld was created with
minimal underfill and drop-out and with a consistent width and defect free weld bead.
Double pass crack repairs, offset by 600 µm (center to center), were used to repair
significantly skewed cracks that required larger weld width.
5.6 Mechanical Testing for Determining Repaired Crack Strength
Tensile tests were conducted for single and double pass welds, as well as unwelded
(baseline) AA 7075-T6 sheets. Both the ductility and the ultimate strength were recorded.
The results are shown in Figure (15). Four samples for each condition were tested due to
limited numbers of crack samples and due to the fact that the results were highly repeatable
(see below).
Laser Welding72
Fig. 14. Single-pass laser welded fatigue crack
The average UTS of the base AA 7075-T6 is 579 MPa, which is identical to the documented
value (Sanford, 2003). As shown in figure 7, the lowest strength is 571 MPa and highest is
584 MPa, equivalent to –1.4 % to +0.9% in variation from the average value. The average
UTS of the single-pass weld is 430 MPa, which is 74 percent of the base alloy’s strength. The
lowest is 411 MPa and the highest is 443 MPa, equivalent to –4.4% to +3.0% variation from
the average. The average UTS of the double-pass weld is 395 MPa, which is 68 percent of the
base alloy’s strength. The lowest is 379 MPa and the highest is 422 MPa, equivalent to -4.1%
to +6.8 % variation from the average value. These values are extremely encouraging because
the UTS for AA 7075-O, which is the same alloy without heat treatment, is only 220 MPa
(Sanford, 2003). The single pass weld is 95% higher than that of the untreated alloy, while
the double pass weld is 72% higher. These high strength values indicate that the laser did
not completely destroy the heat treatment temper. The strength is probably retained due to
the use of the fiber laser which, with its highly concentrated energy deposition, produces
narrow welds to allow for fast cooling by the bulk material.
As the results of the UTS strength results were highly repeatable, no more samples were
tested. For the tensile tests to determine UTS, four samples with highly repeatable results
are justified. However, it should be noted that if fatigue life were to be tested, more samples
would be needed as fatigue life tests usually exhibits wider statistical distribution. In this
study, no attempt was made to test the fatigue life as crack fusion alone should not be
considered a viable repair technique unless it is used together with composite patches. It
should be clear to see the benefit of the because without it crack fusion, the composite patch
is bonded to a part with zero UTS at the crack region and with a high stress intensity factor
at the crack front. On the other hand, with crack fusion, the UTS is 172% - 195% that of the
untreated alloy and there is no crack front with a high stress concentration.
In addition to tensile tests, the ductility was also measured. The average elongation for the
base alloy was measured to be 4.9 percent, while the single pass weld was just under 1
percent and the double bead-on-plate was approximately 0.5 percent. The significant drop
in ductility was probably due to the rapid cooling of the weld as described earlier. For the
double-pass weld, the second pass re-melted some weld of the first pass, which probably
caused the ductility to drop even further. This effect has been observed before (Verkat et al.,
1997) in laser welding and can be improved slightly with the appropriate addition of filler
wire (Yoon and Wallach, 2008).
Fig. 15. Base AA 7075-T6 compared to single and double pass bead-on-plate welds
6. Conclusion
In this chapter, topics related to extending fiber laser welding of aluminium in the low
speed range were discussed. General topics, such as the properties of aluminium and
welding defects, review of high speed laser welding of aluminium, and fiber laser
characteristics and optical setups for safety, were first reviewed. Recent research results on
the modelling and validation of laser welding of aluminium, experimental characterization
of low speed welding processes, and the instability phenomenon and its probable causes
were then presented. Finally, an application of low speed fiber laser welding of aluminium
for repairing fatigue cracks was discussed.
The difficulty in extending fiber laser welding of aluminium to low speeds is that there
exists a low speed threshold (1 mm/s), below which the process becomes unstable. This
threshold appears to be related to the molting front propagation speed, which was found to
be approximately 1.1 – 1.4 mm/s. Therefore, when the welding speed is less than 1 mm/s,
the laser irradiates over the molten pool longer, resulting in less efficient energy coupling
for forming high aspect ratio welds. One possible solution to avoid this problem is to
employ pulsed welding to reduce the laser power when it is irradiating over the molten
pool and to resume the laser power when it moves over a solid surface. More research is
needed to devise suitable pulsing schemes based on this instability observation.
Additionally, more studies are needed to understand the overheating of the molten pool
and the keyhole stability, as well as the keyhole’s interaction with the melting front. It is
also important to study how the laser energy density and the currently observed low speed
threshold, 1 mm/s, are related. It would be useful to devise new experiments to quantify
each term in Equation 14 to further understand the overheating of molten pool.
Finally, the most challenging factor for successful crack fusion is related to the plate flatness
which critically affects the relative position between the laser focusing point and the plate