Game Maker Tutorial Adding Depth to Games pot
Bạn đang xem bản rút gọn của tài liệu. Xem và tải ngay bản đầy đủ của tài liệu tại đây (5.12 MB, 144 trang )
1
Game Maker Tutorial
Adding Depth to Games
Written by Mark Overmars
Copyright © 2007 YoYo Games Ltd
Last changed: February 23, 2007
Uses: Game Maker7.0, Pro Edition, Advanced Mode
Level: Intermediate
Real games are 3-dimensional, aren't they? Well, actually not. All games produce a 2-
dimensional image on the screen of your computer. They might look 3-dimensional but
that does not mean they are 3-dimensional. So what does it mean when a game claims to
be 3-dimensional? This question is difficult to answer. It is a combination of the way the
game is created, the visual image the player sees, and the way the player controls the
game. In this tutorial we will show how to give your games a 3-dimensional look; how to
add depth in your games. But we won’t use the 3D graphics functions for this. We will
describe more simple techniques like parallax. scaling, transparency, and isometric views.
Most of this can be achieved by the drag-and-drop actions in Game Maker although at
some places we will need a little bit of GML code. To follow the tutorial you should have
some experience in the use of Game Maker but you do not need to know GML well. All
example games we create in this tutorial are provided in the folder
Examples that comes
with this tutorial and can be loaded into Game Maker. Also all resources are provided in
the folder
Resources.
Introduction
Modern 3-dimensional games model the game world with 3-dimensional objects. They
use the 3-dimensional graphics hardware to render such scenes. Given a viewpoint, that
is, the position from which the player inspects the game world, the hardware creates the
correct image taking into account aspects like lighting, hidden surface removal (objects
behind other objects cannot be seen and should not be drawn) and atmospheric effects.
With the current hardware this can lead to spectacular experiences but there is a price to
pay for this. Modeling a 3-dimensional world with 3-dimensional objects and creating the
animations for the characters requires a lot of practice and is time consuming. And
creating the game logics, including aspects like behavior of the game entities, 3D
collision checking, camera movement, etc., is also much more difficult for than for 2-
dimension games. As a result the production of a modern 3-dimensional game is a huge
undertaking that involves a large team of specialized workers and typically costs millions
of dollars. And still many of these games have errors, in particular in the handling of the
camera and the character motions and collision checking.
Does this mean that 3-dimensional games are out of reach for you? Well, yes and no.
Game Maker does not directly support 3-dimensional game worlds although there are
functions for 3-dimensional graphics (and a separate tutorial is available on how to use
that). But actually all 3-dimensional looking games produced up to 1995 and many games
2
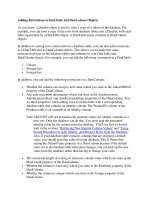
since don't use 3-dimensional worlds. For example games like Age of Empires (see
Figure 1) and the Command and Conquer series (except for the most recent) do not use a
3-dimensional game world. They are so-called isometric games. They use sprites to
represent the game world and the characters, and use some relatively simple tricks to give
the user a feeling of a 3-dimensional world. And in this tutorial we will explain the basics
of such games.
Figure 1. The isometric world of Age of Empires.
Fooling your brain
How do we make something look 3-dimensional? The basic idea is that we have to fool
our brain into thinking that the image we see is 3-dimensions. So why do we think that an
image we see is 3-dimensional. A number of aspects play a role here.
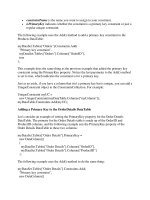
Objects that lie behind other objects are (partially) invisible
This is an important aspect. You normally cannot look through solid objects. When for
example a character is partially hidden by a rock the viewer immediately knows that the
character is behind the rock. In this way the viewer gets a better insight in the 3-
dimensional relationship between the objects (see Figure 2). So to make a world look 3-
dimensional we should only display the (parts of) objects that are actually visible. This
process is normally called hidden-surface removal.
Figure 2. Hidden surface removal helps in establishing
the depth relation of objects.
3
3-dimensional graphics hardware does hidden-surface removal automatically but,
because Game Maker deals with a 2-dimensional world, we have to deal with this
ourselves. The way to achieve this is to draw the sprites that correspond to the objects in
the correct order. The object that lies furthest way is drawn first. The next object is drawn
on top of it, and so on. Because closer objects are drawn on top of object behind them,
they will (partially) hide the other objects. In Game Maker we can indicate this order by
setting the depth for the different objects. Instances of objects with larger depth are drawn
earlier than instances of objects with a smaller depth and, hence, appear behind them.
Translucent objects show what is behind
When objects are partially translucent, you see through them what is behind them. Using
translucency combined with the correct depth order increases the feeling of depth further.
Objects that lie further away appear smaller
Clearly, the further away objects are the smaller they appear. This gives a very strong
notion of distance and, hence, a better 3-dimensional feeling.
Figure 3. Distant instances appear smaller.
This can be achieved by changing the size of the sprites depending on the depth. You can
either make sprites with different sizes or draw the sprites with a scale factor. (We will
discuss this further below.) When an object moves towards the viewer it should become
larger. This gives a very strong feeling of moving through a 3-dimensional world. Be
careful though. When the scaling is wrong it gives the exact opposite effect.
Objects that lie further away appear vaguer
When objects lie further away you cannot see them so well any more. This also works the
other way around. When an image appears vague we interpret it as lying further away.
Hence, adding a feeling of mist and blurring images that lie further away a bit gives a
good sense of distance. This can be achieved by using different sprites for the same
instance, depending on its depth.
Object that lie further away appear to move slower
An object that lies far away takes longer to traverse from the left to the right through your
view while an object that lies closer moves much faster through your view. You can use
this to give the viewer an indication of the depth of the objects. One particular aspect of
this is parallax scrolling that we will describe below. Also, objects that move away from
you or towards you hardly change position on the screen. So normally the speed in the
4
vertical direction on the screen (which often corresponds to movement towards you or
away from you) should be smaller than the horizontal speed.
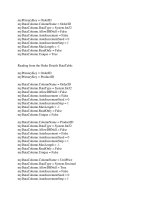
Objects tend to have a shadow
Objects cast shadows. It is difficult to compute the shadows that are cast on other objects
but it is relatively easy to have shadows on the floor. And even if there is no precise
shadow it is good to have a little dark spot around the bottom of an object. This gives the
impression that the object stands on the floor. Make sure the shadows are consistent, that
is, all objects have shadows (or none) and that they have the same size and are in the
same direction. For example, in Figure 4, for the left character it is unclear where she
stands. The middle character clearly stands on the ground while the right one jumps
above it.
Figure 4. Even a simple shadow gives position information.
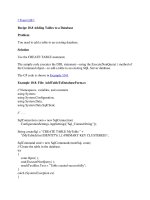
Parallel lines appear to meet in a point
As you probably all know, parallel lines in a 3-dimensional world meet in the distance in
a point. For example, the two sides of a road meet in the distance. Stated more precisely,
our view generates a perspective projection. This in some sense deforms the objects
depending on their depth but this deformation is exactly what gives the 3-dimensional
feeling. Consider for example the images in Figure 5. The left image shows a projection
without perspective. The vertical lines are parallel. In the right image we use a
perspective transformation and as a result the lines will meet somewhere in the distance.
It gives a much better 3-dimensional feeling.
Figure 5. Using a perspective projection.
5
Perspective projections are important for 3-dimensional games but unfortunately they are
not easy to achieve with sprites. So sprite based games normally don’t use perspective
transformations. To limit the effect of this they often use a projection under an angle of
45 degrees. That is, they don’t look straight from the front but a bit from the side. As a
result the effect of parallel lines is less prominent and, hence, the viewer is less distracted
by them. This is the basis of isometric games. Figure 6 shows the same scene but now
under an isometric projection. If you look careful the lines are indeed still parallel (which
is wrong) but still it looks a lot more 3-dimensional than the left image above.
Figure 6. Using an isometric projection.
Creating isometric games is possible with Game Maker and below we will show how to
do this.
Parallax Scrolling
As was indicated above, object that lie far away move slower than objects that are near to
the viewer. In this section we will use that observation. However, we will only use it to
create effective side scrolling backgrounds. You can find the example in the folder
Examples with the file name parallax.gmk.
As you should know you can add backgrounds to your rooms in Game Maker. Very often
a room has just one background but it is possible to have multiple backgrounds. Clearly,
to see those backgrounds they need to be partially transparent or cover just part of the
room. By giving the lower backgrounds a slower horizontal speed than the higher
backgrounds you give the player the impression that those backgrounds are further away.
In this section we will create a small example of a car driving sideways on a road. We
don’t aim for graphic quality; but just want to demonstrate the effect.
First of all we use two backgrounds. The first one indicates some mountains in the
distance.
6
Figure 7. The distant mountains.
This background will be placed at the top of the room and scrolls left with a very small
speed of -1. You can set this speed in the Room Properties. We tile it horizontally but not
vertically. The second background represents the road. It is very small, is placed at the
bottom of the room and moves much faster (speed -4). Again we tile it only horizontal.
We place a car on the road but it does not need to move. Because the road moves under it
we already get an illusion of motion. Because the road moves faster than the mountains
you get the feeling that the mountains are far away.
To add a bit more depth to this demo we are going to include some trees. We use tree
sprites of three different sizes as in Figure 8.
Figure 8. The same tree at three different distances.
For each of these trees we create an object. To make sure that the small tree is behind the
middle tree which again must be behind the large tree we give the objects different
depths. (Below we will talk more about depths.) The large tree will be placed close to the
road and in the Create event we let it move to the left with a speed of 4, like the road.
The middle tree will be placed a bit further away and we give it a speed of 3. Finally, the
small tree we give a speed of 2. We place a couple of them at appropriate places in the
room. To make sure that they reappear at the right if they disappear to the left we add an
Outside Room event in which we include a Wrap Screen action, indicating the object
should wrap horizontally. The resulting demo looks like in Figure 9.
7
Figure 9. The parallax demo.
Clearly this demo is not a game. To turn it into a game you must give the player the
opportunity to steer the car and for example add other traffic to avoid.
Parallax scrolling is very useful in for example platform games. In this case though, you
should adapt the speed of the moving backgrounds to the (horizontal) speed of the
character that is controlled by the player.
Parallel Projections
Even though true 3-dimensional games should use perspective projections we will first
describe how parallel projections can still be used to create a feeling of depth. In a
parallel projection the size of the objects stays the same independent of the distance. Also
parallel lines remain parallel. This makes it a lot easier to use sprites because sprites have
a fixed size (although they can be scaled). Clearly, a parallel projection gives a distortion
of the view. To limit this distortion we will make sure that the player cannot see objects
that are far away. So he will not really notice the errors. We achieve this by looking down
on the world under an angle (normally an angle of about 45 degrees is used). So a world
that consists of squares will now look like rectangles.
8
Figure 10. Looking at the square grid under an angle turns
the squares into rectangles.
For a background image this will look as in Figure 11. It is easy to create such an image.
We simply scale the image in the vertical direction only.
Figure 11. A parallel project of a simple world.
We will demonstrate this approach with a small demo in which the player controls a
character that can walk through a world with some trees. The demo can be found in the
file
parallel.gmk in the Examples folder. There are three things we must handle in an
application like this: We must make sure that hidden-surface removal is done correctly.
So when the character is behind a tree it should be drawn before the tree is drawn to make
it partially invisible. Secondly, we have to correctly deal with the speed of the character.
Moving back and forth must be slower than moving left and right. Finally, and the most
difficult, we must handle the collisions correctly.
Let us start with the hidden-surface removal. As you should know every sprite has an
origin. Default this is the top-left corner of the sprite image. When we place an instance
of an object at a particular position we actually put the corresponding sprite with its
origin at that position. When we deal with a 3-dimensional world it is easiest to take as
the origin of the objects the position where they stand on the ground. For all sprites we
9
set the origin to that position. So for example for the character that walks through the
forest we set the sprite as in Figure 12.
Figure 12. The properties form for the player sprite.
Note that we also disabled Precise collision checking and that we manually set a small
manual bounding box at the bottom of the character. So collisions will not be performed
with the whole sprite but only with this small rectangle. We will use that below. Our
character will be represented by 4 different sprites; on for each of the four direction in
which he can walk. Clearly for each we should set the same origin (and the same
bounding box).
Now what should the depth be? In most situations the order in which the objects must be
drawn is the same as the order in which they stand on the ground. So by setting the origin
as indicated above, the y-coordinate of the instance determines the order. Instances with a
low y-coordinate are close to the top of the window and must be draw before the ones
with a higher y-coordinate. So a higher y-coordinate must correspond to a smaller depth.
This can be achieved by setting the depth to –y using the Set Variable action as indicated
in Figure 13.
10
Figure 13. Setting the depth of the instance.
For the static objects, e.g. the trees in our example, we need to do this just once in the
Create event. For the dynamic objects, the character in our example, we must do this in
every step. You best use the End Step event for this to make sure that all other events are
processed before the depth is adapted.
Secondly, we must deal with the motion of the character. We can do this in the usual way
using the arrow keys. In each of the arrow keys event we set the motion in the correct
direction and set the correct sprite for the instance. Also, to get an animation of the sprite
while moving and no animation when the character is not moving we use the variable
image_speed. This variable indicates the speed with which the subimages in the
animation must be shown. Setting it to 1 plays the animation in a normal speed. Setting it
to 0 will stop the animation. So whenever the user presses an arrow key we choose the
correct sprite and set the image speed to 1 using the Change Sprite action; see Figure 14.
(We use -1 for the subimage to avoid a change in subimage when we already move in the
same direction.)
11
Figure 14. Changing the sprite.
When the player releases a key we set the
image_speed to 0 using the Set Variable
action. The same we do when a collision occur.
This all has nothing to do with 3-dimensional games. It is the usual way to handle
character motion in many games. The only thing we do have to take care of in a 3-
dimensional game is the difference in speed. For the horizontal motion we use a speed of
3 while for the vertical motion we use a lower speed of 2. You must experiment with
these numbers to get the best effect for your game.
Finally we must deal with collisions. Normally a collision occurs when the sprites
partially overlap. This is fine for 2-dimensional game but not for 3-dimensional games.
When the character stands in front of a tree the sprites overlap but there is no collision.
So we need another area that must define the collision. Normally this is the area of the
instance on the ground. Only when the feet of the character overlap with the bottom of
the trunk of the tree there is a real collision. The easiest way to achieve this is to define a
very small bounding box for all the sprites at the bottom and not use precise collision
checking. A collision is only reported when the bounding boxes partially overlap, which
is exactly what we want.
For more complex shapes a small rectangle at the bottom might not indicate the correct
collision area. In that case we can use another feature of Game Maker. An object can
have a different mask than the sprite used to represent the instance. So we can make a
second sprite that has the shape of the required collision areas and use that as collision
mask. We will use this approach below when creating an isometric game.
We now have all the ingredients for the 3-dimensional game we want to make. To make
it all look a bit nicer we use a tile set of background tiles. We nicely scale them as
indicated above to obtain tiles of size 48x24. With this we fill the background. We also
12
add some walls as tiles to the background. To create collisions with these we use a
standard technique in which we define an invisible solid wall object and place instances
of this object on top of the walls in the background. So the character will stop because it
collides with these invisible instances while the player only sees the nice background
behind them. Check out the
parallel.gmk file for details.
Finally we must create the room. We will use a view in the room such that the player sees
only part of the world. To enhance the feeling of depth we make the view 400x200, so
again scaling with a factor 1/2 in the vertical direction. In many games this proportion is
achieved by adding some information panel below the scrolling world. (This is the reason
why you better put the information panel at the bottom of the screen rather than at the
side for this type of games.) The final demo looks as in Figure 15.
Figure 15. The parallel demo.
Scaling Sprites
In the previous section we used a parallel projection. If we keep the view high enough
from the ground in a fixed orientation, and we show just a small part of the world this is
good enough. But if we want to get a first person view or a view closer to the ground we
need perspective projection. The size of objects must be smaller when the objects are
further away. But how do we achieve that? In the first parallax scrolling example we used
three different tree sizes. This is fine when the trees stay at fixed distances but in a real
3D game the player might approach them and, hence, the size should change
continuously. We could create a huge number of different sprites, one for each size, but
this will use a lot of memory. You might though want to do this for really important
objects because it gives the best quality. For the other instances we can use the scaling of
sprites. In this section we will show how to do this using a simple example in which the
player must avoid trees while moving through a forest.
So we first need a sprite for the tree. We use one sprite here. For the sprite we manually
set a small bounding box at the trunk of the tree as above. This is the only part where we
13
are interested in collisions with the player. Also we place the origin at the bottom of the
tree. So the tree sprite properties will look as follows:
Figure 16. The tree sprite.
We will again use the mountains for the background, but this time we will not use any
scrolling. Instead we use a wide room of width 2000. We place the main character, for
which we also need a sprite, in the middle at the bottom of the room. We will use a view
of size 480x320 and keep the character basically in the middle by setting the view
borders and indicating that the view should follow the character as in Figure 17.
Figure 17. The view keeps the player in the center.
14
The player will move left and right when the player presses the left or right arrow key.
Clearly we must avoid it to move too far to the left or too far to the right. As scoring we
use the time the player survives. So in the Step event of the player we add 1 to the score.
When the player collides with a tree we show the high-score list and restart the game.
What remains is the tree. There are three aspects we have to deal with: the size, the
position on the screen, and the depth. Trees will appear at y-position 180. In the end step
event we scale the sprite based on its y-position. For this we can change the variable
image_xscale and image_yscale. We use a scale factor that is close to 0 when the y-
position is 180 and increases when the tree moves down. To be precise, we use a scale
value of
(y-178)/100. You can play a bit with the scale factor if you like (make sure it
is always positive). Alternatively you could use the Transform Sprite action.
The second thing to deal with is the depth. Also in the Step event we set the
depth to –
y
. This means that trees closer to the bottom of the screen (with larger y-coordinate and
closer to the viewer) have a smaller depth and are drawn on top of the others, as we want.
We also need to give the player an appropriate depth to keep him at the correct position
among the trees.
Finally we must control the movement. This is harder than it may seem. We can let the
trees move down with constant speed but, as you will notice, this will visually slow them
down (this is because objects close by seem to move faster than objects far away). So we
must increase the vertical speed. Also, objects move towards the sides if they get closer
(because parallel lines meet in a point at infinity). So, based on the position of the tree
relative to the middle of the view, we must adapt its horizontal speed. We do this using
the piece of code in Figure 18 in the Step event.
Figure 18. Adapting the movement of the tree.
15
(Note the use of local variables
xoff and yoff.) The numbers have been determined
experimentally. You might want to change them a bit.
To finish the game we must add a few other things, like destroying trees when they
disappear below the screen and adding a controller object that controls the appearing of
trees (more when the score gets higher). You can find the demo game in the file
scaling.gmk. You can use it as a basis for your own games.
You can actually use the same mechanism to create a full first person shooter game. Here
the player object has a position and an orientation in the game world. For all other
instances in the world you must compute their position relative to the direction the player
is looking in, and their distance. The distance determines the drawing order and the size
as above. (To avoid drawing too many instances you normally only draw instances if they
are close enough.) For such a game it is though easier to use the functions for 3-
dimensional graphics that the Pro Edition of Game Maker has. Another tutorial deals with
this.
Isometric Games
We will finally look at a very popular type of game: isometric game. Many of the very
popular games of the recent past are isometric. Examples are Age of Empires, Diablo,
Command and Conquer, SimCity, and many other strategy and simulation games (see for
example Figure 19).
Figure 19. SimCity is an isometric game.
Such games are in principle possible with Game Maker (but realize that these commercial
games took years to create by dedicated teams of workers).
The principle of an isometric game is that the 3D world is viewed under a fixed 45-
degree angle. Again parallel projection is used, that is, there is no perspective, and so
objects in the distance will not become smaller. Assume the world consists of square cells
as in the left picture of Figure 20 below. An isometric view will look like the right
picture. Each square has become a diamond shape. To make lining up cells easy we
typically use a 2x1 diamond, e.g. 32x16 pixels.
16
Figure 20. In isometric games squares become diamonds.
Doing the same with a background image we get the pictures in Figure 21.
Figure 21. An isometric view on the world.
Such background images can be made rather easily with Game Maker. First make a tiled
background. Next edit the background, enlarge the canvas, rotate it by –45 degrees, and
stretch (or actually shrink) it vertically to 50%. Alternatively you can use a set of tiles
that are already of the correct size and orientation. In the room editor you can indicate to
use an isometric grid. Now it is relatively easy to put the tiles in the room at the correct
places.
The advantage of an isometric projection over a normal projection as we did before is
that our mind immediately interprets the diamonds as squares viewed under an angle.
This gives a 3-dimensional impression. Clearly we will still get perspective distortions
because the size of objects does not change with the distance. This perspective distortion
can again be limited by showing only a small part of the world. So most isometric games
use a limiting view on the world.
Once you have a nice background we need to place objects on it. These objects should
obviously have a 3D look from the correct 45 degree angle. Creating such isometric
17
objects is not easy and is normally the most time consuming task when creating an
isometric game.
Each object has a "shadow" on the floor. This shadow is crucial. It will be used for
collision detection, or stated differently, it will be used as collision mask. So for an object
you will need to make two sprites: the image of the actual object and the shadow mask. It
is best to always make the origin of the sprite and the mask the center of the shadow. For
example, below you see an image of a wall element we are going to use in our isometric
maze, and the corresponding shadow mask (the cross is the origin).
Figure 22. An isometric sprite and its collision mask.
The mask in this case has precisely the size of one tile in the image.
By doing collision detection on the shadows the sprites are allowed to overlap, as long as
their shadows do not overlap. This is precisely what we want. When e.g. a ball runs
among the blocks the sprites can overlap. But a collision with a wall occurs once the
shadow of the ball hits the shadow of the wall.
As in the parallel case we set the depth of each instance to –y. In this way the instances
are drawn in the correct order.
There is a problem though. When creating the rooms the sprites are not drawn in this
order. This might make it difficult to create the right scenes. One advice is to always start
at the top and work your way down. Also, on the toolbar there is a button to sort the
instances by y-coordinate, which is just what we want.
A final word about motion. Because of the projection, horizontal motion should be twice
as fast as vertical motion. Also, when for example using arrow keys to steer the motion, it
is common to let them correspond to diagonal motion (along the sides of the tiles) rather
than horizontal and vertical motion.
A Maze Example
As an example we are going to make a simple isometric maze game. It is not very
sophisticated but it will show you the basic ideas. The game can be found in the file
isometric.gmk.
18
As a first step you better design the maze on paper. It will be very difficult to do this
while creating the room. We next create a background floor for the maze that fills the
whole area covered by the maze.
Next we create the sprites. As indicated above we need two sprites for each object: the
actual image and the mask used for collision checking. (Actually, for many objects we
can use the same mask.) Make sure that each sprite is nicely drawn on the floor and that
the origin is in the middle of the shadow mask.
To make things more interesting we also add a gate. The gate consists of three parts. The
left and right poles are simply a bit higher walls in a different color. They use the same
mask as the normal walls and are exactly the same (so we give them the wall object as
parent to give then the same behavior). The middle piece of the gate is different. It
consists of a block higher in the air. It does not need a mask because the ball can move
under it. But we need to make sure that its origin is still in the center of its shadow
(otherwise it would not be drawn at the correct depth).
For each fixed element we set its depth in the Create event. For the ball we set it in the
End Step event. For the rest the game is largely the same as a simple maze game. When
you press an arrow key we move the ball a little bit in the correct diagonal direction,
assuming the new position is collision free. As indicated above the horizontal distance is
twice as large as the vertical distance. When the ball (that is, its shadow) collides with the
flag (that is, again its shadow), the maze has been solved.
Creating the rooms is a bit more work this time. You have to place all wall elements
correctly. Also, as indicated above, best work your way from the top downwards. Use the
button in the toolbar to sort the instances by y-coordinate if you made a mistake. Use a
16x8 grid to align the instances correctly. You can indicate that you want to use an
isometric grid to make it easier to place the instances. You might want to uncheck the
box to delete underlying instances because this makes it easier to place the wall elements.
There is one more trick added to the demo. When you hold the <Space> key you can see
the ball through the wall. This is useful when the moving object can completely disappear
behind other objects. This is done as follows. A new object called
transparent_ball
is created. It is given a depth of –100000, that is, in front of everything else. When the
user presses <Space> an instance of this object is created and when he releases the key
the object is destroyed. We make sure the object is at the same position as the actual ball,
we give it the same sprite, but set its alpha value to 0.2. As a result we see a transparent
image of the ball in front of the walls. This does though give the opposite impression of
the walls being partially visible.
19
Figure 23. Using a second, translucent copy of the ball.
You might want to play a bit more with the demo. Add some nicer looking wall and
gates, add some levels, etc.
More advanced isometric games
Isometric games are very well suited for many types of games. The major complication
though is that you need nice looking tiles and sprites. There are though lots of resources
for this on the web, including some programs that help you. Use e.g. Google and type as
keywords "isometric tiles" and you will find many interesting pages. For the rest, as was
hopefully made clear above, it is easier than it might seem. The only two things you have
to keep in mind are the collision masks and setting the depth correctly. Here are a few
more things to keep in mind:
• When you cannot walk behind certain objects (like mountains or woods) you best
draw them on the background. Next you can use some invisible objects to avoid
that the moving objects can stand on top of them.
• When an object spans different tiles (like e.g. a gate) split it into several pieces to
avoid problems with the depth.
• Remember to always put the origin at the center of the vertical projection of the
object. So for example, a flying bird will have its center quite a distance below it.
Note that it is not necessary to make the sprite this long. The center can lie outside
the sprite.
Conclusions
Hopefully this tutorial has convinced you that it is possible to make many different types
of games with Game Maker that have a clear 3-dimensional look and feel. As always,
only your imagination is the limit. And if you want to make some real 3-dimensional
games you might want to download the First Person Shooter tutorial from the YoYo
Games website
.
1
Game Maker Tutorial
Designing Good Games
Written by Mark Overmars
Copyright © 2007 YoYo Games Ltd
Last changed: February 21, 2007
Uses: no specific version of Game Maker
Level: Beginner
When Atari produced its first game console in the seventies is was not very popular. This
changed drastically when the game Space Invader was created and bundled with the
console. Within a short period of time Atari sold a huge number of consoles. The same
thing happened when Pacman was produced. And for the Nintendo Game Boy Tetris
was the absolute winner. Why are these games so special that they mean the difference
between success and failure of the devices they were created for?
Figure 1. PacMan and all of its clones are still very popular games.
The same applies in PC games. Some games become extremely popular making their
creators instant millionaires, while other games, that look almost the same, become
miserable failures. And then there is also a large collection of games that you never see
because they were cancelled halfway the production and their creators went bankrupt.
What makes a game a winner and what leads to failure? This is a very difficult question
to answer. It involves many different aspects. In this tutorial we will delve into some of
these aspects in the hope it will help you to create better games. Many elements of this
tutorial were based on a paper by Creg Costikyan
1
.
1
Creg Costikyan, I have no words & I must design, Interactive Fantasy #2, 1994. See also
/>.
2
What is a Game?
Before talking about good games we should decide what a game is in the first place.
There is a surprising amount of discussion about this issue and there are many different
definitions. It is easier to say what is not a game. This
A movie is not a game
This is rather obvious, but why? What elements of games are missing in movies? The
main difference is that there is no active participation of the viewer in a movie. The
viewer does not control the movie and cannot make decisions that influence the outcome
of the movie. The same is true for stories and plays in a theater. Also the final outcome of
the movie is fixed (even though the viewer might not know it). This is a crucial aspect of
movies and plays. People in general don’t like plays in which the outcome is not
predetermined. In games the opposite is true. People do not like it when the outcome of a
game it fixed. They want influence on that outcome. They want to be in control.
A toy is not a game
You play with a toy but you do not play with a game. You play the game. With a toy
there are no predefined goals although during play you tend to set such goals yourself. A
number of computer games actually are close to being toys. For example, in SimCity or
The Sims there are no clearly defined goals. You can build your own city or family and
most likely set your own goals (like creating the biggest city) but there is not really a
notion of winning the game. One could add this (e.g. you could add that the game is won
when your city has reached a particular population) but this can be frustrating because it
is not a natural ending. This being said, there is nothing wrong with creating a nice
interactive computer toy.
Figure 2. Is SimCity a game?
3
A drawing program is not a game
A drawing program is fun to play with and encourages creativity, but again it has no clear
set goals. The user defines the goals and it is the user who decides whether the goals are
reached.
A puzzle is not a game
This is a more difficult one. Clearly many games contain puzzle elements. But a puzzle is
static, while a game is dynamic and changes in the course of playing it. A satisfying game
can be played over and over again and there are different strategies that lead to success.
So what is a (computer) game then? Here is a possible definition:
Note that the definition does not talk about graphics, or sound effect, or in-game movies.
Such aspects obviously do play a role in making nice, appealing games, but they are not
the essential aspects of games. Let us look at the different ingredients of the definition in
some more detail.
A computer game is a software program
This makes it rather different from for example board games or sport games. It takes
away some of the fun of games. There are no pieces to move around and there is no
physical satisfaction (although some recent games, like Dance Dance Revolution or the
games for the new Nintendo Wii console involve physical exercise). Also the social
aspects are less prominent, although online multiplayer games add a new form of social
interaction. But we get quite a bit in return. A software program can much better react to
and adapt to the players. Most computer games have a real-time element that is not
present in board games. The game continues even when the players do nothing. This can
lead to enhanced excitement and a better feeling of presence in the game world. Also
computer games can adapt to the players making it satisfying for largely different players,
both beginners and advanced. The possibility of having computer-controlled opponents
adds many new challenges. Computer games can also be more complex because the game
itself can help the players understand the different aspects and teach the player how to
play. Finally, computer games can create a more immersive environment by adding
wonderful graphics, music and cut-scenes.
A computer game involves players
This is rather obvious. A game is not something to watch. You should be involved in a
game. Don’t underestimate the importance of the player. Beginning game designers often
forget that you make the game not for yourself but for the people that are going to play it.
So you always have to think about who they are. A game for children should be rather
different than a game for adults. And a game for hard-core gamers should be rather
different from a game for less experienced players. You need to pick the correct
audience. Bad games are often written for the wrong audience. For example, a very
A computer game is a software program in which one or more players make decisions
through the control of game objects and resources, in pursuit of a goal.
4
experience flight simulator freak wants to be able to control every aspect of the plane and
wants things to be as realistic as possible. For a player that just wants a bit of quick flying
fun this is frustrating and boring and such a player will most likely never get the plane to
take off, let alone to get it to land.
Playing a game is about making decisions
The player makes decisions that influence the rest of the game. In fast paced action
games such decision typically involve in which direction to move and which weapon to
choose for shooting. In complicated strategy games the decisions involve were to build
your settlements, which units to train, when and where to attack, etcetera. Of course
decisions should have an effect. Surprisingly, in many games the effect of decisions is
only marginal. For example, often it does not really matter which weapon to use. This
often leads to frustration. Carefully balancing decisions and their effects is crucial for
satisfying game play.
Playing a game is about control
The player should feel in control of the game. Not the other way round. Uninterruptible
sequences in which the control is taken out of the hands of the player still occur in many
games and often lead to frustration. The more freedom there is for the player, the better.
There is though a catch here. A game is also about surprises and dramatic effects. Such
effects can be created much better if the player is not in control. For example, in a movie,
when the main character approaches a door you can let the music rise. The viewer knows
that something is going to happen. Together with zooming in on the door, this can create
a great dramatic effect. But if the same happen in a game and at the last instance the
player decides not to open the door, most of the effect is gone and even becomes absurd.
Careful balance of freedom of control and dramatic effect is difficult. (There is another
less valid reason for not allowing too much control. More freedom and control for the
player makes it more work to create the game.) Whenever you need to constrain the user,
try to do this in a natural way. For example, in Riven the player moves between different
parts of the game world. By letting the user use some kind of train system it is natural
that this motion goes automatic and cannot be controlled by the player.
Game objects and resources
In a game you normally control certain game objects, like the main character, units, a car,
etc. In some games you can control just one object while in other games, for example
strategy games, you can control many different objects. Besides the game objects that the
player controls, there are normally many other objects that are controlled by the
computer. The game objects the player controls play a certain role in the game. This is an
important property. In other programs you also control certain objects, like buttons, but
these do not play a role in the program. They are only meant to give certain commands to
the program. Besides controlling game objects you must often also manage certain
resources. This is most evident in strategy games and simulation games in which you
must manage the amount of food, wood, stone, gold, etc. But also in many other games
there are resources to manage, like ammunition for your weapons, a shield that can be
used a limited amount of time, etc. Careful planning of resources and their use can add
5
many nice aspects to the game play. The game designer must balance the availability of
resource with their need, to achieve interesting game play.
A game needs a goal
This is a crucial ingredient in a game. People want to win a game and, hence, there must
be a goal to reach. For long games there should also be sub-goals, like finishing a
particular level, defeating a certain monster, or acquiring a new spell. Reaching a goal or
sub-goal should result in a reward. Such a reward can consist of a score or some nice
movie, but it is better if the reward is actually part of the game play itself, for example a
new weapon, some additional useful information, etc. We will talk more about goals and
rewards in a moment.
So now we know what a computer game is. But is does not say much about when a game
is good. Think about the following computer game:
If you verify it, this game has all the ingredients described above. There is a player, there
is a decision to make, the player controls what is happening, there are game objects (the
prince, the cave monster, etc.) and there is a clear goal. But it is obviously a rather boring
game. There is no challenge. The game is too easy. So clearly we have to do a better job
to make an interesting game.
Reaching Goals
An important part of a game is that there is a goal and the game challenges the player to
try and achieve this goal. Actually, there are often many different sub-goals. Goals come
in all sorts and shapes. A goal can be to try and shoot an enemy plane, or to finish a level
by collecting all diamonds, or to reach the highest score or to finish the game. Clearly
some of these goals are short-term goals while others are long-term goals that can only be
reached by playing the game for weeks. A good game is filled with these goals and the
player should be rewarded when he reaches one of the goals. Rewards give an important
additional motivation to try and reach the goals.
Goals should not be too easy to achieve. There must be a challenge. And when the game
progresses the goals should become harder to reach and the player has to become better at
the game to achieve them. This learning curve is very important. In the beginning the
player needs to understand the controls and the mechanisms in the game. This is best
done by letting him achieve some simple goals. Later on, the player understands the game
better and will be ready for bigger challenges.
You have to rescue the princess who is held in a fortress. On the screen you are shown
two roads, one leading to a fortress and the other leading to a cave. You have to decide
which road to take. You choose the road to the fortress? Congratulations. You rescued the
princess and won the game. You choose the other road? Bad luck. You are eaten by the
cave monster and die.
6
Obviously, when goals are hard to achieve, there is a big chance of failure. You have to
be careful with failure though. It can easily put the player off, making him stop playing.
And that is definitely not what you want to happen. To avoid this it is crucial that, in the
case of failure, the player always has the feeling he made a mistake that he could have
avoided. It should not be the game’s fault that the player lost, but his own. It is one of the
aspects that distinguish games like PacMan and Tetris from other games. You always
have the feeling you did something stupid. You can be pretty angry with yourself when it
goes wrong and you are determined to avoid this mistake the next time. This feeling
keeps you playing the game. On the other hand, consider a maze game in which from
time to time at a random spot a flash of lighting occurs, killing you if you happen to be in
the neighborhood. In such a game you, as a player, did nothing wrong. You just had bad
luck to be at the wrong spot. This is very frustrating. You are not angry with yourself but
with the game. And you probably soon stop playing it. Don't think that commercial
games are perfect in this matter. Quite some games for example produce enemies at
random locations and random moments in time. If you have bad luck they appear at the
wrong moment right next to you and kill you.
You should learn from this that you have to be careful with "luck" in your games.
Whether the player can achieve a goal should not depend on good or bad luck. Bad luck
is of course very frustrating for a player but also good luck does not give the player
satisfaction. Imagine that you can be lucky and find a super bomb just before facing the
main enemy. Having the super bomb make the fight very simple while not having it
makes it a major challenge. With the super bomb the player will not have the feeling he
conquered the enemy himself. It would have been much better if the super bomb was
always there but the player had to make a difficult move to get it, for example, jumping
over a dangerous pit. Now the player has an interesting decision: performing the
dangerous jump to make the fight easy, or not risking the fall and fighting the enemy with
lesser weapons.
Decisions
As we saw in the last example, creating an interesting decision enhances the game play
considerably. In general, decisions are a crucial ingredient of games. The more
interesting the decisions, the more interesting the game is. There can be very simple low-
level decisions or very high-level strategic decisions.
Let us look at the well-known PacMan game. It is packed with decisions. The most
important decision that you constantly have to take is which direction to move in. Are
you trying to stay as far as possible away from the monsters or are you going after the
dots, even if the monsters stay close-by? And will you go to a corner, where you might be
caught or will you stay in the center where you can move in more directions but can also
be attacked from multiple sides? A second type of decisions lies with the pills you can eat
to chase the monsters. When are you going to use them? Do you leave them to the end
and only use them to get to the final dots or do you use them early on to clear most of the
maze? And if you eat them, are you going to hunt for the monsters to get extra points or