Real World Adobe InDesign CS4- P6 docx
Bạn đang xem bản rút gọn của tài liệu. Xem và tải ngay bản đầy đủ của tài liệu tại đây (957.87 KB, 30 trang )
A Good Foundation
Being methodical every now and then can save a lot of trouble later.
Setting up master pages, dening layers, creating layout grids amd
ruler guides are not the most glamorous parts of InDesign, but they’re
a good place to spend a little organizational energy. Far from cramp-
ing your creative style, paying attention to basic layout options—at
the very beginning of the production process, if possible—sets the
stage on which you produce and direct the play of your publications.
-
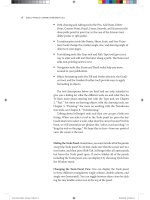
Finding and Changing
Object Formatting
In this example, we want to
search for the objects with a
gray stroke and change the
stroke to black. We also want
to reduce the stroke weight. Please imagine that there are
hundreds of these, on dozens
of pages.
Press Command-F/Ctrl-F to display the
Find/Change panel. Click the Object tab, then
click the Specify Attribute to Find button.
Use the Find Object Format Options dialog box to set up
the attributes you want to nd. Click the OK button when
you’re done, then, back in the Find/Change panel, click
the Specify Attributes to Change button.
Use the Change Object Format Options dialog
box to set up the replacement attributes, then
press OK to return to the Find/Change panel.
e Find/Change panel
displays the formatting
attributes you selected.
Click the Change All
button…
…and InDesign changes the objects whose
formatting matches the attributes you selected.
Real_World_Adobe_InDesign_CS4b.pdf 151Real_World_Adobe_InDesign_CS4b.pdf 151 08/04/2009 05:54:23 p.m.08/04/2009 05:54:23 p.m.
Text is the stream of characters that inhabit your publications. Text
is not about what those characters look like (that’s “type,” the topic
of the next chapter)—it’s about the characters themselves, and the
containers that hold them.
All text in an InDesign document exists in one or more stories. A
story consists of at least one text container: the container is usually a
text frame, but can sometimes be a path text object. A story can be as
small as a single, unlinked text frame, or as large as a series of hun-
dreds of linked text frames containing tens of thousands of words
and spanning hundreds of pages.
Text frames (see Figure 3-1) are similar to the text “boxes” found
in QuarkXPress, and they’re also similar to the text “blocks” found
in PageMaker. In our opinion, InDesign’s text frames present a “best
of both worlds” approach—you get the exibility and uidity of Page-
Maker’s text blocks combined with the precision of QuarkXPress’
text boxes.
Text, in a word, is what publications are really all about. A picture
might be worth a thousand words, but they’re not very specic words.
When you create a poster for a concert, for example, the text is what
tells the viewer where the concert will be presented, at what time,
and on which date. e point of using an image, color, or a stylish
layout is to get people to read the text.
Text
3
Real_World_Adobe_InDesign_CS4b.pdf 152Real_World_Adobe_InDesign_CS4b.pdf 152 08/04/2009 05:54:23 p.m.08/04/2009 05:54:23 p.m.
is chapter is all about how to get text into your InDesign docu-
ments—how to create and edit text frames, enter text, edit text, and
import text les. It’s also about creating text variables and condi-
tional text, checking the spelling of the text in your publication, and
about nding and changing text.
Creating Text Frames
Before you can add text to your InDesign publication, you’ve got to
have something to put it in: a text frame. To create a text frame, you
can use any or all of the following methods.
Draw a frame using one of the basic shape tools or the frame
drawing tools. To convert the frame to a text frame, select the
frame and choose Text from the Content submenu of the Object
menu (see Figure 3-2). If you have turned on the Type Tool
Converts Frames to Text Frames option in the Type panel of the
Preference dialog box, you can also convert the frame by click-
ing the Type tool inside the frame.
Drag the Type tool to create a frame whose height and width are
dened by the area you specied by dragging (see Figure 3-3).
Drag a text place icon. e text place icon appears whenever you
import a text le, or click the in port or out port of a text frame
(see Figure 3-4). See “Importing Text” later in this chapter.
Deselect all (Command-Shi-A/Ctrl-Shi-A) and then paste
text into the publication (or drag it out of another application
and drop it into the publication, which accomplishes the same
thing). InDesign creates a text frame containing the text.
Drag a text le (or series of text les) out of your operating
system’s le browser (the Finder on the Macintosh, or the
Windows Explorer in Windows) and drop it into an InDesign
publication.
In port
Out port (for linking text
frames together)
When you turn on the Show Text
reads option (press Command-
Option-Y/Ctrl-Alt-Y), InDesign
displays lines representing the
links between text frames.
-
Text Frame Anatomy
Real_World_Adobe_InDesign_CS4b.pdf 153Real_World_Adobe_InDesign_CS4b.pdf 153 08/04/2009 05:54:23 p.m.08/04/2009 05:54:23 p.m.
.
Select a frame
drawing tool.
Drag the tool to draw a frame. InDesign sets the content type
of the new frame to “Graphic.”
Click the Type tool inside
the frame, or…
…select Text from the Content
submenu of the Object menu.
InDesign converts the graphic
frame to a text frame.
-
Converting Any Frame
to a Text Frame
Drag the Type tool. InDesign creates a text frame
that’s the width and height you
specied by dragging.
Select the Type tool.
-
Drag the Type Tool
You “load” a text place icon
by placing a text le or by
clicking the in port or out
port of a text frame.
…to create a text frame that’s the
width and height you specied by
dragging.
Drag the text place icon…
-
Drag a Text Place Icon
Real_World_Adobe_InDesign_CS4b.pdf 154Real_World_Adobe_InDesign_CS4b.pdf 154 08/04/2009 05:54:24 p.m.08/04/2009 05:54:24 p.m.
Note that InDesign does not require you to create a text frame
before you add text, as (for example) QuarkXPress does. Most of
the text frame creation methods described previously dynamically
create a text frame as you enter, import, or paste text.
Once you’ve created a text frame, you can change its size, shape,
and rotation angle just as you would any other object you’ve created
(see Chapter 5, “Drawing” and Chapter 9, “Transforming”). You can
also change the shape of the text frame using InDesign’s drawing
and path editing tools (see Chapter 5, “Drawing”).
Text can also appear on a path—for more on this topic, see Chap-
ter 6, “Where Text Meets Graphics.”
Setting Text Frame Options
Text frames have attributes that are not shared with graphics frames
or with frames whose content is set to “Unassigned.” To view and
edit these attributes, choose Text Frame Options from the Type
menu, or press Command-B/Ctrl-B. or hold down Option/Alt as you
double-click the frame with either the Selection or the Direct Selec-
tion tool. InDesign displays the Text Frame Options dialog box (see
Figure 3-9).
e controls in this dialog box set the number of columns, inset
distances, and rst baseline calculation method for the text frame.
InDesign text frames can contain up to 40 columns—enter the
number of columns you want in the Number eld. To dene the dis-
tance between columns, or “gutter,” enter a value in the Gutter eld.
Columns and
Text Frames
-
Text Frame Options
As in many other dialog
boxes and panels, the
“chain” icon enforces
the same spacing in all
associated elds.
Real_World_Adobe_InDesign_CS4b.pdf 155Real_World_Adobe_InDesign_CS4b.pdf 155 08/04/2009 05:54:24 p.m.08/04/2009 05:54:24 p.m.
.
Column width. When we think of the typesetting specications for
a block of text, we think rst of the typeface, then the point size, the
leading, and the measure, or column width—in that order. When
we see a line of type, our thoughts go something like this: “at’s
Bodoni Book, eleven-on-een, on a fourteen pica measure.” e
length of the lines of text is roughly as important as the character
shapes, their size, and their leading.
InDesign recognizes the importance of column width in typeset-
ting by giving you the ability to determine the width of a text frame
by the width of its columns. When you type the number of columns
in the Text Frame Options dialog box and click OK, InDesign divides
the current width of the text frame into columns for you. However, if
you specify a value in the Width eld, then the program changes the
width of your text frame so that the columns will t.
e Fixed Column Width option tells InDesign what to do with
your text frame when it gets wider or narrower. When you turn this
option on, you’ll notice that when you resize the text frame it snaps
to widths determined by the xed widths of the columns (and gut-
ters) it contains (see Figure 3-6). If you leave this option turned o,
the column widths change when you resize the frame.
Regardless of the options in this dialog box, we have to point out
that a layout created using multicolumn text frames is far less exible
than the same layout using single column text frames. For example,
…InDesign resizes the
text frame based on the
column width you entered
(rather than evenly
dividing the width of the
text frame into columns
of equal width).
When you resize a text
frame that has a xed
column width…
…InDesign will “snap”
the frame widths based
on that column width. No
matter how narrow you
make the frame, it will
always contain at least
one column of that width.
When you turn on the Fixed
Column Width option…
-
Fixed Column Width
Real_World_Adobe_InDesign_CS4b.pdf 156Real_World_Adobe_InDesign_CS4b.pdf 156 08/04/2009 05:54:24 p.m.08/04/2009 05:54:24 p.m.
you cannot change the width or height of just one of the columns in
a multi column text frame.
e values you enter in the Inset Spacing section of the Text Frame
Options dialog box control the distances InDesign will push text
from the edges of the text frame. You can enter an inset distance
from 0 to 8640 points (or about 120 inches). To enter dierent values
for each eld, you’ll have to turn o the Make All Settings the Same
option (the little chain thingy). Unfortunately, you can’t enter nega-
tive values to make the text hang out of the text frame.
Inset distances work in conjunction with (and in addition to) the
margins of the paragraphs in a text frame (see Figure 3-7). In general,
we prefer to work with the text inset values set to zero, and use the
le and right indent values of individual paragraphs to control the
distance from the edges of the text to the edges of the text column.
Setting Text
Frame Insets
Enter inset distances in the
elds in the Inset Spacing
section of the dialog box to
push text away from the
edges of the text frame.
Paragraph indents are
applied in addition to the
text frame inset distances.
When you select the text
frame with the Selection
tool, InDesign displays the
text inset boundary.
-
Text Frame Insets
By default, InDesign applies no inset—
note that this diers from most versions
of QuarkXPress, which apply a one point
inset by default.
Real_World_Adobe_InDesign_CS4b.pdf 157Real_World_Adobe_InDesign_CS4b.pdf 157 08/04/2009 05:54:24 p.m.08/04/2009 05:54:24 p.m.
.
However, these inset features are sometimes helpful when you need
to move all the text in a frame up or down slightly without moving
the frame itself.
e Oset pop-up menu in the First Baseline section of the Text
Frame Options dialog box oers ve methods for calculating the
position of the rst baseline of text in a text frame: Ascent, Cap
Height, Leading, x Height, and Fixed (see Figure 3-8).
If you use either the Ascent or Cap Height method, the tops of
characters in your text frames will touch (or come close to touching)
the top of the text frame (provided, of course, that the top frame inset
is zero). Choosing x Height is similar: the tops of the lower-case char-
acters will bump up against the top of the frame (and the ascenders
and uppercase letters will pop out the top of the frame). ese set-
tings come at a price, however: it’s almost impossible to calculate the
distance from the top of the frame to the baseline of the rst line of
text in the frame (without resorting to scripting).
In addition, using these methods means that InDesign will vary
the leading of the rst line when you enter characters from dierent
fonts in the line, or change the size of characters, or when you embed
inline graphics in the line.
Is that bad? It is, if you care about type.
Setting First
Baseline Position
Example font is Minion Pro;
example leading is 24 points.
Distance from the top of the text
frame to the rst baseline:
24 points.
Distance from the top
of the text frame to the
rst baseline:
15.6000316143036
points.
Distance from the top
of the text frame to the
rst baseline:
10.4640212059021
points.
Distance from the top
of the text frame to the
rst baseline:
17.44775390625 points.
All baseline distances calcu-
lated using Neo-Atlantean
super science, and will vary
from font to font.
Distance from the top of the text
frame to the rst baseline:
24 points.
If you use the Fixed or
Leading options, you can
know exactly where the rst
baseline of text will fall in
relation to the top of the text
frame, regardless of the font
or the point size of the text.
-
First Baseline Position
Real_World_Adobe_InDesign_CS4b.pdf 158Real_World_Adobe_InDesign_CS4b.pdf 158 08/04/2009 05:54:24 p.m.08/04/2009 05:54:24 p.m.
It’s important that you know exactly where the rst baseline of
text in a text frame will appear, relative to the top of the text frame.
Why? Because if you know the position of the rst baseline, you can
snap the top of the text frame to your leading grid—and rest secure
in the knowledge that the rst baseline will fall neatly on the next
baseline.
To control the location of the rst baseline of text in a text frame,
choose either Leading or Fixed from the Oset menu in the First
Baseline section. When you choose Leading, the rst baseline is one
leading increment from the top of the text frame—regardless of the
size of the characters (or the height of inline graphics) in the line.
When you choose Fixed, you can specify exactly how far from the
top of the frame the rst baseline should fall using the Min eld.
e Min eld for the Oset settings other than Fixed means,
“between the Min value and what the Oset would be ordinarily, use
the larger value.”
For more on leading, see Chapter 4, “Type.”
In a typical magazine spread, some text wraps around graphics;
some text doesn’t. Imagine that you want the body text of an article
to wrap around an image—but want to place a headline on top of the
same image. To keep text in a text frame from obeying a text wrap,
select the frame, open the Text Frame Options dialog box, and then
turn on the Ignore Text Wrap option (see Figure 3-9).
Ignoring Text Wrap
When you try to place
a text frame on top of a
graphic that has a text wrap,
InDesign pushes the text out
of the frame.
Unless, that is, you display
the Text Frame Options
dialog box (select the text
frame and press Command-
B/Ctrl-B) and turn on the
Ignore Text Wrap option.
Text wrap boundary
Once you do this, text
in the text frame ignores
the text wrap.
-
Ignoring Text Wrap
Real_World_Adobe_InDesign_CS4b.pdf 159Real_World_Adobe_InDesign_CS4b.pdf 159 08/04/2009 05:54:25 p.m.08/04/2009 05:54:25 p.m.
.
Note that in this case (where the text was on top of the oending
graphic) you could also turn on the Text Wrap Only Aects Text
Beneath option in the Composition Preferences dialog box. is
preference aects all text wraps in your le (see Chapter 6, “Where
Text Meets Graphics”).
Vertical justication controls the vertical position of the text in a text
frame (see Figure 3-10). To set the vertical justication method used
for a text frame, select the text frame, display the Text Frame Options
dialog box, and then choose a method from the Align pop-up menu.
Top. Aligns the text to the top of the text frame, positioning the
rst baseline of text in the frame according to the method you’ve
selected from the Oset pop-up menu (see above).
Center. InDesign centers the text between the bottom of the text
frame and the top of the rst line of text (taking the baseline
options into account). Note that the text may be mathematically
centered, but might not appear centered in some cases. In these
relatively rare cases, you may have to work with the First Base-
line or Baseline Shi settings to center the text.
Bottom. Aligns the baseline of the last line of text in the text
frame to the bottom of the frame. When you choose this
method, the the Oset pop-up menu has no eect.
Justify. Adds vertical space to the text in the text frame (using
paragraph spacing and/or leading to add this space) to ll the
text frame with the text. Note that using the Justify method will
not pull overset text into the text frame (that is, it won’t lessen
the leading value to make more text t in the frame; it only adds
space). e rst line of the text frame will remain where it was,
based on the First Baseline setting.
Paragraph Spacing Limit. e problem with vertically justied text
is that it overrides your leading values, and we don’t take kindly to
anyone messing with our leading. Fortunately, when you choose Jus-
tify from the Align pop-up menu, InDesign activates the Paragraph
Spacing Limit control, which sets the maximum amount of space
you’ll allow between paragraphs in the text frame. Once the space
between paragraphs reaches this value, InDesign adjusts the lead-
ing of each line in the text frame, rather than adding space between
paragraphs. To keep InDesign from changing leading at all, enter a
large value (up to 8640 points) in this eld. On the other hand, if you
really want InDesign to change the leading instead, enter zero.
Vertical Justication
Real_World_Adobe_InDesign_CS4b.pdf 160Real_World_Adobe_InDesign_CS4b.pdf 160 08/04/2009 05:54:25 p.m.08/04/2009 05:54:25 p.m.
Rectangular Frames Only. Vertical justication settings other than
Top have no eect on non-rectangular text frames. is includes
frames that have had corner eects applied to them.
Linking and Unlinking Text Frames
You can link one text frame to another to make the text continue—
or “ow”—from frame to frame. In InDesign, the controls for link-
ing and unlinking text frames are the “in port” and “out port” icons
on the text frames themselves. e process of linking text frames in
InDesign is similar to working with the “windowshade handles” on
PageMaker text blocks, and should feel familiar to PageMaker users.
When you enter zero, InDesign
applies leading to make the text
ll the height of the text frame.
When you enter a value, InDesign
applies paragraph spacing up to that
amount before changing the leading.
When you choose Center
from the Align pop-up menu,
you might want to choose the
Cap Height or Ascent option
from the Oset pop-up
menu (in this case, choosing
Leading is not a good idea,
as it pushes the text away
from the visual center of the
text frame).
When you choose Justify
from the Align pop-up menu,
InDesign adds space to force
the text to ll the height
of the frame. e method
InDesign uses is based on
the value you enter in the
Paragraph Spacing Limit
eld (you can enter values
from 0 to 8640 points).
-
Vertical Justication
Real_World_Adobe_InDesign_CS4b.pdf 161Real_World_Adobe_InDesign_CS4b.pdf 161 08/04/2009 05:54:25 p.m.08/04/2009 05:54:25 p.m.
.
ere’s no need to go to the Toolbox to get a special “linking” tool, as
there is in QuarkXPress.
When you link text frames together, you’re threading stories
through the text frames. When you place text to create a series of
linked text frames, you’re owing text.
e text in a story has a direction—it has a beginning, a middle,
and an end. When we speak, in this section, of a particular text frame
appearing before or aer another, we’re talking about its position in
the story, not relative to its position on the page.
e way that InDesign displays the in port and out port of a text
frame tells you about the text frame and its position in a story (see
Figure 3-11).
When the in port or out port is empty, no other text frame is
linked to that port. When both ports are empty, the text you see
in the text frame is the entire story.
When you see a plus sign (+) in the out port, it means that not
all of the text in the story has been placed. e remaining (or
“overset”) text is stored in the text frame, but is not displayed.
When you see a triangle in the in port or the out port (or both),
InDesign is telling you that the text frame is linked to another
text frame.
To link one text frame to another, choose the Selection or Direct
Selection tool, then click either the in port or the out port of a text
frame. InDesign displays the text place icon. Place the cursor over
another frame (when you do this, InDesign displays the text link
Linking Text Frames
is text frame contains all of the text in a story. How can you tell?
e in port is empty, and… …the out port is also empty.
is text frame is at the start
of a story, because the in
port is empty.
When you see a triangle in
the out port, it means that
the text frame is linked to
another text frame.
A “+” in the out port means that the
text frame is the last text frame in
a story, and that there’s more text
to place (the unplaced text is called
“overset” text).
-
In Ports and Out Ports
Real_World_Adobe_InDesign_CS4b.pdf 162Real_World_Adobe_InDesign_CS4b.pdf 162 08/04/2009 05:54:25 p.m.08/04/2009 05:54:25 p.m.
icon, which either looks like a little chain or like some text inside big
parentheses, depending on what type of frame you’re hovering over)
and then click. InDesign links the two frames (see Figure 3-12). at
sounds pretty simple, but there are a number of details you should
keep in mind:
Unlike QuarkXPress, InDesign can link two text frames when
both frames contain text. When you do this, the stories in the
text frames are merged into a single story. If the text in the rst
text frame did not end with a carriage return, InDesign will run
the text in the second text frame into the last paragraph of the
rst text frame (see Figure 3-13).
Unlike PageMaker’s text blocks, InDesign frames can be linked
when they’re empty. is means you can easily set up text lay-
outs without having the copy in hand and without resorting to
a “dummy text” placeholder.
Select a text frame and click its out port.
InDesign displays the text place icon.
InDesign changes
the text place
icon to the link
icon.
Click the link
icon on the frame.
InDesign links
the two frames.
Position the text place
icon over a frame.
If you’ve turned on the Show
Text reads option (on the
View menu), InDesign will
display a line linking the out
port of one text frame with
the in port of another.
At this point, you can also
create a new text frame by
dragging the text place icon.
e new frame will be linked
to the text frame you clicked.
You can also
click the in port
to load the text
place icon.
-
Linking Text Frames
Real_World_Adobe_InDesign_CS4b.pdf 163Real_World_Adobe_InDesign_CS4b.pdf 163 08/04/2009 05:54:25 p.m.08/04/2009 05:54:25 p.m.
.
Two unlinked text frames. Click the out port of one of the
frames to load the text place icon.
Click the text place icon on
the other frame.
InDesign links the two frames.
-
Linking Stories
If the rst frame did not
end with a carriage return,
InDesign runs the text from
the rst paragraph of the
second frame into the last
paragraph of the rst frame.
e port you click (the in port or the out port) sets the position
of the link in the sequence of linked text frames making up the
story. If you click the out port, the text frame you link to will
come aer the current text frame. If you click the in port and
then another frame, this second frame will come earlier in the
story (see Figure 3-14).
When you click the out port of a text frame that contains more
text than it can display (that is, an out port that displays the “+”
symbol), the additional text will ow into the next text frame in
the story (see Figure 3-15).
You don’t have to link to another text frame—you can also create
a link to a graphic frame or a frame whose content type has been
set to “None.”
To create a new text frame that’s linked to an existing text frame,
click the in port or out port of the existing frame and then drag
the text place icon.
As you link and unlink text, InDesign changes the appearance
of the cursor to give you a clue about what you’re doing or are
about to do.
What if you have a “loaded” text place cursor and then realize
that you need to scroll, or turn to another page? No problem—
you can scroll, zoom, turn pages, create or modify ruler guides,
and create new pages.
To “unload” the text place cursor (disable it, like if you change
your mind midstream), click on any tool in the Toolbox (or just
press a key to switch tools, like “V” for the Selection tool).
Link icon Unlink icon
Real_World_Adobe_InDesign_CS4b.pdf 164Real_World_Adobe_InDesign_CS4b.pdf 164 08/04/2009 05:54:25 p.m.08/04/2009 05:54:25 p.m.
To break a link between text frames, double-click the in port or out
port on either side of the link (see Figure 3-16). When you break
a link between text frames that have text content, the text usually
becomes overset text.
Alternatively, you can click the out port of one frame and then
click the next frame in the thread (see Figure 3-17). When you move
the text place icon over the next frame, InDesign displays the Unlink
Text icon (which is subtly dierent than the Link Text icon). Click
the Unlink Text icon on the frame, and InDesign breaks the link.
When you break a link in the middle of multiple frames, the links
before and aer the break remain. If boxes A, B, C, and D are linked
together, and you break the link between B and C, then C and D will
stay linked together (even though there won’t be any text in them).
What happens to text frame links when you delete or cut a linked text
frame or series of linked text frames? First, InDesign does not delete
any text in the story—the only time it does that is when you select
all of the frames in the story and delete them. Otherwise, InDesign
always ows the text contained by the frames you’ve deleted into the
remaining frames in the story. If you want to delete text, you have
Unlinking Text Frames
Cutting and Pasting
Text Frames
Two unlinked
text frames.
When you load
the text place
icon by clicking
the out port…
…and link to
another text
frame…
…that frame
becomes the next
frame in the story.
If, on the other
hand, you load
the text place icon
by clicking on an
in port…
…the frame you link to
becomes the previous
text frame in the story.
-
Controlling the Order
of Text Frames in a
Story
is text frame contains overset
text. When you link it to another
text frame…
…InDesign places the overset text
in the following text frame (in this
example, all of the text in the story
has been placed).
-
Placing Overset Text
Real_World_Adobe_InDesign_CS4b.pdf 165Real_World_Adobe_InDesign_CS4b.pdf 165 08/04/2009 05:54:26 p.m.08/04/2009 05:54:26 p.m.
.
to select it using the Type tool rst. For more on selecting text, see
“Editing Text,” later in this chapter.
When you cut or copy linked text frames, then paste, InDesign
maintains the links between the duplicated frames—but not between
the duplicates and the original frames or any other frames (see Figure
3-18). e copies of the frames contain the same text as the originals.
A side eect of this behavior is that you can copy text frames from
a story that are not linked to each other, and, when you paste, the text
frames will be linked. is can come in handy when you’re trying to
split a story that is in multiple frames (see in Figure 3-19).
Select a text frame and double-click
the out port (or in port).
InDesign breaks the link at the
point at which you clicked.
-
Unlinking Text Frames
Move the text place icon over the
next (or previous, if you clicked
an in port) text frame. InDesign
displays the unlink icon.
InDesign breaks the link between
the two text frames.
Select a text frame then click
the out port (or in port).
InDesign displays a text
place icon.
-
Another Method
In this example, we’ve selected the
second and third text frames in a
story. When we copy and paste…
…InDesign retains the link between
the two copied frames.
In this example, we’ve selected the
rst and third text frames in a story.
When we copy and paste…
…the duplicate frames are linked—
even though the frames were not
directly connected to each other.
-
Cutting and Pasting
Linked Frames
-
More About Copying
and Pasting Linked
Frames
Real_World_Adobe_InDesign_CS4b.pdf 166Real_World_Adobe_InDesign_CS4b.pdf 166 08/04/2009 05:54:26 p.m.08/04/2009 05:54:26 p.m.
It’s easy to add a text frame in the middle of a sequence of linked text
frames. Just follow these steps (see Figure 3-20).
1. Use the Selection tool to click the out port at the point in the
story at which you want to add the new frame.
2. Drag the text place icon to create a new text frame, or click an
existing, empty, unlinked frame.
InDesign only lets you link to empty and unlinked frames unless
you’re adding frames to the beginning or end of your thread.
Adding a New
Frame to a Story
Click the out port of a text
frame at the point at which
you want to add the new
frame (or click the in port
of the following frame).
InDesign displays the
text place icon.
Drag the text place icon.
InDesign creates a new
text frame and adds the
text frame to the story.
To add a text frame at the
beginning of the story, click
the in port of the rst text
frame in the story.
-
Adding a New Frame
to a Story
Flowing Text
When you select Place from the File menu (and then choose a text
le), or use the Selection tool to click the in port or out port of a text
frame, your cursor changes to the text place icon. You can drag the
text place icon to create a text frame, or you can click on an existing
frame to ow text into it. Flowing text is all about the care, mainte-
nance, and feeding of the text place icon (see Table 3-1 for more on
text place icons).
Real_World_Adobe_InDesign_CS4b.pdf 167Real_World_Adobe_InDesign_CS4b.pdf 167 08/04/2009 05:54:26 p.m.08/04/2009 05:54:26 p.m.
.
Icon: What it means:
Manual text ow. Click to ow text into a frame; click
in a column to create a frame that’s the width of the
column, or drag to create a frame.
Semi-automatic text ow. InDesign “reloads”
the text ow icon aer each click or drag.
Super Autoow text ow. Click to place all of the text
in the story (InDesign adds pages as necessary).
Automatic text ow. InDesign ows the story to all
empty pages, but does not add pages.
e text ow icon is above a guide or grid “snap” point.
e text ow icon is above a frame; clicking will place
the text in the frame.
-
Text Place Icons
e text place icon can also show a preview of the text you’re about
to place. For more on this, see the description of the Show umb-
nails on Place option in the Interface panel of the Preferences dialog
box in Chapter 1, “Workspace.”
Once you’ve “loaded” the text place icon, you can use one of
InDesign’s four text ow methods: Manual text ow, Semi-automatic
text ow, Automatic text ow, or Super Autoow. ese determine
what happens when you click or drag the text place icon. Here’s the
lowdown.
Manual text ow. By default, InDesign uses the manual text
ow method. When you click the text place icon on your page,
or drag the text place icon, InDesign creates a new text frame
and ows the text into it (see Figure 3-21). When you click the
text place icon in between column guides, the width of the text
frame is determined by the width of the column you clicked in;
the height of the frame is the distance from the point at which
you clicked the text place icon to the bottom of the column (see
Figure 3-22). In a one-column document, the text frame reaches
from the page’s le to right margins. InDesign then ows the
text into the new text frame. When you click the text place
icon on an existing text frame or series of linked text frames,
InDesign ows the text into the frame or frames. In either case,
once InDesign is done owing the text, the text place icon
disappears and you’re back to whatever tool you had selected
before you loaded the text place icon. To continue placing text,
click the out port to reload the text place icon.
Real_World_Adobe_InDesign_CS4b.pdf 168Real_World_Adobe_InDesign_CS4b.pdf 168 08/04/2009 05:54:26 p.m.08/04/2009 05:54:26 p.m.
Semi-automatic text ow. Semi-automatic text ow is almost
exactly like manual text ow—the dierence is that InDesign
reloads the text place icon. e advantage? You don’t have to
click the out port of a text frame to reload the text place icon. To
turn on semi-automatic text ow, hold down Option/Alt when
the text place icon is visible. InDesign displays the semi-auto-
matic text place icon (see Figure 3-23).
Automatic text ow. Automatic text ow—which you get if you
hold down both Option/Alt and Shi—places as much text in
the story as can t on the pages in your document (the cursor
looks like a solid down arrow). InDesign adds text frames as
necessary on each subsequent column or page (and links them
together, of course), but it won’t add additional pages to your
document.
Super Autoow. Hold down Shi, and the text place icon turns
into the autoow icon. Click the autoow icon, and InDesign
places all of the text, creating new frames and pages as neces-
sary (see Figure 3-24). When you click the autoow icon in a
text frame or series of linked text frames, InDesign duplicates
that frame (or frames) on any new pages it creates, automatically
links the frames, and places the text in the frames. When you
click the autoow icon in a column, InDesign creates a new text
frame in each column (adding pages until it has placed all of the
text in the story).
Load the text place icon (by
placing a text le or clicking
the in port or out port of any
text frame). InDesign displays the manual
text ow icon. Drag the icon.
InDesign ows text into the area
you dened by dragging.
Load the text place icon.
InDesign displays the
manual text ow icon.
Click the manual text ow
icon in a column.
InDesign ows the text into the
column. Click the out port to reload
and place more text.
-
Manual Text Flow
-
Manual Text Flow and
Column Guides
Real_World_Adobe_InDesign_CS4b.pdf 169Real_World_Adobe_InDesign_CS4b.pdf 169 08/04/2009 05:54:27 p.m.08/04/2009 05:54:27 p.m.
.
Load the text place icon.
InDesign displays the
manual text ow icon.
Hold down Option/Alt to switch to
the semi-automatic text ow icon,
then click the icon in a column.
InDesign ows the text into the
column, then automatically reloads
the text place icon.
Click the semi-automatic text ow
icon in the next column. InDesign
creates a new text frame and links it
to the previous text frame.
Repeat this process until you’ve
placed all of the columns of text you
want to place.
-
Semi-Automatic
Text Flow
Load the text place icon.
InDesign displays the
manual text ow icon.
Hold down Shi to switch to the
Super Autoow text ow icon, then
click the icon in a column.
InDesign ows the text into the
available columns or text frames,
and continues adding new text
frames and pages until there’s no
more text le to place.
-
Super Autoow
If you want InDesign to add text frames and/or pages as you type,
use the options in the Smart Text Reow section of the Type panel of
the Preferences dialog box, as described in Chapter 1, “Workspace.”
When you want to shrink a text frame so that it’s just big enought to
t its content (for a photo caption, for example), you’ve got a number
of dierent methods you can call on. First, you can press Command-
Option-C/Ctrl-Alt-C, to t the frame to its content. But you can also
double-click any of the text frame’s edges with the Selection tool to
shrink the text frame in a specic dimension (see Figure 3-25).
Shrinking Text Frames
Real_World_Adobe_InDesign_CS4b.pdf 170Real_World_Adobe_InDesign_CS4b.pdf 170 08/04/2009 05:54:27 p.m.08/04/2009 05:54:27 p.m.
-
Shrinking Text Frames
Double-click the top or bottom
edge of a text frame…
Double-click the le or right
edge of a text frame…
Double-click one of the
corners of the text frame…
…and InDesign shrinks the
frame vertically.
…and InDesign shrinks the
frame horizontally.
…and InDesign shrinks the frame
horizontally and vertically.
Entering Text
e simplest way to get text into the text frames in your InDesign
publications is to type it. To do this, create a text frame by dragging
the Type tool, or select the Type tool and click in a frame (again, it
doesn’t have to be a text frame). You can also double-click with either
the Selection tool or the Direct Selection tool to automatically switch
to the Type tool. All these methods place a blinking text cursor (or
“text insertion point”) inside the text frame. Type, and the characters
you type will appear in the text frame.
We don’t know about you, but we’re not getting any younger, and we
have trouble remembering exactly which keys to press to produce
certain special characters. If you’re like us, you’ll appreciate the list
of common character shortcuts in Table 3-2. InDesign lists these
shortcuts in the Insert Special Character, Insert Break Character,
and Insert White Space submenus (under the Type menu, or in the
Context menu, see Figure 3-26).
Inserting Special
Characters
Real_World_Adobe_InDesign_CS4b.pdf 171Real_World_Adobe_InDesign_CS4b.pdf 171 08/04/2009 05:54:27 p.m.08/04/2009 05:54:27 p.m.
.
Special character: What you press:
#VMMFUt Option-8/Alt-8
Column break Keypad Enter
Copyright symbol (©) Option-G/Alt-G
Discretionary hyphen Command-Shi /Ctrl-Shi
Ellipsis (…) Option-;/Alt-;
Em dash (—) Option-Shi /Alt-Shi
Em space Command-Shi-M/Ctrl-Shi-M
En dash (–) Option /Alt
En space Command-Shi-N/Ctrl-Shi-N
Even page break undened
Figure space undened
Flush space undened
Frame break Shi-Keypad Enter
Hair space undened*
Indent to here Command-\/Ctrl-\
Next page number Command-Option-Shi-]
Ctrl-Alt-Shi-]
Non-breaking hyphen Command-Option /Ctrl-Alt
Non-breaking space Command-Option-X/Ctrl-Alt-X
Odd page break undened*
Page break Command-Keypad Enter
Ctrl-Keypad Enter
Page number Command-Option-Shi-N
Ctrl-Alt-Shi-N
Paragraph symbol (¶) Option-7/Alt-7
Previous page number Command-Option-Shi-[
Ctrl-Alt-Shi-[
Punctuation space undened
Trademark (™) undened
Le double quote (“) Option-[/Alt-[
Le single quote (‘) Option-]/Alt-]
Right double quote (”) Option-Shi-[/Alt-Shi-[
Right single quote (’) Option-Shi-]/Shi-Alt-]
Straight single quote Control-'/Alt-'
Straight double quote Control-Shi-'/Ctrl-Alt-'
Section symbol (§) Option-6/Alt-6
in space Command-Option-Shi-M
Ctrl-Alt-Shi-M
Registered trademark (®) Option-R/Alt-R
-
Entering Special
Characters
Real_World_Adobe_InDesign_CS4b.pdf 172Real_World_Adobe_InDesign_CS4b.pdf 172 08/04/2009 05:54:27 p.m.08/04/2009 05:54:27 p.m.
All of the keyboard shortcuts for these special characters can be
redened and/or added (for those characters lacking a default key-
board shortcut) by selecting Keyboard Shortcuts from the Edit menu
and then navigating to the Type Menu section.
We’re sometimes stumped when it’s time to type a dagger (†) or a cir-
cumex (ˆ). And we oen spend time hunting through the Character
panel (on the Mac OS) or Character Map (in Windows) looking for
the right character in a symbol font (such as Zapf Dingbats).
If you also have this problem, you’ll love the Glyphs panel. A
“glyph” is the term for a specic shape of a character. To open this
panel, choose Glyphs from the Type menu (see Figure 3-27).
e Glyphs panel is easy to use: while the text cursor is in a text
frame, choose the font, then double-click a character from the list of
characters in the Glyphs panel. InDesign inserts the character at the
location of the cursor.
Now here’s the cool part: If a character can be found inside a font,
you can use it—even if the character is outside the range of charac-
ters supported by your system. For instance, many fonts have a ½
character, but there’s no way to type it on the Mac OS. is seems
like a silly feature—aer all, why would fonts contain characters that
would be inaccessible to any other program? We don’t know, mate,
but they do. Fonts have all kinds of foreign-language characters,
weird punctuation, and even ornaments that simply can’t be used
in QuarkXPress or other programs. But the Glyphs panel makes it
easy to get to them. Characters such as “” and “” ligatures, which
aren’t part of the Windows character set, suddenly become available
(without switching to an “expert” font). It’s well worth your time to
trawl through your fonts just to see if there’s anything you can use
that you haven’t been using.
Inserting Glyphs
Click the Type tool
in a text frame.
Display the context
menu and choose
a special character
from the Insert
Special Character
submenu.
InDesign enters
the character.
In this example, the section
marker text (in the Section
Options dialog box) is
“Sixteenth Century.”
-
Entering Special
Characters Using the
Context Menu
Real_World_Adobe_InDesign_CS4b.pdf 173Real_World_Adobe_InDesign_CS4b.pdf 173 08/04/2009 05:54:27 p.m.08/04/2009 05:54:27 p.m.
.
Choose Glyphs from
the Type menu.
Click the Type tool in a text frame.
Select a font
family and
type style, then
double-click a
character…
…and InDesign inserts
the character.
Click these buttons to
reduce or enlarge the
size of the character
display.
If you’ve selected an OpenType
font, you can choose alternate
character glyphs from the
pop-up menus associated with
each character.
e Show menu provides a
number of ways to sort and
display the glyphs avail-
able in the font. One of our
favorites is Alternates for
Selection, which appears
when you have text selected.
Select some text…
…and choose Alternates
for Selection from the
Show menu.
If the font contains alternate
glyphs for the selected
characters, they will appear
in the Glyphs panel.
Note that this particular alternate glyph won’t appear
unless you have Discretionary Ligatures turned on.
Double-click the alternate glyph to
replace the selected characters.
-
Inserting Characters
Using the Glyphs
Panel
Real_World_Adobe_InDesign_CS4b.pdf 174Real_World_Adobe_InDesign_CS4b.pdf 174 08/04/2009 05:54:28 p.m.08/04/2009 05:54:28 p.m.
-
Recently Used Glyphs
e Recently Glyphs section of
the Glyphs panel displays the
glyphs you’ve inserted.
Recently used glyphs. e Glyphs panel keeps track of the glyphs
you’ve inserted using the panel, and displays them in the Recently
Used section of the panel (see Figure 3-28). If you don’t see this sec-
tion, choose Show Options from the Glyphs panel menu. To clear
this list, choose Recently Used from the Delete Glyph Set submenu
of the Glyphs panel menu.
Missing characters. You’ve got to keep in mind that just because
one font has a particular glyph doesn’t mean that another font will.
When you use the Glyphs panel, InDesign remembers the Unicode
value for that glyph. When you change fonts, the program tries to
nd the same Unicode value in the new font. If the font designer
didn’t include that glyph, or assigned a dierent Unicode value,
InDesign displays the dreaded pink highlight instead of the glyph.
Glyph Sets. You’ve spent hours looking, and you’ve nally found
the perfect ornament characters for your publication. Unfortunately,
they’re in three dierent fonts. Wouldn’t it be great if you could save
those three characters in a special place to access them later? at’s
where glyph sets come in. To make a new glyph set to store your
characters, choose (surprise!) New Glyph Set from the Glyphs panel
menu (see Figure 3-29). en, the next time you nd a character you
love, click it and choose your set from the Add to Glyph submenu (in
the panel menu). You can mix and match fonts in a set, and have as
many dierent sets as you want.
InDesign lists your glyph sets in the View Glyph Set submenu of
the Glyphs panel menu; once you select a set, you can insert a glyph
into the current text frame by double-clicking it.
By default, glyphs in a set remember what font they came from.
So, when you insert a glyph from a set, InDesign assigns the proper
font. However, sometimes you want to insert a character in the cur-
rent font of the selected text. You might want to include the one-half
(½) symbol in your set, but want it to appear in the current font when
you insert it. To do this, select the name of the glyph set from the
Edit Glyph Set submenu of the panel menu, select the character, and
turn o the Remember Font with Glyph checkbox. InDesign indi-
cates that this character can be in any font with a little “u” symbol
in the panel.
Real_World_Adobe_InDesign_CS4b.pdf 175Real_World_Adobe_InDesign_CS4b.pdf 175 08/04/2009 05:54:28 p.m.08/04/2009 05:54:28 p.m.