Real World Adobe InDesign CS4- P8 docx
Bạn đang xem bản rút gọn của tài liệu. Xem và tải ngay bản đầy đủ của tài liệu tại đây (1.5 MB, 30 trang )
Text Display Options. You can select any font and size you want,
though it behooves you to pick something as readable as possible
(David likes 16-point Georgia). You can also choose line spacing
(a.k.a., leading), the text color, whether text should be anti-aliased,
and a background color for your story windows. e eme pop-up
menu oers several text color and background color combinations,
but you don’t have to use these. ese settings have no eect on the
printed appearance of your text; they’re just for the story windows.
Cursor Options. We’ve never met anyone who wanted to use any-
thing other than the normal, thin cursor (called Standard here). But
you can choose ick, Barbell, or Block. (e Block option really
complements the “DOS look” described above.) And if a blinking
cursor drives you mad, turn o the Blink option.
Paragraph styles column. Use this control to change the size of the
paragraph style column (the column on the le in a story window).
Notes
You can attach notes to text in an InDesign story. e Notes panel is
the key to managing notes (see Figure 3-55). Notes provide a great
way to add comments or other information to text—especially when
you’re working with editors (even if they use InCopy). Notes can be
-
Story Editor
Display Preferences
No, no, no!
We trust that you will use
these settings responsibly.
Real_World_Adobe_InDesign_CS4b.pdf 211Real_World_Adobe_InDesign_CS4b.pdf 211 08/04/2009 05:54:36 p.m.08/04/2009 05:54:36 p.m.
.
created, edited, converted to text, or deleted, and can be viewed in the
Story Editor or the Notes panel. You won’t be able to see your notes in
the Layout view, though you will be able to see the note anchor when
you click the Show/Hide Notes button in the Notes panel.
Notes take on the current “user color,” which is based on the user
name. To change the current user name or user color, choose User
from the File menu and enter a new name and user color.
You can use the Notes panel to jump from one note to another
note using the Go to Next Note or Go to Previous Note buttons.
To create a note, do any of the following (see Figure 3-56).
Click the Type tool in text at the location at which you want to
insert the note, display the Notes panel, and then choose New
Note from the Notes panel menu (or click the New Note button).
Select the Note tool and click it in text. e Notes panel appears.
Choose New Note from the Notes menu. InDesign displays the
Notes panel.
Select a range of text, then choose Convert to Note from the
Notes menu (or from the Notes panel menu).
Aer creating a note using any of the rst three approaches shown
above, you can type the text of your note in the Notes panel.
Creating Notes
Notes panel with Note
Info displayed.
Notes panel buttons
Notes panel without
Note Info.
Show/Hide Notes
Go to Note Anchor
Go to Next Note Go to Previous Note
New Note
Delete Note
-
Notes Panel
e Go to Next Note and Go to Previous Note
buttons will not become active until you click
the Type tool in a story that contains notes.
Real_World_Adobe_InDesign_CS4b.pdf 212Real_World_Adobe_InDesign_CS4b.pdf 212 08/04/2009 05:54:36 p.m.08/04/2009 05:54:36 p.m.
To view the content of the note, either select the note and display the
Notes panel, or open the story in the Story Editor (see Figure 3-57).
Choose Expand/Collapse Notes in Story to display the notes if they
are not already visible.
To delete an individual note, place the cursor immediately aer it
and press Delete/Backspace. To delete the note from the Notes panel,
navigate to the note and then click the Delete Note button at the
bottom of the panel. To delete all notes in a story, choose Remove
Notes from Story from the Notes menu or the Notes panel menu.
To convert a note to text, select the note (or the note anchor, in layout
view) and choose Convert to Text from the Notes menu (see Figure
3-58). Alternatively, you can navigate to the note using the Notes
panel, then choose Convert to Text from the panel menu. Text can
be also be copied out of a note and pasted into normal text.
Editing Notes
Deleting Notes
Converting Notes
to Text
-
Adding a Note
Click the Type tool in text,
then choose New Note from
the Notes panel menu.
InDesign adds a note at the
location of the cursor. You’ll
be able to see the note anchor
in layout view. (If you can’t
see the note anchor, click the
Show/Hide Notes button at
the bottom of the panel.)
Enter text in the
Notes panel.
-
Editing a Note
You can edit notes directly
in the Story Editor…
…or in the Notes panel.
Real_World_Adobe_InDesign_CS4b.pdf 213Real_World_Adobe_InDesign_CS4b.pdf 213 08/04/2009 05:54:36 p.m.08/04/2009 05:54:36 p.m.
.
Using Adobe InCopy
We don’t ordinarily talk about buying additional programs in this
book, but we need to make a quick exception for Adobe InCopy, a
word processor that is designed to work with InDesign documents—
sort of a Story Editor on steroids. While it’s not part of the Creative
Suite, it’s well worth buying if you work with text heavy publications,
especially if you’re collaborating with other people.
With InCopy you can write or edit stories using all of the text-
formatting features available in InDesign, using the same paragraph
and character styles, with the knowledge that what you set in InCopy
will appear the same in InDesign. InCopy lets you see your stories in
story mode (like Story Editor), layout mode (as though you’re seeing
the layout in InDesign, but can only edit the story), or galley mode
(like story, but you actually see the line breaks).
Checking Spelling
Toward the end of a project, we always fall prey to the delusion that
everything, every last word, on all of our pages, is misspelled. We
nd ourselves staring blearily at relatively simple words. Is “dog”
really spelled “D-O-G?” In our typical pre-deadline panic, we don’t
know. Everything looks wrong.
-
Converting a
Note to Text
Select a note.
Choose Convert to Text
from the Notes panel menu.
InDesign inserts the
note in the text.
When you convert the note to text, the
inserted text will be formatted with the
formatting it had in the note (usually the
Basic Paragraph style), not with the format-
ting of the surrounding text. In this example,
we applied the appropriate formatting to the
note before we converted it.
Real_World_Adobe_InDesign_CS4b.pdf 214Real_World_Adobe_InDesign_CS4b.pdf 214 08/04/2009 05:54:36 p.m.08/04/2009 05:54:36 p.m.
InDesign can check the spelling of any text in an InDesign text
frame, and can also catch duplicated words (“the the”) and possible
capitalization errors. InDesign uses the language dictionary or dic-
tionaries associated with your text to perform the spelling check.
To check spelling, follow these steps (see Figure 3-59).
1. Press Command-I/Ctrl-I (or choose Check Spelling from the
Edit menu). InDesign starts to check the spelling of the cur-
rent selection, story, or document (depending on the current
selection) and displays the Check Spelling panel when it nds a
suspect word. You can leave the panel open while editing text.
2. At this point, you can dene the scope of the spelling check
using the Search pop-up menu. Note that InDesign can check
the spelling of all of the open publications, if you want, or you
can restrict the spell check to the current story, or—if you have
one or more words highlighted—even just to the selected words.
3. Whenever InDesign nds a suspect word, you can:
Skip the word without making any change. To do this,
click the Skip button. To have InDesign ignore every
occurrence of the word, click the Ignore All button.
Replace the word with one of the suggestions. Select the
suggestion, and InDesign enters the suggested word in
the Change To eld. Click the Change button to replace
the selected word with the suggestion. Click the Change
All button to replace every instance of the selected text
with the text in the Change To eld.
Enter replacement text in the Change To eld. Click the
Change button to replace the selected word with the text
you’ve entered, or click the Change All button to replace
every instance of the selected text.
Add the word to the user dictionary. is is a good thing to
do with technical terms and names that appear frequently in
your publications. For more on entering words in the diction-
ary, see “Adding Words to the User Dictionary.”
Aer you’ve taken any of the above actions, InDesign contin-
ues with the spelling check.
4. When you’ve nished checking the spelling of the publication
(or publications), you can click the Done button to close the
Check Spelling panel.
Real_World_Adobe_InDesign_CS4b.pdf 215Real_World_Adobe_InDesign_CS4b.pdf 215 08/04/2009 05:54:36 p.m.08/04/2009 05:54:36 p.m.
.
We use lots of words in our publications that aren’t found in the
InDesign dictionary. Even quite common, household words such as
“Kvern” and “Blatner” will provoke an angry query from the spelling
checker. You can allay InDesign’s fears by entering these words in a
separate dictionary, the “user dictionary.” When InDesign can’t nd
a word in its dictionary, it consults the user dictionary. If a word
appears in both the standard dictionary (which can’t be edited) and
the user dictionary, InDesign favors the word in the user dictionary.
You can add a word to the user dictionary in two ways: from within
the Check Spelling panel or from the Dictionary panel. When you’re
checking your document’s spelling and a “misspelled” word pops up,
you can simply click the Add button. To add or remove items from
your user dictionary, you can open the Dictionary panel by choosing
Dictionary from the Spelling submenu of the Edit menu (see Figure
3-60). You can edit the dictionary while checking spelling.
1. Enter the word you want to add in the Word eld of the Diction-
ary panel, if necessary (if you’re in the middle of a spelling check,
InDesign enters the unknown term in the eld).
2. Click the Hyphenate button when you want to view the word’s
hyphenation points (see Chapter 4, “Type”). InDesign displays
the proposed hyphenation points in the word.
Hyphenation points are ranked—the best break is a single
tilde (“~”), the next best point is two tildes (“~~”), and the least
good is three tildes (“~~~”). You can enter hyphenation points
in words you’re adding to the user dictionary, or change the
hyphenation points of words already in the user dictionary.
If you do not want InDesign to hyphenate the word, enter a
tilde before the rst character of the word.
Adding Words to the
User Dictionary
InDesign scrolls to display
any suspect words it nds
while checking spelling.
You can choose to replace
the suspect word with a word
from the dictionary, or skip
the word, or add the word to
your user dictionary.
-
Checking Spelling
Real_World_Adobe_InDesign_CS4b.pdf 216Real_World_Adobe_InDesign_CS4b.pdf 216 08/04/2009 05:54:37 p.m.08/04/2009 05:54:37 p.m.
3. Choose either the user dictionary or your document’s name
from the Target pop-up menu. Generally, you’ll want to add
words to the user dictionary which can be used by all your
documents. However, if you choose your current le, then
the word will only appear spelled correctly in that document,
and no others. is might come in handy if you’re building
an annual report for a medical company and you don’t want
to add “uoxetine” to your general user dictionary.
4. Click the Add button to add the word to the user dictionary.
Once you add a word to your user dictionary you can remove it: Just
choose Dictionary from the Spelling submenu of the Edit menu,
select the word you want to remove, and click the Remove button.
But you can also tell InDesign to remove a word from the regular
dictionary by adding it to the Removed Words list.
1. Open the Dictionary panel and choose a target. (If you choose
your user dictionary, the change will aect all your documents;
if you choose just the open document from the Target pop-up
menu, the word is only removed from this document.)
2. Select Removed Words from the Dictionary List pop-up menu.
3. Type the word in the Word eld (if you’re in the middle of
checking your document’s spelling, it should show up here
automatically).
4. Click the Add button. is adds the word to the list of words
that should be removed.
Removing Words From
the User Dictionary
Click the Hyphenate
button or enter tildes (~)
to indicate hyphenation
points.
Click the Add button
to add the word to the
dictionary.
-
Adding a Word to the
User Dictionary
Real_World_Adobe_InDesign_CS4b.pdf 217Real_World_Adobe_InDesign_CS4b.pdf 217 08/04/2009 05:54:37 p.m.08/04/2009 05:54:37 p.m.
.
At this point, the word will appear as incorrect when you check its
spelling. Later, if you want to take it o the “removed” list, you can
open the Dictionary dialog box, select the word, and click Remove.
Dynamic Spelling. You can also check the spelling of text without
going to the Check Spelling dialog box. To do this, turn on Dynamic
Spelling (using either the Enable Dynamic Spelling option in the
Spelling Preferences dialog box or the corresponding option on the
Spelling submenu of the Edit menu). Aer you do this, InDesign will
mark suspect words in your document using the colors you assigned
in the Preferences dialog box. If you’re working with a long docu-
ment, it can take some time for InDesign to apply the highlight.
You can use the Context menu to change suspect words to any of
a list of likely replacements, add the word to the dictionary, or direct
InDesign to ignore the word (see Figure 3-61).
Autocorrect. If you enter a lot of text using InDesign, and you habit-
ually type “hte,” for “the,” (or “pargraph,” for “paragraph,” as Ole
does), you’ll love the autocorrect feature (see Figure 3-62). As you
type, autocorrect will change the text you’ve typed to x common
typing errors. You can also use Autocorrect to change capitalization
errors (“Indesign” to “InDesign,” for example). Autocorrect has no
eect on text you have already entered.
-
Dynamic Spelling
When you have turned on the Dy-
namic Spelling option, InDesign will
mark questionable words (i.e., words
that are not found in the dictionary).
To deal with one of the
marked words, click the Type
tool inside the word and then
display the Context menu.
Choose one of the actions from the Context
menu. Select one of the suggestions to replace
the highlighted word.
In this example, we’ve told InDesign that the
word is spelled correctly, so InDesign removes
the highlight from the word.
Real_World_Adobe_InDesign_CS4b.pdf 218Real_World_Adobe_InDesign_CS4b.pdf 218 08/04/2009 05:54:37 p.m.08/04/2009 05:54:37 p.m.
To turn this feature on or o, use the Enable Autocorrect option
in the Autocorrect Preferences dialog box, or choose Autocorrect
from the Spelling submenu of the Edit menu. To have Autocorrect
catch errors of capitalization, turn on the Autocorrect Capitalization
Errors option.
As you can see by looking at the Autocorrect Preferences dialog
box, InDesign has a large list of common misspelled words and their
corresponding corrections.
To add the error, click the Add button. InDesign displays the
Add to Autocorrect List dialog box. Enter the typo in the Misspelled
Word eld, and enter the correct text in the Correction Field. Click
the OK button, and InDesign adds the error to the Autocorrect list.
To remove a word from the list, select the word and click the
Remove button. To edit a word in the list, click the Edit button.
Footnotes
InDesign CS2 introduced the ability to add footnotes to text, a ca-
pability requested by InDesign users
1
since version 1.0. InDesign’s
footnotes don’t do everything that one could possibly want in such
a feature. but they’re able to handle a broad range of footnote needs.
What are the limitations? e biggest one is that you’re limited
to one footnote numbering style in a document. If your publications
feature one footnote numbering style for body text, and another
style for sidebars, you’ll have to take care of one of the footnote styles
manually (as you have in previous versions).
e other signicant (in our opinion) limitation is that the width
of the footnote text is based on the width of the column containing
the footnote reference marker.
In addition, footnote text is not aected by text wrap, and you
cannot add footnotes to footnote text or text in a table.
1
ough we have never found a use for them, ourselves.
-
Autocorrect
When the Autocorrect
feature is on, InDesign
will correct misspelled
words as you type.
Real_World_Adobe_InDesign_CS4b.pdf 219Real_World_Adobe_InDesign_CS4b.pdf 219 08/04/2009 05:54:37 p.m.08/04/2009 05:54:37 p.m.
.
Finally, footnotes go to the bottom of the column, which is not
necessarily the bottom of the page. is means that if we want to
add a graphic between the footnote reference and the footnote text,
we’d have to resort to text wrap or an inline graphic just to fool the
footnote into landing at the bottom of the page.
As usual, we’ve written an introduction to a section without fully
dening our terms. When we say “footnote reference marker,” we
mean the number or symbol that appears in the body text. When we
say “footnote text,” we’re referring to the text that appears at the bot-
tom of the column. ese two parts make up a “footnote.”
To create a footnote, follow these steps (see Figure 3-63).
1. Set the cursor at the point at which you want to add the footnote.
2. Choose Insert Footnote from the Context menu (or the Type
menu). When you do this, InDesign inserts a footnote marker (a
number or symbol) and positions the text cursor in the footnote
text. e footnote text is usually at the bottom of the column
containing the marker, but can appear elsewhere in some cases.
3. Enter the text for the footnote.
Creating a Footnote
-
Creating a Footnote
Position the cursor in text.
Choose Insert Footnote from
the Context menu…
Enter the text of the footnote.
…and positions the cursor in
the footnote text area (this
example uses the default
footnote formatting).
InDesign adds a
footnote reference…
Real_World_Adobe_InDesign_CS4b.pdf 220Real_World_Adobe_InDesign_CS4b.pdf 220 08/04/2009 05:54:37 p.m.08/04/2009 05:54:37 p.m.
When you are done editing the footnote text, you can return to
the footnote marker (in the body text) by choosing Go to Footnote
Reference from the Context menu.
To select all of the text in a footnote, press Command-A/Ctrl-A
Editing footnote text is something like editing text in a table cell.
If you happen to delete the footnote number in the footnote text,
you can reinsert it by choosing Footnote Number from the Insert
Special Character submenu of the Context menu.
To delete a footnote, delete the footnote marker.
To control the appearance and behavior of the footnotes in a docu-
ment, choose Document Footnote Options from the Type menu. e
Footnote Options dialog box appears (see Figure 3-64).
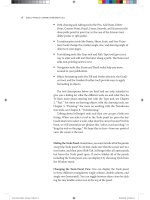
Numbering Style. Choose the numbering style you want to use.
Start At. Use this option to set the starting number for the footnotes
in each story in the document. If you’re continuing footnote num-
bering from another document, this option comes in handy.
Footnote Options
-
Footnote Options
Real_World_Adobe_InDesign_CS4b.pdf 221Real_World_Adobe_InDesign_CS4b.pdf 221 08/04/2009 05:54:37 p.m.08/04/2009 05:54:37 p.m.
.
Restart Numbering Every. You can choose to have footnote number-
ing restart every page, spread, or section. Some numbering systems
(such as asterisks) are designed to restart every page.
Show Prex/Sux In. “Prex” and “sux,” in this case, refer to
characters that can be placed before or aer the gure number. ese
characters can appear in the footnote reference, the footnote text, or
in both places (see Figure 3-65). You can also enter the character(s)
you want to use, or choose a predened character from a list.
Character Style. is option species the character style applied to
the gure reference number.
Position. Sets the position of the gure number reference character.
You can choose subscript, superscript, or normal position.
Paragraph Style. Choose the paragraph style you want to apply to
the footnote text.
Separator. Denes the character between the gure number and the
body of the footnote text.
Minimum Space Before First Footnote. Use this option to spec-
ify the minimum amount of space between the rst footnote in a
column and the bottom of the text in the column.
Space Between Footnotes. How much vertical space do you want to
insert between footnotes? Enter it here.
First Baseline Oset. is option is very similar to the corresponding
option in the Text Frame Options dialog box—it controls the method
-
Footnote Prex/Sux
Select or enter the prex or
sux characters.
Turn the Show
Prex/Sux option on.
Set the location(s) at
which the prex/sux
should appear.
InDesign adds the prex/sux characters
at the locations you specied.
Real_World_Adobe_InDesign_CS4b.pdf 222Real_World_Adobe_InDesign_CS4b.pdf 222 08/04/2009 05:54:38 p.m.08/04/2009 05:54:38 p.m.
used to calculate the position of the rst baseline of text in a footnote
(see the discussion of rst baseline osets earlier in the chapter).
Place End of Story Footnotes at Bottom of Text. Turn this option on,
and InDesign will place the footnotes at the end of the story imme-
diately aer the end of the text, rather than at the bottom of the last
text column (see Figure 3-66).
Allow Split Footnotes. When this option is true, InDesign will split
footnotes across columns and pages. When it’s false, InDesign will
attempt to t all footnotes into the column containing the footnote
(see Figure 3-67). If it’s not possible to t the footnote in that column,
InDesign will push the footnote text to the last column in the frame.
If that won’t work, InDesign will attempt to push the reference and
the footnote to the next column capable of holding them both.
Rule Above. To add a dividing line above the footnote text, turn on
the Rule Above option. Most of the controls in this section corre-
spond to paragraph rule options (see Chapter 4, “Type” for more on
paragraph rules), but some of them are specic to footnotes.
-
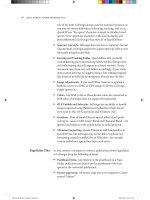
Placing Footnotes at
the End of a Story
How should InDesign handle
the last footnote or group of
footnotes in a story? at’s
the point of the Place End of
Story Footnotes at Bottom of
Text option.
Footnotes at the bottom of the last text frame (option o).
Footnotes at the bottom of the text at the end of the story (option on).
Real_World_Adobe_InDesign_CS4b.pdf 223Real_World_Adobe_InDesign_CS4b.pdf 223 08/04/2009 05:54:38 p.m.08/04/2009 05:54:38 p.m.
.
-
Splitting Footnotes
(or Not)
When you turn the Allow
Split Footnotes option on,
InDesign will split foot-
note text among columns
(depending on the length
of the footnote text and
the location of the footnote
reference marker).
Turn the Allow Split
Footnotes option o, and
InDesign will push the
footnote (both the marker
and the footnote text) to the
next column capable
of containing it. With this
option o, long footnotes
and short columns can easily
result in overset text.
Choose First Footnote in Column from the pop-up menu to con-
trol the settings for the rule above the top of the rst footnote only;
choose Continued Footnotes to specify the formatting of the rules
above all subsequent footnote sections, including footnotes contin-
ued in other columns.
e width of a paragraph rule can be set by either the width of the
text or the width of the column, but the width of a footnote rule is
determined by the value in the Width eld.
Conditional Text
If you publish multiple versions of a document—multiple languages,
or any other time the text of the document changes from version to
version—you should look at InDesign’s conditional text feature.
Ole, for example, publishes (for Adobe) a number of documents
related to InDesign scripting. Most of the body copy is the same
from version to version, but the script examples vary. In some edi-
tions, the examples are written in AppleScript; in others, the script-
ing language is JavaScript; and another version features VBScript.
To keep from having to maintain the dierent versions as separate
documents, Ole uses conditional text.
Real_World_Adobe_InDesign_CS4b.pdf 224Real_World_Adobe_InDesign_CS4b.pdf 224 08/04/2009 05:54:38 p.m.08/04/2009 05:54:38 p.m.
Conditional text has two components: the conditions themselves,
and the text you’ve marked using the conditions. You work with con-
ditional text using the Conditional Text panel (see Figure 3-68). To
display the panel, choose Conditional Text from the Text and Type
submenu of the Window menu.
-
Conditional Text Panel
-
Conditional Text Panel
A check in this column shows the condition(s)
applied to the selected text.
You can load conditions
and condition sets from
other documents.
Choose Show/Hide Options to
display or hide the Set pop-up
menu.
Double-click a condition to
edit its denition.
You can control the way
that InDesign displays the
condition indicators using
the pop-up menu.
Click to create a new condition.
Click to delete the selected condition(s).
Click this column to show or hide a condition (when
you see the eye icon, the condition is visible).
To create a condition, follow these steps (see Figure 3-69).
1. Display the Conditional Text panel, if it’s not already visible.
2. Click the New Condition button at the bottom of the panel, or
choose New Condition from the panel menu. InDesign displays
the New Condition dialog box.
3. Enter a name for the condition, then specify the format of the
condition indicator using the Method, Appearance, and Color
pop-up menus.
4. Click OK to close the dialog box.
Creating Conditions
Choose New Condition from
the panel menu…
Dene the appearance of the condition using
the controls in the Indicator section.
Real_World_Adobe_InDesign_CS4b.pdf 225Real_World_Adobe_InDesign_CS4b.pdf 225 08/04/2009 05:54:38 p.m.08/04/2009 05:54:38 p.m.
.
-
Applying a Condition
e process of applying a condition is pretty much the same as apply-
ing any other formatting—select some text, then click the condition
or conditions in the Conditional Text panel that you want to apply
to the text (see Figure 3-70). To remove the condition, select the text
and click the condition again (or apply the Unconditional condition).
Applying Conditions
Select some text.
InDesign applies the
condition to the text.
(We’ve deselected the text
so that you can see the
condition indicator)
Click the
condition
you want to
apply.
A condition set is a group of conditions that can be shown or hidden
at the same time. When you apply a condition set, InDesign changes
the visibility of all conditions as specied in the set. It’s quicker than
clicking them one by one. To create a condition set, follow these steps.
1. Display the Conditional Text panel, if it’s not already visible.
Choose Show Options from the panel menu if the Set pop-up
menu is not already visible.
2. Change the visibility of the conditions using the rst (le-most)
column in the panel list). Make the conditions you want to
include in the set visible; hide the others.
3. Choose Create New Set from the Set pop-up menu. InDesign
displays the XX dialog box.
4. Enter a name for the condition set and click the OK button.
InDesign adds the condition set to the Set pop-up menu.
When you want to apply the condition set, choose it from the Set
pop-up menu. InDesign will set the visibility of all conditions based
on the stored settings in the condition set.
Creating
Condition Sets
Real_World_Adobe_InDesign_CS4b.pdf 226Real_World_Adobe_InDesign_CS4b.pdf 226 08/04/2009 05:54:39 p.m.08/04/2009 05:54:39 p.m.
Find and Change
Economists and productivity experts keep telling us that personal
computers have not lived up to their promise of increased productiv-
ity. Workers, they say, are no more productive than they were before
the microcomputer revolution.
ey are, of course, wrong—or maybe they’ve never worked as
typists or typesetters. Since the advent of word processing and desk-
top publishing soware, we “text workers” have been enjoying a pro-
ductivity increase that is nothing short of mind boggling. Although
we’re not sure “enjoying” is quite the right word.
One of the key innovations of the text processing revolution is the
ability to nd text in a document and, if necessary, to change it to
something else—and all in an automated fashion. It doesn’t matter
what you call it—“nd and change” or “search and replace,” it’s a
kind of text-manipulation tool we didn’t have in the “good ol’ days.”
Find and change is all about pattern recognition. Most of what we
do in InDesign (or in life, for that matter) is repetitive. We work our
way through text, selecting each occurrence of “f f i” and changing
it to “” (the ligature). Or we select each bullet character and replace
it with a character from Zapf Dingbats. In each case, we’re searching
for one pattern in our text and replacing it with another.
Finding and changing text is all about working with strings. A
string is any range of text—a single character, a word, or a phrase.
Strings can also contain special, non-printing characters, such as tab
characters, em spaces, or carriage returns.
InDesign has three dierent ways to nd and change text, which
we’ll call Text, GREP, and Glyph. ese search methods correspond
to the tabs you see in the Find/Change dialog box (see Figure 3-78).
e Object tab in the Find/Change dialog box is for nding and
changing formatting applied to page items (rectangles, ellipses, and
text frames, for example), and is discussed in Chapter 5, “Drawing.”
Text. Find and change text strings and text formatting. Includes
the ability to search for a limited set of “wildcard” characters.
GREP. Find and change text and formatting using regular
expressions. Regular expressions give you a way to use much
more sophisticated patterns in your searches.
Glyph. Find and change individual glyphs.
In addition to the dierent search methods, there are at least four
dierent ways to perform a search-and-replace operation.
Real_World_Adobe_InDesign_CS4b.pdf 227Real_World_Adobe_InDesign_CS4b.pdf 227 08/04/2009 05:54:39 p.m.08/04/2009 05:54:39 p.m.
.
-
Find/Change dialog box
Click the tabs to display
the options for the
dierent nd/change
types.
Specify Attributes to
Find button
Clear Specied
Attributes button
Find/change options.
Find/change range.
Find/change formatting options. If you do not see
these controls, click the More Options button.
-
Find/Change Options
Include Locked Stories
Include Locked Layers
Include Hidden Layers
Include Master Pages
Include Footnotes
Option on Option o
Whole Word
Case Sensitive
Search for text and replace it with dierent text.
Search for formatting and replace it with other formatting.
Search for text and apply formatting to it.
Search for formatting, and replace it with text.
Find/Change Options All three text search methods have a set of options in common. You
can turn these options on or o using the little icon buttons in the
Find/Change dialog box (see Figure 3-72).
Include Locked Layers (Find Only). InDesign will not change text
on locked layers, but you can nd it by turning this option on. To
change text on a locked layer, unlock the layer or move the text to
another layer.
Include Locked Stories (Find Only). A locked story is a story that
has been checked out using InCopy or Version Cue. To nd text in
these stories, turn this option on.
Real_World_Adobe_InDesign_CS4b.pdf 228Real_World_Adobe_InDesign_CS4b.pdf 228 08/04/2009 05:54:39 p.m.08/04/2009 05:54:39 p.m.
Include Hidden Layers. Turn this option on to nd and change text
on hidden layers. InDesign will display a block highlight when it
nds text on a hidden layer, but it won’t show the text itself.
Include Master Pages. To nd and change text in text frames on
master spreads, turn this option on.
Include Footnotes. To nd and change text in footnotes, turn this
option on.
Text Search
Method Options
In addition to the above options, the Text search method provides
two additional options: Whole Word and Case Sensitive.
Whole Word. Turn on the Whole Word option when you want to
nd only exact matches for the text you entered in the Find What
eld (if you’ve entered “dog” and want to nd only that word, and not
“dogged” or “underdog”).
Case Sensitive. Turn on the Case Sensitive option to nd only text
with the same capitalization as the word you entered (this way, you’ll
nd “dog,” but not “Dog”).
Find/Change Ranges All three text search methods give you a way to dene the range of
text you want to search. Choose one of the options on the Search
pop-up menu to set the range of the search: Story, To End of Story,
Document, or All Documents. Story always begins the search from
the beginning of the story, while To End of Story only searches from
the current text cursor position onward. All Documents means
every currently open document; this is helpful when you need to nd
something that may appear in multiple chapters of a book
e options in the Text panel of Find/Change provide basic text
search capabilities. is is where you want to go when you need to
search for one word and replace it with another. Nothing fancy.
If you need to nd some text, follow these steps (see Figure 3-73).
1. Open the Find/Change dialog box (press Command-F/Ctrl-F).
Click the Text tab if you need to display the Text panel.
2. Enter the string you want to nd in the Find What eld.
3. Set the range of the search using the Search pop-up menu.
4. Set nd/change options (particularly the Case Sensitive and
Whole Word options) as necessary.
Finding Text
Real_World_Adobe_InDesign_CS4b.pdf 229Real_World_Adobe_InDesign_CS4b.pdf 229 08/04/2009 05:54:39 p.m.08/04/2009 05:54:39 p.m.
.
Enter the text you
want to search for. Enter
metacharacters (if necessary)
using the pop-up menu (or
simply type them into the
Find What eld).
Once you’ve entered a string
in the Find What eld, the
string will appear on the
pop-up menu associated
with the eld. is makes it
easy to search again for the
same string.
Aer you click the Find button,
InDesign selects each instance
of the text it nds, and scrolls to
display the selection.
Use these controls to
dene the search range
and search options.
If InDesign nds the text in overset
text, the phrase “Overset Text” appears
above the Find What eld.
To nd the text
again, click the Find
Next button.
-
Finding Text
5. Click the Find button. InDesign nds an occurrence of the
string you entered in the Find What eld and displays it in the
publication window, turning pages and scrolling to display the
text, if necessary. You can click the Find Next button to nd the
next occurrence of the text in the specied search range until,
eventually, you’ll return to the rst instance InDesign found.
About metacharacters. You can’t enter invisible characters—such
as tab characters, line-end characters, or carriage returns—in the
Find What or Change To elds. To get around this, you enter codes—
known as “metacharacters”—representing those characters. ere’s
no need for a cheat sheet for these characters—they appear on the
pop-up menus attached to the Find What and Change To elds.
Real_World_Adobe_InDesign_CS4b.pdf 230Real_World_Adobe_InDesign_CS4b.pdf 230 08/04/2009 05:54:39 p.m.08/04/2009 05:54:39 p.m.
To enter a metacharacter in the Find What or Change To elds,
you can either enter it directly (if you know the code) or choose it
from the pop-up menus associated with the elds.
Suppose you need to nd all of the part numbers in a document. e
part numbers start with the string “IN” and are followed by four let-
ters, a hyphen, and four numbers. How can you nd all of the strings?
Use InDesign’s “wildcard” metacharacters—these give you a way
to nd patterns containing unspecied characters. Again, these char-
acters appear on the pop-up menu associated with the Find What
eld. To match any single character, type “^?” in the Find What eld.
Enter “^9” to nd any single digit, or “^$” to nd any single letter.
To nd all of the part numbers in the example, you’d enter
“IN^$^$^$-^9^9^9^9” in the Find What eld. Note that using wild-
card metacharacters also helps you avoid nding the strings you
don’t want to nd—if, in our example, we’d used the wildcard-laden
string “IN^?^?^?^?^?^?^?^?^?” we’d run the risk of nding the word
“INdubitable,” which appears in our imaginary catalog many times,
rather than the part numbers.
Be careful—entering these wildcard characters in the Change To
eld results in text being replaced by the metacharacter codes them-
selves, which is almost certainly not what you want. at’s why the
wildcards don’t appear on the Change To eld’s pop-up menu.
is is the kind of nd/change operation that the GREP search
method is good at. Take a look at “Using GREP,” later in this chapter.
To replace one text string with another, you enter text in both the
Find What and Change To elds of the Find/Change dialog box (see
Figure 3-74). Once you’ve done this, you have two choices:
You can choose to have InDesign replace all instances of the
string in the Find What eld with the string you entered in the
Change To eld throughout the search range by clicking the
Change All button.
You can nd each occurrence of the string in the specied
search range and decide to replace it or not. To do this, click
the Find button, view the found text, and then click the Find
Next, Change, or Change/Find button. e Find Next button
moves on to the next instance of the string without making any
changes; the Change button replaces the selected text with the
contents of the Change To eld, and waits to see what you’ll do
next. e Change/Find button replaces the string, then nds the
next instance and waits.
Wildcard
Metacharacters
Replacing Text
Real_World_Adobe_InDesign_CS4b.pdf 231Real_World_Adobe_InDesign_CS4b.pdf 231 08/04/2009 05:54:39 p.m.08/04/2009 05:54:39 p.m.
.
Enter the text you want to
nd in the Find What eld.
Enter the replacement text
in the Change To eld.
Click the Find button
to nd the rst
instance of the text…
…then click the Change button to
replace the found text with the text
in the Change To eld…
…or click the Change/Find button to
change the text and then nd the next
occurrence. Or click the Change All
button to change all occurrences.
-
Replacing Text
e Case Sensitive option also determines the case of the replace-
ment characters. When this option is turned o, InDesign pays
attention to the capitalization of the word: If the word it nds is capi-
talized, it will replace it with a capitalized word, even if the word you
typed in the Change To eld was in all lowercase.
AIf you’re a hardcore Find/Change end, you’re going to want use
keyboard shortcuts whenever possible. When you use keyboard
shortcuts, you can nd and change text without having to have the
Find/Change dialog box visible.
Here are a few shortcuts we nd useful; you can, of course, change
them (to do this, select Keyboard Shortcuts from the Edit menu and
look in the Text and Tables Product Area).
You can load the Find What eld by selecting one or more
characters in a story and pressing Shi-F1.
You can load the Replace With eld by selecting some text and
pressing Command-F2/Ctrl-F2.
You can nd the next occurrence of the most recent search by
pressing either Shi-F2.
Once you've found some text, you can replace it (using the cur-
rent settings) by pressing Command-F3/Ctrl-F3. To replace the
text and nd the next occurrence of the nd text, press Shi-F3.
What do you do when you want to nd all of the occurrences of the
word “Zucchini” formatted as 10-point Helvetica bold? It’s easy—use
the Find Format Settings and Change Format Settings controls at the
Text Find/Change
Keyboard Shortcuts
Finding and Changing
Formatting Attributes
Real_World_Adobe_InDesign_CS4b.pdf 232Real_World_Adobe_InDesign_CS4b.pdf 232 08/04/2009 05:54:40 p.m.08/04/2009 05:54:40 p.m.
bottom of the Find/Change dialog box (if you can’t see these settings,
it’s because you need to expand your Find/Change dialog box—click
the More Options button, and InDesign expands the panel to display
these options).
To choose the formatting attributes you want to nd, click the
Specify Formatting to Find button. InDesign displays the Find
Format Settings dialog box (see Figure 3-75).
e eleven panels of the Find Format Settings dialog box give you
the ability to specify almost any formatting that can be applied to
text in InDesign. Navigate through the panels until you nd the for-
matting options you want, then use them to specify the formatting
you want to nd. When you’re done, click the OK button to close the
dialog box. InDesign displays a list of the options you’ve chosen in
the eld in the Find Format section of the Find/Change dialog box.
Note that when you rst open the Find Format Settings dialog
box, all the pop-up menus and elds are blank. Let’s say you select a
format—such as 6-point text—and then change your mind; you can
simply select the eld and press Delete to make it blank again. is
comes in handy when searching for fonts. If you select the font Pala-
tino, the styles eld automatically changes to “Roman,” which means
InDesign will only search for the characters that use the Roman font
style and won’t nd italic or bold text in that font. However, if you
delete “Roman” from that eld, the program searches for all cases of
Palatino, no matter what the style.
To set up the formatting options you want to apply to any text
you nd, click the Specify Formatting to Change button. is dis-
plays the Change Format Settings dialog box, which is identical in
all but name to the Find Format Settings dialog box. Use the Change
Format Settings dialog box to specify the formatting you want to
apply, then return to the Find/Change dialog box. InDesign displays
the formatting you’ve chosen in the eld in the Change Format Set-
tings section.
When you’ve specied formatting in the Find Format Settings sec-
tion, InDesign displays an icon above the Find What eld. When you
enter formatting in the Change Format Settings section, InDesign
displays the icon above the Change To eld.
To clear the formatting you’ve set in either the Find Format Set-
tings or the Change Format Settings dialog boxes, click the Clear
button in the corresponding section of the Find/Change dialog box.
Once you’ve specied the formatting you want to nd and/or
change, you can use the Find/Change dialog box in the same manner
as you would when nding/changing text strings.
Real_World_Adobe_InDesign_CS4b.pdf 233Real_World_Adobe_InDesign_CS4b.pdf 233 08/04/2009 05:54:40 p.m.08/04/2009 05:54:40 p.m.
.
If you can’t see the
Find Format and Change
Format areas in the panel,
click the More Options
button (which then becomes
the Fewer Options button)
to display Find/Change
formatting options. Click the Specify Attributes to Find button to
display the Find Format Settings dialog box.
Use the panels of the Find
Format Settings dialog box
to specify the formatting you
want to nd.
Click the Specify Attributes to Change button,
then use the Change Format Settings dialog box
to specify the formatting you want to apply.
When you’ve specied
formatting, InDesign
displays an alert icon.
e Find Format Settings
and Change Format
Settings dialog boxes
contain the same set
of panels and options.
-
Find and Change
Formatting Attributes
In this example, we want to
replace the Myriad Pro text
with a dierent font.
When you’re ready to
change text, click the Change All
button, or click Find Next to step
through the nd/change process.
InDesign changes the formatting,
nding and changing the font
and style you specied.
Real_World_Adobe_InDesign_CS4b.pdf 234Real_World_Adobe_InDesign_CS4b.pdf 234 08/04/2009 05:54:40 p.m.08/04/2009 05:54:40 p.m.
Note that when you have specied formatting in the Find Format
Settings or Change Format Settings dialog boxes, you can:
Leave the contents of the Find What and Change To elds empty.
When you do this, InDesign searches for any instances of the
formatting you’ve specied in the Find Format Settings dialog
box, and replaces it with the formatting you’ve entered in the
Change Format Settings dialog box.
Enter text in both the Find What and Change To elds. In this
case, InDesign searches for an instance of the string you entered
in the Find What eld that has the formatting specied in the
Find Format Settings dialog box, and replaces the text it nds
with the string you entered in the Change To eld. InDesign
applies the formatting from the Change Format Settings dialog
box to the replacement text.
Enter text in only the Find What eld and leave the Change To
eld blank. When you do this, InDesign searches for the string
you entered in the Find What eld (and any formatting you’ve
specied in the Find Format Settings dialog box), and changes
the formatting of the found text to the formatting specied in
the Change Format Settings dialog box (but does not change the
text string itself).
Enter text only in the Change To eld and leave the Find What
eld blank. In this case, InDesign searches for the formatting
you set in the Find Format Settings dialog box, and replaces any
text it nds with the string you entered in the Change To eld
(including any formatting you’ve specied in the Change Format
Settings dialog box). While you aren’t likely to use this method
(it’s pretty strange), it’s nice to know it’s available.
Lurking near the bottom of the options on the Other submenu on the
pop-up menu associated with the Change To eld are a pair of menu
items: Clipboard Contents, Formatted, and Clipboard Contents,
Unformatted. ey’re obscure, but they’re really useful. If you enter
these metacharacters in the Change To eld, you’re telling InDesign
to paste the current contents of the Clipboard wherever it nds
the text you’ve asked it to nd. Anything you can copy—including
objects—you can paste over the text you nd (see Figure 3-76).
You know what Unicode code point (or ID, or value) you want to
search for, but you can’t gure out how to enter it in the Find What
Replacing Text with
the Clipboard
Finding Text by Its
Unicode Value
Real_World_Adobe_InDesign_CS4b.pdf 235Real_World_Adobe_InDesign_CS4b.pdf 235 08/04/2009 05:54:40 p.m.08/04/2009 05:54:40 p.m.