Tài liệu The Adobe Photoshop Cs4 Dictionary: The a to Z Desktop Reference of Photoshop- P8 docx
Bạn đang xem bản rút gọn của tài liệu. Xem và tải ngay bản đầy đủ của tài liệu tại đây (3.87 MB, 28 trang )
W
wW
301
Photoshop CS4 A–Z
Fluorescent
Tungsten
Daylight
Custom
Cloudy
Auto
As Shot
1
WIA support
Menu: –
Shortcut: – See also: Import command
Version: 6.0, 7.0, CS, CS2,
CS3, CS4
The process of downloading pictures
from your digital camera to the computer
requires the installation of camera drivers
before the transfer can begin.
Installing the software that came bundled
with your camera usually also takes care
of installing the drivers. Many cameras
use a WIA (Windows Image Acquisition)
driver to connect to software that resides
on the computer.
Both Photoshop and Windows XP make
use of WIA drivers to communicate with
a range of installed devices.
This feature has largely replaced the older
TWAIN import option found in earlier
versions of Photoshop.
White Balance, Raw
Menu: –
Shortcut: – See also: Camera Raw 4.0
Version: 6.0, 7.0, CS, CS2,
CS3, CS4
One of the real advantages of recording
your photos in the Raw format is the ability
to edit the white balance settings used for
the pictures later on at the desktop. Though
the setting used to capture the image
is recorded as part of the EXIF data you
can elect to fi ne-tune this setting or even
disregard it altogether selecting a different
setting to associate with the picture.
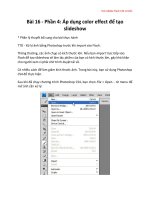
The White Balance option in the Camera
Raw dialog (1) provides a series of preset
options designed to match specifi c light
sources. As well as these set options the
Temperature and Tint sliders allow users
to customize their white balance settings
for a given image.
Controlling the white balance setting is
one way to remove color casts in your
photographs. Alternatively, intentionally
choosing the wrong setting can be used
to create dramatically different versions
of your pictures as well.
WHITE BALANCE, RAW
W
wW
Photoshop CS4 A–Z
302
1
2
Wind fi lter
Menu: Filter > Stylize > Wind
Shortcut: – See also: Filters
Version: 6.0, 7.0, CS, CS2,
CS3, CS4
The Wind fi lter, as one of the group of Stylize
fi lters, simulates the look of wind blasting
across the canvas surface by adding
trailing lines from the edge details.
The dialog contains two controls, Method
of type of wind (1) and Direction (2). A
preview window is also supplied to help
you judge the correct combination of
settings for your photo.
Window – Options
Menu: Window > Options
Shortcut: – See also: View
Version: CS3, CS4
Photoshop CS3/CS4 include an Options
entry in the Window menu.
Selecting or deselecting this option will
either display or hide the options bar which
sites just below the menu bar at the top of
the Photoshop workspace.
Window – Tools
Menu: Window > Tools
Shortcut: – See also: View
Version: CS3, CS4
The Tools entry in the Window menu was
fi rst introduced in Photoshop CS3.
Selecting this option will display the
toolbox (this is default setting of the entry).
Unchecking the Tools entry will hide the
toolbox.
WIND FILTER
W
wW
303
Photoshop CS4 A–Z
2
1
3
1
2
Workgroup
Menu: –
Shortcut: – See also: Version Cue
Version: CS, CS2, CS3, CS4
As part of the process of creating a new
project in Version Cue you have the option
of allowing the project, and its associated
media assets, to be shared with others
in your network (1). Typically the group
of users who collaboratively work on a
common project is called a Workgroup.
Determining who has access and at what
level this access is granted is managed via
the Version Cue administration utility.
Here the administrator of the project
can add new users and alter their access
settings (2).
Version Cue is only available to
Creative Suite users.
Working spaces, ICC
profi le
Menu: –
Shortcut: – See also: Color Settings
Version: 6.0, 7.0, CS, CS2,
CS3, CS4
Unlike print, monitor, camera or scanner
profi les, a working profi le or space is
not linked to specifi c input or output
characteristics. Instead a working space
acts as an intermediate profi le that provides
a base for editing and enhancing picture
colors and tones and also establishes a
known reference point for these tones and
colors when converting to other output
specifi c spaces.
The ICC profi le that you choose to use
as your working space should refl ect
the requirements of the area that you
work in the most. For instance, many
photographers whose work is destined
for the printed page choose to use the
AdobeRGB profi le as their working space
feeling that this space best suits their work
environment. In contrast web designers
often prefer to use sRGB as their working
space as it refl ects the characteristics of
screen-based display more easily than
other choices.
The options in the Edit > Color Settings
dialog allows you to set the working spaces
that will be used in Photoshop for RGB,
CMYK, Gray and Spot (color) pictures.
Also in this dialog are controls (Color
Management Policies) that govern how
Photoshop handles opening pictures that
are not tagged or tagged with a profi le that
is different to the one nominated for the
working space.
Work Paths, converting
selections to
Menu: –
Shortcut: – See also: Paths, Selections
Version: 6.0, 7.0, CS, CS2,
CS3, CS4
Many imaging workers steer away from
creating paths because they feel that the
tools needed to create and edit them (Pen
and Direct Selection tools) are diffi cult and
confusing to use. These same workers on
the other hand often have no problem with
using the various selection tools to create
very sophisticated selections.
If you fall into this category and need
to create a path quickly and easily then
the best approach is to start by making
a selection (1) . Next, display the Paths
palette and then click on the Make Work
Path from Selection button (3) at the
bottom of the palette.
This automatically converts the selection
to a path and places a thumbnail version
of the path in the palette (2).
WORK PATHS, CONVERTING SELECTIONS TO
W
wW
Photoshop CS4 A–Z
304
NEW for CS2
File Navigator workspace
Lightbox workspace
Filmstrip Focus workspace
NEW for CS2
1
Metadata Focus workspace
2
1
1
2
Workspace, Photoshop
Menu: Window > Workspace
Shortcut: – See also: Workspace customize,
Workspace Bridge
Version: CS2, CS3,
CS4
Photoshop ships with a range of preinstalled
workspaces (1) which can be located
listed under the Window > Workspace
menu. Each of these settings controls the
appearance and position of palettes, the
allocation of keyboard shortcuts as well
as the appearance of menu items.
Also listed in this menu are entries for
resetting the workspace and saving
customized workspace settings that suit
your individual way of working.
Customized spaces are created by adjusting
the settings in the Keyboard Shortcuts &
Menus dialog (2) and arranging palettes
before saving the setup via the Window >
Workspace > Save Workspace option.
The newly created workspace then
becomes a separated entry at the bottom
of the Workspace menu.
Workspace, Bridge
Menu: Bridge: Window > Workspace
Shortcut: Ctrl/Cmd F1 – F6 See also: Workspace customize,
Workspace Photoshop
Version: CS2, CS3, CS4
The way that your photos are displayed
in Bridge can be altered via the options
listed under the Window > Workspace
menu (1). Here you can choose from fi ve
set workspace settings plus a reset setting
or choose to save the current workspace
as a custom setting.
Workspace, customize
Menu: Window > Workspace > Save Workspace
Bridge: Window > Workspace > Save Workspace
Shortcut: – See also: Workspace Bridge, Workspace
Photoshop
Version: CS2, CS3,
CS4
Both Photoshop and Bridge contain
options to customize and save specifi c
workspace setups. When a workspace is
saved the custom setting is added to the list
of available workspaces that is displayed in
the Window> Workspace menu (1).
To create your own custom space in
Photoshop or Bridge start by adjusting the
size and position of interface components
such as palettes and panels. Next, select the
Save Workspace option from the Window
> Workspace menu and then enter the
name and select the options to save in the
Save Workspace dialog (2).
Photoshop CS2, CS3 and CS4 have the
additional benefi t of being able to customize
the keyboard shortcuts associated with the
space and the appearance and contents
of menus as well. This is achieved via the
Keyboard Shortcuts & Menus dialog.
WORKSPACE, BRIDGE
XYZ
XYZ
305
Photoshop CS4 A–Z
ABCDEFGHIJKLMNOPQRSTU-
VWXYZABCDEFGHIJKLM-
NOPQRSTUVWXYZABCDEFGHIJKLMNOPQRSTUVWX-
YZABCDEFGHIJKLMNOPQRSTUV
WXYZABCDEFGHIJKLMNOPQRSTUVWXYZA-
BCDEFGHIJKLMNOPQRSTUVWX-
YZABCDEFGHIJKLMNOPQRSTU-
VWXYZABCDEFGHIJKLMNOPQR
STUVWXYZABCDEFGHIJKLM-
NOPQRSTUVWXYZABCDEFGHI-
JKLMNOPQRSTUVWXYZABCDEF-
GHIJKLMNOPQRSTUVWXYZABCDEFGHIJKLMN
OPQRSTUVWXYZABCDEFGHI-
JKLMNOPQRSTUVWXYZABCDEF-
GHIJKLMNOPQRSTUVWXYZABC-
DEFGHIJKLMNOPQRSTUVWXYZABCDEFGHIJ
KLMNOPQRSTUVWXYZABCDEFGHIJKLMNOPQRSTU-
VWXYZABCDEFGHIJKLM-
NOPQRSTUVWXYZABCDEFGHI-
JKLMNOPQRSTUVWXYZABCDEF-
GHIJKLMNOPQRSTUVWXYZABC-
DEFGHIJKLMNOPQRSTUVWXYZABCDEFGH-
IJKLMNOPQRSTUVWXYZABCDE-
FGHIJKLMNOPQRSTUVWXYZAB-
CDEFGHIJKLMNOPQRSTUVWX-
YZABCDEFGHIJKLMNOPQRSTU-
VWXYZABCDEFGHIJKLM-
XYZ
2
1
1 2
1
XMP
Menu: –
Shortcut: – See also: XMP sidecar fi les
Version: 6.0, 7.0, CS, CS2,
CS3, CS4
XMP is short for Extensible Metadata
Platform which is a metadata standard
that Adobe built to house the information
that relates to your picture fi les.
Information such as author, camera,
resolution, color space and keywords are all
stored in this format and for the most part
the details are saved within the picture fi le
itself, but when this is not possible the data
is included in a separated sidecar fi le.
The presence of this information makes
searching, sorting and managing of
your pictures much easier as XMP is a
key technology used in many features in
Bridge and other applications in Adobe’s
Creative Suites.
The XMP detail that is linked to your
fi les can be viewed in Photoshop via the
File > File Info dialog (1) or by displaying
the Metadata panel (2) in Bridge (View >
Metadata Panel).
XMP is not the only metadata that can be
stored with your fi les. Details may also be
attached in EXIF, GPS and IPTC formats.
When this occurs Adobe applications such
as Photoshop and Bridge synchronize and
describe this metadata in XMP in order to
ensure better integration with applications
features.
XMP
XMP sidecar fi les
Menu: –
Shortcut: – See also: XMP
Version: 6.0, 7.0, CS, CS2, CS3, CS4
In some situations a portion of the XMP-
based metadata that is stored with a
picture is not saved in the fi le itself. Instead
the information is stored in an XMP fi le
that is saved with the original photograph
(1). This extra fi le is called an XMP sidecar
fi l e ( 2 ) .
One example of the use of sidecar fi les is the
settings changes made when processing a
fi le in the Camera Raw feature. The user
can elect to save these changes settings in
the original fi le or with the fi le in a sidecar
format.
Where the detail is stored can be set in the
preferences for the feature, which can be
selected via the Preferences entry in the
pop-up menu displayed by pressing the
side-arrow next to the Settings menu in
the Camera Raw dialog.
The Edit > Camera Raw Preferences dialog
in Bridge 2.0 provides a clearer choice for
setting up sidecar fi les. The ‘Save image
settings in’ menu provides the options of
using the Camera Raw database or Sidecar
fi les for storing the development settings
(3).
3
XYZ
306
XYZ
Photoshop CS4 A–Z
1
2
3
4
Zoom In
Original
Zoom Out
ZigZag fi lter
Menu: Filter > Distort > ZigZag
Shortcut: – See also: Filters
Version: 6.0, 7.0, CS, CS2,
CS3, CS4
The ZigZag fi lter, as one of the group of
Distort fi lters, simulates up and down
waves such as pond ripples.
The dialog contains controls that adjust
the style and intensity of the effect. The
Amount slider (1) alters the strength of
the ripple effect, which basically translates
to the depth and height of the resultant
waves. Low values create shallower, more
subtle effects; higher numbers produce
more dramatic results.
The Ridges slider (2) increases or decreases
the number of ridges used in the effect.
Three different types of ZigZag fi ltration
are available from the drop-down Style
menu (3) – Pond ripples, Out from the
center and Around the center.
Also included is a simulated preview
window, where the fi lter is applied to a wire
frame representation of your picture (4).
Zoom In/Zoom Out
Menu: View > Zoom In/Zoom Out
Shortcut: Ctrl/Cmd =
Ctrl/Cmd -
See also: Zoom tool,
Navigator
Version: 6.0, 7.0, CS, CS2, CS3, CS4
The View > Zoom In/Zoom out menu
options magnify and reduce the size of the
onscreen image in a way that is similar to
the Zoom tool.
Each selection of the menu item (or
keystroke combination) changes the
magnifi cation of the image by set
increments between a minimum of 1 pixel
(usually less than 1%) and a maximum of
3200%.
ZIGZAG FILTER
Zoom to 3200%
Menu: View > Zoom In
Shortcut: Ctrl/Cmd + See also: View
Version: CS3, CS4
New for Photoshop CS3/CS4 is the ability
to zoom in to a magnifi cation of 3200%.
At this level the pixels that make up even
a high resolution image like the example
are clearly visible.
Original
Zoomed to 3200%
XYZ
XYZ
307
Photoshop CS4 A–Z
1 2
3
Zoom tool
Menu: –
Shortcut: Z See also: Match Zoom,
Navigator
Version: 6.0, 7.0, CS, CS2,
CS3, CS4
The Zoom tool is used to adjust the
magnifi cation of your picture on screen.
After selecting the tool from the toolbar,
choose a mode, Zoom In (1) or Zoom Out
(2), from the settings in the options bar.
Next click onto the picture part that you
want to magnify, or make smaller. The
onscreen image will increase, or decrease,
in size and the magnifi cation value will be
displayed in the title bar of the document
window (3).
Sections of a picture can be zoomed to fi t
the width of the program’s workspace by
click-dragging a zoom marquee around
the area to be enlarged. Automatically
the selected area is enlarged to fi t the
workspace.
ZOOM TOOL
Zoomify
Menu: File > Export > Zoomify
Shortcut: – See also: ZoomView fi les
Version: CS3, CS4
In CS3 and CS4 the Export > ZoomView
option has been replaced with the Export
> Zoomify feature. The feature works in
a similar way to its predecessor in that
it allows photographers to display high
quality versions of their high resolution
images on the internet.
Unlike ZoomView, though, Zoomify doesn’t
require an additional viewer to be installed
to view the resultant web pages. The image
tiles that are combined to make it possible
to zoom and pan across the high resolution
image are created in industry standard
JPEG format and the containing page and
navigation controls are built with HTML
and Flash.
The functionality and look of the viewer
can be customized by editing the Flash
source code fi le (FLA fi le).
After opening the picture that you want to
convert to a high resolution web format,
select File > Export > Zoomify. Adjust the
settings in the Zoomify Export such as the
Output location, Image Tile Options, and
Browser Options.
To complete the process click the OK button
at the top of the dialog. This will start the
process of creating the tiled image fi les,
web page and navigational components
of the zoomify site.
Full screen zoom High resolution using Zoomify
XYZ
308
XYZ
Photoshop CS4 A–Z
Standard view
1
ZoomView format
Menu: File > Export > ZoomView
Shortcut: – See also: ZoomView fi les
Version: 6.0, 7.0, CS, CS2
The ZoomView fi le format is designed for
delivering high resolution images over the
internet.
Photoshop users can convert their pictures
into this format by selecting the File >
Export > ZoomView feature.
Pictures in this format can only be
displayed when the free Viewpoint media
player (www.viewpoint.com ) is installed.
Once installed the user can then zoom and
pan high resolution photographs that have
been saved in the ZoomView format.
ZOOMVIEW FILES
Zoomed in view
1
2
3
4
ZoomView fi les
Menu: File > Export > ZoomView
Shortcut: – See also: ZoomView format
Version: 6.0, 7.0, CS, CS2
The Export to ZoomView feature allows
image makers to save their pictures in an
innovative high resolution web deliverable
format that allows both panning and
zooming from within the browser
window.
To convert your pictures to the viewpoint
format open the fi le in Photoshop and
then select File > Export > ZoomView (1).
The Viewpoint ZoomView Save dialog
is then displayed (2). Choose to include
instructions with the web page (3), select
the location where the ZoomView fi les
will be saved, input the base fi lename,
allocate a tile size and level of quality, and
the dimensions that the picture window
will be when displayed in a browser, and
click OK.
The feature creates two folders and two
associated fi les including the main page
or HTML fi le (4).
The Export to ZoomView option has been
replaced with the Export to Zoomify
command in Photoshop CS3.
309
Step by step
Photoshop CS4 A–Z
IMPORTING PHOTOS INTO BRIDGE
Finally, choose what other actions Bridge
will take after downloading the fi les. Here
you can select to open Bridge after the
transfer is complete, automatically convert
the images to DNG format and even make
a backup of the originals to another drive.
Clicking the Get Photos button will transfer
your pictures to your hard drive.
3
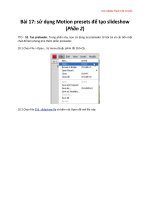
After fi nding and selecting the source of
the pictures adjust the Import Settings.
Browse for the folder where you want the
photographs to be stored and if you want
to use a subfolder select the way that this
folder will be named from the Create
Subfolder drop-down menu.
2
Select the From Camera or Card Reader
option from the File menu, or select the
Bridge option from the pop-up dialog that
is displayed when the card reader is
connected to the computer. Choose the
Standard dialog.
1
As well as performing the basic setup
actions indicated in the Standard step-by-
step to the left, you can add in metadata
details to be attached to each downloaded
fi le. Here, the Basic Metadata option is used
to add simple author and copyright
information. Use the drop-down menu to
select any presaved metadata templates.
2
To switch the Photo Downloader to the
Advanced version of the feature click on
the Advanced Dialog option at the bottom
of the window.
1
The small checkboxes at the bottom right
of the preview thumbnails can be used to
choose which images to transfer. All photos
are selected by default but can be
deselected by clicking the UnCheck all
option at the bottom of the preview
window. Click the Get Photos button to
start the import process.
3
01 IMPORTING PHOTOS INTO BRIDGE
From camera or card
reader (Standard)
Menu: Bridge: File > Get Photos From Camera
Shortcut: – OS: Mac, Windows
Version: CS3, CS4 See
also:
Adobe Photo Downloader
(APD)
From camera or card
reader (Advanced)
Menu: Bridge: File > Get Photos From Camera
Shortcut: – OS: Mac, Windows
Version: CS3, CS4 See
also:
Adobe Photo
Downloader (APD)
ABCDEFGHIJKLMNOPQRSTU-
VWXYZABCDEFGHIJKLM-
NOPQRSTUVWXYZABCDEFGHI-
JKLMNOPQRSTUVWXYZABCDE-
FGHIJKLMNOPQRSTUVWXYZAB-
CDEFGHIJKLMNOPQRSTUVWX-
YZABCDEFGHIJKLMNOPQRST-
UVWXYZABCDEFGHIJKLM-
NOPQRSTUVWXYZABCDEFGHI-
JKLMNOPQRSTUVWXYZABCDE-
FGHIJKLMNOPQRSTUVWXYZAB-
CDEFGHIJKLMNOPQRSTUVWX-
YZABCDEFGHIJKLMNOPQRSTU-
VWXYZABCDEFGHIJKLMN-
OPQRSTUVWXYZABCDEFGHI-
JKLMNOPQRSTUVWXYZABCDE-
FGHIJKLMNOPQRSTUVWXYZAB-
CDEFGHIJKLMNOPQRSTUVWX-
YZABCDEFGHIJKLMNOPQRSTU-
VWXYZABCDEFGHIJKLM-
NOPQRSTUVWXYZABCDEFGH-
IJKLMNOPQRSTUVWXYZABCDE-
FGHIJKLMNOPQRSTUVWXYZAB-
CDEFGHIJKLMNOPQRSTUVWX-
YZABCDEFGHIJKLMNOPQRSTU-
VWXYZABCDEFGHIJKLM-
NOPQRSTUVWXYZABCDEFGHI-
SBS
Step by step
310
Photoshop CS4 A–Z
CHANGING BRIGHTNESS
Moving the Midtone Input slider to the left
increases the brightness of the photo.
Levels
Menu: Image > Adjustments > Levels
Shortcut: Ctrl/Cmd L OS: Mac, Windows
Version: 6.0, 7.0, CS,
CS2, CS3
See
also:
Levels command
02 CHANGING BRIGHTNESS
Before
The simplest way to make a photo brighter
using the Curves feature is to click-drag the
midtone part of the curve upwards.
Dragging the curve downwards makes the
photo darker. Using curves to perform this
action means that both the shadows and
highlight tones are left untouched by the
changes.
Curves
Menu: Image > Adjustments > Curves
Shortcut: Ctrl/Cmd M OS: Mac, Windows
Version: 6.0, 7.0, CS,
CS2, CS3,
CS4
See
also:
Curves
The Shadow/Highlight feature provides
some brightness control using the Shadows
controls as long as the Tonal Width value
is kept pretty high. Moving the Amount
slider right brightens the darkest portions
of the image.
Shadow/Highlight
Menu: Image > Adjustments > Shadow/Highlight
Shortcut: – OS: Mac, Windows
Version: CS, CS2,
CS3, CS4
See
also:
Shadow/Highlight
The Brightness/Contrast feature provides
a quick and easy adjustment of the overall
brightness of the image. Pushing the slider
to the right lightens the midtones.
Brightness/Contrast
Menu: Image > Adjustments > Brightness/Contrast
Shortcut: – OS: Mac, Windows
Version: 6.0, 7.0, CS,
CS2, CS3,
CS4
See
also:
Brightness/Contrast
After
311
Step by step
Photoshop CS4 A–Z
Holding the Alt key whilst moving these
Input sliders will preview the pixels that are
being converted to pure black or white
(clipped). Move the sliders in until you see
the fi rst few pixels and then adjust the
sliders slightly to ensure no pixels are being
clipped.
To reduce contrast in a photo, drag the
Black and White Output sliders towards the
center of the histogram.
2
To increase contrast in a photograph move
the Highlight and Shadow input sliders in
the Levels dialog towards the center of the
histogram.
1
3
To add more contrast click-drag the
highlight portion of the curve upwards and
the Shadow section downwards. This
creates a classic S shape to the curve. To
reduce the contrast reverse these actions
moving the shadows upwards and the
highlights downwards.
2
The newly revised Curves feature provides
more tonal enhancement options than ever
before. With the addition of a black and
white input slider you can perform the
same contrast enhancement step as in the
Levels feature. Just move the Highlight and
Shadow input sliders in the Levels dialog
towards the center of the histogram.
Holding the Alt key whilst moving these
Input sliders will preview the pixels that are
being converted to pure black or white
(clipped). As with the Levels sliders move
the controls inwards until you see the fi rst
few pixels and then adjust the sliders
slightly to ensure no pixels are being
clipped.
1
Levels
Menu: Image > Adjustments > Levels
Shortcut: Ctrl/Cmd L OS: Mac, Windows
Version: 6.0, 7.0, CS,
CS2, CS3,
CS4
See
also:
Levels command
Curves
Menu: Image > Adjustments > Curves
Shortcut: Ctrl/Cmd M OS: Mac, Windows
Version: CS3, CS4 See
also:
Curves
03 ADJUSTING CONTRAST
ADJUSTING CONTRAST
Before
After
Step by step
312
Photoshop CS4 A–Z
05 SHARPENING
The Auto Color feature provides a handy
one-click correction of many color cast
problems. If the results are not what you
expect then undo the action by immediate-
ly selecting the Edit > Undo Auto Color
option.
Using the Variations feature requires you
to recognize the nature of the cast in your
photos and then to click on a thumbnail
sample that will help reduce the problem.
In this example Decrease Red and Increase
Green were both used to help correct the
picture.
The Amount slider is used to alter the
degree of change applied when each
thumbnail sample is pressed.
Select the sharpening type from the
Remove list. Choose Lens Blur for less halo
effects at higher sharpening settings.
3
Adjust the Radius slider to control the
number of pixels surrounding an edge that
is included in the effect.
2
Select the Smart Sharpen fi lter. Adjust the
Amount slider to control the strength of
the fi lter.
1
04 REMOVING COLOR CASTS
After
Before
Auto Color Correction
Menu: Image > Adjustments > Auto Color
Shortcut: Shft Ctrl/Cmd B OS: Mac, Windows
Version: 6.0, 7.0, CS,
CS2, CS3, CS4
See
also:
Auto Color Correction
Variations
Menu: Image > Adjustments > Variations
Shortcut: – OS: Mac, Windows
Version: 6.0, 7.0, CS,
CS2, CS3,
CS4
See
also:
Variations
Adjust Sharpness
Menu: Filter > Sharpen > Smart Sharpen
Shortcut: – OS: Mac, Windows
Version: CS2, CS3,
CS4
See
also:
Unsharp Mask fi lter,
Smart Sharpen fi lter
Before
Choose the More Refi ned option for more
precise sharpening results but longer
processing times.
4
REMOVING COLOR CASTS
Like the Variations feature it is important
to be able to identify the nature of the cast
before using the control. Then use the
sliders in the Color Balance feature to
remove a cast by adding in the opposite
color to the image. For example, with an
image with a red cast you will need to move
the Cyan/Red slider to the Cyan end of the
control. Color Balance also has the option
to localize the changes to a specifi c set of
tones – shadows, midtones or highlights.
Color Balance
Menu: Image > Adjustments > Color Balance
Shortcut: – OS: Mac, Windows
Version: 6.0, 7.0, CS,
CS2, CS3
See
also:
Color Balance
The Auto Levels option can also provide
good cast removal results and it can be a
good idea to try an auto option fi rst before
moving on to more manual approaches if
necessary.
Auto Levels
Menu: Image > Adjustments > Auto Levels
Shortcut: Shft Ctrl/Cmd L OS: Mac, Windows
Version: 6.0, 7.0, CS,
CS2, CS3
See
also:
Auto Levels,
Auto Contrast
313
Step by step
Photoshop CS4 A–Z
Adjust the opacity of this layer to govern
the level of sharpening. Sharpening using
this technique means that you can remove
or adjust the strength of the effect later by
manipulating the fi ltered layer.
3
With the fi ltered layer still selected switch
the blend mode to Hard Light. This mode
blends both the dark and light parts of the
fi ltered layer with the picture layer, causing
an increase in contrast.
2
Make a copy (Layer > Duplicate Layer) of
the picture layer that you want to sharpen.
Filter the copied layer with the High Pass
fi lter (Filter > Other > High Pass) and press
OK.
1
Next, apply the Find Edges fi lter (Filter >
Stylize > Find Edges) to the grayscale layer
and then invert the results (Image >
Adjustments > Invert).
2
The fi rst step to using the Find Edges fi lter
to confi ne sharpening to just the edges of
a picture is to make a copy of the back-
ground layer (Layer > Duplicate Layer)
and desaturate the color (Image >
Adjustments > Desaturate).
1
Now click back to the new Smart Object
layer and select the Unsharp Mask or Smart
Sharpen fi lter from the Filter > Sharpen
menu. Click OK to the dialog without
making any changes and then Alt/Opt click
the Smart Filter’s thumbnail mask to display
it in the main work area. Now paste the
memory contents to the mask (Ctrl/Cmd V).
With the edge mask now in place, double-
click the Unsharp Mask fi lter entry in the
Layers palette and adjust the sharpening
settings to suit.
4
You can also allocate the amount of RAM
set aside specifi cally for Photoshop in this
dialog. With the scratch disks now set up
click OK to close the window and then quit
Photoshop as the changes will not take
effect until you restart the program.
3
The Performance dialog has settings to
allocate all the hard disks you have installed
as extra RAM. It is best not to use the same
location for Windows/Mac OS virtual
memory. It is also worth selecting your
fastest drive fi rst as the extra speed will
also help increase performance.
2
The preferences settings for Photoshop are
located under the Edit > Preferences menu.
Here you will fi nd a series of settings that
allow you to adjust the default workings
of the program. To change or allocate
scratch disks select the Performance or
Plug-Ins & Scratch Disks option.
1
High Pass sharpening
Menu: Filter > Sharpen > Smart Sharpen
Shortcut: – OS: Mac, Windows
Version: 6.0, 7.0, CS,
CS2, CS3,
CS4
See
also:
Unsharp Mask fi lter,
Smart Sharpen fi lter
Find Edges sharpening
Menu: Filter > Sharpen > Smart Sharpen
Shortcut: – OS: Mac, Windows
Version: CS3, CS4 See
also:
Unsharp Mask fi lter,
Smart Sharpen, fi lter
Smart Objects
Scratch disks
Menu: Edit > Preferences > Performance
Shortcut: – OS: Mac, Windows
Version: 6.0, 7.0, CS,
CS2, CS3,
CS4
See
also:
Preferences, Photoshop
After
06 SPEEDING UP
PHOTOSHOP
Now to add the sharpening to just the
edges with the aid of the new Smart Filters
technology. Start by converting the image
layer to a Smart Object layer (Layer > Smart
Objects > Convert to Smart Object). Next
switch back to the fi ltered layer and select
all of the image content (Ctrl/Cmd A) and
copy this to memory (Ctrl/Cmd C).
3
SHARPENING
Step by step
314
Photoshop CS4 A–Z
Adjust the Amount slider to control the
strength of the fi lter, checking the results
in both the thumbnail and full image
previews. Click OK to fi nish.
3
Tick the Monochromatic option to restrict
the effect to changes in the tone of pixels
rather than color.
2
Select the Add Noise fi lter from the Noise
section of the Filter menu. Adjust the
thumbnail preview to a view of 100% and
tick the Preview option. Select Uniform for
an even distribution of new pixels across
the image, or pick Gaussian for a more
speckled effect.
1
Move the Scaling slider to change the size
of the texture. Adjust the Relief slider to
control the dominance of the fi lter. Select
a Light direction to adjust the highlights
and shadow areas of the texture.
2
Select the Texturizer fi lter from the Texture
section of the Filter menu. Adjust the
thumbnail preview to a view of 100%.
Select Texture type from the drop-down
menu.
1
Tick the invert box to switch the texture
position from ‘hills’ to ‘valleys’ or reverse
the texture’s light and dark tones. Click OK
to fi nish.
3
Once back at the Texturizer dialog, move
the Scaling slider to change the size of the
texture. Adjust the Relief slider to control
the dominance of the fi lter. Select a Light
direction to adjust the highlights and
shadow areas of the texture. Click OK to
fi lter the photo.
3
Pick the Load Texture item from the drop-
down list in the Texture menu. Browse
folders and fi les to locate texture fi les. Click
fi le name and then open to select.
2
Shoot, scan or design a texture image and
save as a Photoshop fi le (.PSD). Next, select
the Texturizer fi lter from the Texture
heading in the Filter menu.
1
07 INCORPORATING TEXTURE
After
Before
Adding noise
Menu: Filters > Noise > Add Noise
Shortcut: Ctrl F OS: Mac, Windows
Version: 6.0, 7.0, CS,
CS2, CS3,
CS4
See
also:
Add Noise fi lter
The Texturizer fi lter
Menu: Filters > Texture > Texturizer
Shortcut: Ctrl F OS: Mac, Windows
Version: 6.0, 7.0, CS,
CS2, CS3,
CS4
See
also:
Texturizer fi lter
DIY texture
Menu: Filters > Texture > Texturizer
Shortcut: Ctrl F OS: Mac, Windows
Version: 6.0, 7.0, CS,
CS2, CS3,
CS4
See
also:
Texturizer fi lter
INCORPORATING TEXTURE
315
Step by step
Photoshop CS4 A–Z
With the dialog still open use the Hue slider
to alter the color of the tint. Traditional
looking sepia tone is approximately a value
of 30 and a blue tonier equivalent can be
found at a value of 215. The strength of the
color is controlled by the Saturation
slider.
3
After the Hue/Saturation dialog is opened
proceed to the bottom right-hand corner
of the dialog and select the Colorize option.
Immediately the image will be changed to
a tinted monochrome.
2
The simplest way to add a tint to your color
photos and convert them to monochrome
in one step is to make use of the Colorize
option in the Hue Saturation feature in the
Image > Adjustments menu.
1
With the Filter dialog open either select a
preset fi lter from the drop-down menu or
choose a color as the basis of the fi ltering.
Unlike monochrome tinting this fi lter keeps
the underlying color of the picture.
1
The new Black & White feature in Photoshop
CS3 not only provides a method for creating
customized grayscale conversions from
color originals, but it also contains a Tint
option as well. Ticking the Tint checkbox
at the bottom of the dialog activates the
Hue and Saturation controls, which then
behave in a similar way to those found in
the Hue/Saturation feature.
Adjust the Density setting to fi ne-tune the
strength of the fi lter. To maintain the
overall contrast ensure that the Preserve
Luminosity option is selected. Alternatively,
to emphasize the fi lter color deselect this
setting.
2
Without closing the Variations dialog now
check the Shadows option and add a
different color to these image tones. In the
example the shadows were colored blue
by clicking the Increase Blue thumbnail
repeatedly. Click OK to apply the split
toning changes.
3
Next select the Variations option from the
Image > Adjustment menu. Check the
Highlights option and then click on the
thumbnail for the color to apply to these
tones. Here I decreased Blue.
2
Change any grayscale photos to RGB mode
(Image > Mode > RGB Color). If you are
starting with a colored photo convert it to
a monochrome using the Image >
Adjustments > Desaturate.
1
08 TINTING AND TONING PICTURES
After split toning
Before
Simple tints
Menu: Image > Adjustments > Hue/Saturation
Shortcut: Ctrl/Cmd U OS: Mac, Windows
Version: 6.0, 7.0, CS,
CS2, CS3,
CS4
See
also:
Hue/Saturation
Color temperature tints
Menu: Image > Adjustments > Photo Filters
Shortcut: – OS: Mac, Windows
Version: CS, CS2,
CS3, CS4
See
also:
Photo Filter
Split toning
Menu: Image > Adjustments > Variations
Shortcut: – OS: Mac, Windows
Version: 6.0, 7.0, CS,
CS2, CS3,
CS4
See
also:
Variations
After temperature tint
TINTING AND TONING PICTURES
Black & White tints
Menu: Image > Adjustments > Black & White
Shortcut:
Shift Ctrl/Cmd
Alt/Opt B
OS: Mac, Windows
Version: CS3 See also: Black & White
1
Step by step
316
Photoshop CS4 A–Z
To help you preview how your cropped
picture will appear, Photoshop shades the
area of the picture that is to be removed.
You can alter the color and opacity of this
shading (called the shield) using the settings
in the tool’s options bar. The crop is
executed by clicking the ‘tick’ at the right-
hand end of the options bar or hitting the
Enter/Return key.
3
By dragging the cursor whilst it is outside
the marquee it can be rotated to crop and
straighten at the same time.
2
To start a new crop select the Crop tool and
click-drag a marquee over the parts of the
picture you want to keep. You don’t have
to be exact with this fi rst rectangle as you
can adjust the size and shape of the
marquee by click-dragging the corner and
side handles.
1
2
You can make a crop of a specifi c size and
resolution by adding these values to the
options bar before drawing the cropping
marquee. Using this feature you can crop
and resize in one step.
1
When you execute the crop, Photoshop will
automatically crop and resize the picture.
To reset the Crop tool to normal choose the
Clear button from the options bar. Pressing
the Front Image button forces the Crop
tool to use the size of the open front image
for the crop settings.
3
09 CROPPING YOUR PHOTOS
After
Before
Basic crops
Menu: –
Shortcut: C OS: Mac, Windows
Version: 6.0, 7.0, CS,
CS2, CS3,
CS4
See
also:
Crop tool
Crop to a specifi c size
Menu: –
Shortcut: C OS: Mac, Windows
Version: 6.0, 7.0, CS,
CS2, CS3,
CS4
See
also:
Crop tool
CROPPING YOUR PHOTOS
With the dimensions set when you click-
drag the Crop tool the feature will only
draw rectangles the size and shape of the
values you have entered. There is also a
place on the options bar to enter the
resolution of the cropped image. Leaving
this option blank will maintain the
resolution of the original; adding in a value
will crop and alter resolution in the one
action.
1
317
Step by step
Photoshop CS4 A–Z
To change the view of the images in the Photomerge workspace
use the Move View tool or change the scale and the position of the
whole composition with the Navigator. Images can be dragged to
and from the light box to the work area with the Select Image tool.
With the Snap to Image function turned on, Photomerge will match
like details of different images when they are dragged over each
other.
3
Now choose the Layout type from the Photomerge dialog. For most
panoramas the Auto option is a good place to start. For very wide
panoramas with many source fi les try the Cylindrical Layout and for
stitches where it is important for the images to remain distortion-
free, pick Reposition only. For more manual control or in situations
when the Auto option doesn’t produce acceptable results choose
the Interactive Layout option. The Advanced Blending option (bottom
of the dialog) will try to smooth out uneven exposure or tonal
differences between stitched pictures. Select OK to start the stitching
process. With all options the process will proceed automatically. The
exception is the Interactive Layout option which opens the Photomerge
workspace and then allows you to start to edit the layout of your
source images manually.
2
Select Photomerge from the File menu (File > Automate > Photomerge)
to start a new panorama. Click the Browse button in the dialog box.
Search through the thumbnails of your fi les to locate the pictures for
your panorama. Click the Open button to add fi les to the Source Files
section of the dialog. Alternatively you can start in Bridge by multi-
selecting your source fi les fi rst and then choosing Tools > Photoshop
> Photomerge.
1
Checking the Use Perspective box will instruct Photoshop to use the
fi rst image placed into the layout area as the base for the composition
of the whole panorama. Images placed into the composition later
will be adjusted to fi t the perspective of the base picture. The fi nal
panorama fi le is produced by clicking the OK button.
10 CREATING
PANORAMAS
Stitching Photos
Menu: File > Automate > Photomerge
Shortcut: – OS: Mac, Windows
Version: CS, CS2, CS3,
CS4
See also: Photomerge (CS3)
4
CREATING PANORAMAS
Step by step
318
Photoshop CS4 A–Z
Black & White
Menu: Enhance > Convert to Black and White
Shortcut:
Shift Alt/Opt
Ctrl/Cmd B
OS: Mac, Windows
Version: CS3, CS4 See
also:
Black and White
Correct the highlights by dragging the
white point slider to the left.
3
Using the Levels control, map the dark
pixels to black by dragging the black point
slider to the right.
2
Select the Image > Mode > Grayscale option
and then click on the OK button in the
Discard Color warning box.
1
The one-step Desaturate feature produces
the same results as manually desaturating
the photo using the controls in the Hue/
Saturation feature (Enhance > Adjust Color
> Adjust Hue/Saturation).
2
You can also use the Desaturate option
(Image > Adjustments > Desaturate). This
feature has the advantage of keeping the
photo in RGB mode after the conversion,
allowing hand coloring of the photo.
1
With the Hue/Saturation dialog open, drag
the Saturation slider all the way to the left
(a setting of -100) to produce a grayscale
result.
3
Fine-tune how colors map to specifi c grays
using the adjustment sliders. Move a color
slider to the left to darken its gray in the
conversion or to the right to lighten it.
3
Use the presets in the Black & White dialog
to establish the basic look of the conversion.
Preview the results in the main
workspace.
2
The Black & White feature (Image >
Adjustment > Black & White) in Photoshop
CS3 Adobe provides a new easy-to-use
feature for the custom mapping of color
to gray.
1
11 CONVERT COLOR PHOTOS TO BLACK AND WHITE
After
Before
Change to Grayscale
Menu: Imge > Mode > Grayscale
Shortcut: – OS: Mac, Windows
Version: 6.0, 7.0, CS,
CS2, CS3,
CS4
See
also:
Mode
Remove color
Menu: Enhance > Adjust Color > Remove Color
Shortcut: Shft Ctrl/Cmd U OS: Mac, Windows
Version: 6.0, 7.0, CS,
CS2, CS3, CS4
See
also:
Hue/Saturation
CONVERT COLOR PHOTOS TO BLACK AND WHITE
319
Step by step
Photoshop CS4 A–Z
Remove colorful or highly patterned
backgrounds from your screen, as this can
affect your color perception.
3
Check that your computer is displaying
thousands (16-bit color) or millions (24- or
32-bit color) of colors.
2
To start the calibration process make sure
that your monitor has been turned on for
at least 30 minutes.
1
Use the Step By Step Wizard to guide you
through the set up process. If a default
profi le was not supplied with your
computer, contact your monitor
manufacturer or check their website for
details.
5
Start the Adobe Gamma utility. In
Windows, this is located in the Control
panel. For Macintosh users, use Apple’s
own Display Calibrator Assistant, as Adobe
Gamma is not used with the new system
software.
4
Save the profi le, including the date in the
fi le name. As your monitor will change with
age, you should perform the Gamma setup
every couple of months. Saving the setup
date as part of the profi le name will help
remind you when last you used the
utility.
6
12 COLOR MANAGEMENT
Calibrate monitor
Menu: –
Shortcut: – OS: Mac, Windows
Version: 6.0, 7.0, CS,
CS2
See
also:
Color Settings,
Calibrate monitor
To ensure that Photoshop is operating with
a color-managed workfl ow think about
how you would normally view your work
and then select the profi les for RGB, CMYK
and Grayscale working spaces and the color
management policies for conversions in the
Color Settings dialog.
Color Settings
Menu: Edit > Color Settings
Shortcut:
Shift
Ctrl/Cmd K
OS: Mac, Windows
Version: 6.0, 7.0, CS,
CS2, CS3,
CS4
See
also:
Color Settings
Selecting the Edit > Convert to Profi le will
change the picture’s color to the selected
color space. Unless you have a specifi c
profi le for your printer or output device
use sRGB for screen work and AdobeRGB
for images destined for printing.
Convert to Profi le
Menu: Edit > Convert to Profi le
Shortcut: – OS: Mac, Windows
Version: 6.0, 7.0, CS,
CS2, CS3
See
also:
AdobeRGB, sRGB,
ICC profi les
Choosing the Edit > Assign Profi le option
will apply the profi le without converting
the picture. This gives the image the
appearance that it has been converted but
maintains the underlying colors of the
original.
Assign Profi le
Menu: Edit > Assign Profi le
Shortcut: – OS: Mac, Windows
Version: 6.0, 7.0, CS,
CS2, CS3
See
also:
AdobeRGB, sRGB,
ICC profi les
COLOR MANAGEMENT
Step by step
320
Photoshop CS4 A–Z
With the selection still active choose Edit >
Stroke. In the Stroke dialog that appears,
pick the width of the stroke (line) and its
color. Next select the Inside option as the
location. Click OK to draw the colored
border.
2
Open a suitable photo in the Photoshop
workspace. Use the Select > All command
to place a marquee around the whole
canvas.
1
Add a blank layer to the document. Fill the
layer with white (Edit > Fill) and then
convert it to a background layer (Layer >
New > Background from Layer).
2
Another approach starts by changing the
background layer to an image layer (Layer
> New > Layer from Background) and then
increasing the canvas size (Image > Canvas
size).
1
Now select Layer > Layer Style > Stroke.
Adjust the Stroke settings in the Layer Style
dialog before clicking OK to apply.
3
13 SIMPLE LINE FRAME
Before
Stroke selection
Menu:
Edit > Stroke
Shortcut: – OS: Mac, Windows
Version: 6.0, 7.0, CS,
CS2, CS3,
CS4
See
also:
Stroke a selection
Stroke layer style
Menu: Layer > Layer Style > Stroke
Shortcut: – OS: Windows
Version: 6.0, 7.0, CS,
CS2, CS3,
CS4
See
also:
Style settings
After
2
1
14 MULTI-LAYER
COPY
Multi-layer copy
Menu: Edit > Copy Merge
Shortcut: – OS: Mac, Windows
Version: 6.0, 7.0, CS,
CS2, CS3,
CS4
See
also:
Copy Merged command
SIMPLE LINE FRAME
To make a single layer copy of the content
of a multi-layered Photoshop document,
without fl attening or merging, start by
selecting the whole canvas area using Select
> All.
Now copy the merged layers using Edit >
Copy Merged and then create a new
document the size of the copied layers with
File > New > Blank File and paste down the
merged copy using Edit > Paste.
321
Step by step
Photoshop CS4 A–Z
Select the Save for Web & Devices option
from the File menu. Choose GIF as the fi le
type. Preview the animation by clicking the
browser preview button at the bottom of
the screen or by clicking the VCR buttons
to the right of the preview. Select OK to
save the fi le.
3
Adjust the Frame Delay option to control
the length of time each individual image
is displayed. Select the number of times
that the animation will play from the drop-
down menu.
2
Create a Photoshop fi le with several layers
of differing content. Display the Animation
palette and convert the layers to frames
with the Make Frames From Layers option
in the side-button menu (top right).
1
15 PHOTOSHOP ANIMATION
Animated GIF
Menu: File > Save for Web & Devices
Shortcut:
Alt/Opt Shft
Ctrl/Cmd S
OS: Mac, Windows
Version: 6.0, 7.0, CS,
CS2, CS3, CS4
See
also:
GIF format
Frame 3
Frame 2
Frame 1
Animation preview
Now construct the web page and add in
the new matted graphic. When the page
is displayed the background of the object
will seamlessly merge with the page
color.
3
Select File > Save for Web & Devices. In the
dialog select the JPEG option as the fi le
format. Select the web page color from the
Matte pop-up menu. Click OK to save.
2
To create a matted web image, choose the
web page color and then create a picture
with a transparent background.
1
16 WEB MATTING
Background Matting
Menu: File > Save for Web & Devices
Shortcut:
Alt/Opt Shft
Ctrl/Cmd S
OS: Mac, Windows
Version: 6.0, 7.0, CS,
CS2, CS3, CS4
See
also:
Save for Web &
Devices
Before
After
PHOTOSHOP ANIMATION
Step by step
322
Photoshop CS4 A–Z
Initially all the photos will remain displayed
as individual thumbnails. To stack the
pictures in the group, click on the number
in the top left-hand corner of the fi rst
thumbnail. To display all the photos
contained in a stacked, click on the
number.
3
To stack or group a selection of photos,
again multi-select the candidate photos in
the Content panel and then right click on
one of the thumbnails. Next, choose Group
as Stack from the pop-up menu.
2
To display a selection of photos in the
Preview panel just multi-select the
thumbnails in the content area. The size of
each image will be automatically adjusted
to suit the space available in the panel.
1
To burn in make sure that the new layer is
active and then select the default colors
for foreground (black) and background
(white). Select a soft-edged brush and
reduce the opacity to between 20–30%.
Start to paint in the bright areas of the
image. The black paint combined with the
Soft Light blend mode acts like a non-
destructive burn in tool.
2
Start by creating a new blank layer above
the image or background layer. Next
rename the layer Dodge and Burn and
change the blend mode of the layer to Soft
Light. The lightening and darkening
changes will be applied to this layer and
the original pixels beneath will not be
touched.
1
To lighten or dodge areas switch paint
colors so that now the foreground color is
white and paint away as before. In this
scenario the white paint and the Soft Light
blend mode works like a non-destructive
version of the Dodge tool.
3
Now change the blend mode of the Texture
layer to Vivid Light or Hard Light. Select
the Add Noise fi lter from the Filter > Noise
menu and adjust the settings in the Filter
dialog whilst watching the results preview
in the document window.
3
Next fi ll the layer with 50% gray using the
Edit > Fill layer command. 50% gray is one
of the preset fi ll options available in the Fill
dialog. This mid gray fi ll provides a tone for
the Add Noise fi lter to work on.
2
Start by creating a new layer above the
image layer or background layer in your
photo. You can do this by selecting Layer
> New > Layer or by clicking the Create New
Layer button in the Layers palette. Label
this layer Texture.
1
17 GROUPING
PHOTOS
Grouping in Bridge
Menu: Organizer: Edit > Add Caption to Selected Items
Shortcut: Shft Ctrl T OS: Windows
Version: 6.0, 7.0, CS,
CS2, CS3,
CS4
See
also:
Captions
Dodge and Burn tool
Menu: –
Shortcut: B OS: Windows
Version: 6.0, 7.0, CS,
CS2, CS3,
CS4
See
also:
Brush tool
Adding Texture
Menu: –
Shortcut: – OS: Windows
Version: 6.0, 7.0, CS,
CS2, CS3,
CS4
See
also:
Add Noise fi lter
GROUPING PHOTOS
18 NON-DESTRUCTIVE TECHNIQUES
323
Step by step
Photoshop CS4 A–Z
Now apply the color and notice that the
brush is substituting the color for the gray
tones in the picture and it is doing so
proportionately: dark gray = dark green,
light gray = light green. Once the leaves
and stems have been colored, select new
colors for the fl owers and fi nally the
bucket.
3
Select the Brush tool from the toolbox and
adjust its size and edge softness using the
settings in the options bar. Change the
blend mode to Color by clicking on the
Mode drop-down menu in the options bar
and selecting the Color option from
towards the bottom of the list.
2
Most black and white photographs will
need to be changed to RGB mode for this
technique (Image > Mode > RGB Color).
Now click on the foreground swatch in the
toolbox and select a color appropriate for
your picture. Here I chose a dark green for
the leaves.
1
19 ADDING COLOR
TO BLACK AND
WHITE PHOTOS
Hand coloring
Menu: Image > Mode > RGB
Shortcut: – OS: Mac, Windows
Version: 6.0, 7.0, CS,
CS2, CS3, CS4
See
also:
Color blending mode
21 VIGNETTING
Now pick the Levels feature (Enhance >
Adjust Lighting > Levels) and drag the
middle slider to the right to darken the
selection area (drag the slider to the left to
lighten these parts). Click OK to apply the
changes.
3
With the selection still active choose the
Feather command (Select > Feather) and
input a Feather Radius value into the dialog.
Click OK to continue.
2
To create a vignette make an oval selection
of the focal point of the picture with the
Elliptical Marquee tool. Next, invert the
selection (Select > Inverse) so that
everything else is now selected.
1
Create a vignette
Menu: Select > Modify > Feather
Shortcut:
Alt/Opt Ctrl/
Cmd D
OS: Mac, Windows
Version: 6.0, 7.0, CS,
CS2, CS3, CS4
See
also:
Feather command
Before
After
Select an existing recipient from the
contacts list or add a new contact. Choose
the format that the pictures will appear in
from the drop-down menu.
Add or delete photos from the thumbnail
list of those to include with the buttons at
the bottom left of the dialog.
2
You can elect to use a photo that is currently
open in the Editor work space or select
images from inside the Photo Browser.
Select the File > Attach to E-mail to start
the feature and display the new dialog.
1
22 EMAIL PHOTOS
Attach to Email
Menu:
File > Attach to Email
File > Email
Shortcut: – OS: Mac, Windows
Version: 3, 4, 5 See
also:
Slide show
4
Next, hide the selection using the shortcut
keys of Ctrl/Cmd + H (the selection is still
active, you just cannot see the marching
ants) and open the Motion Blur dialog.
Adjust the Angle and Distance settings to
suit the picture and check the preview. Click
OK to complete.
To soften the transition between the sharp
and blurred sections apply a large feather
(Select > Modify > Feather) to the selection.
This replaces the normal sharp edge of the
selection with a gradual change between
selected and non-selected areas.
2
To control the picture parts to be blurred
we start by selecting the area to remain
sharp. Use the Lasso tool to draw a freehand
selection around the driver. Next, invert
the selection (Select > Inverse) so that the
entire image except the driver is now
selected.
1
20 RECREATING
MOTION
Motion Blur fi lter
Menu: Filter > Blur > Motion Blur
Shortcut: – OS: Mac, Windows
Version: 6.0, 7.0, CS,
CS2, CS3, CS4
See
also:
Filters
3
ADDING COLOR TO BLACK AND WHITE PHOTOS
Step by step
324
Photoshop CS4 A–Z
22 SELECTION TECHNIQUES
Hold down the Shift key whilst drawing to
restrict the shape to either a square or a
circle. Hold down the Alt (Windows) or
Option (Mac) key to draw the shape from
its center. Hold down the Spacebar to
reposition the marquee.
2
After selecting the tool, click-drag to draw
a marquee on the image surface.
1
Marquee tools
Menu: –
Shortcut: M OS: Mac, Windows
Version: 6.0, 7.0, CS,
CS2, CS3,
CS4
See
also:
Elliptical Marquee,
Rectangular Marquee
To take away from an existing selection
hold down the Alt/Opt key so that the brush
tip now has a small minus sign in the middle
and paint over the area to be removed. To
add to an existing selection hold down the
Shift key so that the brush tip has a plus
sign in the middle and paint over the new
areas.
The mode buttons on the options bar can
be used as an alternative method for
changing from adding to or subtracting
from selections.
2
After selecting the tool, adjust the settings
in the options bar to vary the brush size,
shape and hardness (edge softness). To
make a selection paint over the area to be
included. The selection outline will grow
as you continue to paint. When you release
the mouse button the tool will automatically
refi ne the selection further.
1
Quick Selection Tool
Menu: –
Shortcut: W OS: Mac, Windows
Version: CS3, CS4 See
also:
Selections, Lasso tools
To draw a freehand line, hold down the Alt
(Windows) or Option (Mac) key and click-
drag the mouse.
2
After selecting the tool, click and release
the mouse button to mark the fi rst
fastening point. To draw a straight line,
move the mouse and click again to mark
the second point.
1
Polygonal Lasso
Menu: –
Shortcut: L OS: Mac, Windows
Version: 6.0, 7.0, CS,
CS2, CS3,
CS4
See
also:
Polygonal Lasso tool,
Magnetic Lasso tool,
Lasso tools
After selecting the tool, click-drag to draw
the selection area by freehand. Release the
mouse button to join the beginning and
end points and close the outline.
Lasso
Menu: –
Shortcut: L OS: Mac, Windows
Version: 6.0, 7.0, CS,
CS2, CS3,
CS4
See
also:
Polygonal Lasso tool,
Magnetic Lasso tool,
Lasso tools
To close the outline, either move the cursor
over the fi rst point and click or double-
click.
3
SELECTION TECHNIQUES
325
Step by step
Photoshop CS4 A–Z
If the tool doesn’t snap to the edge
automatically, click the mouse button to
add a fastening point manually. Adjust
settings in the options bar to vary the tool’s
Magnetic function. To close the outline,
either double-click or drag the pointer over
the fi rst fastening point.
2
After selecting the Magnetic Lasso tool,
click and release the mouse button to mark
the fi rst fastening point. Trace the outline
of the object with the mouse pointer. Extra
fastening points will be added to the edge
of the object automatically.
1
Magnetic Lasso
Menu: –
Shortcut: L OS: Mac, Windows
Version: 6.0, 7.0, CS,
CS2, CS3,
CS4
See
also:
Polygonal Lasso tool,
Magnetic Lasso tool,
Lasso tools
With black as the foreground color paint
over the areas not to be selected. The
painted sections will be colored red by
default. If you accidently paint in the wrong
place simply switch to white as the
foreground color and paint over the
mistake. Once you have fi nished painting
click the Quick Mask button again to switch
back to Selection mode.
2
Ensure that the foreground and background
colors are in the default colors then select
the Quick Mask mode button at the bottom
of the toolbox.
1
Mask based selections
Menu: –
Shortcut: Q OS: Mac, Windows
Version: 6.0, 7.0, CS,
CS2, CS3,
CS4
See
also:
Selections, Lasso tools,
Quick Selection tool
Constrain the selection to adjacent pixels
only by checking the Contiguous option.
With the Magic Wand tool active, click onto
the part of the image that you want to
select. Modify the Tolerance of the selection
by altering this setting in the options bar
then deselect. Then click the tool again to
reselect with the new Tolerance settings.
1
Magic Wand
Menu: –
Shortcut: W OS: Mac, Windows
Version: 6.0, 7.0, CS,
CS2, CS3,
CS4
See
also:
Lasso tools, Quick
Selection tool
Adding to and
subtracting from selections
The choices in the Selection tool’s options bar
determine how the new selection interacts with
the existing one.
(1) New selection (default mode).
(2) Add to selection (Shift key).
(3) Subtract from selection (Alt key).
(4) Intersect with selection (Shift Alt keys).
1 2 3 4
1 2 3
Magic Wand
settings:
The range of colors and
tones selected with the
Magic Wand tool is determined by the Tolerance (1) and Contiguous settings (3) in the tool’s options bar. High
Tolerance values select a broader range of color/tones. Only adjacent pixels are selected when the Contiguous
option is set. A softer selection edge is created when the Anti-aliased option (2) is set.
2
SELECTION TECHNIQUES