Real World Adobe InDesign CS4- P15 doc
Bạn đang xem bản rút gọn của tài liệu. Xem và tải ngay bản đầy đủ của tài liệu tại đây (1.52 MB, 30 trang )
3. Choose a color swatch from the Color pop-up menu, and enter
a tint value in the Tint eld, if necessary. Note that you can also
set the ll to overprint using the Overprint option.
4. Click the OK button to close the dialog box and apply the ll.
Alternatively, you can apply a ll to a cell using the Swatches panel or
Color panel (see Figure 6-33).
1. Select a cell or range of cells.
2. Click the Fill selector at the top of the Swatches panel or Color
panel to make it active (if it’s not already active).
3. Click the swatch (if you’re using the Swatches panel) or color (if
you’re using the Color panel) to apply it to the cell.
Applying Gradients to Table Cells. You can apply a gradient to the
ll and stroke of a cell, but the results might not be what you’d expect
(see Figure 6-34).
1. Select the cells.
-
Applying a Stroke to
Selected Cell Borders
In this example, we want to
remove the strokes around
the outside edges (top, le,
and right) of the rst row in
the table, but we don’t want
to remove the stroke at the
bottom of the row. To do
this, we use the Cell Proxy
in the Stroke panel.
When you click a border in
the Cell Proxy, it changes
from blue to gray (which
is hard to represent in this
book!)
Select the cell you
want to format.
InDesign displays the Cell
Proxy in the Stroke panel.
Click the cell border you want to protect
from formatting, then apply a stroke.
In this example, we have turned o the bottom border.e top, le, and right
borders of the rst row have
been set to zero point strokes,
but the bottom border of
the row retains its original
stroke weight.
Real_World_Adobe_InDesign_CS4b.pdf 421Real_World_Adobe_InDesign_CS4b.pdf 421 08/04/2009 05:55:20 p.m.08/04/2009 05:55:20 p.m.
.
-
Applying a Fill to a Cell
(Dialog Box Method)
Select a cell or
series of cells.
Choose Strokes and Fills from the Cell
Options submenu of the Context or Table
menu. InDesign displays the Strokes and
lls panel of the Cell Options dialog box.
Specify ll options
in the Strokes and
Fills panel of the Cell
Options dialog box.
InDesign applies the ll to
the selected cells.
-
Applying a Fill to a Cell
(Panel Method)
Click the Fill selector at the top
of the Swatches panel (if it’s
not already active).
Select a cell or a range of cells.
Click a swatch.
InDesign applies the ll to the selected cells.
Real_World_Adobe_InDesign_CS4b.pdf 422Real_World_Adobe_InDesign_CS4b.pdf 422 08/04/2009 05:55:20 p.m.08/04/2009 05:55:20 p.m.
-
Applying a
Gradient to a Cell
Select a cell.
Display the Gradient panel
and click the Gradient Ramp
to apply a gradient ll.
InDesign positions the start
and end of the gradient (in
this example, the center
point of a radial gradient)
based on the width and
height of the entire table—
not the width of the cell itself.
Center point of a radial gradient
applied to the cell.
2. Display the Gradient panel, if it’s not already visible.
3. Click in the Gradient Ramp to apply a gradient to the selected
cells. Adjust the gradient settings to dene the type, color, and
angle of the gradient (as discussed in Chapter 5, “Drawing”).
Note that the gradient is based on the width and height of the
table, rather than on the selected cell or cells. is may or may not
give you the eect you’re looking for. To gain more control over the
start/end points of the gradient, create and ll a rectangle, then paste
the rectangle into the cell.
Applying Diagonal Lines. To apply diagonal lines to a cell, use the
options in the Diagonal Lines panel of the Cell Options dialog box
(see Figure 6-35).
1. Select a cell, row, column, or table (table border strokes apply to
the entire table, so you need only select part of the table).
2. Display the Diagonal Lines panel of the Cell Options dialog box
(choose Diagonal Lines from the Cell Options submenu of the
Context menu).
3. Turn on one of the diagonal lines options. Choose a stroke
weight, stroke type, color, and tint. If you want the diagonal
lines to overprint, turn on the Overprint option. If you want the
diagonal lines to appear in front of the table, turn on the Draw
in Front option.
Real_World_Adobe_InDesign_CS4b.pdf 423Real_World_Adobe_InDesign_CS4b.pdf 423 08/04/2009 05:55:20 p.m.08/04/2009 05:55:20 p.m.
.
4. Click the OK button to apply the diagonal lines.
Formatting Table Borders. To apply a stroke to the edges of a table,
use the options in the Table Border section of the Table Setup panel
of the Table Options dialog box (see Figure 6-36). Note that apply-
ing a border to a table is the same as applying borders to the outside
edges of each of cells on each side of the table—but it’s a lot faster.
1. Select a cell, row, column, or table (table border strokes apply to
the entire table, so you need only select part of the table).
2. Display the Table Setup panel of the Table Options dialog box
(press Command-Option-Shi-B/Ctrl-Alt-Shi-B).
3. Choose a stroke weight, stroke type, color, and tint. If you want
the stroke to overprint, turn on the Overprint option.
-
Applying Diagonal
Lines to a Cell
InDesign displays the
Diagonal Lines panel of the
Cell Options dialog box.
Select a cell, then choose
Diagonal Lines from the
Cell Options submenu of the
Context or Table menu.
Use the controls to specify
the formatting of the
diagonal lines.
InDesign applies the
diagonal lines to the cell.
In this example table,
a diagonal line in a cell
indicates that the seats in
that section are no longer
available. TimeTravel Tickets
has run out of box seats
for the November 25, 1882,
premiere of “Iolanthe,” so we
have to apply diagonal lines
to the corresponding cell.
Real_World_Adobe_InDesign_CS4b.pdf 424Real_World_Adobe_InDesign_CS4b.pdf 424 08/04/2009 05:55:20 p.m.08/04/2009 05:55:20 p.m.
-
Applying Strokes to
Table Borders
Select a cell, row, column, or the entire
table (as we have in this example), then
Press Command-Shi-Option-B/Ctrl-
Shi-Alt-B to display the Table Setup
panel of the Table Options dialog box.
Specify the stroke weight, color,
and tint you want to apply to
the table borders. Click the OK
button to apply your changes.
InDesign applies the stroke
to the outside borders of
the cells at the outside (le,
right, top, or bottom)
of the table.
Example table without
a table border.
4. If you want to prevent the table border formatting from overrid-
ing formatting you’ve applied to the cells in the table (i.e., any
formatting other than the default table formatting), turn on the
Preserve Local Formatting option.
Applying Alternating Fills and Strokes. e options in the Row
Strokes, Column Strokes, and Fills panels of the Table Options
dialog box provide a way for you to vary the formatting of rows and
columns in a table according to a predened pattern. Shading table
rows or columns is oen a more visually pleasing way to format a
table than using strokes (this depends on the design of the piece in
which the table appears).
Real_World_Adobe_InDesign_CS4b.pdf 425Real_World_Adobe_InDesign_CS4b.pdf 425 08/04/2009 05:55:21 p.m.08/04/2009 05:55:21 p.m.
.
All of these panels work the same way—you select a pattern from
the Alternating Pattern pop-up menu, and then you specify the for-
matting applied by that pattern. If the pattern you chosee is None,
InDesign doesn’t alternate the corresponding ll or stroke properties
in the table. Otherwise, InDesign applies one of two formats to the
rows and columns in the table. Formatting you apply using alter-
nating lls or strokes overrides any cell formatting you’ve already
applied to the cells in the table (it has no eect on text formatting).
To apply an alternating ll or stroke pattern to a table, follow
these steps (see Figure 6-37).
1. Select a cell, row, column, or table (this formatting applies to the
entire table, so do whatever is easiest for you).
2. Display the panel of the Table Options dialog box that corre-
sponds to the attribute you want to work with (i.e., Row Strokes,
Column Strokes, or Fills). Turn on the Preview option—it can
help you understand the eect of the formatting options.
-
Applying
Alternating Fills
Select a cell, row, column,
or table, then choose
Alternating Fills from the
Table Options submenu of
the Context or Table menu.
Select a pattern from the
Alternating Pattern pop-up
menu, then specify the
formatting you want to
apply.
Note that we’ve directed our
alternating pattern to skip
the rst two rows in the table
(to avoid the table header
row and title).
InDesign applies the
alternating ll pattern to
the rows in the table.
Real_World_Adobe_InDesign_CS4b.pdf 426Real_World_Adobe_InDesign_CS4b.pdf 426 08/04/2009 05:55:21 p.m.08/04/2009 05:55:21 p.m.
3. Choose an option from the Alternating Pattern pop-up menu.
4. Choose a color for the alternating pattern (until you do this, you
probably won’t see any changes to the table, even if you have
turned on the Preview option).
5. If you want the alternating pattern to ignore rows at the begin-
ning or end of the table (for alternating row strokes) or at the le
or right edges of the column (if you’re working with alternating
column strokes), enter the number of cells in the Skip First and
Skip Last elds.
It should be clear you can create quite complex alternating for-
matting using these options. e only real way to learn how the dif-
ferent alternating formatting features work is to experiment with the
settings. Create an example table, open the Table Options dialog box,
turn on the Preview option, and play!
Table and Cell Styles
e problem with formatting tables is that it just takes far too long,
especially when you have a bunch of tables in a document. at’s
where table styles come in handy! Table styles—like their cousins
paragraph styles and object styles—are a way to collect a bunch of
formatting together and give it a single name. InDesign oers both
table styles (for table-wide formatting) and cell styles (for formatting
that aects a single cell).
e Basic Table Style. Every new document comes with one table
style called Basic. e problem is that if you redene Basic and use it
in your document, and then later copy one of these ables and paste
it into a dierent document, your table will change in appearance.
Because of that, we recommend you create your own styles instead
of using Basic.
While it’s tempting to jump in and discuss table styles, it’s typically
better to dene your cell styles rst because you’ll use them in your
table style denition. To dene a new cell style, follow these steps (see
Figure 6-38):
1. Choose New Cell Style from the Cell Style panel menu or
Option/Alt-click on the New Cell Style button in the panel.
Dening Cell Styles
Real_World_Adobe_InDesign_CS4b.pdf 427Real_World_Adobe_InDesign_CS4b.pdf 427 08/04/2009 05:55:21 p.m.08/04/2009 05:55:21 p.m.
.
2. In the General pane of the New Cell Style dialog box, give the
style a name and—if you want—a keyboard shortcut. (Shortcuts
have to be based on the keys on a numeric keypad.) If you’ve
already created a cell style, you can base your new one on it so
that it takes on all the same formatting.
e coolest feature in the General pane is the Paragraph Style
pop-up menu. If you choose a paragraph style here, it will auto-
matically apply to any text inside the cell.
3. e next three panes—Text, Strokes and Fills, and Diagonal
Lines—are virtually identical to same-named panes in the Cell
Options dialog box, so there’s no reason to repeat ourselves. For
more information, see those sections earlier in this chapter.
-
Dening Cell Styles
Hold down Option/Alt and
click the New Cell Style button
to force the New Cell Style
dialog box to open.
Work your way through
the panels in the Cell Style
Options dialog box to dene
a new cell style.
To apply a cell style, place
the cursor in the cell and
click in the Cell Styles panel.
Click the OK button to close
the dialog box, and InDesign
adds a new cell style.
Just as in a
Character style,
blank elds are
ignored when
the cell style is
applied.
Real_World_Adobe_InDesign_CS4b.pdf 428Real_World_Adobe_InDesign_CS4b.pdf 428 08/04/2009 05:55:21 p.m.08/04/2009 05:55:21 p.m.
e important thing to note about these panes, however, is
that—like character styles—all the controls are blank until you
set them. A blank eld or pop-up menu (or a dash in a checkbox)
means “ignore this formatting” so it won’t be applied when the
cell is styled. For example, if you leave the Cell Fill Color pop-up
menu blank, then your cell style will not override the cell ll
color already applied to the cell in the table.
If your cursor is currently inside a formatted cell when you create
a new cell style, the current formatting appears in the New Cell Style
dialog box automatically. at’s oen the fastest way to dene a cell
style. However, InDesign won’t apply the cell style for you aer you
click OK—you still have to do that with a click in the Cell Styles panel.
Once you’ve dened the cell styles you need, it’s time to build your
table style. To dene a table style, follow these steps (see Figure 6-39):
1. Choose New Table Style from the Table Style panel menu or
Option/Alt-click on the New Cell Style button in the panel.
2. In the General pane of the New Table Style dialog box, give the
style a name and—if you want—a keyboard shortcut based on
the numeric keypad keys. If you want to base the table style on
another table style, choose it from the Based On dialog box. We
recommend not basing new styles on the Basic Table style, as it
makes it too easy for tables to get messed up when copying them
to a new document.
You can have InDesign automatically apply cell styles to areas
of your table by choosing from the Cell Styles pop-up menus.
For example, if you have created a cell style to describe the look
of all the cells in your table (not including a header row), choose
that style from the Body Rows pop-up menu. You can specify
dierent cell styles for Body Rows, Header Rows, Footer Rows,
and the cells in the Le Column and Right Column.
Remember that each of these cell styles can apply its own
paragraph style to the text inside those cells, too. at’s how you
apply paragraph styles throughout a table by using a table style.
3. e next four panes of the New Table Style dialog box—Table
Setup, Row Strokes, Column Strokes, and Fills—are nearly iden-
tical to the similarly-named panes in the Table Options dialog
box, so go read about those earlier in the chapter.
However, some features are conspiculously absent in the
table style denition, notably anything that has to do with the
Dening Table Styles
Real_World_Adobe_InDesign_CS4b.pdf 429Real_World_Adobe_InDesign_CS4b.pdf 429 08/04/2009 05:55:21 p.m.08/04/2009 05:55:21 p.m.
.
-
Dening a Table Style
Hold down Option/Alt and click
the New Table Style button in
the Table Styles panel.
Apply cell styles here
Here we’ve
turned o the
table border.
e original
unformatted table.
Aer applying the table
style, the paragraphs are
formatted and the rows
have alternating tints.
Aer we convert the rst row
to a header row, InDesign
automatically applies the
header cell style to it.
structure of the table: Table Dimensions, Headers, and Footers.
Table styles cannot control these aspects of a table. at can be
quite frustrating at times. For example, if you import an Excel
or Word table and apply a table style to it, there’s no way for the
style to tell the table that the rst row should be a header row.
Instead, you have to manually use Convert Rows to Header. at
can get tiresome with a lot of tables.
Real_World_Adobe_InDesign_CS4b.pdf 430Real_World_Adobe_InDesign_CS4b.pdf 430 08/04/2009 05:55:21 p.m.08/04/2009 05:55:21 p.m.
4. When you’re done specifying the look at feel of the table, click
OK. InDesign won’t apply the style to a currently selected table;
you have to click on the style name in the panel.
Applying Table and Cell Styles. As mentioned above, you can apply a
table or cell style by—gasp!—placing the cursor in the table or cell (or
selecting more than one cell) and clicking on the style name in the
Table Styles or Cell Styles panel. Unfortunately, we don’t see any way
to apply a table style when placing a Word or Excel document.
You can also apply a table style to a table when you rst create it
with the Insert Table or Convert Text to Table features (both dialogs
sport a Table style pop-up menu from which to choose a style).
Redening Styles. You can change the denition of your table or
cell styles at any time by selecting the style in the panel and choos-
ing Style Options from the panel menu (or, better, from the Con-
text menu). You can also change the formatting on your document
page, then select the table or cell and choose Redene Style from
the Table Styles or Cell Styles panel menu. When you change a table
or cell style denition, the new formatting is immediately reected
throughout your document.
Clearing Overrides. Just because you’ve applied a table or cell style
doesn’t mean you can’t override that with further local formatting.
When you do apply local formatting on top of a cell or table, you’ll
see the familiar plus (+) sign next to the style name, indicating there’s
additional formatting here. You can see what that formatting is by
hovering the cursor over the style name.
To remove the local formatting, you can Option/Alt click on the
style name in the Table Styles or Cell Styles panel. If you want to
remove both local formatting applied to a table as well as any cell
styles that were applied, Option-Shi/Alt-Shi-click on a table style.
Another way to remove styles is to choose Clear Overrides from
the Table Styles or Cell Styles panel menu (or click the Clear Over-
rides button at the bottom of the panel)—this is the same as Option/
Alt-clicking. When it comes to cell styles, you have a nal option in
the panel menu (and panel button): Clear Attributes Not Dened by
Style. e dierence is subtle: Clear Overrides only removes the local
formatting that overrides the cell style denition. Clear Attributes
Not Dened by Style will clear all local formatting, even if it had
nothing to do with the cell style’s denition.
Real_World_Adobe_InDesign_CS4b.pdf 431Real_World_Adobe_InDesign_CS4b.pdf 431 08/04/2009 05:55:22 p.m.08/04/2009 05:55:22 p.m.
.
If you want to remove the cell style entirely, select the cell (or cells)
and click [None] in the Cell Styles panel.
Sorting Styles. If you don’t like the order in which styles appear in
the Table Styles or Cell Styles panel, you can rearrange them in two
ways: You can choose Sort by Name from the panel menu or you can
drag each style up or down to the position you want it.
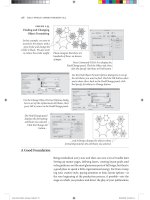
Loading Styles. You can copy the cell styles or table styles from
another InDesign document by choosing Load Table Styles or Load
Table and Cell Styles from the Table Styles or Cell Styles panel menu.
When you do this, InDesign asks which styles you want, and—if
some of the incoming styles have the same names as styles in your
current document, what you want to do about it (see Figure 6-40).
-
Loading Table Styles
Style Groups. You can group your table and cell styles together into
groups (or folders, or sets, or whatever you want to call them) using
the same techniques as grouping in the Paragraph Styles panel or
elsewhere. First, make a style group by clicking the New Style Group
button at the bottom of the Table Styles or Cell Styles panel, then
drag your styles into the group. Alternately, you can select one or
more styles and choose New Group from Styles from the panel menu.
If you want the same-named style in more than one group, select
that style and choose Copy to Group from the panel menu.
Text Wrap
Any independent object in an InDesign publication can have a text
wrap—a boundary that repels text—applied to it. Wrapping text
around an object is something like the opposite of owing text inside
a text frame. When you ow text inside a frame, you want text to stay
Real_World_Adobe_InDesign_CS4b.pdf 432Real_World_Adobe_InDesign_CS4b.pdf 432 08/04/2009 05:55:22 p.m.08/04/2009 05:55:22 p.m.
inside a path; when you apply a text wrap, you want to keep it out. To
set the text wrap for an object, follow these steps (see Figure 6-41).
1. Select an object—any frame or group—on an InDesign page.
2. Display the Text Wrap panel, if it’s not already visible (press
Command-Option-W/Ctrl-Alt-W).
3. Click one of the Text Wrap buttons in the Text Wrap panel.
InDesign displays the text wrap boundary around the selected
object, and pushes any text falling inside the text wrap boundary
to the outside of the boundary. If you applied the text wrap to a
text frame, the text in that frame is unaected by the text wrap
boundary.
4. Set the text wrap oset distances using the Top, Le, Bottom,
and Right elds in the Text Wrap panel. If you want the text
wrap to be the same on all four sides, make sure the Link icon is
enabled in the middle of the panel. However, if you’ve selected
anything other than a rectangular frame, you’ll only be able to
adjust a single eld (the Le eld) to set the oset distance.
Note that when it comes to inline or anchored objects (objects
that are anchored to a position in a text story), text wrap doesn’t
always play by the same rules. We cover that in more detail in “Inline
Frames and Anchored Objects,” later in this chapter.
When you choose the Wrap Around Object text wrap type, and
have an imported graphic selected, InDesign adds a new section to
the bottom of the Text Wrap panel (if you don’t see it, choose Show
Options from the Text wrap panel menu). You can create the text
wrap contour from paths or an alpha channel stored in a graphic,
or detect the edges of objects in an image (see Figure 6-42). It’s very
similar to the clipping path options.
As we pointed out in the “Composition Preferences” section of Chap-
ter 1, “Workspace,” many people aren’t used to the fact that applying
text wrap to an object aects the text below and above that object in
the stacking order. Fortunately, you can make individual text frames
immune to text wrap: Select the frame, choose Text Frame Options
from the Object menu (or press Command/Ctrl-B) and turn on the
Ignore Text Wrap checkbox.
InDesign can apply an inverted text wrap to an object, which causes
text to wrap to the inside of the text wrap (see Figure 6-43). We nd
Contour Options
Ignoring Text Wrap
Inverted Text Wrap
Real_World_Adobe_InDesign_CS4b.pdf 433Real_World_Adobe_InDesign_CS4b.pdf 433 08/04/2009 05:55:22 p.m.08/04/2009 05:55:22 p.m.
.
To wrap text around an
object, select the object and
then click one of the text
wrap options in the Text
Wrap panel (we’ve listed
the “ocial” name of the
text wrap type below each
example).
No Text Wrap
Wrap Around Object Shape
Wrap Around Bounding Box
Jump Object
Jump to Next Column
When you choose one of
the rectangular text wrap
options (Wrap Around
Bounding Box, Jump Object,
or Jump to Next Column),
you can adjust the oset
values for the top, right, le,
and bottom independently.
If you choose Wrap Around
Object Shape, you can only
enter a single oset value
that applies to all sides of
the text wrap.
…and InDesign changes the oset
for the corresponding side.
Enter a value in one of the oset elds…
e Jump Object text wrap option
causes text in any column touching
the text wrap boundary to jump
over the text wrap—it’s as if the wrap
extends to the width of the column.
e Jump to Next Column text wrap
option pushes any text in the column
below the top of the text wrap bound-
ary to the top of the next column.
-
Text Wrap
Real_World_Adobe_InDesign_CS4b.pdf 434Real_World_Adobe_InDesign_CS4b.pdf 434 08/04/2009 05:55:22 p.m.08/04/2009 05:55:22 p.m.
-
Contour Text
Wrap Options
is image includes a path
saved in Photoshop.
When you rst apply a
contour text wrap, InDesign
bases the text wrap on the
image bounding box.
If you don’t see the bottom
half of the panel, choose
More Options from the
panel menu.
To base the text wrap
contour on the saved path,
choose Photoshop Path
from the Type pop-up
menu…
…and then choose the path name
from the Path pop-up menu.
InDesign sets the text wrap contour
to the shape of the path.
this very helpful when well, actually, almost never. But it’s nice to
have options.
e text wrap boundary is a path, and can be edited and adjusted just
as you’d change the shape of any path in InDesign (see Figure 6-44).
You can draw new line segments using the Pen tool, or change the
location of path points using the Direct Selection tool.
Editing a Text Wrap
Regular Text Wrap Inverted Text Wrap
-
Inverted Text Wrap
Real_World_Adobe_InDesign_CS4b.pdf 435Real_World_Adobe_InDesign_CS4b.pdf 435 08/04/2009 05:55:22 p.m.08/04/2009 05:55:22 p.m.
.
e text wrap boundary
appears in a tint (we think
it’s 50 percent) of the selec-
tion color of the layer con-
taining the object—this can
make it dicult to see.
Select points on the text
wrap boundary just as
you would select points
on any path.
Drag the points to a
new location.
InDesign wraps the text
around the edited text
wrap boundary.
You can also use the Pen
tool to add points, delete
points, or change the control
handles of points of a text
wrap boundary.
-
Editing a Text Wrap
In CS2 and earlier, items on the master page that had text wrap
would not aect document page items unless they were overridden.
Now there’s a choice: By default, a master page object does aect text
wrap on document pages, but if you don’t want it to, you can select
the object on the master page and choose Apply to Master Page Only
from the Text Wrap panel menu.
When you apply text wrap to an object that is narrower than the
column of text, the text will typically ow on both the le and the
right sides of it—useful in a few instances, ugly in most. You can con-
trol where you want the text to ow by choosing from the Wrap To
pop-up menu in the Text Wrap panel (see Figure 6-45). If you want it
to work like QuarkXPress, choose Largest Area.
Master Page
Text Wrap
Wrap To Options
-
Choose a Wrap
To Option
e default Wrap To
setting (Both Right
& Le Sides) leaves
something to be
desired.
Choosing Right Side or
Largest Area from the
Wrap To pop-up menu
forces the text to ow
on only one side of the
object.
Real_World_Adobe_InDesign_CS4b.pdf 436Real_World_Adobe_InDesign_CS4b.pdf 436 08/04/2009 05:55:23 p.m.08/04/2009 05:55:23 p.m.
Converting Text to Outlines
When you work in graphic design, you frequently need to alter char-
acter shapes for logos or packaging designs. For years, we dreamed
about the ability to turn type into paths (or “outlines”) we could
edit. Finally, applications such as FreeHand and Illustrator added
the feature. And, as you’d expect in a modern page layout program,
InDesign has it.
You can convert characters from just about any font (including
TrueType, PostScript Type 1, and OpenType fonts) for which you
have the printer (outline) font.
Once you’ve converted the characters into outlines, you lose
all text editing capabilities, but you gain the ability to paste things
inside the character outline, to use the path as a frame, and to change
the shapes of the characters themselves.
To convert characters of text into paths, follow these steps (see
Figure 6-46).
1. Select the text you want to convert. You can select text using
either the Type tool, or select the text frame using the Selection
tool or the Direct Selection tool.
2. Choose Create Outlines from the Type menu (or press
Command-Shi-O/Ctrl-Shi-O). InDesign converts the
characters into paths. If you selected the characters using the
Type tool, InDesign positions the paths on the current line as an
inline graphic; if you selected the text frame using the Selection
tool or the Direct Selection tool, InDesign joins the resulting
outlines into a compound path.
When you convert individual characters containing interior
space (such as “P” or “O”) into paths, InDesign turns them into com-
posite paths (see “Compound Paths” in Chapter 5, “Drawing”). is
is handy. Not only are multiple-part characters (such as i, é, and ü)
treated as single paths, but characters with interior paths (such as O,
P, A, and D) are transparent where they should be, and ll properly.
You can always make the characters into normal (not composite)
paths. To do this, select the character and choose Release Compound
Path from the Paths submenu of the Object menu (see Figure 6-47).
If you weren’t able to convert the text into paths, make sure that you
have the outline (printer) fonts and that they’re somewhere InDesign
can nd them. If you don’t have the outline fonts, InDesign won’t be
able to convert your text into paths.
If Your Characters
Won’t Convert
Real_World_Adobe_InDesign_CS4b.pdf 437Real_World_Adobe_InDesign_CS4b.pdf 437 08/04/2009 05:55:23 p.m.08/04/2009 05:55:23 p.m.
.
Select a text frame
with the Selection tool…
…and choose Create Outlines from
the Type menu. InDesign converts
the characters in the selected text
frame into a compound path.
To see the individual paths and points, select the
compound path using the Direct Selection tool.
-
Converting Text
to Outlines
Select the compound
path containing the
character outlines and
choose Release from the
Paths submenu.
InDesign converts the
compound path into
normal paths.
e same formatting (ll and
stroke) is applied to all of the
resulting paths—even the paths
that create the hollow areas
inside characters.
To put the characters back together again,
use the Direct Selection tool to select the path
representing the hollow area or areas of a
character and choose Reverse Path from the
Paths submenu of the Object menu.
Select the other path or paths in the character
and choose Make from the Compound Paths
submenu of the Object menu.
InDesign joins the
paths, restoring the
interior space.
-
Working with
Character Outlines
Also, note that some text elements don’t convert to paths at all. For
example, paragraph rules (Rule Above or Rule Below) and automatic
bullets or numbers.
Inline Frames and Anchored Objects
It was the Dark Age of page layout. e ame of classical desktop pub-
lishing knowledge ickered but dimly, kept barely alive by devoted
Real_World_Adobe_InDesign_CS4b.pdf 438Real_World_Adobe_InDesign_CS4b.pdf 438 08/04/2009 05:55:23 p.m.08/04/2009 05:55:23 p.m.
acolytes in isolated monasteries. Pestilence and famine stalked the
narrow aisles between our unheated cubicles. And, almost worst of
all, page layout programs could not paste graphics into text. Produc-
ing publications featuring graphics “anchored” to a specic piece of
text was a nightmare. It went something like this. Scroll. Zoom in.
Measure. Pull a guide down from a ruler. Select a graphic. Drag the
graphic until it snaps to the guide. Sigh heavily. Repeat.
ese days, we embed graphics in lines of text whenever the
graphics have a dened relationship to the text. You know what we
we’re talking about—illustrations that should appear immediately
aer a paragraph (think of the screen shots in a manual), or icons
“hanging” to the le of a column of text, or graphic symbols in a line
of text. If you anchor the graphics in the text, they’ll follow the text
as it ows through the text blocks or text frames containing the story.
Really early versions of InDesign oered only “inline frames,” but
now you can create inline frames, above line frames, and anchored
objects, too.
An inline frame sits in the text position where it’s placed, though
you can adjust its vertical oset (how far up or down it sits from
the baseline of the text around it). For example, you might want
to put graphic in the middle of a line of text.
An above line frame sits between the line you placed it on and
the line above it. InDesign adds space between the lines to make
room for the object, ignoring leading or other spacing you’ve set.
We usually call these inline frames, even though they’re techni-
cally dierent.
An anchored object can be placed anywhere on your page, even
outside the text frame.
Using inline frames does more than just “stick” a frame to a par-
ticular location in a story—it also makes it easier for you to control
the space between the graphic and the text. Complicated spacing
arrangements that would be dicult (and involve lots of measuring
and moving) without inline frames become easy to implement using
leading, tabs, indents, and paragraph space above and below.
What can you anchor? Even though we keep saying “frames,” you
can actually anchor any kind of object into a text frame. You can
use graphic frames, text frames, lines, and groups as well, opening
up new ways to solve old problems and adding capabilities that are
entirely new. You can even create inline frames or anchored objects
using frames that contain other frames or other inline frames.
Real_World_Adobe_InDesign_CS4b.pdf 439Real_World_Adobe_InDesign_CS4b.pdf 439 08/04/2009 05:55:23 p.m.08/04/2009 05:55:23 p.m.
.
What can’t you do to anchored objects? Despite an impressive array
of cool things you can do with inline frames and anchored objects,
there are still a few things you can’t do. For example, you can’t link (or
“thread”) an inline or anchored text frame to another text frame. You
also cannot see what’s inside them when you’re in Story Editor mode
(or Galley or Story mode in InCopy). e latter is especially annoy-
ing. In fact, we’re typing this in Story Editor right now and can’t see
the heading in the next paragraph because it’s already anchored. Just
another good reason to buy a another monitor so that you can have
Story Editor and the document layout visible at the same time.
You can use any of the following methods to create an inline frame
(see Figure 6-48).
Paste a frame or group into text.
Place a graphic when you have an active text insertion point.
Position the text cursor where you want the inline frame and
choose Insert from the Anchored Object submenu (under the
Object menu or the context menu). en choose Inline or Above
Creating an
Inline Frame
-
Creating an
Inline Frame
You can also select the object
as if it were a single character
of text by using the Type tool.
3. Paste the object into the
text. At this point, you can
select the object using the
Selection tool (or select object
contents using the Direct
Selection tool) and adjust
the object’s vertical position
relative to the line of text.
2. Select the Type tool and
click inside a text frame.
1. Select the object (graphic
frame, text frame, or group)
you want to embed in the
text and cut or copy it to the
Clipboard.
Real_World_Adobe_InDesign_CS4b.pdf 440Real_World_Adobe_InDesign_CS4b.pdf 440 08/04/2009 05:55:23 p.m.08/04/2009 05:55:23 p.m.
Line from the Position pop-up menu. We virtually never use the
Insert Anchored Object feature, but it’s nice to know it’s there.
Instead, we usually paste an existing object, or place a le.
Use the Type tool to select a character or a range of characters
and choose Convert to Outlines from the Type menu. InDesign
creates a path for each character in the selection and embeds the
paths, as a compound path, in the text.
InDesign treats each inline frame as a single character of text.
When you view the text in Story Editor, you can see the “anchor
marker” (a little anchor symbol) in the text.
You can select an inline frame using the Type tool and adjust its
leading and baseline shi using the Character panel. You can adjust
the horizontal distance between the inline frame and the other char-
acters on the line using kerning or tracking—you can even kern text
following the inline frame back into the frame (you can’t, however,
kern the frame back into characters preceding it on a line).
You can select an inline frame using the Selection or Direct Selec-
tion tools, and you can edit the shape of the inline frame using the
path drawing tools (the Pen, Add Point, Delete Point, and Convert
Point tools). You can also drag an inline frame up or down in the text
frame using either of the selection tools (see Figure 6-49), or you can
apply a baseline shi to the character containing the inline frame.
Another way to adjust the vertical oset of a selected inline object
is to choose Options from the Anchored Objects submenu (under
the Object menu or the context menu) and change the Y Oset value.
is is a particularly good way to get the oset back to zero if you
have accidentally nudged it up or down.
When you insert an inline frame into a text frame, InDesign gives
it the leading value of the surrounding text. If you’re using “auto”
leading, and if the inline frame is taller than the height of the text,
InDesign pushes the line down to prevent the inline frame from
overlapping the lines above it. If you’re using a xed leading value,
you’ll see the inline frame overlap the text. By default, InDesign posi-
tions the bottom of the inline frame at the baseline of text.
is works perfectly for us—when the inline frame shares a line
with other text, we usually want the leading of the line to stay the
same as the other lines in the paragraph—and we can get this eect
using xed leading values. When we place an inline frame in a para-
graph by itself, however, we usually want the height of the paragraph
to equal the height of the inline frame—and we can get that eect by
using “auto” leading for the paragraph.
Inline Frames
and Leading
Real_World_Adobe_InDesign_CS4b.pdf 441Real_World_Adobe_InDesign_CS4b.pdf 441 08/04/2009 05:55:24 p.m.08/04/2009 05:55:24 p.m.
.
e rules are a little dierent when an inline frame falls on the
rst line of text in a text frame. In that case, the position of the base-
line of the inline frame is controlled by the First Baseline option in
the Text Frame Options dialog box.
If the height of the inline frame is greater than the height of the
characters in the line (and it usually is), choosing “Ascent” positions
the top of the inline frame at the top of the text frame. is pushes
the rst line down to accommodate the height of the inline frame.
If you adjust the vertical position of the inline frame, the position
of the rst line of text moves up or down. e same thing happens
when you choose “Cap Height” (note that these two settings produce
dierent results for text, but are the same for inline frames).
When you choose “Leading” InDesign positions the baseline of
the rst line of text according to the largest leading value in the line.
If you’re using a xed leading value, and you’ve set the leading of the
inline frame to the leading of the surrounding text, the position of
the baseline of the rst line of text won’t change, regardless of what
you do with the inline frame.
We always use the “Baseline” option for our rst baseline posi-
tion, and we always set the leading of a graphic that shares a line
with text characters to the leading of those characters. is way, we
always know where the rst baseline of text will fall, and we don’t
have to worry that changes to the shape, size, or baseline position of
the inline frame will mess up the leading.
-
Adjusting the Position
of an Inline Frame
InDesign limits this movement—you can’t drag
the object from side to side, and you can’t shi
the object’s top below the baseline or move the
object’s bottom above the baseline. To do that,
select the inline frame using the Type tool and
apply baseline shi.
Drag the inline frame up or
down (InDesign won’t let
you drag it from side to side).
Select an inline frame with the
Selection tool.
Real_World_Adobe_InDesign_CS4b.pdf 442Real_World_Adobe_InDesign_CS4b.pdf 442 08/04/2009 05:55:24 p.m.08/04/2009 05:55:24 p.m.
e only time we use “auto” leading is when we’re working with
a paragraph that contains only an inline frame. e only trouble is
that we want the vertical distance taken up by the paragraph to be
exactly equal to the height of the inline frame—no more, no less. By
default, InDesign’s “auto” leading value is equal to 120% of the point
size of the type (or, in this case, the height of the inline frame). How
can we get the base “auto” leading percentage down to 100%?
e percentage used to calculate “auto” leading, as it turns out, is
a paragraph-level attribute. To view or adjust this percentage, choose
Justication from the Paragraph panel’s menu. InDesign displays the
Justication dialog box. Enter 100 in the Auto Leading eld and click
OK to close the dialog box (see Figure 6-50). Once you’ve done this,
the leading of the paragraph will equal the height of the inline frame.
If you want, you can add this to a paragraph style denition.
In this example, the leading of the paragraph containing the inline frame is
set to “Auto,” and the Auto Leading value is set to 120 percent, which means
that the lines following the graphic do not align to the 14-point baseline grid.
Leading = 14
Height of inline graphic:
56 points (4 × 14)
Set the Auto Leading value to 100 percent, and InDesign makes the vertical
space occupied by the inline frame equal to the height of the frame.
-
Inline Frames and
“Auto” L eading
If there’s one thing that inline frames make easier, it’s hanging side
heads. You know—the headings that appear to the le of a column
of text (like the one to the le of this paragraph). In InDesign, you
can create a hanging side head that follows a paragraph of text as it
ows through a publication—no more dragging the headings to a
new position when text reows. You use a hanging indent and an
inline frame, as shown in the following steps (see Figure 6-51).
Creating Hanging
Side Heads
Real_World_Adobe_InDesign_CS4b.pdf 443Real_World_Adobe_InDesign_CS4b.pdf 443 08/04/2009 05:55:24 p.m.08/04/2009 05:55:24 p.m.
.
-
Creating a
Hanging Side Head
You’ve created a hang-
ing side head that will
move with the para-
graph of body text as
that paragraph moves
in response to editing or
layout changes.
Adjust the size and/or posi-
tion of the inline text frame
until it looks the way you
want it to.
Cut or copy the text frame to the
Clipboard, then click the Type tool in the
text (before the tab character) and paste
the text frame from the Clipboard.
Adjust the size of the text
frame, if necessary.
Cut or copy the heading
to the Clipboard, then
press Command-Shi-A/
Ctrl-Shi-A (to deselect
all), and then paste.
InDesign places the text
from the Clipboard in a
new text frame.
is paragraph has a
negative rst line indent to
accommodate the heading,
and I’ve already entered a
tab character before the rst
line of the paragraph.
Use the Type tool to
select the text you want
to format as a hanging
side head.
Real_World_Adobe_InDesign_CS4b.pdf 444Real_World_Adobe_InDesign_CS4b.pdf 444 08/04/2009 05:55:24 p.m.08/04/2009 05:55:24 p.m.
1. Create a hanging indent. To do this, set a le indent that’s the
width of the “companion column” you want to the le of the
paragraph, then set a negative rst line indent equal to the width
of the le indent. Place a tab stop at the le indent.
2. Enter a tab character before the rst character of the paragraph.
is pushes the text to the le indent.
3. Paste a text frame before the tab character you just entered.
Adjust the position of the inline text frame, if necessary.
4. Enter the heading’s text in the inline text frame.
5. Format the heading.
at’s all there is to it—you now have a hanging side head that
will follow the paragraph anywhere it goes. is same technique can
be used to position graphics frames, and is handy when you need to
“hang” an icon or a vertical rule to the le of a particular paragraph.
Of course, you can accomplish the same thing with an anchored
object—which can actually sit in the margin outside the text frame
(see “Creating an Anchored Object,” later in this chapter). But some
people nd inline frames easier to work with.
As we mentioned earlier, you can select an inline or anchored object
using the Type tool (the object behaves as if it were a single character
in the story) or the Selection tool or Direct Selection tool. If you use
the Type tool, you can select more than one inline or anchored object
at a time (to control their position in the Anchored Object Options
dialog box). Using either method, you can delete the object by press-
ing Delete.
To “unanchor” an inline frame or anchored object, select it using
the Selection tool, then cut and paste. If it’s an anchored object, you
can also select Release from the Anchored Object submenu (on the
Object menu or context menu). Release doesn’t work for inline or
above line objects.
Above line objects are much like paragraph rules, but you can use
any object (or group of objects), to create a wider range of eects. For
example, you might use an imported graphic as a rule above a para-
graph. You can make an above line object in one of two ways.
Choose Insert from the Anchored Object submenu (from the
Object menu or the context menu), and then choose Above Line.
Selecting and
Removing Inline and
Anchored Objects
Creating Above
Line Objects
Real_World_Adobe_InDesign_CS4b.pdf 445Real_World_Adobe_InDesign_CS4b.pdf 445 08/04/2009 05:55:24 p.m.08/04/2009 05:55:24 p.m.