Real World Adobe InDesign CS4- P18 doc
Bạn đang xem bản rút gọn của tài liệu. Xem và tải ngay bản đầy đủ của tài liệu tại đây (793.98 KB, 30 trang )
Exporting EPS
Although we tend to eschew EPS when we can, there are times when it
can come in handy. For example, if you have designed an ad that will
be placed in a magazine produced with any version of QuarkXPress
earlier than version 7. ose versions didn’t handle PDF particularly
well, so EPS is probably the better bet.
To export an InDesign page (or series of pages) as an EPS graphic
(or series of graphics, as EPS is, by denition, a single-page-at-a-time
format), choose EPS from the pop-up menu in the Export dialog box
or the Save as Type eld (Windows), pick a location for the le, and
then click the Save button. InDesign displays the Export EPS dialog
box. is dialog box has two tabs: General and Advanced. Here’s a
quick description of the options in each tab.
General. e controls in the General tab dene the way that InDesign
exports objects to the EPS le (see Figure 7-22).
Pages. Which pages do you want to export? Bear in mind, as
you work with the controls in this tab, that each page in the
page range you specify will be exported as a separate EPS le.
To export pages one, two, three, seven, and twelve, for example,
enter “1-3,7,12” into the Ranges eld. See “Page Ranges” in
Chapter 11, “Printing,” for more information. When you turn
on the Spreads checkbox, InDesign exports the pages in read-
ers spreads, just as they appear in your document window. For
instance, pages 2 and 3 are combined into one wide EPS le.
PostScript. Choose the PostScript version of the printer you
expect to use to print the EPS. If you’re sure you’re printing on
a PostScript 3 printer, choose Level 3. Choose Level 2 if your
printer could be PostScript Level 2 or PostScript 3. InDesign no
longer supports PostScript Level 1 printers; a Level 2 EPS le
may or may not print on one of these old beasts.
Color. Do you want to convert RGB images in your publication
to CMYK as you create the EPS? If so, choose CMYK from the
Color pop-up menu. e method InDesign uses for this conver-
sion depends on the settings in the Color Settings dialog box
(see Chapter 10, “Color,” for more on color management). While
it’s rare that you’d need to choose Gray or RGB, these options
will convert all colors to their grayscale or RGB equivalents.
If you’re using some other soware to handle the EPS’s color
separation, you can choose Leave Unchanged. When you do
Real_World_Adobe_InDesign_CS4b.pdf 511Real_World_Adobe_InDesign_CS4b.pdf 511 08/04/2009 05:55:35 p.m.08/04/2009 05:55:35 p.m.
.
this, InDesign leaves RGB and CMYK images alone during the
export process.
Preview. EPS les usually have low-resolution, built-in previews,
which applications use to display the EPS on screen; Macintosh
EPS les typically have PICT previews, Windows EPS les must
use TIFF previews. If you’re re-importing the EPS le back into
an InDesign document, you can leave the Preview pop-up menu
set to None, because InDesign actually creates a preview on the
y when you import the le. Similarly, if you’re going to open
the EPS le in Photoshop (rasterizing it into a bitmapped image),
Illustrator (converting it into paths), or process the EPS le with
some soware that doesn’t require a preview image, you can
leave Preview set to None. If the EPS will be used in any other
program (like QuarkXPress), select PICT or TIFF (the latter is
more exible because most Macintosh programs can read both
PICT and TIFF).
Embed Fonts. To make sure that the EPS contains all of the
fonts you’ve used, choose Complete from the Embed Fonts
pop-up menu. Why not do this every time? Because your EPS
les can become huge, bloated, and swollen with included fonts.
To reduce the size of the EPS, choose Subset to include only the
characters needed to print the text in the EPS. Choose None
when you don’t want or need to include any fonts in the EPS.
Some fonts cannot be embedded—the font manufacturer
has included information in the font that prevents embedding.
When InDesign reads this information, it will not include the
fonts in the EPS, regardless of the choice you make from the
-
EPS Export Options,
General Tab
Real_World_Adobe_InDesign_CS4b.pdf 512Real_World_Adobe_InDesign_CS4b.pdf 512 08/04/2009 05:55:35 p.m.08/04/2009 05:55:35 p.m.
Embed Fonts pop-up menu. If you nd you’re missing a font in
an EPS, return to the InDesign publication and convert all of the
characters that use the missing font to outlines and then export
the EPS again.
Data Format. Choose ASCII if you expect to print the EPS on a
system connected to a printer via a serial cable, or if you plan to
edit the EPS using a text editor or word processor—otherwise,
choose Binary to create a compressed version of the le. Binary
les are smaller and therefore transmit to the printer faster, but
they sometimes choke really old networks.
Bleed. If you do not enter values in the four Bleed elds (Top,
Bottom, Inside, and Outside—or Le and Right, in a non-facing-
pages document), InDesign sets the edge of the EPS bounding
box to the edge of the page you’re exporting. Enter a value in
the Bleed elds to expand the area of the page. See Chapter 11,
“Printing,” for more on bleeding o the edge of the page.
Advanced. Just because it’s called the Advanced tab of the Export
EPS dialog box doesn’t necessarily mean that these options are any
more advanced or tricky. ese features let you control how images
and transparency are handled in EPS les (see Figure 7-23).
Send Data. In most cases, you want the full resolution of your
bitmapped images to be included in your EPS les (so they
can later be printed properly). On occasion, however, you may
want only a low-resolution version of your images in the EPS
le. For example, let’s say you were going to rasterize the EPS in
Photoshop in order to save it as a GIF or JPEG and place it on
the Web; there’s no need for the full-resolution images, so you
could choose Proxy from the Send Data pop-up menu. If you’re
planning to print the EPS through an OPI system, and plan to
replace the images, or if you’re creating the EPS for onscreen
viewing only, choose Proxy.
OPI Image Replacement. Turn this option on to have InDesign
perform OPI image replacement as you export the EPS. If you’re
exporting a page containing EPS graphics with OPI image links,
you’ll probably need to turn this option on (unless your EPS will
later be processed by an OPI server).
Omit For OPI. To keep InDesign from including a certain type
of imported graphic le in the EPS, turn on the correspond-
ing option in the Omit section (to omit placed TIFF images, for
Real_World_Adobe_InDesign_CS4b.pdf 513Real_World_Adobe_InDesign_CS4b.pdf 513 08/04/2009 05:55:35 p.m.08/04/2009 05:55:35 p.m.
.
example, turn on the Bitmapped Images option). We discuss
OPI in more detail in Chapter 11, “Printing.”
Transparency Flattener. In order for transparency eects to
print on most devices, InDesign must “atten” them. We discuss
attening and transparency attening styles in great detail in
Chapter 11, “Printing.” Suce it to say that you can choose a
attener style here, as well as tell InDesign to ignore any attener
style spread overrides that you (or someone else) may have made
in the document (by turning on Ignore Spread Overrides).
Ink Manager. e Ink Manager manages how colors trap with
each other and how spot colors interact (for instance, you can
use the Ink Manager to alias one spot color to another). We
cover the Ink Manager in Chapter 10, “Color.”
Exporting PDF
InDesign can export Adobe Acrobat Portable Document Format
les (what normal people call “PDF”), which can be used for remote
printing, electronic distribution, or as a graphic you can place in
InDesign or other programs. InDesign’s PDF les can even include
“rich” media, such as buttons, movies, and sounds. InDesign doesn’t
need to use the Acrobat Distiller (or the Distiller Assistant) to create
PDF les.
-
EPS Export Options,
Advanced Tab
Real_World_Adobe_InDesign_CS4b.pdf 514Real_World_Adobe_InDesign_CS4b.pdf 514 08/04/2009 05:55:36 p.m.08/04/2009 05:55:36 p.m.
Note, however, that Distiller oen makes more compact PDF les
than exporting directly from InDesign, which may be important if
your PDF les are destined for the Web. If you want to use Distiller
to make PDF les instead of creating them directly using the Export
feature, you must use the Print dialog box to write PostScript to disk
rst (we discuss how to do that in Chapter 11, “Printing”).
While PDF is great for putting publications on the Web, or for
creating other sorts of online publications, most of us ink-on-paper
types care more about making PDF les suitable for print. InDesign
can export PDFs for just about any purpose, onscreen or on-press. It
all depends on how you set up the export options.
When you export a PDF (by selecting Export from the File menu
and choosing Adobe PDF from the Type pop-up menu), InDesign
displays the Export PDF dialog box. is dialog box contains seven
panes for setting PDF export options: General, Compression, Marks
and Bleeds, Output, Advanced, Security, and Summary. Remem-
ber that in all paned dialog boxes like this one, you can jump to the
second pane by pressing Command-2/Ctrl-2, the third pane with
Command-3/Ctrl-3, and so on.
Above all these panes sits the Adobe PDF Preset pop-up menu,
which lets you select an export preset (each of which is a collection
of various export options). You may be familiar with these styles, as
they’re basically identical to those found in Illustrator and Distiller.
We discuss creating your own in “Dening a PDF Export Preset,”
later in this chapter.
e General pane of the Export PDF dialog box (see Figure 7-24) is a
hodge-podge of options, controlling everything from what pages get
exported to whether InDesign should launch Acrobat aer saving
the le.
Standard (PDF/X). InDesign fully supports several important inter-
national ISO standards, including PDF/X-1a and PDF/X-3. You can
select either of these from the Standard pop-up menu or the Preset
menu. However, if you’re going to use PDF/X, we strongly recom-
mend you choose from the Preset menu instead of the Standard
menu—otherwise, it’s easy to make a PDF/X le that, while techni-
cally valid, will make the recipient of the le unhappy.
e PDF/X-1a preset is for a straight CMYK-only (or CMYK plus
spot color) workow, and is relatively popular in the United States.
PDF/X-3 is used in color managed workows, especially in Europe,
because they can include RGB and Lab color data, too.
General
Real_World_Adobe_InDesign_CS4b.pdf 515Real_World_Adobe_InDesign_CS4b.pdf 515 08/04/2009 05:55:36 p.m.08/04/2009 05:55:36 p.m.
.
PDF/X-4 is similar to PDF/X-3, but with an important twist:
While PDF/X-3 is based on the Acrobat 4 format, PDF/X-4 is based
on Acrobat 5. As we point out below, Acrobat 5 (PDF 1.4) supports
transparency, so it doesn’t require attening. at’s why PDF/X-4 is
the preferred format when printing to a printer with a PDF RIP (as
opposed to a simple PostScript RIP), such as one with the Adobe PDF
Print Engine.
Both of these standards aren’t some weird, proprietary avor of
PDF; they’re just regular PDF les that specify the sorts of things
that can be included. For example, you can’t put a button or movie or
even an RGB image in a PDF/X-1a le, and all fonts must be embed-
ded. Note that you can make a PDF/X compliant PDF le without
choosing from the Standard or Preset pop-up menus; these just
make it easier.
Compatibility. Who is your audience for this PDF le? Acrobat 8 has
been out for a couple of years now, so we usually assume that most
professionals have it but many of the general public may only have
Acrobat 5 (or at least the free Acrobat 5 Reader). On the other hand,
if there’s any chance your recipient only has Acrobat 4, you’ll need
to choose Acrobat 4 from the Compatibility pop-up menu. Unfortu-
nately, the PDF version numbering can be confusing: Version 1.3 is
Acrobat 4, 1.4 is Acrobat 5, 1.5 is Acrobat 6, version 1.6 is Acrobat 7,
and (nally)version 1.8 is Acrobat 8.
-
Export PDF Options,
General Pane
Real_World_Adobe_InDesign_CS4b.pdf 516Real_World_Adobe_InDesign_CS4b.pdf 516 08/04/2009 05:55:36 p.m.08/04/2009 05:55:36 p.m.
ere’s another reason you want to pay attention here: If you have
used any transparency eects in your document, the Compatibility
pop-up menu controls who does the attening. Choosing Acrobat 4
means you want InDesign to atten the le (see “Transparency Flat-
tener” later in this section, and “Printing Transparency” in Chapter
11, “Printing”). Acrobat 5, 6, and 7 can read the unattened transpar-
ency eects. If we’re sending les to our printer or an imaging bureau
that we trust knows about attening, then we’d much rather send
them Acrobat 6 or 7 PDF les.
Similarly, if you want your PDF to have interactive elements (like
buttons and movies), there’s a good chance you’ll want to save this as
an Acrobat 6 or 7 le. (See Chapter 13, “Interactive PDF,” for all the
reasons why.)
Page Ranges. Which pages do you want to export? Just as in the Gen-
eral pane of the Print dialog box, you can export all document pages
(click the All option) or specify individual page ranges (135-182) or
noncontiguous pages (3, 7, 22) in the Range eld. Note that unless
you have Absolute Numbering selected in the General pane of the
Preferences dialog box, you’ll need to type page ranges with their
actual names. For instance, if you want to export the rst four pages
and you’re using roman numerals, you’ll have to type “i-iv”. If you’ve
specied a page number prex, like “A”, you’ll have to include that in
the Range eld, too.
Reader’s Spreads. When you turn on the Spreads option, InDesign
exports each spread in the page range you’ve specied (see above) as
a single page of the exported PDF. is is called “reader’s spreads”
because the spread appears as it would to a reader ipping through a
book or magazine. is does not create “printer spreads,” which you
need to print a saddle-stitched booklet. You need a separate plug-
in to do that. Personally, when we want to view a PDF in reader’s
spreads, we don’t turn on this feature; we just turn on the Facing
option in Acrobat’s View menu—the eect is basically the same.
Embed Page umbnails. Creates a preview image, or “thumbnail”
of each page or spread (if you’re exporting reader’s spreads) you
export. You can display thumbnails when you view the PDF using
Acrobat or Acrobat Reader. ey don’t do much for us, and they
increase the size of the le.
Optimize for Fast Web View. e key word here is “Web.” e
only time you’d want to turn this on is when you’re creating a
Real_World_Adobe_InDesign_CS4b.pdf 517Real_World_Adobe_InDesign_CS4b.pdf 517 08/04/2009 05:55:36 p.m.08/04/2009 05:55:36 p.m.
.
document that will only be viewed on the Web. When this option is
o, InDesign includes repeated objects (such as objects from master
pages) as individual objects on each page of the PDF. When you
choose Optimize PDF, InDesign exports a single instance of each
repeated item for the entire PDF. When the item appears on a page
in the PDF, InDesign includes a reference to the “master” item. is
reduces the le size of the PDF without changing the appearance of
the exported pages. When this option is on, InDesign also overrides
the settings in the Compression pane with its own Web-appropriate
settings, and restructures the le so that it can be downloaded one
page at a time from a Web server rather than having to download the
whole megillah.
Create Tagged PDF. Most people expect their PDF les to always
appear just as they do in InDesign—each line of text ending in the
same position on the page. But what if someone who is blind wants
to read your document with a Braille reader? What if someone wants
to see your PDF on their iPhone or other mobile device? In that case,
it would be very helpful if the PDF included some “intelligence” or
“accessibility” in the form of tags that—behind the scenes—declare
this to be a paragraph that can reow as necessary, that thing in the
upper corner of the page to be a page number that doesn’t have to
appear on a mobile device, and so on.
If you predict that your PDF le might show up in a non-tradi-
tional reader, turn on the Create Tagged PDF checkbox. Obviously,
there is hardly ever a need for tags in documents that are simply
being printed, but they don’t aect le size or export time much, so
we oen just leave this option turned on.
Note that inside the PDF these tags are actually written in XML,
and any tags you’ve applied with the Tags panel (see Chapter 14,
“XML”) will appear in the PDF, too. is oers some interesting side
eects. For example, if you create a tag named “Artifact” in the Tags
panel and then apply it to a text frame, Acrobat considers the object
irrelevant and not part of the text ow when reading the PDF out
loud or displaying it on some mobile devices. at’s perfect for text
frames such as running heads and page numbers.
To be honest, in most cases, if you really want your documents
to be accessible (especially to be “Section 508” compliant), you will
likely need to do a lot more clean-up work on them in Acrobat Pro-
fessional aer exporting with tags.
View PDF aer Exporting. When you turn this option on, InDesign
opens the le in Acrobat aer exporting the PDF.
Real_World_Adobe_InDesign_CS4b.pdf 518Real_World_Adobe_InDesign_CS4b.pdf 518 08/04/2009 05:55:36 p.m.08/04/2009 05:55:36 p.m.
Create Acrobat Layers. Acrobat 6 introduced the idea of hiding and
showing layers within a PDF le. If you turn on the Create Acrobat
Layers checkbox, all your InDesign document’s layers (even hidden
layers) are converted into Acrobat layers and can be controlled from
within Acrobat. In a stroke of brilliance, even the page marks (like
crop and registration marks) are put on their own layer. Obviously,
this only works when exporting in the Acrobat 6 (PDF 1.5) format
or later.
Export Layers. Normally, an object will only appear in your PDF
if it’s on a layer that is both visible and printable—that is, the Show
Layer and Print Layer checkboxes are both enabled in the Layer
Options dialog box. However, you can override this by choosing
either All Layers or Visible Layers from the Export Layers pop-up
menu. e former prints everything, even objects on hidden or non-
printing layers. at’s nice when you forget to turn on hidden layers
before starting the PDF export process. e latter option prints all
visible layers (whether they’re “printable” or not).
Include Bookmarks. If you’ve used the table of contents feature
(which we discuss in Chapter 8, “Long Documents”), you can tell
InDesign to automatically build bookmarks for your PDF le
based on the table of contents. Just turn on the Include Bookmarks
checkbox. Or, if you used the Bookmarks panel to add custom book-
marks to your document (see Chapter 13, “Interactive PDF”) you
have to turn this checkbox on to actually see them in the PDF le.
Again, this is a feature suitable for PDFs destined for onscreen view-
ing, not prepress.
Hyperlinks. You can use the Hyperlinks panel to add as many
hyperlinks to your document as you want, but unless you turn on
this checkbox they won’t appear in your PDF le. When you turn
this option on, InDesign also creates hyperlinks in your table of
contents and indexes (see Chapter 8, “Long Documents,” for more
on these features). Of course, it’s not really appropriate to include
hyperlinks when sending o a PDF for high-resolution printing. See
Chapter 13, “Interactive PDF,” for more on hyperlinks.
Visible Guides and Grids. If you turn on this export option, InDesign
exports all visible guides (margins, ruler guides, baseline guides, and
so on), which may be helpful for designers who are collaborating on a
project. e only guide type that doesn’t export is the document grid
(even if it’s visible).
Real_World_Adobe_InDesign_CS4b.pdf 519Real_World_Adobe_InDesign_CS4b.pdf 519 08/04/2009 05:55:36 p.m.08/04/2009 05:55:36 p.m.
.
Non-printing Objects. Ordinarily, nonprinting objects (items for
which you’ve turned on the Non-printing checkbox in the Attributes
panel) won’t appear in exported PDF les. You can force them to
export (overriding the Attributes panel) by turning on the Export
Non-printing Objects checkbox in the Export PDF dialog box. Why
would you do this? We bet someone can think of a good reason.
Interactive Elements. If your document contains buttons, movies, or
sounds, you need to turn on the Interactive Elements checkbox to
include them in the PDF le. Like the Hyperlinks option, there’s no
reason to turn this on for documents bound for press. When you
do turn it on, however, you can also tell InDesign (in the Multime-
dia pop-up menu) whether to embed all sounds and movies into the
PDF or leave them linked to the disk le. See Chapter 13, “Interactive
PDF,” for more on these sorts of things. e setting in the Multime-
dia pop-up menu overrides any object-level settings you have chosen
for movies and sounds.
e options in the Compression pane dene the compression and/
or sampling changes applied to the images in your publication as it’s
exported as a PDF (see Figure 7-25). Compression is almost always a
good thing, but you need to choose your compression options care-
fully, depending on where your PDF is headed. PDFs for onscreen
viewing can handle more compression, and those destined for the
Web typically need a lot of compression to keep le sizes down. A
PDF le that you’re sending to a printer for high-resolution output
requires very little compression, if any (unless you have to e-mail the
le or it won’t otherwise t on a disk for transport).
Bitmapped images are almost always the largest part of a docu-
ment, so PDF’s compression techniques focus on them. InDesign has
two methods of making your les smaller: lowering the resolution of
the images and encoding the image data in clever ways.
Resampling. If you place a 300 ppi CMYK image into your docu-
ment and scale it down 50 percent, the eective resolution is 600 ppi
(because twice as many pixels t in the same amount of space). When
you export your PDF, you can ask InDesign to resample the image
to a more reasonable resolution. If your nal output is to a desktop
inkjet printer, you rarely need more than 300 or 400 ppi. Printing on
a laser printer or imagesetter (or any device that uses halone screens,
as explained earlier in this chapter) requires no more than 1.5 to 2.0
times the halone screen frequency—a 150 lpi halone rarely needs
more than 225 ppi of data to print beautifully.
Compression
Real_World_Adobe_InDesign_CS4b.pdf 520Real_World_Adobe_InDesign_CS4b.pdf 520 08/04/2009 05:55:36 p.m.08/04/2009 05:55:36 p.m.
Monochrome (or bi-level) bitmapped images do not have halone
screens applied to them by the printer and, therefore, are not sub-
ject to the same rules that govern grayscale and color images. In a
monochrome image, you never need more resolution than the reso-
lution of the printer. If your nal output is your 600 dpi laser printer,
you certainly never need more than 600 dpi monochrome images.
Imagesetter output rarely requires more than 1200 dpi (though for
a sheetfed art book, we might bump this up to 1500 dpi). Printing
on uncoated stock requires less resolution because of halone spots
spreading; you can easily get away with 800 dpi for newsprint.
If you’re exporting a PDF for online viewing, you can get away
with 72 or 96 ppi, unless you want the viewer to be able to zoom in
on the image and not see pixelation.
InDesign only downsamples when exporting PDF les. at is, it
throws away data to decrease image resolution (it won’t add resolu-
tion). Downsampling works by turning an area of pixels into a single,
larger pixel, so the method you use to get that larger pixel is cru-
cial. When you downsample an image, InDesign takes the average
color or gray value of all of the pixels in the area to set the color or
gray value of the larger pixel. When you subsample an image, on the
other hand, InDesign uses the color or gray value of a single pixel
in the middle of the area. is means that subsampling is a much
less accurate resampling method than downsampling, and shouldn’t
be used for anything other than proong your document. We rarely
use Average Downsampling or Subsampling; instead, the best option
-
Export PDF Options,
Compression Pane
Real_World_Adobe_InDesign_CS4b.pdf 521Real_World_Adobe_InDesign_CS4b.pdf 521 08/04/2009 05:55:37 p.m.08/04/2009 05:55:37 p.m.
.
is Bicubic Downsampling, which provides the smoothest sampling
algorithm.
Ultimately, however, we much prefer to just get the resolution
right in Photoshop before placing the image, rather than relying on
InDesign to downsample it. at way, we can see the result of resam-
pling on the screen, and undo the change if necessary. Otherwise, we
won’t see the result until we view the PDF.
Compression. e PDF specication supports both ZIP and JPEG
encoding for grayscale and color bitmapped images; and CCITT
Group 3, CCITT Group 4, ZIP, and Run Length encodings for mono-
chrome bitmapped images. In Acrobat 6 or later, you can even use
JPEG 2000. It’s enough to make your head spin! Which method
should you use? Again, it depends on where the PDF is going and
what kind of images you’ve got.
Scanned images generally compress better with JPEG, and syn-
thetic images (such as screen captures that have a lot of solid colors
and sharp edges) compress better with ZIP. However, JPEG compres-
sion, even at its highest quality setting, removes data from an image
le (it’s “lossy”). Most designers nd that some JPEG compression
for scanned photographs is an acceptable compromise, as it results in
dramatically smaller le sizes. JPEG 2000 compresses even smaller
and results in less degradation. But, ultimately, when we don’t need
to worry about le size, we prefer to use ZIP for everything because
ZIP compression does not discard image data (it’s “lossless”). You
never know when you might need that image data!
If we are using JPEG, then we make a choice from the Image
Quality pop-up menu: You get the best compression with Minimum
quality, but who wants to look at the results? Unfortunately, the only
good way to choose from among the Image Quality options is to save
two or three to disk, look at them in Acrobat, and compare their le
sizes.
Exporting PDF les for print is easier: We usually just choose ZIP
from the Compression pop-up menu for both color and grayscale
images. However, if you need to save some disk space (again, like if
you’re emailing the le to your output provider), it’s usually reason-
able to use Automatic (JPEG) compression with the Image Quality
pop-up menu set to Maximum quality—the resulting JPEG images
are usually indistinguishable from uncompressed images. Or, if you
know that the recipient has Acrobat 6 or later, then consider using
the better-quality JPEG 2000 compression.
As for monochrome image encoding, it’s rare to see much of a dif-
ference among the choices (they’re all lossless and provide reasonable
Real_World_Adobe_InDesign_CS4b.pdf 522Real_World_Adobe_InDesign_CS4b.pdf 522 08/04/2009 05:55:37 p.m.08/04/2009 05:55:37 p.m.
compression). We usually use Run Length or ZIP encoding, but only
because we don’t like the sound of CCITT. Say it aloud a few times,
and you’ll see what we mean.
Compress Text and Line Art. e Compress Text and Line Art
option applies to text and paths you’ve drawn in InDesign—we
cannot think of any reason you should turn this option o.
Crop Image Data to Frames. When you turn this option on,
InDesign sends only the visible parts of the images in the publica-
tion. is sounds reasonable, and can result in a much smaller le
for publications that contain cropped images. But it also means you
won’t have access to the image data if you edit the image in the PDF.
Most of the time, this isn’t a problem, but you might want to turn
this option o if your PDF includes images that bleed (so that you or
your service provider can later increase the bleed area, if necessary).
In a desperate attempt at reducing the redundancy in our overly
complex lives, we’re going to skip a detailed analysis of the Marks
and Bleeds pane of the Export PDF dialog box and instead point out
that these features are exactly the same as the features in the Print
dialog box (see “Marks and Bleeds” in Chapter 11, “Printing”).
e Output pane lets you control how color in your document is
handled (see Figure 7-26).
Color Conversion. Choose No Color Conversion from the Color
Conversion pop-up menu if you don’t want InDesign to mess with
your colors and just write them into the PDF as specied. at is,
RGB colors will remain RGB, and CMYK colors will stay CMYK.
is is what you get with PDF/X3 or PDF/X4, because in that stan-
dard, colors are managed at print time from Acrobat.
If you do want InDesign to manage the colors, you should choose
either Convert to Destination or Convert to Destination (Preserve
Numbers). In either case, all RGB colors get converted to CMYK
based on the CMYK prole you choose in the Destination pop-up
menu. However, when you choose the “preserve numbers” option,
any CMYK colors that you have specied in your InDesign docu-
ment (such as colors you have applied to text or frames) are le alone—
that is, they are not converted from your document CMYK prole to
the destination CMYK prole. For example, this stops 100-percent
black text changing to four-color CMYK text, or 100-percent cyan
Marks and Bleeds
Output
Real_World_Adobe_InDesign_CS4b.pdf 523Real_World_Adobe_InDesign_CS4b.pdf 523 08/04/2009 05:55:37 p.m.08/04/2009 05:55:37 p.m.
.
changing to a mix of cyan, yellow, and magenta (which was a prob-
lem in earlier versions of InDesign).
However, whether or not you choose “preserve numbers,” if your
CMYK image is tagged with a color prole and that prole was
preserved when you placed it (which is typically not the case with
CMYK images), it will get cross-converted to the new CMYK space.
(See Chapter 10, “Color,” for more on color management.)
Note that choosing CMYK does not separate spot colors to
CMYK in the PDF le; if you want to do that, you should use the Ink
Manager (see below).
If you have turned o color management (that is, you chose Emu-
late InDesign 2.0 in the Color Settings dialog box), then you have
only three choices: do nothing, Convert to CMYK, or Convert to
RGB. Either way, InDesign uses its internal RGB-to-CMYK con-
version method (the default CMYK space is based on SWOP inks—
technically, it’s the default CMYK settings from Photoshop 5; the
default RGB space is AdobeRGB).
Prole Inclusion Policy. When you’re converting colors, you can tell
InDesign whether or not to embed ICC proles into your PDF le. In
a color-managed workow, it is important to include proles, or else
other programs (or InDesign, if you’re re-importing the PDF into an-
other InDesign document) cannot color-manage the le. However, if
you are simply creating a CMYK les (such as a PDF/X1-a workow),
there is no reason to include your proles. Also, turn this option o
-
Export PDF Options,
Output Pane
Real_World_Adobe_InDesign_CS4b.pdf 524Real_World_Adobe_InDesign_CS4b.pdf 524 08/04/2009 05:55:37 p.m.08/04/2009 05:55:37 p.m.
when exporting PDF les for the Web, since the Web isn’t color man-
aged and ICC Proles increase le size.
Simulate Overprint. Acrobat 4 has no way to preview overprint-
ing instructions, so if you need to use Acrobat 4 and you need to
proof overprinting, you can turn on the Simulate Overprint option.
Because everyone we know is using a newer version of Acrobat, we
rarely have to worry about this feature. Note that Simulate Overprint
should not be used for nal artwork, as it radically changes your
document (spot colors are changed to process colors, for instance).
It’s just a low-end proong tool.
Ink Manager. Have a spot color that should be a process color? Or
two dierent spot colors that really should be one? e Ink Manager
handles these kinds of troubles (for more information, see “Ink Man-
ager” in Chapter 10, “Color”).
PDF/X. If you have chosen one of the PDF/X options in the Stan-
dards pop-up menu at the top of the dialog box, InDesign oers you
the option of specifying the nal output destination prole in the
mysteriously named Output Intent Prole Name. Fortunately, this is
almost always exactly the same as the Destination prole you chose
above. You can also add a short description in the Output Condition
Name eld if you think anyone downstream at the printer will care
(seems doubtful to us). If the prole you choose is registered some-
where (such as the International Color Consortium at www.color.
org), you can specify a name and URL in the nal two elds of this
section. at information simply gets embedded in the PDF le so
someone can later decode what you’ve done.
ere’s nothing particularly “advanced” about any of the options in
this pane, and while you probably won’t spend much time messing
with these settings, it is important to understand what they do and
why you’d want to change them (see Figure 7-27).
Subset Fonts. InDesign can always embed font information in
exported PDF les, so it doesn’t matter whether the person you give
the le to has the font. e exception to this is when the font manu-
facturer has specied that their font should not be embedded. Many
Asian fonts cannot be embedded, for instance. is is a political and
legal hot-potato that we’re not going to touch, other than to say that
if your fonts cannot be embedded, complain to the font developer,
Advanced
Real_World_Adobe_InDesign_CS4b.pdf 525Real_World_Adobe_InDesign_CS4b.pdf 525 08/04/2009 05:55:37 p.m.08/04/2009 05:55:37 p.m.
.
not Adobe (or us). Or, better yet, if there isn’t a lot of text in that font,
convert the text to outlines before printing or exporting.
Anyway, usually the question isn’t whether to embed your fonts,
but rather how much of the font you want to embed. e value you
enter in the Subset Fonts eld sets the threshold at which InDesign
includes complete fonts in the PDF you’re exporting. When you
“subset” a font, you include only those characters that are used on
the pages you’re exporting, which keeps le size down. Enter 100
to force InDesign to always save a subset of the font’s characters, or
enter 0 to force InDesign to include the entire font (or fonts) in the
PDF. You can also enter some other percentage value to strike a bal-
ance between the two extremes, but we generally nd that either we
want subsets or we don’t.
One reason you might not want to subset your fonts is to maxi-
mize the potential for editing the PDF later. Let’s say you subset your
fonts, and later need your output provider to edit the PDF (perhaps
to change a typo). If they need to change “karma” to “dharma” and
you haven’t used the letter “d” elsewhere in the document, they can’t
do it (unless they have the font installed on their system).
Another reason not to use font subsetting is if you expect users
on a platform other than your own to view and print your exported
PDFs. We know, it’s supposed to work. In our experience, it doesn’t.
Platform-specic character encoding and printer driver issues always
seem to cause problems when we subset fonts in a PDF. At least one
of the authors (Ole!) feels strongly that font subsetting should always
be avoided for this reason. e small amount of (cheap!) disk space
-
Export PDF Options,
Advanced Pane
Real_World_Adobe_InDesign_CS4b.pdf 526Real_World_Adobe_InDesign_CS4b.pdf 526 08/04/2009 05:55:37 p.m.08/04/2009 05:55:37 p.m.
you use to embed the entire font is a small price to pay, compared to
(expensive!) last-minute print production problems.
InDesign CS unfortunately embedded its fonts in a format called
“CID” (which is usually reserved for Asian fonts). is wouldn’t have
been so bad except that some laser printers (notably PostScript “emu-
lators”) couldn’t deal with CID fonts. e good news is that InDesign
no longer embeds fonts using CID encoding, so this should no longer
be a problem.
Omit for OPI. In an OPI workow, the high-resolution image data
is kept separate from your document until it’s merged in at the last
minute before printing. If you have an OPI server capable of pro-
cessing PDF les with OPI comments, you can keep InDesign from
including a certain type of imported graphic le in the PDF le by
turning on the corresponding option in the Omit section (to omit
placed EPS images, for example, turn on the EPS option). We discuss
OPI in more detail in Chapter 11, “Printing.”
Transparency Flattener. While Acrobat 5 can handle InDesign’s
transparency eects, Acrobat 4 is clueless. So if you’re exporting
an Acrobat 4 le, InDesign must “atten” all transparency eects.
We discuss attening and the Transparency Flattener Style pop-up
menu in great detail in Chapter 11, “Printing.” Suce it to say that
you can choose a attener style here, as well as tell InDesign to ignore
any attener style spread overrides you may have made in the docu-
ment (by turning on the Ignore Spread Overrides checkbox).
Job Denition Format. e Job Denition Format (JDF) is talked
about a lot, but most people don’t realize that it all just comes down
to adding some metadata about your document to the le (in this
case, the PDF le). Adobe wants you to think that InDesign directly
supports JDF, but if you turn on the Create JDF File Using Acro-
bat checkbox, all you really get is a regular PDF le plus a tiny JDF
le in the same folder. Plus, InDesign launches Acrobat Professional
(which you have to have installed to make use of this feature) and lets
you use its JDF tools to ll in the details—such as who is the primary
contact person for this print job, what kind of paper stock should it
be printed on, and so on.
Digital Rights Management (DRM) is all the rage these days. e
basic issue is who gets to do what with your content? When it comes
to PDF les, you have several DRM options set out in the Security
pane of the Export PDF dialog box (see Figure 7-28).
Security
Real_World_Adobe_InDesign_CS4b.pdf 527Real_World_Adobe_InDesign_CS4b.pdf 527 08/04/2009 05:55:38 p.m.08/04/2009 05:55:38 p.m.
.
In our view, most of the PDF security features are for PDFs you’re
exporting for online distribution (that is, the PDF is the nal product
of your production process), and not for prepress use. We might have
our paranoid moments, but our practicality gets the better of them
most of the time—and it’s just not practical to lock up a PDF that’s
headed for printing and prepress work. ink about it—do you want
your imagesetting service bureau calling you at four in the morning
to ask for the password you used to lock up a PDF?
On the other hand, if you’re exporting a PDF to send to a client
or a printer who you don’t have a close relationship with, you might
want to activate some of these settings.
Passwords. You can give your PDF le two dierent passwords: one
to limit who can open the document (Document Open Password),
and one to limit who can change the security settings in the docu-
ment (Permissions Password). e two passwords must be dierent.
If you’re going to turn on any security settings in the PDF—even
if you don’t require a Document Open Password—then we strongly
encourage you to provide a Permissions Password (just in case you
need to make changes to the PDF later).
Note that if you choose to export in Acrobat 4 (PDF 1.3) format,
InDesign only uses the older 40-bit RC4 encryption, which isn’t
nearly as powerful as the newer 128-bit encryption—you get better
encryption when you export as Acrobat 5 or 6 (PDF 1.4 or 1.5).
-
Export PDF Options,
Security Pane
Real_World_Adobe_InDesign_CS4b.pdf 528Real_World_Adobe_InDesign_CS4b.pdf 528 08/04/2009 05:55:38 p.m.08/04/2009 05:55:38 p.m.
Permissions. e two pop-up menus and three checkboxes in the
Permissions settings are self-explanatory: ey let you control
whether the le can be printed (or at what resolution), whether it
can be altered, whether content can be copied or extracted, whether
screen readers for the visually impaired should be supported, and
whether your metadata should be readable by databases or search
systems (see “File Info and Metadata,” earlier in this chapter). ese
are useful if you’re sending a le to a client and you don’t want them
to do anything but add comments, or if you’re sending a le to be
printed, and you want to make sure the output provider doesn’t “acci-
dentally” change anything. But the security settings can play havoc
with some non-Adobe PDF readers (like Mac OS X Preview).
e last pane of the Export PDF dialog box, Summary, lists all the
settings in all the tabs in one long text list. Do we ever sit and read
through this? Nope; it’s more time-consuming to read through this
unformatted list of settings than it is to skip through each of the
panes. However, it’s nice that you can click the Save Summary button
to save this list to disk as a text le. If you’re exporting a PDF le to
send to someone else, consider including this summary along with
it, so that they know how you set up the dialog box (and can see
whether you did anything inappropriate). You can also use this saved
summary as a log of what you did to later refer to if something prints
in an unexpected fashion.
PDF export presets are like paragraph styles—they’re bundles of
attributes that can be applied in a single action. Almost all of the
attributes in the PDF Export dialog box are included in a PDF export
preset (the Ink Manager and the Security settings aren’t). It’s easy to
create a PDF export preset; set up the Export PDF dialog box with
the options the way you want them, click the Save Preset button at
the bottom of the dialog box, and then give the style a name. You can
then go ahead and export, or just cancel out of the Export PDF dialog
box (if you just wanted to set up the preset without exporting).
InDesign also has a second method for making PDF export pre-
sets, though we nd it slightly more cumbersome (see Figure 7-29).
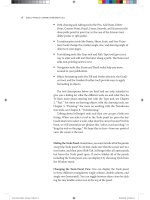
1. Choose Dene from the Adobe PDF Presets submenu, under the
File menu. InDesign displays the Adobe PDF Presets dialog box
with a list of the current PDF export presets.
2. Click the New button. InDesign displays the New PDF Export
Preset dialog box, but with a few dierences: there’s a Name eld
at the top, there’s no Security pane, and Ink Manager and page
Summary
Dening a PDF
Export Preset
Real_World_Adobe_InDesign_CS4b.pdf 529Real_World_Adobe_InDesign_CS4b.pdf 529 08/04/2009 05:55:38 p.m.08/04/2009 05:55:38 p.m.
.
ranges are grayed out. Note that if you select an export preset
before clicking New, this dialog box will be based on the preset
you selected.
3. Enter a name for the PDF export preset in the Name eld, then
set up the PDF export options using the panes of the dialog box.
Click the OK button when you’re done. InDesign returns you to
the Adobe PDF Presets dialog box and adds the new preset to
the list of available presets.
To export a PDF using the settings in a PDF export preset, choose
the preset name from the Adobe PDF Preset pop-up menu in the
Export PDF dialog box. InDesign applies the settings of the PDF
export preset to the controls in the Export PDF dialog box. You’ll
still need to enter a page range in the General pane—the export
preset does not include that information.
Note that you can also make PDF presets in Acrobat Distiller or
any other Creative Suite application. InDesign and the other Creative
Suite programs share PDF presets, which makes creating consistent
PDF les much easier.
You can use the Adobe PDF Presets dialog box to add, delete, rename,
edit, and import or export PDF export presets.
To delete a PDF export preset, select the preset name
and click the Delete button. (You can’t delete the default
presets: High Quality Print, PDF/X-1a, PDF/X-3, PDF/X-4,
Press Quality, and Smallest File Size.)
To export PDF export presets, select the presets and click the
Save As button. InDesign displays the Save PDF Export Presets
Managing PDF
Export Presets
Choose Dene from the
Adobe PDF Presets sub-
menu, under the File menu.
InDesign displays the Adobe
PDF Presets dialog box.
Click the New button.
-
Dening a PDF
Export Preset
Real_World_Adobe_InDesign_CS4b.pdf 530Real_World_Adobe_InDesign_CS4b.pdf 530 08/04/2009 05:55:38 p.m.08/04/2009 05:55:38 p.m.
dialog box. Specify a le name and location and click the OK
button.
To import a PDF export preset or set of presets, open the Adobe
PDF Presets dialog box and click the Load button. InDesign
displays the Load PDF Export Presets dialog box. Locate and
select a le containing the saved presets and click the OK button.
If the PDF export presets you’re importing already exist in the
publication, InDesign will create copies (InDesign appends a
number—usually “1”—to the duplicate presets).
To edit or rename a PDF export preset (other than the default
ones), select the preset name in the Adobe PDF Presets dialog
box, then click the Edit button.
InDesign Interchange Formats INX and IDML
What if you could describe your whole InDesign document as a com-
pact text le? at’s what the InDesign Interchange (INX) and the
InDesign Markup Language (IDML) formats are: XML representa-
tions of each and every object on every page of your document, as
well as the styles, colors, margins, and all other document informa-
tion. You can export an INX or IDML le, send it to someone else,
and, when they open it, InDesign creates a new le that looks exactly
like the one you made.
Why would you want to do this? One reason is backward compat-
ibility—INX is the only way that you can “save back” from InDesign
CS4 to InDesign CS3. Unfortunately, you cannot easily open CS4’s
INX les in InDesign CS2. Instead, you’d have to open it in CS3, then
reexport as INX from there. ere is one other method, discovered
by Mike Rankin, which he wrote up here: />(By the way, we expect that in CS5, the INX format will go away,
and downsaving will be accomplished with IDML instead.)
Another reason to use INX or IDML is to remove corrupt data
that may have snuck into your le. For example, some folks have
reported that they cannot delete unwanted color swatches in their
Swatches panel. In most (but not all) cases, simply exporting the doc-
ument in the INX format and then reopening it clears out the trouble.
In one case we saw, we had to dig deeper to get rid o the prob-
lem: We opened an INX le that had the can’t-delete-color problem,
opened it with a text editor (BBEdit, in this case), searched through
it for the code that dened the color in question, deleted it, saved the
Real_World_Adobe_InDesign_CS4b.pdf 531Real_World_Adobe_InDesign_CS4b.pdf 531 08/04/2009 05:55:38 p.m.08/04/2009 05:55:38 p.m.
.
le, and opened it back in InDesign. e color was gone. Do we rec-
ommend this kind of editing? No, not really, and we certainly can’t
guarantee that it won’t ruin your day (and le). But it worked that
time, and it’s a good example of the power of INX and IDML.
Here’s another reason to use INX and IDML: It’s a very compact
way to describe a le. David recently exported a 20 Mb InDesign le
as a 1.5 Mb INX le. Compressed, this document became 200 Kb. It
was easy to email to a colleague, who unzipped it and then opened
it in InDesign to recreate the le without any loss of data or quality.
Note that this depends on the recipient of the le having the linked
graphics used in the le—if not, expect gray boxes in place of the
graphics and “Missing” icons in the Links panel.
One last reason you might want to use IDML: It’s really easy
to edit or even create these les, without ever using InDesign. For
example, a database could be programmed to write IDML les that
turn into fully-formatted InDesign documents when you open them.
We talk more about that in Chapter 14, “XML.”
To export an INX or IDML le, choose Export from the File
menu, then select InDesign Interchange (INX) or InDesign Markup
(IDML) from the Format pop-up menu. You can open an INX or
IDML le just as you would open any other InDesign document.
Snippets
What happens when you select one or more objects on your page and
drag them to the desktop? InDesign creates a snippet le with the
.INDS le name extension. A snippet is a le written in the InDesign
Interchange (INX) language that describes one or more objects from
a page or spread. (As opposed to an INX le, which describes an
entire document.)
You can also create a snippet le by dragging one or more objects
into Adobe Bridge, or by selecting and exporting the objects on the
page and choosing InDesign Snippet from the Format pop-up menu
in the Export dialog box.
Snippets are great for sending InDesign objects to someone else
via email, or for saving objects that you want to reuse. In fact, the
Library feature (see Chapter 1, “Workspace”) actually saves objects
internally as snippets. Because snippets are just small XML les, you
could easily place a bunch of them in a database, and then use some
program to build your InDesign pages on the y by pulling just the
snippets you need from the database.
Real_World_Adobe_InDesign_CS4b.pdf 532Real_World_Adobe_InDesign_CS4b.pdf 532 08/04/2009 05:55:38 p.m.08/04/2009 05:55:38 p.m.
To place a snippet into your InDesign le, you can use the Place
command from the File menu, or simply drag the snippet le in
from the desktop or Bridge. If you use File > Place while the text
cursor is inside a text frame, the snippet will automatically become
an anchored object (as long as the snippet denes a single object or
group of objects).
e position of your newly placed snippet depends on the Snippet
Import setting in the File Handling pane of the Preferences dialog
box: You can choose between Position at Cursor Location (wher-
ever you drop it or click to Place it), or Position at Original Loca-
tion (which remembers where it was on the page when you originally
made it). If you want a snippet to always remember its location, lock
the position of the objects before creating the snippet le.
Exporting HTML
Just about everyone needs to repurpose content from an InDesign
document into a Web page sooner or later. Back in the ancient days,
InDesign 2 could export any story as HTML. en InDesign CS and
CS2 replaced that with a featured called Package for GoLive, which
was so painful to use that we have still never found anyone who used
it in a real world production workow.
e good news is that Package for GoLive is now gone. e even
better news is that InDesign can now export HTML with CSS tags.
But the bad news is that InDesign is still very limited in what it can
and cannot export to this format. And the even worse news is that
InDesign still cannot import HTML, so this is still a one-way road.
What to expect when you’re expecting. First and foremost, you
should not plan on using InDesign to actually build or design Web
pages. Its abilities are limited to exporting content (text and images)
in a form that someone who knows about HTML and Web author-
ing will be able to accept and manipulate relatively easily. It’s pretty
clever, but you should expect that virtually every le you export from
InDesign will require some cleanup.
Does that make this feature useless? Far from it! It can be an
incredible time-saver as long as you know what you’re getting into.
What gets exported. InDesign can export text and—optionally—
placed graphics and imported SWF les. at’s it. It will not export
any page geometry (where things are on your page), path or frame
information (shape, ll color, and so on of anything you draw), text
Real_World_Adobe_InDesign_CS4b.pdf 533Real_World_Adobe_InDesign_CS4b.pdf 533 08/04/2009 05:55:38 p.m.08/04/2009 05:55:38 p.m.
.
or graphics on master pages (unless the frame has been overridden on
a document page), eects such as drop shadows, QuickTime movies,
pasted objects, stu on the pasteboard, or XML tags. Adobe’s docu-
mentation notes that hyperlinks to URLs are not supported, but that
is incorrect; these hyperlinks survive exporting to HTML just ne.
However, note that all your local text formatting is stripped away.
e only text “formatting” you’ll get is paragraph and character
styles. So if you want a word to be italic in your exported HTML,
make sure you assign an italic character style to it.
Even then you won’t get an HTML tag such as “<em>” because all
character and paragraph styles are applied using CSS class tags. is
is typically what you’d want for your character styles, but oen not
what you want with paragraph styles—it all depends on how your
CSS tags are dened. Fortunately, it’s pretty easy to clean up these
class tags in a Web authoring tool, such as Dreamweaver or GoLive,
or even in a text editor.
e thing to keep in mind here is that there is nothing in the
resulting HTML le that determines the look of your text. All text
formatting must be dened by the CSS denitions (which InDesign
does not create for you).
Exporting order. One of the more frustrating aspects of how
InDesign exports HTML is that you cannot easily determine what
should or shouldn’t be exported, or in what order your content
should be exported. Ultimately, InDesign exports text and graph-
ics on each page as they’re positioned from le to right, and top to
bottom. at means that if a caption is slightly to the le of its image,
the caption will appear rst in the HTML.
Note that if two or more objects are grouped on a page, InDesign
groups those together in a single DIV tag in the HTML, too. In this
case, the group acts like a single object in InDesign, so the export
order of its elements is determined by the upper-le corner of the
whole group.
You can search the Export dialog box all day, but you won’t nd a
way to export HTML. at’s because the feature lives someplace
unexpected. Here’s how to export an XHTML le:
1. Choose Export for Dreamweaver from the File menu. Note that
the name is misleading because it doesn’t have anything speci-
cally to do with Adobe Dreamweaver—these les will work with
any modern Web authoring tool.
2. Choose a le name and location and then click Save.
Exporting XHTML
Real_World_Adobe_InDesign_CS4b.pdf 534Real_World_Adobe_InDesign_CS4b.pdf 534 08/04/2009 05:55:38 p.m.08/04/2009 05:55:38 p.m.
3. In the General pane of the XHTML Export Options dialog box,
choose whether you want to export the entire document or only
the currently-selected objects (see Figure 7-30). If you choose
Selection and you have a text frame selected, InDesign exports
the entire story, even if part of the story is overset or if the story
threads across multiple pages.
e General pane also lets you control how paragraphs with
automatic bullets or numbering should be handled. In general,
you should choose Map to Ordered List for numbered lists and
Map to Unordered List for bulletted paragraphs; however, if you
want, you could force InDesign to convert either one to text (so
the bullet or number character becomes a character in the text).
You can also choose to convert numbered paragraphs using Map
to Static Ordered List, which still applies the <ol> tag, but adds a
“value” attribute to each paragraph.
By the way, don’t let the “X” bother you; XHTML is simply a
form of HTML with a few more strict rules.
-
Exporting to XHTML/
Dreamweaver
To export a single story,
or a group of images
and stories on a spread,
select them rst, then
choose Selection here.
4. e Copy Images pop-up menu in the Images pane (see Figure
7-31) lets you choose what to do with images in your document
or selection. If you choose Original, InDesign copies the original
linked les into an “images” folder in the same location as the
HTML le—similar to what happens when you Package for
output. (Actually, the folder is given a name constructed of the
HTML le plus “-web-images”.)
If you choose Optimized, InDesign creates a new version of
the image. Unfortunately, InDesign does not have the Save for
Web dialog box (as in Photoshop and Illustrator), so you have
very limited options for the conversion. Turn on the Formatted
checkbox to apply image cropping, scaling, rotation. However,
in general, you’ll get a much better conversion to GIF or JPEG if
you use a program such as Photoshop, Fireworks, or Illustrator
to optimize these images.
Real_World_Adobe_InDesign_CS4b.pdf 535Real_World_Adobe_InDesign_CS4b.pdf 535 08/04/2009 05:55:39 p.m.08/04/2009 05:55:39 p.m.