Adobe Dreamweaver CS3 Unleashed- P5 doc
Bạn đang xem bản rút gọn của tài liệu. Xem và tải ngay bản đầy đủ của tài liệu tại đây (607.09 KB, 50 trang )
Broken Links— Broken links are hyperlinks that are not referenced properly. They generally will be
linked to a file that does not exist in a particular directory or that in most cases is misreferenced.
External Links— This report is a list of external path references within your site. Because
Dreamweaver has no way of checking for external links, it will, at the very least, list them out so you
can check them manually in one short concise list.
Orphaned Files— Orphaned files are files that exist within folders in your site but that are not directly
referenced by your web pages. Assets, for instance, will always appear within this list even when
cloaked. Dreamweaver is providing a list so that later you can go into your site and perform a manual
clean up of unused files.
Before we demonstrate the process of checking links, let's actually create a broken link within our new
sample.html page. You can do this by opening sample.html, placing your cursor on the page, and choosing
Insert, Hyperlink. When the Hyperlink dialog appears, enter the value "Fake Link" within the Text text box
and then enter a broken path in the Link field, perhaps homepage.html. Remember, homepage.html
doesn't actually exist. We're purposely creating a broken reference here to test the functionality. Click OK
and save the page. Now we're ready to check for bad links. Checking links within your site can be
accomplished using one of two methods. First, you can check the links for an individual file; and second, you
can check links for an entire defined site. Because the process for both is similar, I'll demonstrate the Check
Links Sitewide feature for an entire site here. You can do this by following these steps:
1.
Within the Files panel, select the defined site, right-click (Control+click) to access the context menu,
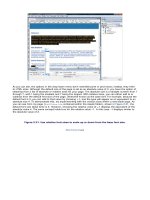
and choose Check Links, Entire Local Site. The Results panel will appear with the Link Checker tab
highlighted, similar to Figure 3.34.
Figure 3.34. Open the Link Checker by choosing Check Links, Entire Local Site.
[View full size image]
As you saw, the Check Links submenu also features the Selected Files/Folders option. If you didn't
need to check the links for the entire site, you could highlight the files and/or folders and choose this
option. Also, the path we took to open the Link Checker is merely one method. Like every other feature
in Dreamweaver, the Check Links feature can be accessed using numerous methods: the Link Checker
can also be accessed directly from the Site menu by choosing Check Links Sitewide. Alternatively, you
can choose the Check Links Sitewide option from the Site submenu located within the Files panel
Options menu.
2.
With the Link Checker tab open, you'll notice a few options. First and foremost, in the top-left corner is
the Show drop-down menu that offers the three available options for link checking reports (Broken
Links, External Links, and Orphaned Files). Also, you'll notice that the Link Checker tab is divided into
two columns; the left side is where problematic files will be listed, and on the right is the link that is
causing the problem.
3.
To fix the broken link, double-click the document on the left side of the pane within the Files column.
This opens the document and highlights the problematic link. Within the Property inspector, change the
link in the Link text field to something that you know is valid, such as index.html. Alternatively, you
could click the troubled link on the right side of the dialog box within the Broken Links column. Here
you can either type in the link manually or click the folder icon to search for the appropriate file. After
the file is found, the correct path is added and the reference to the broken link disappears within the
Link Checker menu.
You can also check the external links within your site by choosing the External Link option from the Show
menu. As you can see from Figure 3.35, the Link Checker pane lists all the external link references, including
the link to the public website as well as the mail link that we created in the previous chapter.
Figure 3.35. Check the external link references within your site by choosing the External Links
option from the Show menu.
[View full size image]
You can change the link references within this list, but they won't ever be removed. Dreamweaver will
always list all external links regardless of whether you know they're correct or not.
Finally, you can view orphaned files, files that are in your site but that aren't linked to any pages, by
choosing the Orphaned Files option from the Show menu. As you can see from Figure 3.36, all files not
directly referenced from an HTML file are shown as orphaned.
Figure 3.36. Orphaned files are listed after you select the Orphaned Files option from the Show
menu.
[View full size image]
If you've determined that a file is no longer needed, you can select it within the list and click the Delete key
on your keyboard. Doing this permanently deletes the file.
Additional options provided by the Link Checker include the following:
Play button— Although the Play button exists as a way to rerun the Link Checker, holding down the
icon displays options for checking links for the current document, the entire site, or selected files and
folders within the site.
Stop button— As your site grows in size, so will the search time. If the search becomes excessively
long, click this button to stop the link checker's search.
Save button— Click this button to save a text-based report of broken links, external links, and
orphaned files for later reference.
Status bar— Click the status bar, located at the bottom of the Results panel, to see a total count of
files scanned as well as a breakdown of total broken, external, orphaned files, and so on.
When you're satisfied with results, close the panel or choose Close Panel Group from the Results panel
Options menu.
Changing Links Sitewide
One of the simplest and most time-efficient methods of managing links within your site is the Change Links
Sitewide feature. This feature, available by choosing Site, Change Links Sitewide, allows you to quickly
change the name of all instances of a specific link referenced within your site. To demonstrate this feature,
let's assume that Mike in Marketing decided he no longer wants the navigation item Company Directory but
instead wanted it to read Employee Directory. Aside from changing the link on every page, you would also
have to rename the file, essentially breaking all references to that file. A quick way to fix this, without
launching the Link Checker, is to use the Change Link Sitewide feature, shown in Figure 3.37, to change all
link references from companydirectory.html to employeedirectory.html.
Figure 3.37. Use the Change Link Sitewide feature to quickly change references of a link.
When you click OK, Dreamweaver scans and fixes all instances of the file.
Creating Site Reports
One of the basic premises behind site management is having the capability to check your work against
various factors before considering your site done. Are you sure every page has a title? Did you add alternate
text to all your images for accessibility's sake? Is your HTML clean enough to be considered valid? These
questions and more can be answered by running site reports on your site. Available by selecting Site,
Reports, the Reports dialog box (shown in Figure 3.28) features numerous options for customizing
Dreamweaver's reporting capabilities.
As you can see from Figure 3.38, the dialog box is split into two parts. The first part, the Report On list
allows you to choose whether to run site reports on the current document, the entire current local site,
selected files within the site, or a specific folder. The second part of the dialog is the Select Reports pane.
Within this pane, you'll choose the options for reporting. These options include the following:
Checked Out By— When Checked Out By is selected, the Report Settings button in the bottom-left
corner of the dialog box becomes active. Click the button to search for an individual who may have
files checked out. It's important to know that this value is case sensitive; however, you don't need to
type in someone's entire name. For example, if you were looking for Zak Ruvalcaba, you could simply
type in Zak, zak, or even Ruvalcaba.
Design Notes— When this option is selected, the Report Settings button also becomes active. Click it
to bring up the Design Notes dialog box in which you can enter the design note to search for and how
to search for it. When searching for a design note, you must enter in a condition, such as contains,
does not contain, is, is not, and so on, for the search to meet.
Recently Modified— Again, choosing this option makes the Report Settings button active. Click the
button to launch the Recently Modified dialog, which allows you to customize time ranges, modified by,
and server location filters for recently modified files.
Combinable Nested Font Tags— Use this option to perform searches for unnecessary uses of
multiple Font tags. If for some reason there is more than one Font tag around a particular area of text,
most likely it's because each Font tag has a different attribute. For example, the following Font tags
<font size="3"><font face="Arial"></font></font> could be combined to read <font
face="Arial" size="3"></font>. This option would alert you of this.
Accessibility— As you'll see in Appendix A, "Accessibility," this option reports on glaring accessibility
issues. Checking this option also makes the Report Settings button available, which, when selected,
allows you to configure various potential accessibility issues to report on.
Missing Alt Text— This option searches all <img> tags within your document to find missing Alt
attributes.
Redundant Nested Tags— This option checks to see if tags are nested inside themselves and
removes them as necessary. For instance, <em>Visit Vecta Corp's website<em>today!</em></em>
could be combined to read <em>Visit Vecta Corp's website today!</em>. This option would alert
you of this.
Removable Empty Tags— Use this option to report on any tags within your web pages that do not
contain anything. An example of an empty tag looks like this: <font></font>. Because the tag doesn't
contain anything, it's not needed and should be removed.
Untitled Documents— Use this handy option to run reports on duplicate titled documents, nontitled
documents, and documents titled as the Dreamweaver default of Untitled Document.
Figure 3.38. Use the Reports feature to run checks on HTML and workflow processes.
To run a site report, follow these steps:
1.
Choose Site, Reports to open the Reports dialog box.
2.
In the Report On list, you can choose the current document (if a document is open), the entire current
local site, any file you may have selected in the Files panel, or a selected folder. For this example, I'll
choose the Entire Current Local Site option.
3.
Now that you've selected what you're going to report on, the next thing to choose is what report you
want to build. You can choose from any one of the options discussed in the preceding bullet points. I'll
choose all the HTML reports except for Accessibility.
4.
Click the Run button to generate the report.
5.
Dreamweaver scans the documents and presents the site report as a list in the Site Reports tab of the
Results panel similar to Figure 3.39. As you can see, Dreamweaver displays an icon symbolizing the
severity of the error (question mark means minor or the user may need to provide more info, a yellow
warning means slightly higher than minor and that the page may fail in certain aspects when validation
is performed, and the red x means a critical error or that the page will fail if validation is performed).
The results also display the filename in which the error appears, the line number of the code in which
the error appears, and a description of the actual error.
Figure 3.39. Site report results are displayed within the Site Reports tab in the
Results panel.
[View full size image]
6.
Similar to the functionality within the Link Checker, you can double-click the error within the Results
panel. Dreamweaver will automatically open the document (in Code view) and have your cursor
focused on the exact line that contains the error.
7.
You can also save the report for later use. To do this, choose the Save button (floppy disc icon).
Dreamweaver will save the file in XML format, allowing you to later format the report into a web page,
a spreadsheet, or a database.
After you've fixed the errors, you can run the report again by selecting the Play button to reopen the
Reports dialog.
Using Advanced Site Management Options
Although it seems we've run the gamut in terms of site management functionality, Dreamweaver includes a
few more features that can only be categorized as advanced site-management options. Available from the
Advanced submenu of the main Dreamweaver Site menu at the top of the screen, these advanced features
include the following:
FTP Log— While transferring files using the built-in FTP client, Dreamweaver records all activity. If an
error occurs when you are transferring a file using FTP, the FTP log can help you determine the
problem. Select this option to present the text-based log within the FTP Log tab in the Results panel.
Recreate Site Cache— You may remember from the beginning of the chapter that we discussed the
cache. I mentioned that Dreamweaver takes a snapshot of your folder and file structure and caches it.
In most cases, this cache is automatically generated, and in some cases, when changes are made
within Dreamweaver, regenerated. If for some reason you make changes to the folder and file
structure outside of Dreamweaver (not recommended), run this handy utility to re-create
Dreamweaver's cache for the site.
Remove Connection Scripts— When connecting to databases, Dreamweaver relies on a connection
script built in to a file and placed within a Connections folder on your site. If you've begun working
with databases, this file is automatically created for you. Unfortunately, Dreamweaver doesn't know
when you're no longer working with databases. You can minimize the security risk of someone
tampering with your databases (if they found this file and were able to decipher the connection string
information) by removing these connection scripts manually. Because your system can be
compromised only while the scripts are actually present on the server, removing the connection scripts
will remove the risk of database access in the future.
Deploy Supporting Files— When working with dynamic web applications, Dreamweaver relies on
prebuilt files and scripts (like connection scripts) to create the functionality that you'll ultimately
interact with. In most cases, Dreamweaver will automatically create a folder within your site for these
files. If for some reason the folder isn't created, you can select this option to force Dreamweaver to do
so. This option will be covered in more detail in Part V, "Dynamic Web Page Development."
Summary
As you've seen in this chapter, Dreamweaver includes numerous options for managing a site. By defining a
site first, you can take advantage of various features outlined within Dreamweaver's framework, including
caching, link verification, file transfer using FTP, site maps, and so on. Now that you have a foundation in
terms of Dreamweaver's user interface, building a web page, and managing a website, let's look at
customizing your preferences so that you can configure Dreamweaver to best suit your workflow.
Chapter 4. Defining Preferences
IN THIS CHAPTER
Using the Preferences Dialog
Setting Keyboard Shortcuts
Working with Tag Libraries
As you become more involved with the development of your web pages, defining preferences will become
increasingly important and, at times, essential. Let's face it, no one likes to develop in a rigid environment
where you're forced to work with a predetermined interface that stifles adaptation to your workflow process.
After all, everyone is different; everyone develops differently, and most importantly, everyone uses certain
tools within Dreamweaver more than others. To this end, Dreamweaver is unusual in the sense that just
about everything can be customized. From workflow processes, to keyboard shortcuts, code hints for tags,
favorite objects, commands, dialog interfaces, the menu bar, and so on—all can be customized to suit the
way you like to work, and not necessarily the way someone at Adobe thinks that you should work.
So far you've learned about the various tools, panels, and windows that Dreamweaver provides as aids in
your site development endeavors. You built a simple web page using these tools within Dreamweaver, and
then you saw how defining a site is beneficial in terms of managing the pages and ultimately the sites that
you work with. Before we continue with more advanced development topics such as tables, CSS, forms, and
the like, let's look at the various preferences you can set to further enhance your website development
experience. Specifically, we'll explore the following:
The Preferences dialog and categories for defining preferences
Keyboard shortcuts
Tag libraries
Although this particular chapter won't examine every customizable feature Dreamweaver provides, don't
worry—most features briefly covered here will be covered in great detail as their usage becomes required
throughout the book. For instance, in Appendix B, "Extending Dreamweaver," we'll discuss how simple
modifications to the menus.xml file can customize the way you interact with the menu bar. Furthermore,
we'll examine how you can build your own objects, behaviors, and server behaviors, and how you can
package and distribute these items to the Dreamweaver community through the Dreamweaver Exchange.
For now, we're merely concerned with customizing the workflow process through simple editable
preferences, keyboard shortcuts, and tag libraries. Let's begin.
Using the Preferences Dialog
Dreamweaver offers numerous methods for workflow customization, but in reality, everything begins with
the Preferences dialog (see Figure 4.1). Available by choosing Edit, Preferences (Dreamweaver, Preferences
on a Mac), the Preferences dialog includes numerous categories for fine-tuned workflow customization.
Figure 4.1. The Preferences dialog includes numerous categories for fine-tuned workflow
customization.
[View full size image]
As you can see from Figure 4.1, everything from how you interact with the Document window to how code is
written within Code view can be customized from this dialog. A complete list follows:
Setting general preferences for Dreamweaver
Optimizing the workspace for accessible page design
Setting AP element preferences
Setting code-coloring preferences
Setting code-formatting options
Setting code hints preferences
Setting code-rewriting preferences
Setting copy-and-paste preferences
Setting CSS Styles preferences
Defining a file-compare program
Setting file types and external editors
Setting fonts preferences for Dreamweaver display
Setting highlighting preferences
Setting invisible elements preferences
Setting preferences for Layout mode
Setting options for new document creation
Setting preferences for previewing in browsers
Setting site preference options
Setting status bar preferences
Setting validator preferences
Note
Most Dreamweaver categories can be accessed from specific panels and dialogs while you're working.
For instance, because the Preview in Browser category allows you to set web browsers for previewing
your pages, it can be accessed directly by selecting the Edit Browser List option located within the
Preview in Browser list on the Document toolbar. Most of the categories you see within the
Preferences dialog function that way. It's simply a matter of convenience to select Edit, Preferences
(Dreamweaver, Preferences) to quickly and easily have access to everything.
Let's discuss each of these preferences in more detail. You may find some preferences that you'll want to
customize to improve the way you work with Dreamweaver.
The General Category
As you can see from Figure 4.1, basic preferences will appear within the General category of the Preferences
dialog. As you've seen in chapters up to this point, options including enabling the Welcome screen, working
with HTML tags instead of CSS, and setting the spell checker dictionary language can all be customized
within this category. A complete list of customizable functionality follows:
Open documents in tabs— This Macintosh-only preference tells Dreamweaver whether to open
documents in tabs or to open each document in its own window that you can freely position on the
screen.
Always show tabs— This preference, which is also Macintosh only, tells Dreamweaver whether to
always show the Tab bar in the Document window or to only show it when there's more than one
document open in tabs. This option is switchable only when the previous preference is enabled. I
recommend that you select this option or else you will find that your Document window will be resizing
itself every time you open or close a second document. This jumping can become distracting.
Show Welcome Screen— As you saw in Chapter 2, "Building a Web Page," the Welcome screen is a
handy window that allows you to quickly open recently opened files, create new files, and create new
files from prebuilt Dreamweaver skeleton files. Choose this option to enable or disable the Welcome
screen when Dreamweaver opens for the first time or when all Document window instances have been
closed.
Note
The Show Welcome screen preference can be disabled from the bottom of the Welcome screen
itself. By default, the Welcome Screen is displayed after a new installation. If you know you
don't want to use it, simply click the Don't show again check box from the lower left corner of
the Welcome Screen. A dialog then pops up to remind you that you can re-enable it here, in
the General category of the Preferences dialog.
Reopen documents on startup— Enable this option if you want Dreamweaver to automatically open
the last file(s) you had open when you closed Dreamweaver. If you disable this option, Dreamweaver
either opens the Welcome screen, if you have that option selected, or a blank screen.
Warn when opening read-only files— Checking this option forces Dreamweaver to alert you when
opening files that are set as read-only. When the alert appears, you are given the option to unlock the
file, check it out, open the file with read-only status, or to cancel completely.
Update links when moving files— This option determines how Dreamweaver should handle the
moving, renaming, or deleting of files within your defined site. From the menu, you have the option of
choosing whether to have Dreamweaver update links automatically, never, or to prompt you before
performing any operations.
Show dialog when inserting objects— Disable this option if you don't want to see a dialog box
when inserting objects such as images, tables, and so on from the Insert bar. If this option is disabled,
all properties for the object must be set within either the Property inspector, Code view, or the
Attributes panel located within the Tag Inspector panel group.
Enable double-byte inline input— Choosing this option enables you to enter double-byte text
directly into your pages if you are using a language that facilitates double-byte text (such as Japanese
characters). When this option is deselected, a text input dialog box appears for entering and
converting double-byte text.
Switch to plain paragraph after heading— Enabling this option causes Dreamweaver to insert a
new paragraph (represented with the <p> tag) when you press Enter after a heading (represented by
the <h1>, <h2> tags, and so on). If this option is not selected, pressing Enter (Return) after a heading
creates a new paragraph with the same heading tag.
Allow multiple consecutive spaces— By default, inserting a normal space into a web page is
represented by the Non-Breaking Space ( ) special character. The Non-Breaking Space is
accessible by choosing Insert, HTML, Special Characters, Non-Breaking Space or by pressing the
keyboard shortcut Ctrl+Shift+space. Check this option to insert a Non-Breaking Space when the
spacebar is pressed.
Use <strong> and <em> in place of <b> and <i>— For standards compliancy, this option should
remain enabled. In fact, the World Wide Web Consortium (W3C) discourages the use of the <b> and
<i> tags. Choosing this option guarantees that the <strong> tag (Bold) is used in place of the <b> tag
and the <em> tag (Italic) is used in place of the <i> tag when their respective buttons are selected
from the either the Property inspector or from the Text, Style submenu.
Use CSS instead of HTML tags— As you saw in Chapter 2, deselecting this option allows you to work
with traditional HTML formatting options. As you'll see in Chapter 6, "Page Formatting Using Cascading
Style Sheets," you would check this option to work with standards-compliant CSS.
Warn when placing editable regions within <p> or <h1>-<h6> tags— This option specifies
whether Dreamweaver displays a warning message whenever you save a Dreamweaver template that
has an editable region within a paragraph or heading tag. The message tells you that users will not be
able to create more paragraphs in the region. It is turned on by default.
Centering— This option group allows you to specify how centering of content should be handled when
the Align Center icon within the Property inspector is selected on an element. Choose the standards-
compliant <div> tag option when you want to wrap your element within a <div align="center"> tag,
attribute, and value. Choose the <center> tag option when you want to use the deprecated <center>
tag. The latter option is not recommended by the W3C.
Maximum number of history steps— Specifies the maximum number of history steps to store in
memory. These steps, also represented by repeatedly choosing Edit, Undo (or by pressing Ctrl+Z/
+Z) are also visible within the History panel. Although you can increase this number, be aware that
these steps are stored in memory. The higher you increase this number, the more of your computer's
memory Dreamweaver will consume.
Spelling dictionary— Lists the various dictionaries to use with the spell checker. By default this
option is set to English (American).
The Accessibility Category
As you can see from Figure 4.2, the Accessibility category of the Preferences window enables you to
customize how you work with various accessibility features within Dreamweaver.
Figure 4.2. The Accessibility category enables you to customize how you work with accessibility
features in Dreamweaver.
[View full size image]
Note
More information on Accessibility can be found in Appendix A, "Accessibility."
Following is a complete list of customizable functionality:
Show attributes when inserting— As you will see in Appendix A, "Accessibility," form objects,
frames, media elements, and images all carry accessibility attributes that you can set. Checking these
boxes guarantees that whenever we insert a form object, create a frame, or insert a media or image
element, a dialog appears allowing for customization of accessibility attributes for the respective
element. If these check boxes are left unchecked, an accessibility dialog will not automatically appear
when you insert the previously mentioned elements onto the page. Again, we'll discuss these options
with more detail in Appendix A.
Keep focus in the panel when opening— Maintains focus on any panel, which makes it accessible
to screen readers. If you use a screen reader and don't select this option, the focus remains on the
Document window when you open a panel and the screen reader won't know anything is different.
(Windows only).
Offscreen Rendering— Select this, Windows-only option if you use a screen reader and
Dreamweaver.
The AP Elements Category
AP Elements, as you will learn in Chapter 7, "Page Structuring Using Cascading Style Sheets," are HTML
elements that can contain text, images, media, and so on. The benefit to using AP Elements is that they are
stackable and moveable within the design window, enabling pinpoint accurate designs. As shown in Figure
4.3, the AP Elements category in the Preferences dialog allows you to customize the look of the AP Element
when it's inserted into the design window.
Figure 4.3. Use the AP Elements category to customize the initial look of <div> tags as they are
inserted into your page.
[View full size image]
Note
Most of these customizable features are also available from the Property inspector after an AP
Element has been inserted into the Document window. The options in the Preferences merely
customize the look of AP Elements when inserted for the first time.
A complete list of functionality exposed by the AP Elements category is given next:
Visibility— Choose an option from this menu to set the initial display properties of the AP Element.
Options include default, inherit, visible, and hidden. Again, you will learn more about these options in
Chapter 7.
Width— Sets the width in pixels of the AP Element when it's first inserted into the Document window.
Height— Sets the height in pixels of the AP Element when it's first inserted into the Document
window.
Background color— Sets the background color of the AP Element when it's first inserted into the
Document window.
Background image— Sets the background image of the AP Element when it's first inserted into the
Document window. If a background image is set and it is smaller than the width and height of the AP
Element, the image will tile vertically and horizontally.
Nesting— Enable this option to automatically nest an AP Element within another AP Element if it is
initially created within the boundaries of an existing AP Element. Disabling this option causes the AP
Element to stack instead of nest.
Netscape 4 compatibility— Enable this option to allow Dreamweaver to automatically insert
JavaScript code within the <head> tag of the web page to fix a known problem within Netscape 4
browsers that automatically causes an AP Element to lose its positioning values if a user resizes the
browser window. Alternatively, you can manually add/remove this code by choosing Commands,
Add/Remove Netscape Resize Fix.
The Code Coloring Category
One of the subtle benefits to working in the code environment within Dreamweaver is that all code is
separated into colors. For instance, most ordinary HTML elements appear as blue, styles as maroon, scripts
as red, form elements as orange, literal text as black, and so on. You may want to pursue these colors even
further and customize them to your liking. Even better, you might want to create more color combinations
for tags. If this is the case, the Code Coloring category of the Preferences dialog is for you. As you can see
from Figure 4.4, the Code Coloring category allows you to customize how elements within a specific tag
library are displayed.
Figure 4.4. The Code Coloring category allows you to customize the color of elements within
various tag libraries.
[View full size image]
As you will see, aside from plain HTML, other tag libraries exist and can be modified. A complete list of
customizable functionality follows:
Document type— This list includes all the document libraries that are supported and can be
customized within Dreamweaver. After you've found the tag library whose colors you'd like to
customize, select it, and click the Edit Coloring Scheme button (discussed next).
Edit Coloring Scheme— After you've selected a tag library from the Document type list box, and
you've clicked the Edit Coloring Scheme button, the Edit Coloring Scheme dialog box appears. As you
can see from Figure 4.5, the Edit Coloring Scheme for <your tag library> dialog allows you to pick
from a Tag list on the left and customize the color of that tag on the right. Dreamweaver also gives
you the options of adding a background color to the tag and changing the weight to Bold, Italic, and
even Underline. After you've customized how you want the tag to look, review it within the Preview
pane and click OK to apply the changes.
Figure 4.5. The Edit Coloring Scheme for HTML dialog box allows you to customize tag colors
as they will appear within the Code view in the Document window.
[View full size image]
Default background— Sets the background color of the Code view. By default, the color is set to
white (represented by the hexadecimal value #FFFFFF).
The Code Format Category
Although the Code Coloring category allows you to make tailored changes that affect the color of code as it's
added to the coding environment, the Code Format category of the Preferences dialog box, shown in Figure
4.6, allows you to customize how the code is added and subsequently formatted within the coding
environment.
Figure 4.6. HTML code is formatted within the coding environment based on modifications you
make within the Code Format category.
[View full size image]
A complete list of customizable functionality follows:
Indent— Enable this option to allow Dreamweaver to automatically indent HTML code according to the
rules specified to the right of this check box. If this option is enabled, specify how many spaces or tabs
Dreamweaver should indent code.
Tab size— The value in this text box determines how many characters wide each tab character
appears in the Code view. For example, with the Tab size set to 4, the default, each tab is displayed in
Code view as a four-character-wide blank space.
Automatic Wrapping— Enable this check box to have Dreamweaver insert a line-break character
when a line reaches the specified column width within the code. Because Dreamweaver inserts line-
break characters only in places where they don't change the appearance of the document in browsers,
some lines may remain longer than the Automatic Wrapping option specified.
Line break type— Choose from one of the three options within this list to set the type of line break
based on the remote server's operating system. Choosing the correct version ensures that your pages
are accurately formatted on the remote server. As you can see from this list, options include Carriage
Return Line Feed (CR LF) for Windows, Carriage Return (CR) for Macintosh, and Line Feed (LF) for
UNIX.
Default tag case— Choose from one of the two options in this menu to force Dreamweaver to add
tags in either uppercase or lowercase format. Because of XHTML compliancy standards, it's generally a
good idea to stick with lowercase.
Default attribute case— Choose from one of the two options in this menu to force Dreamweaver to
add tag attributes in either uppercase or lowercase. Again, because the Web is moving toward XHTML
compliancy, it's generally a good idea to stick with lowercase.
Override case of: Tags and Attributes— Use these powerful check boxes to always force the two
uppercase/lowercase rules mentioned previously. By enabling this option, Dreamweaver converts the
case of code in any document opened within Dreamweaver to lowercase/uppercase. This is a great
way to enforce the rules that you set previously, even for documents you open within Dreamweaver
that weren't created in Dreamweaver.
No break after TD— Choose this option if you don't want Dreamweaver to add a line break after the
<td> (table data for the parent <table>) tag is inserted in code, such as: <td>Hello World</td>.
Disabling this option simply adds a line break after the opening <td> tag and then again after the
literal text.
Advanced Formatting (CSS)— Click this button to launch the CSS Source Format Options dialog
(shown in Figure 4.7). Within this dialog box, you can set generic properties for how Dreamweaver
writes and formats CSS code. Options within this dialog include the following:
Indent properties with— Sets the indentation value for properties within a rule. You can
specify tabs or spaces.
Each property on separate line— Places each property within a rule on a separate line.
Opening brace on separate line— Places the opening brace for a rule on a separate line from
the selector.
Only if more than 1 property— Places single-property rules on the same line as the selector.
All selectors for a rule on same line— Places all selectors for the rule on the same line.
Blank line between rules— Inserts a blank line between each rule.
Figure 4.7. The CSS Source Format Options dialog allows you to customize how
Dreamweaver writes and formats CSS code.
Advanced Formatting (Tag Libraries)— As you will see later in the chapter, selecting this option
opens the Tag Library Editor, which lets you set the formatting of individual tags in contrast to global
settings that appear within this preferences category.
The Code Hints Category
You can set options within the Code Hints category of the Preferences dialog box to customize how
Dreamweaver helps you along in the coding environment. Shown in Figure 4.8, the Code Hints category
allows you to enable or disable automatic tag completion as well as delay in milliseconds the time it will take
for the Code Hints drop-down menu to appear as you write code in Code view.
Figure 4.8. Set preferences in this category to customize how Dreamweaver works with tag
completion and code hints.
[View full size image]
A complete list of customizable functionality follows:
Close tags— Choose from one of the options in this option group to set how and whether
Dreamweaver will automatically close tags for you as you type. For instance, selecting the first option
button (after typing "</") guarantees that if you type the <td> tag, the closing tag won't
automatically appear until you type "</". Selecting the second option button (after typing the open
tag's ">") guarantees that if you type the <td> tag, the closing tag will automatically appear when
you close the opening tag with the ">" symbol. Selecting the Never option guarantees that
Dreamweaver will never automatically close tags.
Options: Enable code hints— As discussed in Chapter 2, the Code Hints menu is a collection of tags,
attributes, and values for various languages supported within Dreamweaver. This option enables or
disables the Code Hints menu that appears when you write code in the Code view.
Delay— Choose a time in seconds from this slider to set the delay of the Code Hints menu. If you
prefer the Code Hints menu to appear instantly, set the slider to 0; if you prefer a longer delay, move
the slider to the right.
Menus— Choose from the check boxes in this list box to set which type of code hints you want
displayed while typing. You can enable a few or all of these options.
The Code Rewriting Category
As you can see, each code category within the Preferences dialog allows you customize the look, formatting,
and in general, the interaction of Dreamweaver and code within Code view. The Code Rewriting category,
shown in Figure 4.9 is no different. It is within this category that you will customize how Dreamweaver
rewrites code of a certain type, encodes special characters, encodes URLs, and so on.
Figure 4.9. Use the Code Rewriting category to customize how Dreamweaver should handle the
rewriting of code of a certain type, how it should encode URLs, and how it should encode special
characters.
[View full size image]
A complete list of functionality is given here:
Fix invalidly nested and unclosed tags— Choose this option to rewrite tags that are invalidly
nested or accidentally left unclosed. For instance, the code <strong><em>Hello
World</strong></em> is rewritten as <strong><em>Hello World</em></strong>.
Rename form items when pasting— This option ensures that forms are always given unique names
when pasting. For instance, if you have <form name="form1"><form> and you copied and pasted that
form somewhere else on the page, it would be renamed to <form name="form2"><form>
automatically. If this option was disabled, the new form would be pasted in with the same name giving
you duplicate forms with the same name.
Remove extra closing tags— Choose this option to force Dreamweaver to delete closing tags that
have no corresponding opening tag.
Warn when fixing or removing tags— When the Fix Invalidly Nested and Unclosed Tags option or
the Remove Extra Closing Tags option is enabled, this option becomes available and can be enabled or
disabled. Enabling this option forces Dreamweaver to display a list of attempted fixes within the
Results panel.
Never rewrite code— Useful when working with languages that have third-party tags, this option
ensures that Dreamweaver doesn't rewrite code in files with the filename extensions that you list in
the In Files with Extensions text field.
Special characters (Encode)— Enabling this option ensures that attribute values that you enter or
edit using Dreamweaver tools such as the Property inspector contain only legal characters.
URL Encoding (Do not encode special characters)— Select this option button to prevent
Dreamweaver from changing URLs to use only legal characters.
URL Encoding (Encode special characters in URLs using &#)— Enabled by default, this option
guarantees that URLs edited with tools within Dreamweaver such as the Property inspector contain
legal characters.
URL Encoding (Encode special characters in URLs using %)— Similar to the previous option, this
option simply uses a different method of encoding more suited to older browsers, but less compatible
with some languages.
Active Content (Insert using browser safe scripts)— This option ensures that active content
(such as Flash or Shockwave media elements) that you insert with Dreamweaver use tags that will
display the content correctly in the latest versions of Internet Explorer. By default, Dreamweaver will
create a Scripts directory and place the file AC_RunActiveContent.js within it and will add a reference
to this file within your pages that contain active content.
Active Content (Convert tags to scripts on file open)— The previous check box guarantees that
Dreamweaver will include and use the AC_RunActiveContent.js file when you insert active content
into your page. This check box creates and implements that same .js file whenever a page is opened
that contains the <object>, <embed>, and <applet> tags. Dreamweaver will then render those tags
null and instead make a direct reference to the .js file within the Scripts directory.
The Copy/Paste Category
You can use the Copy/Paste category, shown in Figure 4.10, to set how Dreamweaver handles the pasting of
text by default when using Edit, Paste or pressing Ctrl+V ( +V).
Figure 4.10. Use the Copy/Paste category to set how Dreamweaver should handle the pasting of
text when using the Edit, Paste option.
[View full size image]