Tài liệu Adobe Photoshop 7.0 for Photographers- P5 docx
Bạn đang xem bản rút gọn của tài liệu. Xem và tải ngay bản đầy đủ của tài liệu tại đây (4.04 MB, 50 trang )
Adobe Photoshop 7.0 for Photographers
180
This is a book about Photoshop and photography. A rich variety of text effects can be
achieved in Photoshop and designers who work in print and multimedia often mainly
use the program for this purpose. Since there are plenty of other Photoshop books
devoted mainly to the needs of graphic designers, I am going to concentrate on the
needs of image makers. But you will find more information on using the type tools
contained in Chapter Fifteen.
Shape tools
Photoshop can let you create shapes that can be in the form of a filled layer with a
vector mask (formerly referred to as a layer clipping path), a solid fill, or a path
outline. You can define polygon shapes and also import custom shapes from EPS
graphics, such as a regularly used company logo, and store these as Shape presets
using the Preset Manager. The shape tools are a recently added crossover feature
from ImageReady. Single pixel or wider lines can be drawn with the line shape tool.
To constrain the drawing angle by 45 degree increments, hold down the Shift key
(this applies to all the painting tools as well). Arrowheads can be added to the line
either at the start or finish of the line. Click the Shape button in line tool Options to
customize the appearance of the arrowhead proportions.
Annotation tools
You can add text or sound notes to a file in Photoshop. Documents that are annotated
in this way can be saved in the Photoshop, PDF or TIFF formats. To annotate an
open document, select the text note tool and click inside the image window. A note
icon is placed together with an open text window. Enter text inside the window – for
example, this can be a short description of the retouching which needs to be carried
Please purchase PDF Split-Merge on www.verypdf.com to remove this watermark.
The work space
181
out on this part of the picture. After completing the text entry, close the text window.
The text note will remain as a small icon floating above the actual image. Although
viewable in Photoshop, these notes will not be visible when you actually come to
print the image. If you save a copy of an image as a PDF and send this to a client,
they will be able to open it in Acrobat, add notes in Acrobat and export a Notes file
for you to import back into the original Photoshop image. To delete a note or delete
all notes, Control/right mouse-click on a note icon. The contextual menu will offer
you the choice of deleting that note or all notes in the current document. If you want
to append a sound note to a file, check in your System Control Panels that the computer’s
built-in microphone is selected as the incoming sound source. When you click in the
window with the sound note tool a small sound recording dialog appears. Press the
record button and record your spoken instructions. When finished, press Stop. The sound
message will be stored in the document when saved in the above file formats.
Eyedropper/color sampler
The eyedropper samples pixel color values from any open image window and makes
that the foreground color. The sample area can be set to Point, 3 × 3 Average, 5 × 5
Average. The Point option will sample a single pixel color value only and this may
not be truly representative of the color you are trying to sample. You might quite
easily be clicking on a ‘noisy’ pixel or some other pixel artifact. A 3 × 3 average, 5 ×
5 average sample area will usually provide a better indication of the color value of
the pixels in the area you are clicking. If you hold down the Option/Alt key, the
sample becomes the background color (but when working with any of the following
tools – brush, pencil, type, line, gradient or bucket – holding down the Option/Alt
key will create a new foreground color). The sampler tool provides persistent pixel
value readouts in the Info palette from up to four points in the image. The sample
point readouts will remain visible all the time in the Info palette. The sample points
themselves are only visible whenever the color sampler tool is selected. The great
value of the color sampler tool is having the ability to monitor pixel color values at
fixed points in an image. To see what I mean, take a look at the tutorial in Chapter
Eight, which demonstrates how the combination of placing color samplers and pre-
cise curves point positioning means that you now have even more fine color control
with valuable numeric feedback in Photoshop. Sample points can be deleted by drag-
ging them outside the image window or Option/Alt-clicking on them (whenever
the color sampler tool is selected).
Please purchase PDF Split-Merge on www.verypdf.com to remove this watermark.
Adobe Photoshop 7.0 for Photographers
182
Measure
The measure tool provides an easy means of measuring distances and angles. To
draw a measuring line, open the Info palette and click and drag with the measure tool
in the image window. The measure tool also has a protractor mode – after drawing a
measuring line, Option/Alt-click on one of the end points and drag out a second
measuring line. As you drag this out, the angle measurements are updated in the Info
palette. The measure tool line will only remain visible when the tool is selected, or
you can hide it with the View > Hide Extras command. The measure tool line can be
updated at any time by clicking and dragging any of the end points. As with other tools
the measure tool can be made to snap to the grid or guides.
Navigation tools – hand and zoom
To navigate around an image, select the hand tool and drag to scroll. To zoom in on
an image, either click with the zoom tool to magnify, or drag with the zoom tool,
marqueeing the area to magnify. This combines a zoom and scrolling function. In
normal mode, a plus icon appears inside the magnifying glass icon. To zoom out,
hold down the Option/Alt key and click (the plus sign is replaced with a minus sign).
A useful shortcut well worth memorizing is that at any time, holding down the
Spacebar accesses the hand tool. Holding down the Spacebar+Command/Ctrl key
calls up the zoom tool (except when editing text). Holding down the Spacebar+Option/
Alt calls up the zoom tool in zoom out mode. An image can be viewed anywhere
between 0.2% and 1600%. Another zoom shortcut is Command/Ctrl-plus (Command-
click the ‘=’ key) to zoom in and Command/Ctrl-minus (next to ‘=’) to zoom out.
The hand and zoom tools also have another navigational function. Double-click the
hand tool to make the image fit to screen. Double-click the zoom tool to magnify the
image to 100%. There are buttons on the Options bar which perform similar zoom
commands: Fit On Screen; Actual Pixels; Print Size. Navigation can also be con-
trolled from the Navigator palette, the View menu and the lower left box of the
image window. Checking the Resize Windows to Fit box will cause the Photoshop
document windows to always resize to accommodate resizing, but within the con-
straints of the free screen area space. The Ignore Palettes checkbox will tell Photoshop
to ignore this constraint and resize the windows behind the palettes.
Please purchase PDF Split-Merge on www.verypdf.com to remove this watermark.
The work space
183
Foreground/background colors
As mentioned earlier when discussing use of the eyedropper tool, the default setting has
black as the foreground color and white as the background color. To reset the default
colors, either click on the black/white foreground/background mini icon or simply click
‘D’. Next to the main icon is a switch symbol. Clicking on this exchanges the colors, so
the foreground becomes the background. The keyboard shortcut for this is ‘X’.
Selection mode/Quick mask
The left icon is the standard for Selection mode display. The right icon converts a
selection to display as a semitransparent colored ‘Quick mask’. Double-click either
icon to change the default overlay mask color. Hit ‘Q’ to toggle between the two modes.
Screen display
The standard mode displays images in the familiar separate windows. More than one
document can be opened at a time and it is easy to select individual images by click-
ing on their windows. The middle display option changes the background display to
an even medium gray color and centers the image in the window with none of the
distracting system window border. All remaining open documents are hidden from
view (but can be accessed via the Window menu). Full Screen mode displays the
image against a black background and hides the menu bar. The Tools palette and
other palettes can be hidden too by pressing the Tab key. To show all the palettes,
press the Tab key again. To toggle between these three viewing modes, press the ‘F’
key. You can also use Tab+Control/right mouse-click to cycle through each open image
window, however the associated screen display is set. Here is another tip: if you are
fond of working in Full Screen mode with a totally black border, but miss not having
access to the menu bar, in the two full screen modes you can toggle the display of the
menu bar with the Shift-F keyboard command. When you are in the middle full-
screen viewing mode you can replace the gray colored pasteboard by selecting a new
color in the Color Picker and Shift-clicking with the paint bucket tool in the paste-
board area. Warning: this action cannot be undone with Command/Ctrl-Z!
Please purchase PDF Split-Merge on www.verypdf.com to remove this watermark.
Adobe Photoshop 7.0 for Photographers
184
Jump to button
ImageReady™ 7.0 is a stand-alone application, that is installed with Photoshop 7.0. Click-
ing on the ‘Jump to’ icon will switch you from Photoshop to ImageReady™ and vice
versa, without having to exit from the current program. The file will always continue to
remain open in the previous program and you can select different programs to jump to
from the File > Jump to menu. Upon installation, applicable application aliases are in-
stalled in the Photoshop 7.0 > Helpers > Jump to Graphics Editor folder, i.e. Adobe
Illustrator™ from Photoshop or HTML editing programs like Adobe GoLive™ from
ImageReady™. If the other program is not currently open, the Jump to button will launch it.
Summary
The tools and palettes mentioned here will be cropping up again over the following
chapters. Hopefully the later tutorials will help reinforce the message. In order to
help familiarize yourself with the Photoshop tools and Palette functions, help dialog
boxes will pop up after a few seconds whenever you leave a cursor hovering over
any one of the Photoshop buttons or tool icons (see: Show Tool Tips in the General
Preferences). A brief description is included in the box and tools have their keyboard
shortcuts written in brackets.
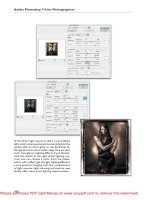
Figure 6.32 The Photoshop Color Picker, which is shown with a ‘grayed out’ color field because Gamut
Warning is currently checked in the View menu. The alert icon beside the newly selected foreground
color tells you it is out of gamut. If you check on the cube icon below, this will make the selected
color jump to the nearest HTML web safe color. If you check the Only Web Colors box the Color
Picker will display the restricted web safe color palette.
Show web safe colors only
The color field area New selected color Out-of-gamut warning
Jump to nearest web safe color
HTML color reference
Please purchase PDF Split-Merge on www.verypdf.com to remove this watermark.
File formats
File Formats
Chapter Seven
P
hotoshop supports just about any image file format you care to mention.
Choosing which format to output your images to should be determined by
what you want to do with that file and the list can then be further narrowed
down to a handful of recognized formats, appropriate to your needs. You may want
to choose a format that is intended for prepress output, or screen-based publishing,
or maybe you wish to use a format that is suitable for image archiving only. Screen-
based publishing is a rapidly growing sector of the publishing industry and it is predicted
that the percentage of designers operating in cross-media publishing, i.e. screen and print,
will soon overtake those working in print design only. The Save for Web dialog contains
a lot of useful web format tools and Photoshop 7.0 ships with ImageReady™ 7.0,
which is a stand-alone web image editing program, and you can switch back and
forth between Photoshop 7.0 and ImageReady™ 7.0 to produce optimized, sliced images,
animated GIFs and even rollover buttons complete with JavaScript code. Adobe
InDesign™ and Adobe GoLive™ enable you to share Photoshop files between these
separate applications and see changes made to a Photoshop file be automatically updated
in the other program. This modular approach means that many Adobe graphics programs
are able to integrate with each other.
While an image is open in Photoshop, it can be manipulated without being limited
by the range of features supported in the original source format. If you open an EPS
format image in Photoshop and simply adjust the levels and save it, Photoshop will
overwrite the original. But you can also edit the same EPS image in Photoshop,
adding features such as layers or adjustment layers. When you come to save, you
will be shown the Save dialog shown in Figure 7.1. This reminds you that the file
contains features that are not supported by the EPS file format and alerts you to the
fact that if you click Save now, not all the components in the image (i.e. layers) will
11885
Please purchase PDF Split-Merge on www.verypdf.com to remove this watermark.
Adobe Photoshop 7.0 for Photographers
186
be fully saved. This is because while you can save the file as an EPS, the EPS format
does not support layers and the document will therefore be saved in a flattened state.
If I were to select the native Photoshop file format and check the Layers box, then it
will become possible for me to now save this version of the image in the native
Photoshop format and preserve the layer features. Only the Photoshop, PDF and
TIFF formats are capable of supporting all the Photoshop features such as vector
masks and image adjustment layers. Saving in the native Photoshop format should
result in a more compact file size, except when you save a layered Photoshop file
with the Maximize Backward Compatibility checked in the preferences. Figure 7.18
at the end of this chapter contains a summary of file format compatibility with the various
Photoshop features.
Figure 7.1 The Photoshop Save dialog box.
TIFF (Tagged Image File Format)
This is the most universally recognized, industry-standard image format. Labs and
output bureaux generally request that you save your output image as a TIFF, as this
can be read by most other imaging computer systems. If you are distributing a file
for output as a print or transparency, or for someone else to continue editing your
Please purchase PDF Split-Merge on www.verypdf.com to remove this watermark.
File formats
187
master file, you will usually be safest supplying it as a TIFF. Photoshop TIFFs now
support alpha channels and paths, although bureaux receiving TIFF files for direct
output will normally request that a TIFF file is flattened and saved with all alpha
channels removed. An uncompressed TIFF is about the same size as shown in the
Image Size dialog box. The TIFF format in Photoshop offers several compression
options. LZW (which appears in the Save dialog box) is a lossless compression op-
tion. Data is compacted and the file size reduced without any image detail being lost.
Saving and opening will take longer when LZW is utilized, so some bureaux will
request that you do not use it. ZIP is another lossless compression encoding that like
LZW is most effective where you have images that contain large areas of a single
color. JPEG compression is a lossy compression method and is described more fully
later. TIFF has the benefit of being able to support transparency and all of the
Photoshop 7.0 features (should you wish to). The byte order is chosen to match the
computer system platform the file is being read on. However, most software programs
these days are aware of the difference, so the byte order is far less relevant now. The main
formats used for publishing work are TIFF and EPS (and also the native Photoshop
file format in an Adobe InDesign™ or Illustrator™ workflow, where Maximize Back-
wards Compatibility must be switched on). Of these, TIFF is the more flexible format,
but this does not necessarily imply that it is better. The PDF file format is also gaining
popularity for DTP (desktop publishing) work. TIFF files can readily be placed in
QuarkXPress™, PageMaker™, InDesign™ and any other DTP or word processing docu-
ment. The TIFF format is more open though and unlike the EPS format, you can make
adjustments within the DTP program as to the way a TIFF image will appear in print.
Figure 7.2 The TIFF save options allow you
to apply LZW, ZIP or JPEG compression to
a file. The Save Image Pyramid option will
save a pyramid structure of scaled-down ver-
sions of the full-resolution image. TIFF pyra-
mid-savvy DTP applications (there are none
I know of yet) will then be able to display a
good quality TIFF preview, but without hav-
ing to load the whole file. If an open image
contains alpha channels or layers, the Save
dialog in Figure 7.1 will indicate this and you
can keep these options checked to preserve
these in a TIFF save. If the File Saving prefer-
ences have Ask Before Saving Layered TIFF
Files switched on a further alert dialog will
warn you after clicking OK to the TIFF op-
tions the first time you save a layered TIFF.
Please purchase PDF Split-Merge on www.verypdf.com to remove this watermark.
Adobe Photoshop 7.0 for Photographers
188
EPS
EPS (Encapsulated PostScript) files are the preferred format for placing large color
separated files within a page layout document. The EPS file format uses a low reso-
lution preview to display the image on screen while the image data is written in the
PostScript language used to build the output on a PostScript device. The image data
is ‘encapsulated’ which means it cannot be altered outside of the program that cre-
ated it (i.e. Photoshop). The downside of using EPS is that all the PostScript image
data must be processed by the RIP every time you make an output, even if only a
smaller amount of data is required to produce a proof and EPS files can take longer
to process than a TIFF. However, you get an almost instantaneous rendering of the
image preview when editing a DTP document on the screen. The saving options
include:
Preview display: This is a low resolution preview for viewing in the page layout.
The choice is between None, a 1-bit/8-bit TIFF preview which is supported on both
platforms, or a 1-bit /8-bit/JPEG Macintosh preview. I recommend the 8-bit preview
mode or JPEG Macintosh preview if working on the Mac.
Encoding: The choice is between ASCII or Binary encoding. ASCII encoding is
more generic but generates large files and is suited to PC platforms only. Binary
encoded files are half the size of ASCII encoded files and can therefore be pro-
cessed more quickly. JPEG coding produces the smallest sized, compressed files.
Use JPEG only if you are sending the job to a Level 3 PostScript printer. Bear in
mind that image quality will become significantly degraded whenever you select a
lower quality JPEG compression setting.
Include Halftone Screen and Include Transfer Functions: For certain subjects,
images will print better if you are able to override the default screen used on a print
job. Transfer functions are similar to making Curves image adjustments. Check these
boxes if you want information entered to override the default printer settings. They
do not alter the screen appearance of the image and are adjusted to accommodate dot
gain output. The screen and transfer functions are defined in Photoshop. If printing
the same file to two different printers, you may wish to save one file for the final
print job as it is and save another version for the proof printer specifying the use of
preset transfer functions to compensate for the different printing characteristics.
PostScript Color Management: This will enable PostScript Level 2 devices or higher
to read the Grayscale, RGB or Lab profiles embedded in Photoshop and convert as
necessary. But I believe it is better to let Photoshop handle the color management
and conversions.
Please purchase PDF Split-Merge on www.verypdf.com to remove this watermark.
File formats
189
If any vector data is present in the document this can be interpreted such that the
vector information will be rasterized in the EPS file. As usual, clipping paths can be
saved in an EPS file – a clipping path will act as an outline mask when the EPS file
is placed into a page layout program. If you have a work path saved in the Paths
palette it can be specified to be used as the clipping path from within Photoshop.
DCS
Figure 7.3 The DCS 2.0 Format options dialog box.
QuarkXPress also uses a version of the EPS format known as DCS (Desktop Color
Separations). The DCS 1.0 format generates five separate files: one preview composite
and four-color separation files. It can be difficult to manage all these individual color
plate files, especially when there are a lot of images in a folder. The DCS 2.0 format
is a self-contained file containing the preview and separations. Crucially, DCS 2.0
supports more than four color channels, i.e. spot colors and HiFi color.
Photoshop PDF
The PDF (Portable Document Format) is an electronic publishing format used
primarily for the distribution of document layouts, although it is fast gaining accep-
tance for prepress work and is the principal format for Adobe Acrobat™ and Adobe
Illustrator™. Adobe Acrobat Reader is a freeware program and widely available to
install from consumer magazine CDs or can be downloaded from the Adobe website.
CD Presentations, like that found on the Adobe Photoshop Tutorial CD, use the
Acrobat PDF format to display electronically published documents. Adobe Acrobat
can reproduce pages designed in InDesign or Illustrator to be viewed as self-
contained documents. Best of all, Acrobat documents are small in size and can be printed
at high resolution. The main selling point of PDF is its independence of computer
Please purchase PDF Split-Merge on www.verypdf.com to remove this watermark.
Adobe Photoshop 7.0 for Photographers
190
operating system and the fonts installed on the client’s computer. I can create a docu-
ment in PageMaker™ and export as an Acrobat PDF using the Acrobat Distiller
program (Distiller is part of the Acrobat program and also included as a separate,
stand-alone application with PageMaker). Anyone who has installed the Acrobat Reader
program can open the PDF document I supply and see the layout just as I intended it to be
seen, with the pictures in full color plus text displayed using the correct fonts. The Photoshop
PDF format (see Figure 7.4) can save all Photoshop 7.0 features, with either JPEG or
lossless ZIP compression and is backwards compatible in as much as it will save a flat-
tened composite for viewing within programs that are unable to fully interpret the
Photoshop 7.0 layer information.
The PDF format in Photoshop is particularly useful for sending Photoshop images to
people who don’t have Photoshop, but do have Acrobat Reader on their computer. If they
have a full version of Acrobat they will even be able to conduct a limited amount of
editing, such as changing a text layer slightly. Photoshop is also able to import or append
annotations from Adobe Acrobat. The Include Vector Data options allow you to embed
text layer fonts and vector layer information. Use the Use Outlines for Text option only if
you are dealing with an application that will have trouble interpreting the embedded font
information.
Figure 7.4 The PDF Options dialog. You can save nearly all of the Photoshop 7.0 features in the PDF
format and include password security to restrict file access to unauthorised users.
Please purchase PDF Split-Merge on www.verypdf.com to remove this watermark.
File formats
191
Figure 7.6 If you try to open a
generic Acrobat PDF from within
Photoshop by choosing File >
Open, you will see the PDF Page
selector dialog, shown bottom left.
Select individual or multiple pages
to rasterize as images in Photoshop.
If you choose File > Import > PDF
Image, you can extract the individual
images (or Import All) from a self-
contained PDF document.
Figure 7.5 The Photoshop PDF Security options.
Please purchase PDF Split-Merge on www.verypdf.com to remove this watermark.
Adobe Photoshop 7.0 for Photographers
192
PDF security
The PDF security options allow you to restrict file access to authorized users only –
you can introduce password protection to open a file in either Acrobat or Photoshop.
And you can also have a secondary password for permission to print or modify the
PDF file in Acrobat. Note that this level of security only applies to reading the file in
Acrobat. You can only password protect the opening of a PDF file in Photoshop.
Once opened in Photoshop, it will be fully editable. There are two security options:
40-bit RC4 for lower-level security and compatibility with versions 3 and 4 of Acrobat
and 128-bit RC4, for higher security and Acrobat 5 only.
Importing multi-page PDF files
The Photoshop Parser plug-ins enable Photoshop to import any Adobe Illustrator,
EPS or generic single/multi-page PDF file. Complete PDF document pages can be
rasterized and batch processed to be saved as Photoshop image document files. Use
File > Import > PDF Image to extract all or individual image/vector graphic files
contained in a PDF document as separate image files (see Figure 7.6).
Figure 7.7 Two JPEG images: both have the same pixel resolution and both have been saved using the
same JPEG quality setting. Yet the cloud image will compress to just 21 kilobytes, while the windows
image is almost three times bigger at 59 kilobytes. This is because of all the extra detail contained in
the street picture. The more contrasting sharp lines there are, the larger the file size will be after
compression. For this reason it is best not to apply too much unsharp masking to an image before you
save it as a JPEG. If necessary, you can deliberately apply blur to a background in Photoshop to remove
distracting detail and thereby reduce the JPEG size.
Please purchase PDF Split-Merge on www.verypdf.com to remove this watermark.
File formats
193
PICT
PICT is primarily a Macintosh file format which while it can be read by PC versions
of Photoshop, it is not a format for DTP work, although it has some uses in certain
multimedia authoring applications. The PICT format utilizes lossless Run Length
Encoding compression – areas of contiguous colors (i.e. subjects against plain color
backgrounds) compress more efficiently without any image degradation, although
files can be compressed using various levels of JPEG compression. I would add
though that there is nothing about PICT which the native Photoshop file format can-
not do better and there are also some pixel size limitations with the PICT format.
JPEG
The JPEG (Joint Photographic Experts Group) format provides the most dramatic
way to compress continuous tone image files. The JPEG format uses what is known
as a ‘lossy’ compression method. The heavier the compression, the more the image
becomes irreversibly degraded. For example, an 18 MB, 10" × 8" file at 300 ppi
resolution can be reduced in size to around 1 MB with hardly any degradation to the
quality of image. If you open a moderately compressed JPEG file and examine the
structure of the image at 200%, you will probably see that the picture contains a
discernible checkered pattern of 8 × 8 pixel squares. This mosaic pattern will easily
be visible at actual pixels viewing when using the heaviest JPEG setting. Compres-
sion is more effective if the image contains soft tonal gradations as detailed images
do not compress quite so efficiently and the JPEG artifacts will be more apparent.
Once an image has been compressed using the JPEG format, it is not a good idea to
resave it as a JPEG a second time, because this will only compound the damage
already done to the image structure. Having said that, providing the image pixel size
remains identical, the destruction caused by successive overwriting is slight (except
in those areas of the picture which have been altered). The JPEG format should
mainly be used to save a copy of an image whenever you want to reduce the file size
so as to occupy a much smaller space than the original. You normally want to com-
pact a file in this way for inclusion on a web page, faster electronic distribution, or
saving a large file to a restricted amount of disk space. Some purists will argue that
JPEG compression should never be used under any circumstances to save a photo-
graphic image. If an EPS or TIFF file is saved with JPEG file compression this can
cause problems when sending a file to some older PostScript devices, so that is one
good reason for not using JPEG. But otherwise, the image degradation is barely
noticeable at the higher quality compression settings, even when the image is viewed
on the screen in close-up at actual pixels viewing, never mind when it is seen as a
printed output. Wildlife photographer Steve Bloom once presented two Pictrograph
Please purchase PDF Split-Merge on www.verypdf.com to remove this watermark.
Adobe Photoshop 7.0 for Photographers
194
Figure 7.9 Here we have one image, but saved thirteen different ways and each method producing a
different file size. The opened image measures 500 × 400 pixels and the true file size is exactly 586
kilobytes. The native Photoshop format is usually the most efficient format to save in. Large areas of
contiguous color such as the white background are recorded using a method of compression that
does not degrade the image quality. The PICT format utilizes the same ‘run length encoding’ compres-
sion method, while the uncompressed TIFF format doggedly records every pixel value and is therefore
larger in size.
Figure 7.8 The JPEG Options save
dialog box. Baseline Standard is
the most universally under-
stood JPEG format option and one
that most web browsers will be
able to recognize. Baseline Opti-
mized will often yield a slightly
more compressed sized file than
the standard JPEG format and most
(but not all) web browsers are able
to correctly read this. The Progres-
sive option creates a JPEG file that
will download in an interlaced
fashion, the same way as GIF files
can be encoded to do so.
Client: Clipso.
Model: Bianca at Nevs.
Please purchase PDF Split-Merge on www.verypdf.com to remove this watermark.
File formats
195
prints at a Digital Imaging Group meeting. One of these was output from a 24 MB
uncompressed original and the other a 2 MB JPEG version. Neither I or any of the other
imaging experts could tell which was which.
File formats for the Web
The JPEG format is mostly used for web design work. A medium to heavy amount of
JPEG compression can make most photographs small enough to download quickly
over the Internet. Image quality is less of an issue here when the main object is to
reduce the download times. Photoshop compresses images on a scale of 0–12. A
setting of 12 will apply the least amount of compression and give the highest image
quality. A setting of 0 will apply the greatest amount of compression and be the most
lossy. When you choose to save as a JPEG, the document window preview will
change to reflect how the compressed JPEG will look after it is reopened again as a
JPEG. The JPEG Options dialog box will also indicate the compressed file size in
kilobytes and provide an estimated modem download time. This feedback information
is tremendously helpful. If you save a master file as a JPEG and later decide the file
needs further compression, you can safely overwrite the last saved JPEG using a
lower JPEG setting. It is possible to repeat saving in the JPEG format this way. For
as long as the image is open in Photoshop, all data is held in Photoshop memory and
only the version saved on the disk is successively degraded.
As you can see in Figure 7.8, JPEG compression is a most effective way to reduce
file size, but this is achieved at the expense of throwing away some of the image
data. JPEG is therefore known as a ‘lossy’ format. At the highest quality setting, the
image is barely degraded and the JPEG file size is just 70 kilobytes, or 12% of its
original size. If we use a medium quality setting the size is reduced further to just 18
kilobytes. This is probably about the right amount of compression to use for a photo-
graph that features in a typical web page design. The lowest compression setting will
squeeze the original 586 kilobytes down to under 7K, but at this level the picture will
appear extremely ‘mushy’ and it is best avoided.
Other file formats for the Internet
Only one thing matters when you publish images on the Web and that is to keep the
total file size of your pages as small as possible. The JPEG format is the most effec-
tive way to achieve file compression for continuous tone images, whereas graphics
that contain fewer, distinct blocks of color should be saved using the GIF format. Occa-
sionally one comes across a photograph to be prepared for a web page that would
save more efficiently as a GIF (see Figure 7.10) and vice versa – there are some graphics
Please purchase PDF Split-Merge on www.verypdf.com to remove this watermark.
Adobe Photoshop 7.0 for Photographers
196
that will benefit from being saved as a JPEG (see Figure 7.11). Photoshop includes sav-
ing options that allow you to save a copy from any type of image state, choosing whether
to include an ICC profile or not in your JPEG file. Some web servers are case sensitive
and will not recognize capitalized file names. Go to Edit menu and select Preferences >
Saving Files and make sure the Use Lower Case Extensions box is checked.
Figure 7.10 Exception to the rule 1: This high
contrast landscape image contains very few tones.
As a 350 pixel tall JPEG the smallest I could make
it was around 33 kilobytes. Not bad, but as a six
color GIF it only occupied 18 kilobytes and with
little comparative loss in quality.
Figure 7.11 Exception to the rule 2: The Index
page graphic for the Association of Photographers
website would normally have been saved as a GIF
(at around 20 kilobytes). The problem here was
that the subtle gray tones looked terrible when
dithered to the 216 color Web Palette. I there-
fore saved as a JPEG retaining the subtlety, mak-
ing the size now 30 kilobytes, still keeping the
total page size within a tolerable limit.
GIF
The GIF (Graphics Interchange Format) format is normally used for publishing graphic
type images such as logos. To prepare an image as a GIF, the color mode must be set
to Indexed Color. This is an 8-bit color display mode where specific colors are ‘in-
dexed’ to each of the 256 (or fewer) numeric values. You can select a palette of
indexed colors that are saved with the file and choose to save as a CompuServe GIF.
The file is then ready to be placed in a web page and viewed by web browsers on all
computer platforms. That is the basic concept of how GIFs are produced. Photoshop
contains special features to help web designers improve the quality of their GIF
outputs, such as the ability to preview Indexed mode colors whilst in the Index Color
Please purchase PDF Split-Merge on www.verypdf.com to remove this watermark.
File formats
197
Figure 7.12 The Save for Web interface. Click on the button next to the Quality setting to open the
Modify Quality Setting dialog. This will allow you to use an alpha channel to zone optimize the JPEG
compression range or as shown above you can check the All Text Layers box to apply a higher quality
compression setting to the text areas and a lower compression to the remaining image.
Modify JPEG quality
Save for Web tools
Preview display options
Preview menu
Select browser menu
Zoom level
Color information
Optimize menu
Optimize settings
Browser preview button
Output settings
Please purchase PDF Split-Merge on www.verypdf.com to remove this watermark.
Adobe Photoshop 7.0 for Photographers
198
mode change dialog box and an option to keep matching colors non-dithered. This
feature will help you improve the appearance of GIF images and reduce the risks of
banding or posterization. Be aware that when the Preview is switched on and you are
editing a large image, it may take a while for the document window preview to take
effect, so make sure that you resize the image to the final pixel size first. You will find
that when designing graphic images to be converted to a GIF, those with horizontal
detail compress better than those with vertical detail. This again is using a form of
Run Length Encoding (RLE) compression.
Save for Web
The Save for Web option is found in the File menu. This comprehensive dialog inter-
face gives you absolute control over how any image can be optimized for web use
when choosing either JPEG, GIF, PNG-8 or PNG-24 formats. The preview display
options include: Original, Optimized, 2-up and 4-up views. Figure 7.12 shows the
dialog window in 2-up mode display. With Save for Web you can preview the original
version of the image plus up to three variations using different web format settings.
In the annotation area below each preview, you are able to make comparative judge-
ments as to which format and compression setting will give the best payoff between
image quality and file size, and also determine how long it will take to download at
a specific modem speed. Use the Preview menu to select from a list of modem and
Internet connections on which these download times are based. You can also use the
Preview menu list to select a preview setting and simulate how the web output will
display on either a Macintosh display, a PC Windows display or with Photoshop
compensation. The Select Browser menu allows you to select which web browser to
use when you want to preview a document that has been optimized, in the actual
browser program (see Figure 7.15).
Photoshop provides an option for Progressive JPEG formatting. Most Netscape and
Internet Explorer browsers support this enhancement, whereby JPEGs can be made
to download progressively the way interlaced GIFs do. The optimized format (see
checkbox below the Optimize menu) can apply more efficient compression, but again
is not generally compatible with any but the more recent web browsers. The quality
setting can be set as Low, Medium, High, Maximum or it can be set more precisely as
a value between 1 and 100%. Custom Save for Web output settings can be saved via the
Optimize menu. The Blur control will allow you to soften an oversharpened original and
obtain further file compression when using the JPEG format.
Next to the Quality setting is a small selection mask icon. Click on this icon to open
the Modify Quality Settings. In the JPEG mode Save for Web dialog you can set zone
optimized levels of compression based on the text layer/vector layer content or an alpha
Please purchase PDF Split-Merge on www.verypdf.com to remove this watermark.
File formats
199
Figure 7.14 The HTML
section of the Optimize Set-
tings found in the Save for
Web dialog. Other menu
options include Background,
Saving, and Slices. Click on
the Generate CSS button
to create cascading style
sheets based on the current
image slicing.
Figure 7.13 Under the Optimize menu you
can choose Optimize To File Size and specify
the optimum number of kilobytes you want
the file to compress to.
channel stored in the master document (see Figure 7.12) so that areas of important
detail can have less JPEG compression applied to them. Adjust the sliders to estab-
lish the range of JPEG compression from the total mask to no mask areas, and vary
the softness of this transition. In Figure 7.12, the Use All text Layers option is checked
and you can see a preview of the mask based on the text layer in the Modify Quality
settings dialog. A higher quality of JPEG compression will be applied to the text in
the final JPEG output. In the Save for Web GIF format mode (discussed next), an
alpha channel can also be used to zone optimize the color reduction and modify the
dither settings. The Save for Web Save dialog lets you save as: HTML and Images,
Images only, or HTML only. The output settings allow you to determine the various
characteristics of the Save for Web output files such as: the default naming structure
of the image files and slices; the HTML coding layout; and whether you wish to save
a background file to an HTML page output (see Figure 7.14). Figure 7.15 shows an
example of a temporary document window generated with the HTML code gener-
ated by Save for Web along with the HTML code in the format specified in the
output settings.
Please purchase PDF Split-Merge on www.verypdf.com to remove this watermark.
Adobe Photoshop 7.0 for Photographers
200
Figure 7.16 This close-up view of the JPEG saved
at the 10% quality setting clearly reveals the under-
lying 8 × 8 pixel mosaic structure, which is how the
JPEG compression method breaks down the con-
tinuous tone pixel image into large compressed
blocks. At the higher quality settings you will have
to look very hard to even notice any change to the
image. Successively overwriting a JPEG will degrade
the image even further. However, if no cropping or
image size change takes place, the degradation will
only be slight. As a general rule always re-JPEG an
image from the uncompressed master file.
Figure 7.15 When a browser window preview
is selected (see Figure 7.11), the default
browser program is launched and a temporary
page will be created, like the one illustrated
opposite. This will allow you to preview the Save
for Web processed image as it will appear on
the final web page. This is especially useful for
checking if the RGB editing space used will be
recognized differently by the browser. If you are
relying on embedded ICC profiles to regulate
the color appearance on screen, you can check
to see if the profile is indeed being recognized
by the selected web browser program.
The Image Size options are fairly similar to those found in the Image > Image Size dialog
box. You can simply enter a new percentage to scale the image to and check what impact
this will have on the file size (this will change the file size in all the optimized windows).
An alternative approach is to select Optimize To File Size from the Optimize menu (see
Figure 7.13). Use this to target the optimized file to match a specific kilobyte file size
output and if you wish, have Photoshop automatically determine whether it is better to
save as a GIF or JPEG.
The GIF Save for Web options are also very extensive. You have the same control
over the image size scale and can preview how the resulting GIF will appear on other
operating systems and browsers – the remaining options all deal with the compres-
sion, transparency and color table settings that are specific to the GIF format. The
Please purchase PDF Split-Merge on www.verypdf.com to remove this watermark.
Adobe Photoshop 7.0 for Photographers
202
The Lossy option allows you to reduce the GIF file size by introducing file compression.
This can be helpful if you have an overlarge GIF file, but too much compression will
noticeably degrade the image until it looks like a badly tuned TV screen. The diffusion
dithering algorithm is effective at creating the impression of greater color depth and
reducing image banding. The Dither slider allows you to control the amount of
diffusion dithering. The Pattern and Noise options have no dither control. If the image to
be saved has a transparent background, the Transparency option can be kept checked
in order to preserve the image transparency in the saved GIF. To introduce transpar-
ency in an image you can select the color to make transparent using the eyedropper
tool and clicking inside the image preview area. The color chosen will appear
selected in the color table. Select one or more colors and click on the Map Selected
Colors to Transparent button in the Color table. You can apply a diffusion, pattern or
noise dither to the transparent areas, which will help create a smoother transparent
blend in your GIF.
The Web Snap slider will let you modify the Color table by selecting those colors
that are close to being ‘browser safe’ and making them snap to these precise color
values. The slider determines the amount of tolerance and you can see the composi-
tion of the Color table being transformed as you make an adjustment. The Interlace
option will add slightly to the file size, but is worth selecting – the image will appear
to download progressively in slices.
Figure 7.18 The color table with Color
palette fly-out menu shown.
A: Maps the selected color to transparency.
B: Shifts/unshifts selected colors to the
Web palette.
C: Adds eyedropper color to the palette.
D: Deletes selected colors.
A B C D
Please purchase PDF Split-Merge on www.verypdf.com to remove this watermark.
File formats
201
Figure 7.17 The Save for Web interface showing GIF settings. Design: Rod Wynne-Powell.
choice of color reduction algorithms allows you to select the most suitable 256 maxi-
mum color palette to save the GIF in. This includes the 8-bit palettes for the Macintosh
and Windows systems. These are fine for platform specific work, but such GIF files
may display differently on the other system’s palette. The Web palette contains the
216 colors common to both platforms and is therefore a good choice for web publish-
ing if viewers are limited to looking at the image on an 8-bit color monitor display. The
Perceptual setting produces a customized table with colors to which the eye is more
sensitive. The default Selective setting is similar to the Perceptual table, but more orien-
tated to the selection of web safe colors – this is perhaps the best compromise solution to
opt for now as even the most basic PC setup sold these days is well able to display 24-bit
color. The Adaptive table palette samples the colors which most commonly recur in the
image. In an image with a limited color range, this type of palette can produce the smoothest
representation with a limited number of colors, but is less ideal for web publishing.
Please purchase PDF Split-Merge on www.verypdf.com to remove this watermark.
File formats
203
PNG (Portable Network Graphics)
This is a newish file format used for the display and distribution of RGB color files
online. PNG (pronounced ‘ping’) features improved image compression and enables
alpha mask channels (for creating transparency) to be saved with the image. Other
advantages over JPEG and GIF are higher color bit depths, supporting up to 32-bit
images and limited built-in gamma correction recognition, so you can view an image
at the gamma setting intended for your monitor. Newer versions of Netscape Navigator
and Microsoft Internet Explorer web browsers will support the PNG format.
Figure 7.19 File format saving options showing which Photoshop features can be saved in the listed
formats. Those indicated with a red dot are savable on the Mac OS only.
tamrofeliF
BGR KYMC
dexednI
roloC
elacsyarG sreyaL
ahplA
slennahC
shtaP CCI snoitatonnA
pohsotohPebodA • • • • • • • • •
0.2pohsotohPebodA • • • • • • •
xiPhsalF • • •
FIGevreSupmoC •
GEPJ • • • • •
SPEpohsotohP • • • • • •
0.1SCDpohsotohP • • •
0.2SCDpohsotohP • • • • • •
FDPpohsotohP • • • • • • • • •
TCIP • • • • •
8-GNP • • • •
42-GNP • • • •
TCxeticS • • • •
FFIT • • • • • • • • •
Please purchase PDF Split-Merge on www.verypdf.com to remove this watermark.
Adobe Photoshop 7.0 for Photographers
204
IVUE
The IVUE format was used by the Live Picture program for display and image
processing in Live Picture. Although Live Picture is currently discontinued, there
are a lot of die hard fans of the program who will want to continue to use it. Files can
be converted from Photo CD or a TIFF file to the IVUE pyramid structure format
using the Live Picture software before they can be opened in the Live Picture pro-
gram. Photoshop and Live Picture complement each other and for that reason you
can import IVUE files into Photoshop, for further modification. The IVUE Import
plug-in (which came with Live Picture) must first be installed in the Photoshop plug-
ins folder.
FlashPix
The FlashPix format was jointly developed and backed by Eastman Kodak, Live
Picture, Microsoft and Hewlett-Packard and is based on the Live Picture IVUE pyra-
mid structure format. High resolution images in the FlashPix format can be viewed
at incremental resolutions via a web browser. To view the full sized image on the
screen, a screen resolution preview only is downloaded. If you zoom in to a small
section, just the detail information in that area of the picture is downloaded to the
browser. The viewer can inspect an image at full view and select any area in close-up
quickly without at any time having to download the entire image. Note that the
FlashPix format plug-in must be installed using the Custom rather than the Easy
Install option. Microsoft
®
OLE is required to run FlashPix – check the Microsoft
®
OLE 2.08 checkbox.
When saving in the FlashPix format there are options for compression (with a choice
of strengths) or no compression. As a FlashPix image is opened in Photoshop, a
choice of image resolutions is offered – this is similar to the choice of Image PAC
resolutions you get with Photo CD.
Future of electronic publishing
It is important for professional image makers to be able to meet the requirements of
different workflows. In the early days of digital imaging we were mostly concerned
about meeting the needs of repro and the ability to edit large files in Photoshop and
choose the right output file format for print. These days we have to take into account
the constraints of screen publishing as well and also the growing importance of
Acrobat PDF as a file format for distribution, soft proofing and final art delivery.
Please purchase PDF Split-Merge on www.verypdf.com to remove this watermark.