Lập trình Androi part 10 pps
Bạn đang xem bản rút gọn của tài liệu. Xem và tải ngay bản đầy đủ của tài liệu tại đây (229.59 KB, 5 trang )
75
75
Chapter
Getting Fancy with Lists
The humble ListView is one of the most important widgets in all of Android, simply
because it is used so frequently. Whether choosing a contact to call, an e-mail message
to forward, or an e-book to read, ListView widgets are employed in a wide range of
activities. Of course, it would be nice if they were more than just plain text. The good
news is that Android lists can be as fancy as you want (within the limitations of a mobile
device’s screen, obviously). However, making them fancy takes some work, as you will
learn in this chapter.
Getting to First Base
The classic Android ListView is a plain list of text—solid but uninspiring. We hand the
ListView a bunch of words in an array, and then tell Android to use a simple built-in
layout for pouring those words into a list.
However, you can have a list whose rows are made up of icons, icons and text, check
boxes and text, or whatever you want. It is merely a matter of supplying enough data to
the adapter and helping the adapter to create a richer set of View objects for each row.
For example, suppose we want a ListView whose entries are made up of an icon,
followed by some text. We could construct a layout for the row that looks like this, found
in the FancyLists/Static sample project:
<?xml version="1.0" encoding="utf-8"?>
<LinearLayout xmlns:android="
android:layout_width="fill_parent"
android:layout_height="wrap_content"
android:orientation="horizontal"
>
<ImageView
android:id="@+id/icon"
android:layout_width="22px"
android:paddingLeft="2px"
android:paddingRight="2px"
android:paddingTop="2px"
android:layout_height="wrap_content"
android:src="@drawable/ok"
8
CHAPTER 8: Getting Fancy with Lists
76
/>
<TextView
android:id="@+id/label"
android:layout_width="wrap_content"
android:layout_height="wrap_content"
android:textSize="44sp"
/>
</LinearLayout>
This layout uses a LinearLayout to set up a row, with the icon on the left and the text (in
a nice big font) on the right.
However, by default, Android has no idea that we want to use this layout with our
ListView. To make the connection, we need to supply our Adapter with the resource ID
of our custom layout:
public class StaticDemo extends ListActivity {
TextView selection;
String[] items={"lorem", "ipsum", "dolor", "sit", "amet",
"consectetuer", "adipiscing", "elit", "morbi", "vel",
"ligula", "vitae", "arcu", "aliquet", "mollis",
"etiam", "vel", "erat", "placerat", "ante",
"porttitor", "sodales", "pellentesque", "augue",
"purus"};
@Override
public void onCreate(Bundle icicle) {
super.onCreate(icicle);
setContentView(R.layout.main);
setListAdapter(new ArrayAdapter<String>(this,
R.layout.row, R.id.label,
items));
selection=(TextView)findViewById(R.id.selection);
}
public void onListItemClick(ListView parent, View v,
int position, long id) {
selection.setText(items[position]);
}
}
This follows the general structure for the previous ListView sample. The key difference
is that we have told ArrayAdapter that we want to use our custom layout (R.layout.row)
and that the TextView where the word should go is known as R.id.label within that
custom layout.
NOTE: Remember that to reference a layout (row.xml), use R.layout as a prefix on the base
name of the layout XML file (R.layout.row).
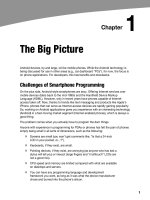
The result is a ListView with icons down the left side. In this case, all the icons are the
same, as shown in Figure 8–1.
CHAPTER 8: Getting Fancy with Lists
77
Figure 8–1. The StaticDemo application
A Dynamic Presentation
Supplying an alternate layout to use for rows, as in the preceding example, handles
simple cases very nicely. However, it falls down when you have more complicated
scenarios for your rows, such as the following:
Not every row uses the same layout (e.g., some rows one line of text
and others have two).
You need to configure the widgets in the rows (e.g., use different icons
for different cases).
In those cases, the better option is to create your own subclass of your desired Adapter,
override getView(), and construct your rows yourself. The getView() method is
responsible for returning a View, representing the row for the supplied position in the
adapter data.
As an example, let’s rework the code shown in the previous section to use getView(), so
we can show different icons for rows. We’ll use one icon for short words and one for
long words (from the FancyLists/Dynamic sample project).
public class DynamicDemo extends ListActivity {
TextView selection;
String[] items={"lorem", "ipsum", "dolor", "sit", "amet",
"consectetuer", "adipiscing", "elit", "morbi", "vel",
"ligula", "vitae", "arcu", "aliquet", "mollis",
"etiam", "vel", "erat", "placerat", "ante",
"porttitor", "sodales", "pellentesque", "augue",
"purus"};
CHAPTER 8: Getting Fancy with Lists
78
@Override
public void onCreate(Bundle icicle) {
super.onCreate(icicle);
setContentView(R.layout.main);
setListAdapter(new IconicAdapter());
selection=(TextView)findViewById(R.id.selection);
}
public void onListItemClick(ListView parent, View v,
int position, long id) {
selection.setText(items[position]);
}
class IconicAdapter extends ArrayAdapter {
IconicAdapter() {
super(DynamicDemo.this, R.layout.row, items);
}
public View getView(int position, View convertView,
ViewGroup parent) {
LayoutInflater inflater=getLayoutInflater();
View row=inflater.inflate(R.layout.row, parent, false);
TextView label=(TextView)row.findViewById(R.id.label);
label.setText(items[position]);
ImageView icon=(ImageView)row.findViewById(R.id.icon);
if (items[position].length()>4) {
icon.setImageResource(R.drawable.delete);
}
else {
icon.setImageResource(R.drawable.ok);
}
return(row);
}
}
}
The theory is that we override getView() and return rows based on which object is being
displayed, where the object is indicated by a position index into the Adapter. However, if
you look at the preceding implementation, you will see a reference to a LayoutInflater
class, which requires a bit of an explanation.
In this case, “inflation” means the act of converting an XML layout specification into
the actual tree of View objects the XML represents. This is undoubtedly a tedious bit of
code: take an element, create an instance of the specified View class, walk the
attributes, convert those into property setter calls, iterate over all child elements,
lather, rinse, and repeat. The good news is that the fine folks on the Android team
wrapped up all that into a class called LayoutInflater, which we can use ourselves.
For our fancy list, we want to inflate a View for each row shown in the list, so we can
CHAPTER 8: Getting Fancy with Lists
79
use the convenient shorthand of the XML layout to describe what the rows are
supposed to look like.
In our example, we inflate the R.layout.row layout we created. This gives us a View
object, which, in reality, is our LinearLayout with an ImageView and a TextView, just as
R.layout.row specifies. However, rather than needing to create all those objects
ourselves and wire them together, the XML and LayoutInflater handle the “heavy
lifting” for us.
So, we have used LayoutInflater to give us a View representing the row. This row is
“empty,” since the static layout file has no idea what actual data goes into the row. It is
our job to customize and populate the row as we see fit before returning it, as follows:
Fill in the text label for our label widget, using the word at the supplied
position.
See if the word is longer than four characters and, if so, find our
ImageView icon widget and replace the stock resource with a different
one.
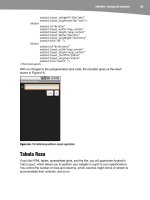
Now, we have a ListView with different icons based on the context of the specific entry
in the list, as shown in Figure 8–2.
Figure 8–2. The DynamicDemo application
Obviously, this was a fairly contrived example, but you can see where this technique
could be used to customize rows based on any sort of criteria, such as other columns in
a returned Cursor.