Lập trình Androi part 04 ppsx
Bạn đang xem bản rút gọn của tài liệu. Xem và tải ngay bản đầy đủ của tài liệu tại đây (211.06 KB, 5 trang )
23
23
Chapter
Using XML-Based Layouts
While it is technically possible to create and attach widgets to your activity purely
through Java code, as we did in the preceding chapter, the more common approach is
to use an XML-based layout file. Dynamic instantiation of widgets is reserved for more
complicated scenarios, where the widgets are not known at compile time (e.g.,
populating a column of radio buttons based on data retrieved from the Internet).
With that in mind, it’s time to break out the XML and learn how to lay out Android
activities that way.
What Is an XML-Based Layout?
As the name suggests, an XML-based layout is a specification of widgets’ relationships
to each other—and to their containers (which are covered in Chapter 6)—encoded in
XML format. Specifically, Android considers XML-based layouts to be resources, and as
such, layout files are stored in the res/layout directory inside your Android project.
Each XML file contains a tree of elements specifying a layout of widgets and containers
that make up one View hierarchy. The attributes of the XML elements are properties,
describing how a widget should look or how a container should behave. For example, if
a Button element has an attribute value of android:textStyle = "bold", that means that
the text appearing on the face of the button should be rendered in a boldface font style.
Android’s SDK ships with a tool (aapt) that uses the layouts. This tool should be
automatically invoked by your Android toolchain (e.g., Eclipse or Ant’s build.xml). Of
particular importance to you as a developer is that aapt generates the R.java source file
within your project, allowing you to access layouts and widgets within those layouts
directly from your Java code, as will be demonstrated in this chapter.
4
CHAPTER 4: Using XML-Based Layouts
24
Why Use XML-Based Layouts?
Most everything you do using XML layout files can be achieved through Java code. For
example, you could use setTypeface() to have a button render its text in bold, instead
of using a property in an XML layout. Since XML layouts are yet another file for you to
keep track of, we need good reasons for using such files.
Perhaps the biggest reason is to assist in the creation of tools for view definition, such
as a GUI builder in an IDE like Eclipse or a dedicated Android GUI designer like
DroidDraw. Such GUI builders could, in principle, generate Java code instead of XML.
The challenge is rereading the UI definition to support edits, which is far simpler when
the data is in a structured format like XML rather than in a programming language.
Moreover, keeping generated XML definitions separated from handwritten Java code
makes it less likely that someone’s custom-crafted source will get clobbered by
accident when the generated bits are regenerated. XML forms a nice middle ground
between something that is convenient for tool writers to use and easy for programmers
to work with by hand as needed.
Also, XML as a GUI definition format is becoming more commonplace. Microsoft’s
Extensible Application Markup Language (XAML), Adobe’s Flex, and Mozilla’s XML User
Interface Language (XUL) all take a similar approach to that of Android: put layout details
in an XML file and put programming smarts in source files (e.g., JavaScript for XUL).
Many less well-known GUI frameworks, such as ZK, also use XML for view definition.
While following the herd is not necessarily the best policy, it does have the advantage of
helping to ease the transition to Android from any other XML-centered view description
language.
OK, So What Does It Look Like?
Here is the Button from the previous chapter’s sample application, converted into an
XML layout file, found in the Layouts/NowRedux sample project:
<?xml version="1.0" encoding="utf-8"?>
<Button xmlns:android="
android:id="@+id/button"
android:text=""
android:layout_width="fill_parent"
android:layout_height="fill_parent"/>
The class name of the widget, Button, forms the name of the XML element. Since Button
is an Android-supplied widget, we can just use the bare class name. If you create your
own widgets as subclasses of android.view.View, you will need to provide a full
package declaration as well (e.g., com.commonsware.android.MyWidget).
The root element needs to declare the Android XML namespace:
xmlns:android="
All other elements will be children of the root and will inherit that namespace declaration.
CHAPTER 4: Using XML-Based Layouts
25
Because we want to reference this button from our Java code, we need to give it an
identifier via the android:id attribute. We will cover this concept in greater detail in the
next section.
The remaining attributes are properties of this Button instance:
android:text: Indicates the initial text to be displayed on the button
face (in this case, an empty string).
android:layout_width and android:layout_height: Tell Android to
have the button's width and height fill the parent—in this case, the
entire screen.
These attributes will be covered in greater detail in Chapter 6.
Since this single widget is the only content in our activity, we need just this single
element. Complex UIs will require a whole tree of elements, representing the widgets
and containers that control their positioning. All the remaining chapters of this book will
use the XML layout form whenever practical, so there are dozens of other examples of
more complex layouts for you to peruse.
What’s with the @ Signs?
Many widgets and containers need to appear only in the XML layout file and do not
need to be referenced in your Java code. For example, a static label (TextView)
frequently needs to be in the layout file just to indicate where it should appear. These
sorts of elements in the XML file do not need to have the android:id attribute to give
them a name.
Anything you do want to use in your Java source, though, needs an android:id.
The convention is to use @+id/ as the id value, where the represents your locally
unique name for the widget in question. In the XML layout example in the preceding
section, @+id/button is the identifier for the Button widget.
Android provides a few special android:id values, of the form @android:id/ You will
see some of these in various examples throughout this book.
And How Do We Attach These to the Java?
Given that you have painstakingly set up the widgets and containers in an XML layout
file named main.xml stored in res/layout, all you need is one statement in your activity’s
onCreate() callback to use that layout:
setContentView(R.layout.main);
This is the same setContentView() we used earlier, passing it an instance of a View
subclass (in that case, a Button). The Android-built View, constructed from our layout, is
accessed from that code-generated R class. All of the layouts are accessible under
CHAPTER 4: Using XML-Based Layouts
26
R.layout, keyed by the base name of the layout file; for example, res/layout/main.xml
results in R.layout.main.
To access your identified widgets, use findViewById(), passing in the numeric identifier
of the widget in question. That numeric identifier was generated by Android in the R
class as R.id.something (where something is the specific widget you are seeking). Those
widgets are simply subclasses of View, just like the Button instance we created in the
previous chapter.
The Rest of the Story
In the original Now demo, the button’s face would show the current time, which would
reflect when the button was last pushed (or when the activity was first shown, if the
button had not yet been pushed). Most of that logic still works, even in this revised
demo (NowRedux). However, rather than instantiating the Button in our activity’s
onCreate() callback, we can reference the one from the XML layout:
package com.commonsware.android.layouts;
import android.app.Activity;
import android.os.Bundle;
import android.view.View;
import android.widget.Button;
import java.util.Date;
public class NowRedux extends Activity
implements View.OnClickListener {
Button btn;
@Override
public void onCreate(Bundle icicle) {
super.onCreate(icicle);
setContentView(R.layout.main);
btn=(Button)findViewById(R.id.button);
btn.setOnClickListener(this);
updateTime();
}
public void onClick(View view) {
updateTime();
}
private void updateTime() {
btn.setText(new Date().toString());
}
}
The first difference is that, rather than setting the content view to be a view we created
in Java code, we set it to reference the XML layout (setContentView(R.layout.main)).
CHAPTER 4: Using XML-Based Layouts
27
The R.java source file will be updated when we rebuild this project to include a
reference to our layout file (stored as main.xml in our project’s res/layout directory).
The other difference is that we need to get our hands on our Button instance, for which
we use the findViewById() call. Since we identified our button as @+id/button, we can
reference the button’s identifier as R.id.button. Now, with the Button instance in hand,
we can set the callback and set the label as needed.
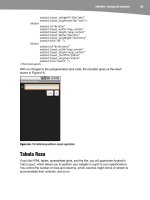
The results look the same as with the original Now demo, as shown in Figure 4–1.
Figure 4–1. The NowRedux sample activity