Real World Camera Raw with Adobe Photoshop CS- P8 pps
Bạn đang xem bản rút gọn của tài liệu. Xem và tải ngay bản đầy đủ của tài liệu tại đây (1.86 MB, 30 trang )
192
Real World Camera
Raw
with
Adobe Photoshop CS
Embed Private Metadata
With the fields I've created myself
-
the Category (Published In Print, Pub
-
lished Online, Unpublished)
-
I can embed the metadata in the image,
but it isn't searchable. It's viewable in the File Info Advanced panel under
Adobe Photoshop Properties, but it's only
editable in my custom File Info
panel or by using a text editor on the sidecar
.xmp file.
However, I never send out my raw images, and any image derived from
the raw has my metadata embedded
directly in the file, where it's safe from
geeks
with
text editors, rather than in a sidecar file. A sued programmer
could remove the metadata, but they'd have to know to look for it in the
first place, so it's fairly
bulletproof.
Figure
6
-
14
shows a custom Fie Info panel developed by my good friend
Seth Resnick. It's quite a bit more complicated than the first example,
and no, I'm not going to show you the code that created it
-
Seth put in
too
much work for me to just
give
it away, and he built this panel without
the benefit of the documentation to which you've been referred.
I
simply
offer it as a useful illustration of just how much you can accomplish with
XMI?
There are two significant points to note about this panel. The first is
that by default, without any user intervention, a rights notice is embed
-
ded in every raw image that's opened in the File Browser
-
notice that
the Rights Management popup doesn't include
"
none
"
as an option. The
second significant point is that the entries from the Rights Management
popup are embedded
in
any files derived from the raw image, in a form
that's uneditable to anyone who isn't either a programmer or a possessor
of the custom File Info panel
-
the File Info panel is the secret decoder
ring for this private metadata and offers the only reasonable means of
removing or changing it.
Making Images Smarter
Metadata has been around in one form or another for a long time, but
in
many
ways
it's still in its infancy. Having a standard in the form of XMP is
one factor that
will
doubtless accelerate its evolution, and the ready avail
-
ability of basic shooting parameters from the
EXIF
data is another.
knowing that their copyright and
rights
management notices
are
embedded
right in the image.
In
the future, you
can
reasonably expect to see software
that makes more intelligent use of
metadata-automatically applying the
right lens corrections based on focal length, or the right noise reduction
based on
IS0
speed, for example. You can also look forward to seamless
integration
withXMP-compliant asset managers and databases.
You'll doubtless encounter speed bumps along the
way,
but
if
you un
-
derstand
how
image metadata works, you'll be in a much better position
to troubleshoot any problems you encounter
than
those who just treat
the whole
thing
as incomprehensible magic.
I
hope this chapter provides
a starting point for further metadata explorations.
T
his
page
left
blank
Working Smarter, Not Harder
The goal of doing
all
the work I've discussed so far in this book is to set
up your raw images with the correct Camera Raw settings and the right
metadata so that you can produce deliverable processed images with the
minimum amount of effort. The minimum amount of effort, in this case,
means
taking
full
advantage of Photoshop's rich automation features, so
that you can simply press a
bunon,
walk
away, and let the computer do
your work for you.
One of the great things about a computer is that once you've made it do
something, you can make it do that same something over and over again,
exactly the same
way,
automatically. Tapping the power of automation is
key to building an efficient workflow, so in this chapter
I'll
show you how
to leverage the work you've done in the Fie
Bmwser and Camera Raw to
produce deliverable images in a variety of formats.
The Fie
~roGer serves as command cenaal for all the operations
I'll
discuss in this chapter. They all boil down to a two
-
step process.
b
You select the images that you want to process in the Fie Browser.
b
You
run
one of the options from the Fie Browser's Automate menu to
produce converted images.
196
Real
World
Camera
Raw
with
Adobe
Photoshop
CS
The Automate menu offers a variety of useful routines for creating im
-
ages
in
a deliverable form, but by far the most powerful and flexible is the
Batch command.
Batch
Processing Rules
The Batch command is one of Photoshop's most powerfd features. It's
conceptually very simple. You point it at a batch of images, it runs an ac
-
tion on them, it (optionally) renames the images, and then it does one of
the
following:
b
Saves new liles
b
Delivers open images
in
Photoshop
b
Saves and closes, overwriting the source liles.
As
you'll see shortly, though, the devil is in the details, and some of the
details
in
the Batch dialog box
are
distinctly counterintuitive. Figure
7
-
1
shows the Batch dialog
box
before customizing any of the settings.
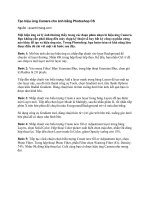
Figure
7
-
1
The
Batch
dialog
box
The dialog boxis split into four different sections,
each
of which controls
a different aspect of the batch
process's
behavior.
Chapter
7:
Exploiting Automation
197
b
Play
lets you choose an action from an action set that
will
be applied
to
all
the images.
b
Source lets you designate the source
-
the images on which the batch
will be executed
-
and also lets you choose some very important
options whose functionality
will
become apparent later.
You
can
run
a batch on a designated folder that you choose in the Batch
dialog box by clicking the Choose button; on opened files; on images
imported through the Photoshop File menu's Import command; or on
the images that are currently selected in the File Browser. For process
-
ing raw images, the source
will
invariably be a folder or the selected
images in the File Browser.
b
Destination lets you control what happens to the processed images.
None delivers them as open images in Photoshop; Save and Close saves
and closes the processed images; Folder lets you designate a folder
in which to save the processed images. It also includes the renaming
features offered by Batch Rename.
When you process raw images, you'll always choose either None or,
much more commonly, Folder. Save and Close often ends up being
a
"
hurt
-
me
"
button, because its normal behavior is to overwrite the
source image. With raw
files this is usually impossible and always
undesirable. Photoshop can't overwrite files in formats it can't write,
includingmost raw image formats; but if you use a camera that records
its raw images
as
.tif, there's a real danger of overwriting your raws if
you choose Save and Close, so avoid it!
b
Errors
lets you choose whether to stop the entire batch when an error is
encountered or log the errors to a file.
I
usually stop on errors when
I'm
debugging an action used in Batch andlogthem to afile when I'm actually
running a batch in a production situation. However, when processing raw
files, the batch typically either works on
all
files or fails on
all
files.
The
diffculties that users typically encounter
in
running Batch are in the
way the selections in the Source and Destination sections interact with the
action appliedbythe batch operation. Here
areTheRules. (Note: these aremy
rules, and
I
swear by them.
They
don't represent the only possible approach,
but by the time you're sufficiently skilled and
knowledgeable to violate them
with
impunity you'll have long outgrown the need for a book like this one!)
198
Real World Camera Raw with Adobe Photoshop
CS
Rules for Opening Files in a Batch Operation
To make sure that the raw files get opened and processed the way yot
want them in a batch operation, you need to record an Open step in thc
action that
will
be applied
in
Batch. In the case of raw images, you'll wan
to make sure that Camera Raw's Settings menu is set to Selected Image
sc
that it applies the custom
-
tailored Camera Raw settings you've made foi
each image, and you'll also want to make sure that Camera Raw's workflour
settings-Space, Bit Depth, Size, and Resolution
-
are set to produce
thc
results you want.
Now comes one of the counterintuitive bits.
Ifyou record an Open stej
in the action, you must check Override Action Open Commands. If yot
don't, the batch will simply keep opening the image you used to recorc
the Open step
in
the action. Override Action Open Commands doesn'
override everything in the recorded Open command; it just overrides
thc
specific choice of file to open, while ensuring that the Selected Image
anc
workflow settings get honored.
Some people find this set of behaviors so frustrating and
counterintui.
tive that they latch onto the fact that you can run Batch using an actior
that doesn't contain an Open step and hence doesn't require messing
around with the checkbox. The problem with doing so is that you
lost
control over Camera Raw's workflow settingsthe batch
will
just use
thc
last
-
used settings. So you may expect a folder
full
of 6,144 by 4,096-pixe
images and get 1,536 by 1,024
-
pixel ones instead, or wind up with 8-bi
sRGB instead of 16
-
bit ProPhoto RGB. If you simply foUowThe Rules, yo1
have complete control over the workflow settings
-
the correct ones ge
used automatically.
Rules for Saving Files in a Batch Operation
To make sure that the processed fdes get saved in the format you want
you need to record a Save step in the action that will be applied in Batch
This Save step dictates the file format
(.tif, .jpg, .psd) and options that gc
with that format
-
TIFF compression options, JPEG quality settings, anc
S
O
on.
Now comes the second counterintuitive bit. You must check
Overridc
Action
"
Save
As
"
Commands, otherwise the fdes don't get saved where
yo^
want them, don't get saved with the names you want, or possibly even don',
get saved at
all!
When you check Override Action
"
Save As
"
Commands
Chapter
7:
Exploiting Automation
199
the file format and file format parameters recorder in the action's Save
step are applied when saving the file, but the name and destination are
overridden by the options you specified in the Batch dialog box.
Rules for Running a Batch Operation
There are two other settings that commonly trip people up. Unless you
check Suppress File Open Options Dialogs, the Camera Raw dialog box
pops up whenever the batch opens a file, and waits for you to do some
-
thing. Checking this option just opens the image directly, like Shii
-
double
-
clicking in the Fie Browser. The Camera Raw settings for each image are
used, but the batch operation isn't
interrupted by the appearance of the
dialog box.
If the workflow settings recorded in the action result in an image in a
color space other than your Photoshop working space, you should also
check Suppress Color Profile Warnings; otherwise the batch may get
interrupted by the Profile Mismatch warning
-
the day always gets off to
a bad start when you find that the batch operation you'd set up to gen
-
erate
2,000
Web
-
ready JPEGs overnight is stalled on the first image with
a warning telling you that the file is
sRGB when your working space is
ProPhoto RGB
Playing
by
the Rules
If you follow the relatively simple set of rules I've provided, your batch
operations won't
fall prey to any of these ills, and they'll execute smoothly
with no surprises. If you fail to do so, it's very likely that your computer
will labor mightily and then deliver either results that are something other
than you desired or, even more frustrating, no results at
all!
So with the rules in mind, let's look first at creating some actions and
then at applying them through the Batch command.
Recording
Batch
Actions
Writing actions for batch
-
processing raw images is relatively simple. You
don't need to worry about making sure that the action can operate on files
that already have layers or alpha channels, or that are in a color space
other than RGB. You're always dealing with a known quantity.
200
Real World Camera Raw with Adobe Photoshop CS
Bear in mind that if your actions call other actions, the other actions
must be loaded in Photoshop's Actions palette, or the calling action
will
fail when it can't find the action being called.
An
easy way to handle this
is to make sure that any actions on which other actions are dependent are
saved in the same set as the actions that depend on them.
I'll start out with simple examples and proceed to more complex ones.
Simple
Action
-
Save
as
JPEG
I'll
start with avery simple action that opens a raw image at its native reso
-
lution and saves it as a maximum
-
quality JPEG in the
sRGB
color space.
Creating an action and action set.
Start out by creating a new action
Set called
"
Raw Processing" in which to save the actions you'll create in
the rest of this section. So the
first step is to create a new action set, which
you do
by
opening the Actions palette and clickingthe folder ("Create new
set") icon and then entering the appropriate name in the ensuing dialog
box and clicking
OK
to dismiss it. The new set then appears in the Actions
palette
-
see Figure
7
-
2.
Figure
7
-
2
Creating
an
action
set
To
createa new action set,
click the
"
Create new set"
icon, enter a name, then
click
OK
The
new set
appears in the
Actions
palette.
Creating a new action.
Beforecreatingthe action, select arawimagein
the Fie Browser that
has
already had customCameraRaw settings applied.
That
way,
once you've createdthe action, you can start recording immedi
-
ately without recording any extraneous steps, such as selecting a file, and
you can correctly record the Camera Raw Selected Image
sening.
Chapter
7:
Exploiting Automation
201
Click the
"
Create new action
"
icon in the Actions palette, enter the
nam+"Save as
PEG
"
-
in
the ensuing dialog box, and then click Record
to dismiss the dialog and start recording the action.
Recording
the Open step.
The first step
is
to openthe image in Camera
Raw, so
that
you
can
include the correct Camera Raw settings in the ac
-
tion. When you use the action in Batch, the Camera Raw dialog box won't
appear, so it's essential to get these settings right when you record this
step. Open the image by double
-
clicking or pressing Command
-
0, and
the Camera Raw dialog box
appeas-see Figure 7-3.
Figure
7-3
Recording
the Open
step
When you record
an
Open
step, it's
critical
to
make
sure that the Wngs
menu
is
set
to
Selected
Image an& the ~rkflow
sem'ngs areset the wayyou
want themfor the batch
operation
You need to record several key settings for this action in the Camera
Raw dialog box
b
Set the Settings menu to Selected Image to ensure that each image gets
opened using its own custom settings.
b
Set the Space menu to sRGB to produce a converted image that's
al
-
ready in sRGB, the standard color space for the Web.
b
Set the Depth menu to
8
bitslchannel, because you're simply saving
JPEGs
(wbichonlysupport8-bit channels), and
this
action won't include
any operations that could
benefit from a higher bit depth.
b
Set the Size menu to the camera's native resolution
(in
this
case,
4064
by 2704).
202
Real World Camera
Raw
with
Adobe Photoshop
CS
Figure 7-4
Recording
the
Save
step
When
you
apply theaction
in
a
batch operation, the
file
name and dz2Sti~tion
will
be
overridden, but the
fomt
options
will
be
applied.
b
Set the Resolution field to
72
pixels per inch to preserve the polite fic
-
tion that Web images are
72
ppi.
Then click OK to open the image. (If the Profile Mismatch warning ap
-
pears, click OK to dismiss it. This doesn't get recorded in the action, and
you'll suppress the
warningwhen you use the action in Batch.) The image
opens, and the Open step appears on the Actions palette.
Recording the Save step. To record the Save step, choose Save
As
from
the File menu, or press Command
-
Shift
-
S. The Save
As
dialog box appears.
The filename and the destination for saving that you enter here
will
have
no impact on the batch
process-I usually enter an obviously silly name
such
as
"foo.jpg" (I'm too lazy to typeUthrowmeaway.jpg") and choose the
Desktop
as
my destination, to simplify cleanup. See Figure
7
-
4.
Make sure that the format is set to JPEG, and incorporate any other set
-
tings in this dialog box that you want to include
in
the action
In
this case,
I'll
leave
all
the options unchecked
-
y RGB file that
I
create without
an embedded profile
can
safely be assumed to be sRGB, and
I
don't care
about icons or
thumbnails-but ifyouwant any of these options included
in
your batch
-
processed files, check them now.
Click Save to proceed to the JPEG Options dialog box, set the Qual
-
ity to Maximum
(12)
and the Format Options to Baseline for maximum
compatibility with JPEG
-
reading software, and then click OK. The Fie
is saved on the Desktop
as
"foo.jpg," and the Save step appears in the
Actions
palette. Since you don'twant the
Batch
to leave dozens or hundreds
of
files
open in Photoshop, close the image so that the Close step appears
in the Actions palette.
3-
1
Chapter). ExpIoitingAu"Mbn
203
Stop
and
Save.
Clickthe Stop buttonin the Actions palette to stop record
-
ing. Photoshop doesn't
allow
you to save individual actions, only action
sets; so
if
you want to save an action as soon as you've written it, you need
to select the action set that contains it in the Actions palette and then
choose Save Actions from the Actions palette menu
-
see Figure
7
-
5.
Note that until you save actions explicitly using the Save Actions com
-
mand,
they
exist only in Photoshop's Preferences, and Photoshop's Prefer
-
ences only get updated when you quit the application"normally" by using
the Quit command.
If
Photoshop crashes, or you suffer a power outage,
any unsaved actions
will
be lost.
A
simple action like this one probably
wouldn't have me running to the Save Actions command, but
if
you make
any actions that are even slightly complex, it's a good idea to save them
before doing anything else.
Ifyouexpand the steps in the Actions palette
by
clickingthe triangles be
-
side them, you
can
see
exactly what has been recorded for each step. When
you use
this
action in Batch
with
the appropriate overrides selected (see
"Batch Processing Rules,
"
earlier in
this
chapter) the file names and folder
locations
will
be overridden
by
the settings in the Batch dialog box, and all
the other settings you've recorded here
will
be honored
-
see Figure
7
-
6.
Figure
7
-
6
Save
as
PEG
action
204
Real World Camera Raw with Adobe Photoshop CS
Variants.
You can create variants of this action by recording different
Open or Save steps. For example, you can create smaller JPEGs by changing
the Size setting in the Camera Raw dialog box to one of the smaller sizes,
and you can embed thumbnails or create lower
-
quality JPEGs by making
those settings in the Save As and JPEG Options dialog boxes, respectively.
To save in a different format, with different options, just choose the desired
format and options when you record the Save step.
Complex
Action
-
Save
for
Edit
The following example is a more complex action that produces 16
-
bit/
channelT1FFs with sharpening applied and adjustment layers set up ready
for final editing in Photoshop. It's designed for use on
"
hero
"
images that
merit individual manual edits in Photoshop. It doesn't actually
do
any of
the editing, because the required edits
will
almost certainly be different for
each image
in
a batch. Instead, it simply does a lot of the repetitive grunt
work involved in setting up an image for editing, so that
when you open
the image, all the necessary adjustment layers are already there, waiting
for you to tweak them.
Creating a new action.
Record this action in the same set as the previ
-
ous one, since it's also designed for rawprocessing.
As
before, select a raw
image
that
has
had custom Camera Raw settings applied before you start
recording the new action. Then click the
"
Create new action
"
icon in the
Actions palette, enter the name
"
Save for Edit
"
in the New Action dialog
box, and then click Record to start recording.
Recording the Open step.
As
before, startby launching CameraRawby
double
-
clicking the selected image.
In
the Camera Raw dialog box, again
make sure that Settings is set to Selected Image. This time, though, you'll
make some different workflow settings.
b
In the Space menu, choose ProPhoto RGB, my preferred working
space.
b
Set the Depth menu to 16lbit channel, because you'll want to make
the edits in Photoshop in 16
-
bitlchannel mode.
F
Set the Sue menu to the camera's native resolution.
Chapter
7:
Exploiting Automation
205
b
Enter
2.40
pixels per inch
in
the Resolution field, because you'll almost
certainly check your edits by printing to an inkjet printer at
240
ppi.
Then
click
OK to open the image. The image opens, and the Open step
appears on the Actions palette.
Adding
the
edits.
This
action will add four different editinglayers (actu
-
ally, three layers and one layer set) to the image before saving and closing.
First, add
sharpeninglayers using your sharpening tool of choice (mine is
PhotoKit SHARPENER
from Pixel Genius
LLO.
Then add a
Levels
adjust
-
ment layer, a Curves adjustment layer, and a HueISaturation adjustment
layer, as follows.
b
I
apply sharpening
by
choosing PhotoKit Capture Sharpener Expert
from Wotoshop's Fie>Automate menu, selecting Digital Mid
-
Res
Sharpen, Medium Edge Sharpen, and clicking OK. You can substitute
your
own
sharpeningroutine here, or youcan elect to defer sharpening
until
you've edited the image in Photoshop.
b
Add a Levels adjustment layer
by
opening the Layers palette's Adjust
-
ment Layers menu, choosing Levels, and then clicking OK to create a
Levels adjustment layer that does not as yet apply any adjustments.
You'll make the adjustments on an image
-
by
-
image basis in Photo-
shop-the action just does the grunt work of creating the layers.
b
You need to take care of one small problem here. PhotoKit Sharpen
-
er produces an open (expanded) layer set, and the Levels layer gets
created inside the set. There's no way to record closing or expanding
a layer
set,
so you need to record a step that moves the Levels layer
out of the set and up to the top of the stack. Using the shortcut for
Laye~,Anange>Bring to Front only moves the layer to the top of the
stack inside the layer set. You have to record dragging it out of the set
and putting it on top of the stack.
The step actually gets recorded as "Move current layer to layer
5.
"
Nor
-
mally
I
try
to avoid recording actions that move a layer to a specific
number in the stack because
I
usually don't know how many layers
willbe present in afile, and recording a specific layer number canlead
to one of two problems. If there aren't enough layers
in
the stack to
move the layer to the
specified number, the action fails with an error
206
Real World Camera
Raw
with
Adobe Photoshop CS
that states "The Move Command is currently not available.
"
If there
are
more layers than anticipated, the layer ends up somewhere other
than where I want it.
Fortunately, in this case you
do
know exactly how many layers
will
be
there, because this action always starts out
with
a flat file and always
adds the same number of layers. So
recording the explicit layer posi
-
tion works for this action. If you start building complex actions, you'll
run
into issues lie these fairly often
-
you just have to be methodical
and keep debugging until you find a workable solution.
Add two more adjustment
IayersaCurveslayer, then aHuelSaturation
layer
-
in both cases simply clicking OKwhen the respective adjustment
dialogboxes, Curvesand HuelSaturation, appear. These layers
are
auto
-
matically created in the correct positions in the stack, so you don't need
to employ any more layer
-
moving trickery-see
Fi
7
-
7.
Figure
7
-
7
Adding
adjustment layers
When you open the
resultingimages in Photoshop, you can start editing
immediately
by
double-clicking the adjustment icon in each adjustment
layer without having to do the work of creatingthem first.
If
you don't need
all
the adjustment layers, youcan easilythmwthe unused ones away.
All
the
edits
will
be
performed in 16
-
bitlchannel mode for the best quality.
Recording
the
Save step. RecordtheSave by choosing Save
As
fromthe
Fie menu. Again, name the file
"foo" and save it on the Desktop for easy
disposal. This time, choose TIFF
as
the format, make sure that the Lay
-
ers and Embed Color Profile checkboxes
are
checked (creating untagged
ProPhoto
RGB
files is aVery Bad Idea), and check Icon and Macintosh
Thumbnail in the Image
Previews
section. Then click Save to advance to
the
Tiff
Options dialog
A:.i,
box.
-
.<-
In
the
TIFF
Options
dialog
box,
choose
ZIP
for both Image Compres
-
sion and
Layer
Compression, and then clickOK
to
complete the
save
-
see
Figure
7-8.
Finally,
dose the image
(so
that the batch operation
will
do
so
too), and
dickthe Stop button
in
theActions palette to stop
recording.
Figure
7
-
9
shows
the
resulting
action
in
the Actions palette with
all
the steps expanded.
Figure
7
-
9
:for
Edit
action
As
with the earlier, simpler action, when you use this action
in
a batch
process
with
the necessary overrides applied
in
the Batch dialog box, the
file names and locations
will
be overridden
by
the Batch settings, while
everything else
in
the Open and Save steps
will
be honored.
208
Real World Camera Raw with Adobe Photoshop CS
Running
Batch
-
Using the actions I've just shown you in Batch is really very simple
-
as
long as you remember The Rules!
(If
you need to take another look, refer
back to
"
Batch Processing Rules,
"
earlier in this chapter.) Play by the rules,
and
all
will go smoothly.Violate them at your peril.
Besides the settings in the Batch dialog box, there are three common
situations that can cause a batch operation to fail.
b
There isn't enoughspace on the destinationvolume to holdthepmcessed
files.
r
No source files were selected
-
-
see
"
Selecting and Editing
"
in Chapter
5,
It'sAllAbout theWorkflowifyou need areminder on howto select images
in the Fie Browser.
r
File with the same names as the ones you're creating already exist in
the destination folder.
If
these points seem blindingly obvious,
I
apologize.
I
mention them
because they've tripped me up more than once. With those caveats in
mind, let's look at setting up the Batch dialog box to
run
the Save for Edit
action you built in the previous section. The key settings in Batch are the
overrides in both the Source and Destination sections of the panel.
Source Settings
Whenever you run a batch operation using
an
action that includes
an
Open step, you must check Override Action
"
Open
"
Commands in the
Source section. To process raw images, you also need to check Suppress
File Open Options Dialogs
-
otherwise the Camera Raw dialog
will
pop up
for every image
-
-
and whenever you run a batch operation unattended,
it's a good idea to
checksuppress Color Profile Warnings so that the batch
doesn't get stuck on a Profile Mismatch warning.
Destination Settings
Similarly, whenever you run a batch operation using an aaion that includes
a Save
As
step, you must check Override Action
"
Save
As
"
Commands in
the Destination section; otherwise the files won't get saved. The Destina
-
tion section also offers the option to rename the files as part of the batch
Chapter
7:
Exploiting Automation
209
Figure
7
-
10
Batch
operation.
I
usually use the raw file name
as
a base and add a job or shoot
designation,
"-cvt"
to indicate that it's a converted file, and the extension
for the
file type, but the renaming feature allows many different file nam
-
ing schemes. See
"
Sorting
and Renaming"
in
Chapter
5,
It's
All
About
the
Workflow,
for the major caveats on file
-
naming conventions. Figure
7
-
10
shows the Batch dialog box set up to
run
the Save for Edit action you cre
-
ated earlier in
this
chapter.
Batch is the most flexible command on the File Browser's Automate
menu, but the menu also includes some automation features that are
useful for very specific purposes.
PDF Presentation
The PDF Presentation command lets you build very simple slide shows
with
the Presentation option, or multi
-
page PDFs
with
the Multi
-
Page Docu
-
ment option. Both options buildamulti-pagePDF
with
one image per page,
but the Presentation option does a little
extra
work, setting up a transition
between pages and making sure that the PDF opens
in
full
screen mode.
I
almost
always
use the Presentation option
-
-
see Figure
7
-
1
1.
21
0
Real World Camera
Raw
with
Adobe Photoshop
CS
Figure
7
-
11
Presentation
PDF Presentation is fairly limited. It doesn't let you add captions, or
cornnight notices, or anything else to the image, and it only lets you set a
single transition that's used between all the images. It does, however, do
the grunt work of getting all the images into a PDE If you
own
Acrobat
6.0
Professional, you can add text there and finesse the Oansitions on an im
-
age
-
by
-
image basis. The PDF Presentation dialog box also gives you one
last opportunity to change the image order by dragging the items in the
list, but
this
is a task that's better done in the File Browser, where you
can
at least see the thumbnails.
Once you've made your choices
in
the PDF Presentation dialog boxand
you've clicked
Save,
you're prompted for a file name and destination for
the PDF; then the PDF Options dialog box appears. Some of the options
in PDF Options are
irrelevantwhen you'reprocessingraw files
-
they can't
contain any transparency
orvector
data-but you
should be aware of what
the other options actually do (see
Fi
7
-
12).
b
Encoding.This option offersthechoice betweenlossless
ZIP
compres
-
sion or lossy JPEG compression, along with a
Quality
setting for the lat
-
ter.
If
the presentation is purely for on
-
screen use, I recommend JPEG
with
a
Quality
setting of no less
than
8.
Ifthere's alikelihood that you'll
need to print the images
bmthe PDF, use ZIP compression instead.
b
Image
interpolation.
This
option
lets
-
compliant applications
use
Postscript
-
based interpolation
to
upsize the images
in
the PDE There are
.w
Chapter
7:
Exploiting Automation
21
1
always
better and more reliable
ways
to
get a larger image
than
upsam-
pling
them
hm a PDF presentation,
so
I
don't recommend
this
option.
b
Downgrade Color Prome. Photoshop
CS
uses
ICC
version
4
profiles
when they're available, which some older PDF readers can't under
-
stand. It's helevant for raw file processing because all four working
space profiles in Camera Raw's workflow settings
are
understandable
by
apps that only understand the
ICC
version
2
spec.
b
PDP
Security.
This
option is very useful
-
it lets you set password-
protected security at various different levels. You can allow the docu
-
ment to be ikely viewed but prevent editing or printing, or you
can
allow limited editing such
as
commenting but prevent any of the data
from being extracted
-
see Figure
7
-
13.
Note, however, that
if
you set any level of security, you need the pass
-
word to open the document in Photoshop.
Once
it's open in Photoshop,
it's completely
editablethe restrictions apply only when the document
is
opened in Acrobat or Acrobat Reader. Macintosh users can open the
PDF in the Mac's
Preview
application with no restrictions, so the security
is
far from bulletproof!
21
2
Real
World
Camera
Raw
with
Adobe
Photoshop
CS
Contact
Sheet
I1
As
its name suggests, Contact SheetU buildsvirtual contact sheets-pages
full
of image thumbnails. The contact sheets
are
built
as
unsaved Photo-
shop documents, with a choice to create either a flat file or a layered one
with
each image (and
each
image's caption,
if
included) on a separate
layer.
Figure
7
-
14
shows the
Contact
Sheet
U
dialog box
Figure
7
-
14
Contact
Sheet
I1
-
-~
The Source Images section of the dialog boxlets you choose the images
for the contact sheet
-
in this workflow, you'd use Selected Images from
Fie Browser. The Document section lets you set the
size,
resolution, and
color mode for the contact sheet. (The color is converted to the current
working space for the selected color mode.) The Flatten
All
Layers check-
Chapter
7:
Exploiting Automation
21
3
box, when checked, creates a flat file, andwhen unchecked, creates a lay-
eredfilewitheach thumbnail and eachcaption on aseparate layer
-
handy
if you want to fine
-
tune the layout in Photoshop.
The Thumbnails section lets you control the size of the thumbnails by
specifying how many rows and columns the contact sheet
will
contain.
The page
mockup underneath the main buttons shows thelayout, and the
readout underneath it shows the
maximum dimensions of each thumb
-
nail. The Rotate For Best Fit checkbox rotates verticals to horizontal to
make bigger thumbnails in the available space. Finally, the Use Filename
As
Caption checkbox does exactly what it says
-
it adds the file name
as
a caption for each thumbnail in your chosen font and size. Figure
7
-
15
shows a contact sheet generated by Contact Sheet
11.
Figure
7
-
15
Contact
sheet
Once the contact sheets are open in Photoshop, you can save or print
them just
as
you would any other Photoshop document.
Picture Package
-
Picture Package is quite simii to Contact Sheet
11,
except it puts multiple
copies of a single image on each page. The Source Images section works
identically to that of Contact Sheet
11.
The Document section also works
21
4
Real
World Camera
Raw
with Adobe Photwhop
CS
lie Contact Sheet
11,
with
the addition of a Layout menu that lets you
choose various diierent layouts. The Label section offers a little more
control over captioning
than
Contact Sheet
11,
includingthe abilityto enter
custom text (but not, unfortunately, different custom text for each image).
Figure
7
-
16
shows the Picture Package dialog box.
&,
If none of the
reset
layo*
is
quitewfiat you need, you can customize
the layout
by
clicking the Edit Layout button to open the
Picture
Package
Edit Layout dialog box
-
-
see
Figure
7
-
17.
You can edit the layout either
by
clicking on the thumbnails and
drag
-
ging the sizing handles to change
size,
or
by
dragging the entire thumb
-
nail to
move,
or
by
entering numben
in
the
appropriate fields. The Add
-
Chapter
I:
Exploiting Automation
21
5
Zone and Delete Zone buttons let you add and delete thumbnails to the
layout. One
slightly
odd feature
is
that ifyou Option
-
click on a thumbnail,
a menu pops up when you release the mouse button, with commands to
duplicate or delete the current thumbnail or add a zone using any of the
preset sizes.
Like Contact Sheet
U,
Picture
Package creates unsaved documents that
are opened in Photoshop, ready for you to save or print.
Web
Photo
Gallery
.
Web Photo Gallery is a surprisingly deep feature. It creates a home page
with
thumbnail images and agallery page for each image, or
a frame-based
page that combines scrolling thumbndswith asingle larger gallery image.
Some of the styles offer a feedback option where visitors to the page
can
check Approved or Other, or email feedback. Figure
7
-
18
shows the Web
Photo Gallery dialog box
Figure
7
-
18
Web
Photo
Gallery
dialog
The Site section lets you choose a style for the gallery from the Style
menu (the appearance of each style
is
reflected in the thumbnail that
appears below the main control buttons) and enter
an
email address for
receiving feedback.
The
Source
Images section lets you choose a folder or Selected Images
from File Browser as source. It's also, somewhat
confusingly, where you
specify the destination folder.
21
6
Real World Camera Raw with Adobe Photoshop
CS
AU
the styles produce the following.
b
AThumbnailFrame Ne. Both of the precedingwill have a .htm or .html
extension, depending on which one you've chosen.
b
An
Images folder that contains the large images and the graphic page
elements.
b
A Pages folder that contains a .htm or .html file for each image.
b
AThumbnails folder that contains the thumbnail JPEGs.
b
A UserSelections.txt file.
The files and folders produced
byweb Photo Galleryalwayshave these
names, so the only way to differentiate between different galleries is by the
enclosing folder name. So it's always a good idea to create a new, empty
folder and use it as the destination.
The remainder of the dialog box is devoted to the Options panels, of
which there are six.
b
The
General
optionslet you choose between a .htm or .html extension,
use
UTF
8
encoding (a Unicode encoding that offers backward com
-
patibility
with
ASCII
-
based systems) for the URL, include width and
height attributes for the images to speed downloading, and choose the
option to preserve or strip
all
the metadata. (If you only want to strip
some metadata, you'll need to edit it using the techniques discussed in
Chapter
6,
UnderstandingMetadata, before running the automation.)
b
The Banner options let you enter a site name, Photographer, contact
info, and date. These entries appear in the banner on each page.
b
The
Large
Images
options let you set the pixel size of the images and
the amount of JPEG compression, apply a border, and use selected
metadata for titles
-
the available options
vary
from style to style.
b
The Thumbnails options let you choose the thumbnail size and, in
some styles, layout, apply a border, and use selected metadatafor titles.
As with the Large Image options, the available options vary from style
to style.