The Adobe Illustrator CS Wow- P3 pptx
Bạn đang xem bản rút gọn của tài liệu. Xem và tải ngay bản đầy đủ của tài liệu tại đây (3.57 MB, 30 trang )
More about controlling the size of your files
The major factors that can increase your file size are the
inclusion of image objects, path pattern, brushes and ink
pen objects, complex patterns, a large number of blends
and gradients (especially gradient mesh objects and gra-
dient-to-gradient blends), linked bitmapped images, and
transparency. Although linked bitmaps can be large, the
same image embedded as an image object is significantly
larger. If your Illustrator file contains linked images, and
you need to save the entire file in EPS (for placement
and printing in other programs), you have the option
Include Linked Files. Most service bureaus highly rec-
ommend this option, as it will embed placed images in
your Illustrator file and make printing from page layout
programs and film recorders much more predictable (be
sure to see the Tip "Proofing your prints" at left). How-
ever, since including placed images will further increase
the file size, wait until you've completed an image and
are ready to place it into another program before you
save a copy with placed images embedded. Whether or
not you choose to embed linked images, you must collect
all of the files that have been linked into your Illustrator
documents and transport them along with your Illustra-
tor file. Illustrator makes your task easier if you choose
File > Document Info > Linked Images, which outputs a
text file of all images in your document. Press Save to cre-
ate a text file that you can keep for future reference or give
to your service bureau as a record of the images included
in your files.
•
ACTIONS
Actions are a set of commands or a series of events that
you can record and save as a set in the Actions palette.
Once a set is recorded, you can play back an action in the
same order in which you recorded it, to automate a job
you do repeatedly (such as a production task or special
effect).
Select the action in the Actions palette and activate
it by clicking the Play icon at the bottom of the palette,
In a jam? There's help available
Adobe pro-
vides many
ways to help
you learn Il-
lustrator and
troubleshoot
problems. Find
help under the Help menu, along
with instant access to Adobe On-
line. You can also access Adobe
Online by clicking the flower icon
on top of the Toolbox.
Is Raster the answer?
Most printing problems in Illustra-
tor CS involve transparency and
flattening. The optimal setting for
the Raster/Vector slider in your
flattening settings is all the way to
Vector, but if you're having trou-
ble printing, you can try setting
it all the way to Raster which may
help in some cases. The flatten-
ing settings can be accessed via
the Print dialog box and the new
Flattener Preview palette, among
other places. See the Transparency
& Appearances chapter for details
about the many ways to control
flattening settings in Illustrator.
The proof is in the Preview
Want the best on-screen preview
for your art? Choose View >Over-
print Preview for the best way to
proof color on your screen and to
see how your art will look when
printed.
Chapter 1 Illustrator Basics 35
Illustrator's new Flattener Preview palette
Resolution templates
If you're saving a batch of docu-
ments, and want them all to have
the same resolution settings, Il-
lustrator's new Templates feature
makes it easy. Just set up a new
document with the settings you
want, and then save it as a tem-
plate (.ait) file (File >Save as Tem-
plate). Then you can base as many
new documents on your template
as you like, and they'll have your
preferred resolution settings.
Selecting objects in an action
When recording an action, use the
Attributes palette (Show Note) to
name an object, and Select Object
(Action pop-up) to type in the
object's name (note) to select it.
by choosing Play from the pop-up menu, or by assigning
the action to a keyboard "F key" (function key) so you
can play the action with a keystroke. You can select an
action set, a single action, or a command within an action
to play. To exclude a command from playing within an
action, disable the checkbox to the left of the command.
In order to play some types of actions, you may have
to first select an object or text. Load action sets using the
pop-up menu. (You can find sets of actions on the Adobe
Illustrator CS CD in the Illustrator Extras folder, and in
the "WOW Actions" folder on the Wow! CD.)
Since you must record actions and save within an
action set, begin a new action by clicking the Create
New Set icon or by choosing New Set from the pop-up
menu. Name the action set and click OK. With the new
set selected, click the Create New Action icon, name the
action, and click Record. Illustrator records your com-
mands and steps until you click Stop. To resume record-
ing, click on the last step, choose Begin, and continue
adding to the action. When you've finished recording,
you'll need to save the action file by selecting the action
set and choosing Save Actions from the pop-up menu.
When you are recording, keep in mind that not all
commands or tools are recordable. For example, the Pen
tool itself is not recordable, but you can add the paths
the Pen tool creates to an action by selecting a path and
choosing Insert Selected Paths from the pop-up menu.
Recording actions takes some practice, so don't get dis-
couraged, always save a backup file, and refer to the User
Guide for more details on Actions.
SCRIPTING AND VARIABLES
Illustrator CS offers expanded scripting support to let
you automate more tasks than before. Illustrator sup-
ports AppleScript (for Mac), Visual Basic scripting (for
Windows), and JavaScript (for both platforms). If you're
familiar with any of these scripting languages, you can
use them to your advantage to save time in Illustrator.
For more information on scripting in Illustrator, see the
36
Chapter 1 Illustrator Basics
"Adobe Illustrator CS Scripting Guide," found on the
Adobe Illustrator CS CD.
Illustrator also supports XML variables. You can
specify variables using the Variables palette, found in
the Window menu. With variables, you can hook up an
Illustrator file to a database, using any of the scripting
languages mentioned above, to automatically gener-
ate versions of artwork. For example, you can create a
business card and then link that card to a database that
contains a list of names. A script could then generate a
separate card for each name in the database. For more
information on this, see the User Guide on Data-Driven
Graphics, and the "Illustrator CS XML Grammar Guide"
on the Adobe Illustrator CS CD.
Variables palette and mockups
Illustrator's Variables palette can help create useful design
mockups within Illustrator. It's helpful not only for trying
out different sets of data for a design, such as localizing
content, but also for showing the same set of data within
multiple designs. It's handy for being able to test out dif-
ferent kinds of data simultaneously in various comps. It
can also be used as a communication tool between the
front end (designers) and the back end (engineers): one
can specify the things that will change in the design and
share that variable set (XML file) with the other to either
make sure that the variable names and types are in synch,
the data is in synch, or both. One of the biggest concerns
for many Web designers is preserving their designs, and
having this intermediate step can help them do so.
!
•
DATA-DRIVEN GRAPHICS
To see an example of data-driven graphics in action, take
a look at the Travel Ads.ai sample file included in the
Illustrator CS Sample Art folder.
Saving time and space
Note: Before you attempt to
minimize the size of your file, make
certain that you're working on a
copy. To minimize the size of your
file, first remove all your unused
colors, patterns, and brushes. You
can do this easily using a handy
set of Actions, included by de-
fault, in the Illustrator CS Actions
palette. Open the palette (Win-
dow > Actions) and choose Delete
Unused Palette Items, which will
automatically select and delete
all unused graphic styles, brushes,
swatches, and symbols. (Click the
triangle next to Delete Unused
Palette Items to choose specific
Actions.) You should minimize the
time it takes to print an Illustrator
file, even if it's been placed into
another program, such as QuarkX-
Press or PageMaker (see the Other
Programs chapter for details on
exporting). If you've scaled or
rotated an Illustrator image once
it's been placed into another pro-
gram, note the numeric percent-
ages of scaling and the degrees of
rotation. Next, reopen the file in
Illustrator, perform the identical
scale or rotation, then place this
pre-transformed version back into
the other program. Make sure you
reset scaling and rotation to zero.
Note: Be certain to scale line
weight, objects, and pattern tiles
when you perform these transfor-
mations in Illustrator.
Chapter 1 Illustrator Basics
37
40 Introduction
42 Building Houses: Sequential Object Construction Exercises
48 A Classic Icon: Five Ways to Re-create Simple Shapes
50 Zen Scaling
52 Zen Rotation
53 Creating a Simple Object Using the Basic Tools
54 A Finger Dance: Turbo-charge with Illustrator's Power-keys
The Zen of Illustrator
Zen: "Seeking enlightenment
through introspection and intuition
rather than scripture." *
You're comfortable with the basic operations of your
computer. You've read through "An Overview of Adobe
Illustrator" in the User Guide. You've logged enough
hours to Illustrator to be familiar with how each tool
(theoretically) functions. You even understand how to
make Bezier curves. Now what? How do you take all this
knowledge and turn it into a mastery of the medium?
As with learning any new artistic medium (such as
engraving, watercolor, or airbrush), learning to manipu-
late the tools is just the beginning. Thinking and seeing
in that medium is what really makes those tools part of
your creative arsenal. Before you can determine the best
way to construct an image, you have to be able to envision
at least some of the possibilities. The first key to master-
ing Illustrator is to understand that Illustrator's greatest
strength comes not from its many tools and functions but
from its extreme flexibility in terms of how you construct
images. The first part of this chapter, therefore, introduces
you to a variety of approaches and techniques for creating
and transforming objects.
Once you've got yourself "thinking in Illustrator," you
can begin to visualize how to achieve the final results.
What is the simplest and most elegant way to construct
an image? Which tools will you use? Then, once you've
begun, allow yourself the flexibility to change course and
try something else. Be willing to say to yourself: How else
can I get the results that I want?
Chapter 2 The Zen of Illustrator
* Adapted from Webster's New World Dictionary of the English Language
40
The second key to mastering Illustrator (or any new
medium) is perfecting your hand/eye coordination. In
Illustrator, this translates into being proficient enough
with the "power-keys" to gain instant access to tools and
functions by using the keyboard. With both eyes on the
monitor, one hand on the mouse, and the other hand on
the keyboard, an experienced Illustrator user can create
and manipulate objects in a fraction of the time required
otherwise. The second part of this chapter helps you to
learn the "finger dance" necessary to become a truly
adept power-user.
The ability to harness the full power of Illustrator's
basic tools and functions will ultimately make you a
true master of Adobe Illustrator. Treat this chapter like
meditation. Take it in small doses if necessary. Be mind-
ful that the purpose of these exercises is to open up your
mind to possibilities, not to force memorization. When
you can conceptualize a number of different ways to
create an image, then the hundreds of hints, tips, tricks,
and techniques found elsewhere in this book can serve as
a jumping-off point for further exploration. If you take
the time to explore and absorb this chapter, you should
begin to experience what I call the "Zen of Illustrator."
This magical program, at first cryptic and counterintui-
tive, can help you achieve creative results not possible in
any other medium.
Chapter 2 The Zen of Illustrator 4141
Building Houses
Sequential Object Construction Exercises
Overview: Explore different
approaches to constructing the
same object with Illustrator's basic
construction tools.
This sequence of exercises explores different ways to
construct the same simple object, a house. The purpose
of these exercises is to introduce you to the flexibility of
Illustrator's object construction, so don't worry if some
exercises seem less efficient than others. In Preferences >
Units & Display Performance, set Units > General for
Inches (so you can use the numbers provided and the
measurements above). And read through the recommen-
dations below for preparing your working environment.
1 Work in Outline mode. Doing so keeps you from being
distracted by fills or line weights, and lets you see the cen-
ters of geometric objects (marked by "x").
2 Use Show Rulers and Show Info. Choose Show Rulers
(View menu) so you can "pull out" guides. Use the Info
palette to view numeric data as you work, or ignore the
numeric data and just draw the houses by eye.
3 Read through the Wow! Glossary. Please make sure to
read How to use this book and the Glossary pull-out card.
4 Use "modifier" keys. These exercises use Shift and
Option (Opt) or Alt keys, which you must hold down
until after you release your mouse button. If you make a
mistake, choose Undo and try again. Some functions are
also accessible from the Context-sensitive menu. Try key-
board shortcuts for frequently-used menu commands.
Dragging out a guide from the Ruler, and
choosing Window>lnfo to open the Info palette
if it's not open before you begin
Hold down the Shift key to constrain movement
to horizontal/vertical direction. For more modi-
fier key help, see the end of this chapter for the
"Finger Dance" lesson.
42
Chapter 2 The Zen of Illustrator
Exercise #1:
Use Add Anchor
Point tool
1 Create a rectangle and a vertical guide. Create a wide
rectangle (1.5" x 1") and drag out a vertical guide that
snaps to the center.
2 Add an anchor point on the top. Use the Add Anchor
Point tool to add a point on the top segment over the cen-
ter guide.
3 Drag the new point up. Use the Direct Selection tool to
grab the new point and drag it up into position (.75" for a
total height of 1.75").
Exercise #2:
Make an extra point
1 Create a rectangle, delete the top path and place a
center point. Create a wide rectangle (1.5" x 1"). With
the Direct Selection tool, select the top path segment and
delete it. With the Pen tool, place a point on top of the
rectangle center point.
2 Move the point up. Double-click on the Selection tool
in the Toolbox to open the Move dialog box and enter a
1.25" vertical distance to move the point up.
3 Select and join the point to each side. Use the Direct
Selection tool to select the left two points and Join
(Object > Path > Join) them to the top point. Repeat with
the right two points.
Chapter 2 The Zen of Illustrator
43
Exercise #3:
Rotate and Add
1 Create two rectangles, one centered on the other.
Create a wide rectangle (1.5" x 1") and drag out a vertical
guide, snapping it to the center. Hold down Opt/Alt and
click with the Rectangle tool (Opt/Alt-click) on the center
guide (on the top segment). Enter 1.05" x 1.05".
2 Rotate one rectangle. Double-click the Rotate tool to
rotate the new rectangle around its center and enter 45°.
3 Select and Add the rectangles. Marquee-select both
objects, choose Widow > Pathfinder and click the Add
icon. Switch to Preview mode to see the single shape!
Exercise #4:
Make a six-sided
polygon
1 Create a six-sided polygon. With the Polygon tool
selected, click once and enter 6 sides and a .866" Radius.
Then double-click the Rotate tool and enter 30°.
2 Delete the bottom point. With the Delete Anchor Point
tool, click on the bottom point to delete it.
3 Move the two bottom points down, then the two
middle points. Use the Direct Selection tool to select
the bottom two points. Then grab one of the points and
Shift-drag in a vertical line (down .423"). Lastly, Direct-
select, grab and Shift-drag the middle two points down
vertically into position (down .275").
44 Chapter 2 The Zen of Illustrator
Exercise #5:
Use Add Anchor
Points filter in a
three-sided
polygon
1 Create a three-sided polygon. With the Polygon
tool selected, click once, then enter 3 sides and a 1.299"
Radius.
2 Use the Add Anchor Points filter. With the polygon
still selected, choose Object > Path > Add Anchor Points
(use the default keyboard shortcut, or create your own).
3 Average the two left points, then Average the
two right points. Direct-select the two left points and
Average them along the vertical axis (Context-sensitive:
Average, or Object > Path > Average), then repeat for the
two right points.
4 Delete the bottom point. With the Delete Anchor Point
tool, click on the bottom point to delete it.
5 Move the top point down. Use the Direct Selection tool
to select the top point, then double-click on the Direct
Selection tool itself (in the Toolbox) to open the Move
dialog box and enter a 186" vertical distance.
6 Slide in the sides towards the center. Use the Direct
Selection tool to click on the right side of the house and
drag it towards the center until the roofline looks smooth
(hold down your Shift key to constrain the drag horizon-
tally). Repeat for the left side of the house. Alternatively,
select the right side and use the key on your keyboard
to nudge the right side towards the center until the roof-
line looks smooth. Then, click on the left side to select
it, and use the key to nudge it towards the center. (If
necessary, change your Keyboard Increment setting in
the Preferences > General dialog.)
Chapter 2 The Zen of Illustrator 45
Exercise #6:
Cut a path and
Paste in Front
1 Cut, paste, then move the bottom of a triangle. With
the Polygon tool selected, click once and enter 3 sides
and a .866" Radius. With the Direct Selection tool, select
and Cut the bottom path to the Clipboard, choose Edit >
Paste in Front, then grab the bottom path and drag it into
position (down .423").
2 Create the sides and move middle points into place.
Direct-select the two right points and join them, then
repeat for the two left points. Finally, select the two mid-
dle points, and grab one to drag both up (.275").
Exercise #7:
Join two objects
1 Make two objects. Click once with the Polygon tool,
enter 3 sides and a .866" Radius. Zoom in on the lower left
corner and, with the Rectangle tool, click exactly on the
lower left anchor point. Set the rectangle to 1.5" x 1".
2 Delete the middle lines and join the corners. Direct-
select marquee the middle bisecting lines and delete.
Select the upper-left corner points and Average-Join by
either Averaging and then Joining the points (see exer-
cises #5 and #6 above) or by pressing -Shift-Option-J/
Ctrl-Shift-Alt-J to average and join simultaneously. Select
and Average-Join the upper right points.
3 Drag the top point down. Grab the top point, hold the
Shift key and drag it into position (down .55").
46 Chapter 2 The Zen of Illustrator
Exercise #8:
Use Add Anchor
Points filter, then
Average-Join
1 Make a tall rectangle, delete top path, add anchor
points, remove bottom point. Create a tall rectangle
(1.5" x 1.75") and delete the top path. Choose Add Anchor
Points (Object >Path) and use the Delete Anchor Point
tool to remove the bottom point.
2 Select and Average-Join the top points and move
middles into position. Direct-select the top two points
and Average-Join (see Exercise #7, step 2). Then Direct-
select the middle points, grab one, and with the Shift key,
drag them both into position (up .125").
Exercise #9:
Reflect a Pen profile
1 Create a house profile. Drag out a vertical guide, then
reset the ruler origin on the guide. To draw the profile,
use the Pen tool to click on the guide at the ruler zero
point, hold down Shift (to constrain your lines to 45°
angles) and click to place the corner (.75" down and .75"
to the left) and the bottom (1" down).
2 Reflect a copy of the profile. Select all three points of
the house profile With the Reflect tool, Option/Alt-click-
on the guide line. Enter an angle of 90° and click Copy.
3 Join the two profiles. Direct-select and Join the bot-
tom two points. Then Direct-select the top two points and
Average-Join (see Exercise #7, step 2).
Chapter 2 The Zen of Illustrator 47
47
A Classic Icon
Five Ways to Re-create Simple Shapes
Overview: Finding different ways to
construct the same iconic image.
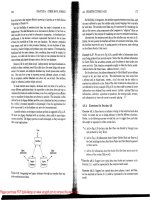
The Outline view of the original logo
The original logo, constructed from a stroked
line and a solid circle
You can construct even the simplest of iconic images in
many ways. Patricia McShane and Erik Adigard of the
M.A.D. graphics firm designed this classic logo for the
Computers Freedom & Privacy annual conference. This
conference addresses the effects of computer and telecom-
munications technologies on societal and personal free-
dom and privacy. This simple iconic representation
of an eye is a perfect example of how you can explore
different ways to solve the same graphics problem.
1 First, construct your logo in the way that seems
most logical to you. Everybody's mind works differ-
ently, and the most obvious solutions to you might seem
innovative to the next person. Follow your instincts as to
how to construct each image. If design changes require
you to rethink your approach (for instance, what if the
client wanted a radial fill instead of the black fill?), try
something slightly, or even completely, different.
Viewed in Outline mode, the original Computers
Freedom & Privacy logo is clean and elegant with a
minimum number of anchor points and lines. The
M.A.D. team constructed the eye from a stroked line
(made with the Pen tool) and a filled, black circle.
Chapter 2 The Zen of Illustrator
48
2 Make the outer eye shape. Create the solid black,
almond-shaped object in any way you wish: Draw it with
the Pen tool like M.A.D. did, or convert an ellipse into the
correct shape by clicking on the middle points with the
Convert Anchor Point tool from the Pen tool pop-up.
3 Try using solid objects. Starting with your base object,
construct the eye with overlapping solid objects. Scale a
version of the outline for the green inset and place a black
circle on the top.
4 Try making a compound object. Use the objects that
you created in the previous version to make a compound
object that allows the inner part of the eye to be cut out.
Select the outer black outline and the inner green inset
and choose Object >Compound Paths >Make.
5 Try using compound shapes. Compound shapes are
powerful tools that let you combine shapes or create
knockouts (see the Drawing & Coloring chapter for details
on compound shapes). To create the back of the eye,
start by creating an ellipse. With the ellipse still selected,
switch to the Selection tool. Now hold Option-Shift
(Mac)/Alt-Shift (Win) keys, grab the center of the ellipse
and drag downward until the center of the new ellipse is
at the bottom of the original ellipse. Select both shapes
and click the Intersect button on the Pathfinder palette.
To create the shape that will become the white of the eye,
select the back of the eye, open the Object >Transform >
Transform Each dialog box and enter: 70 % H, 50% V,
then click Copy. To use this shape to knockout the white
of the eye, first put it behind the back of the eye by using
Object > Arrange > Send to Back, then select both objects
and click on the Exclude button on the Pathfinder palette.
Next, create the circle for the pupil over the knocked out
eye shape, select them both, and click on the Vertical
Align Center and Horizontal Align Center buttons on the
Align palette. To finish, click on the Add button on the
Pathfinder palette.
Converting an oval to make the back of the eye
Constructing the logo with three solid objects
Constructing the logo from an outer compound
object and an inner solid circle
The same logo constructed using Copy, Com-
pound Shape modes, and Transform Each
Chapter 2 The Zen of Illustrator 49
Zen Scaling
Note: Use the Shift key to constrain proportions. Zen Scaling practice is also on the Wow! CD.
1 Scaling proportionally towards the top Click at the top, grab lower-right (LR), drag up
2 Scaling horizontally towards the center Click at the top, grab LR, drag inwards
3 Scaling vertically towards the top Click at the top, grab LR, drag straight up
4 Scaling vertically and flipping the object Click at the top, grab LR, drag straight up
50 Chapter 2 The Zen of Illustrator
1 Scaling proportionally towards the top Click at the top, grab lower-right (LR), drag up
Zen Scaling (continued)
Note: Use the Shift key to constrain proportions. Zen Scaling practice is also on the Wow! CD.
5 Scaling proportionally towards lower-left (LL) Click LL, grab upper-right, drag to LL
6 Scaling horizontally to the left side Click LL, grab lower-right (LR), drag to left
7 Scaling vertically towards the bottom Click center bottom, grab top, drag down
8 Scaling proportionally towards the center Click the center, grab corner, drag to center
Or, to scale about the center, use the Scale tool to click-drag outside the object towards the center
Chapter 2 The Zen of Illustrator 51
5 Scaling proportionally towards lower-left (LL) Click LL, grab upper-right, drag to LL
51
4 Rotating part of a path Marquee points with the Direct Selection tool, then use Rotate tool
Marquee the forearm with Direct Selection tool With the Rotate tool, click on the elbow, grab the hand and drag it around
52 Chapter 2 The Zen of Illustrator
Zen Rotation
Note: Use the Shift key to constrain movement. Zen Rotation practice is also on the Wow! CD.
1 Rotating around the center Click in the center, then grab lower-right (LR) and drag
Or, to rotate about the center, use the Rotate tool to click-drag outside the object towards the center
2 Rotating from a corner Click in the upper left corner, then grab LR and drag
3 Rotating from outside Click above the left corner, then grab LR and drag
52
Creating a Simple Object Using the Basic Tools
Key: Click where you see a RED cross, grab with the С Y arrow and drag towards BLACK arrow.
Make an ellipse and
Option-drag a copy
Scale the copy
Scale a copy of middle
ellipse—flipping it
Make two rectangles,
one thin, one tall
Shear the top of the Shift-Group-select the With the Pen tool draw Direct-select top point,
hat entire hat, then rotate an arm with 3 points Opt-drag, repeat
With the Option key, Add an elbow with Add Marquee the forearm
use Reflect on arm Anchor Point tool with Direct-select
Rotate the forearm
path upwards
Scale the top two
points outward
Marquee the arm
with Group-select
Make a rectangle,
delete the right path
Draw rectangle ends, Fill hat, draw one eye, Shift-Direct-select mul-
draw Pen smile Alt-drag for eye, buttons tiple points on ellipses
Grab one of the selected The final snowman
points, drag slightly
Chapter 2 The Zen of Illustrator 53
53
A Finger Dance
Turbo-charge with Illustrator's Power-keys
Overview: Save hours of production
time by mastering the finger dance of
Illustrators power-keys.
Find a summary of Finger Dance power-keys on
the pull-out quick reference card
If you are using the mouse to choose your selection tools
from the Toolbox, then you need this lesson. With some
time and patience, you'll be able to free up your mouse
so that practically the only thing you do with it is draw.
Your other hand will learn to dance around the keyboard
accessing all of your selection tools, modifying your
creation and transformation tools, using your Zoom and
Hand tools, and last but not least, providing instant Undo
and Redo.
This "Finger Dance" is probably the most difficult
aspect of Illustrator to master. Go through these lessons
in order, but don't expect to get through them in one or
even two sittings. When you make a mistake, use Undo
( /Ctrl-Z). Try a couple of exercises, then go back to your
own work, incorporating what you've just learned. When
you begin to get frustrated, take a break. Later—hours,
days, or weeks later—try another lesson. And don't forget
to breathe.
Rule #1: Always keep one finger on the key (Ctrl
for Windows). Whether you are using a mouse or a
pressure-sensitive tablet, the hand you are not drawing
with should be resting on the keyboard, with one finger
(or thumb) on the key. This position will make that all-
important Undo ( -Z/Ctrl-Z) instantly accessible.
Chapter 2 The Zen of Illustrator54
Rule #2: Undo if you make a mistake. This is so crucial
an aspect of working in the computer environment that I
am willing to be redundant. If there is only one key com-
bination that you memorize, make it Undo ( -Z/Ctrl-Z).
Rule #3: The (Ctrl) key turns your cursor into a
selection tool. In Illustrator, the /Ctrl key does a lot
more than merely provide you with easy access to Undo.
The /Ctrl key will convert any tool into the selection
arrow that you last used. In the exercises that follow,
you'll soon discover that the most flexible selection arrow
is the Direct Selection tool.
Rule #4: Watch your cursor. If you learn to watch your
cursor, you'll be able to prevent most errors before they
happen. And if you don't (for instance, if you drag a copy
of an object by mistake), then use Undo and try again.
Rule #5: Pay careful attention to when you hold
down each key. Most of the modifier keys operate
differently depending on when you hold each key down.
If you obey Rule #4 and watch your cursor, then you'll
notice what the key you are holding does.
Rule #6: Hold down the key(s) until after you let go
of your mouse button. In order for your modifier key
to actually modify your action, you must keep your key
down until after you let go of your mouse button.
Rule #7: Work in Outline mode. When you are con-
structing or manipulating objects, get into the habit of
working in Outline mode. Of course, if you are designing
the colors in your image, you'll need to work in Preview,
but while you're learning how to use the power-keys,
you'll generally find it much quicker and easier if you are
in Outline mode.
Universal Access conflict (Mac)
When you're using Illustrator,
you should probably disable Uni-
versal Access, which is a feature
developed for those with limited
manual dexterity (System Prefer-
ences > Universal Access > Allow
Universal Access Shortcuts). It can
interfere with Illustrator's normal
functioning. If you have limited
manual dexterity, try using CE
Software's QuicKeys to simplify
menu selection, keystrokes, and
object creation.
Chapter 2 The Zen of Illustrator 55
55
56
Chapter 2 The Zen of Illustrator
Chapter 2 The Zen of Illustrator
57
58
Chapter 2 The Zen of Illustrator
Chapter 2 The Zen of Illustrator
59