Sử dụng photoshop cs5 part 24 doc
Bạn đang xem bản rút gọn của tài liệu. Xem và tải ngay bản đầy đủ của tài liệu tại đây (805.81 KB, 6 trang )
ptg
154 Chapter 9
Using the Magic Wand tool
With the Magic Wand tool, you simply click a color
in the image and the tool selects all adjacent pixels
of the same (or a similar) shade or color. Like the
Color Range command, which is discussed on pages
156–157, the Magic Wand lets you control the range
of pixels the tool selects, but unlike Color Range, this
tool lets you add nonsimilar colors to the selection.
To select color areas with the Magic Wand
tool:
1. Click a layer or the Background.
2.
Choose the Magic Wand tool (W or Shift-W).
3.
On the Options bar:
Choose a Tolerance value (use the scrubby slider)
to control the range of colors the tool selects (for
a starting value, try between 30 and 40).
Check Anti-alias to allow the tool to add semi-
transparent pixels along the edges of the color
areas it detects. is will produce smoother edge
transitions for your image edits.
Check Contiguous to limit the selection to areas
that are connected to the rst pixel you click, or
uncheck this option to allow the tool to select
similarly colored, noncontiguous (unconnected)
areas throughout the image with the same click.
To select possible occurrences of a similar color
on all visible layers, check Sample All Layers, or
uncheck this option to select colors on just the
current layer.
4.
Click a color in the image.
5.
Unless your image contains nothing but totally
at color areas (which is unlikely), you’ll have to
do some extra work to rene the selection. Do
any of the following:
To add to the selection, Shift-click any
unselected areas.
A
To subtract any areas from the selection, hold
down Alt/Option and click them. Or choose the
Quick Selection tool, then with the Alt/Option
key held down, drag short strokes across the
areas to be subtracted.
B
To select additional, noncontiguous areas of
a similar color or shade based on the current
Tolerance value, right-click in the document and
choose Similar. (is command works the same
whether the Contiguous option is checked or not.)
A
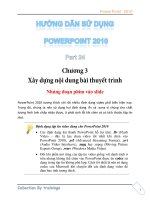
To select the sky in this image layer, we clicked on
the right side with the Magic Wand tool (Tolerance 38;
Contiguous checked), then Shift-clicked more sky areas to
add them to the selection (as shown above).
B
Some areas of the keys became selected, so we are using
the Quick Selection tool with Alt/Option held down to
remove them from the selection.
ptg
Selections & Masks 155
A
Finally, we pressed Backspace/Delete to get rid of the
selected pixels (in this document, the Background is hidden).
6.
Optional: If you have selected a background
area that you want to remove and you clicked
a layer in step 1, press Backspace/Delete;
A
or
if you clicked the Background in step 1, press
Ctrl-Backspace/Cmd-Delete.
★
Deselect (Ctrl-D/
Cmd-D).
➤ You can change the Tolerance value for the
Magic Wand tool between clicks. For example,
for more control when adding unselected shades
or colors along the edges of a selection, lower
the Tolerance value incrementally: Click with a
Tolerance of 30–40 rst, lower the value to 15–20
and click again, then nally lower it to 5–10 and
click once more. To select just one color or shade,
use a Tolerance of 0 or 1.
➤ To undo the results of the last click made with
the Magic Wand tool or to undo the last use of
the Similar command, press Ctrl-Z/Cmd-Z.
To expand a selection using a command:
With any selection tool chosen, choose Select>
Grow or Similar.
B–C
ese commands use the
current Tolerance setting of the Magic Wand
tool. You can repeat either command to further
expand the selection.
➤ When the Magic Wand tool is selected, you can
access the Grow and Similar commands via the
context menu.
TO ANTI-ALIAS OR NOT?
Before using a selection tool, check Anti-alias (if available) on the
Options bar to fade the edge of the selection to transparency, or
uncheck this option to produce a crisp, hard-edged selection.
The effect
of anti-aliasing won’t be visible until you edit the selected pixels.
e A n t i - a l i a s o p t i o n w a s o n
when this selection was created.
e A n t i - a l i a s o p t i o n w a s o
when this selection was created.
B
We clicked the blue
sky area with the Magic
Wand tool (Tolerance of
35), Shift-clicked once
on the clouds…
C
…then chose Select >
Similar. e Tolerance setting
controlled which pixel range
was added to the selection.
ptg
156 Chapter 9
Using the Color Range command
To create a selection with the Color Range command,
you click a color area in the document window or
in the preview area of the dialog, and depending on
the parameters you have chosen, all occurrences of
just one color or a range of related colors become
selected. e dialog also provides controls for
widening or narrowing the range. After closing the
dialog, you can further rene the selection with any
selection tool. e more solid the color areas in an
image, the more eectively this command works.
To create a selection using the Color Range
command:
1. Click a layer.
e command will sample colors
from all the currently visible layers, but of course
only the current layer can be edited.
2.
Optional: Create a selection to limit where the
command can select colors.
3.
Choose Select > Color Range, or if a selection
tool is in hand, right-click in the document and
choose Color Range.
4.
In the Color Range dialog, choose from the
Select menu to limit the selection to Sampled
Colors (shades or colors you’ll click with the
Color Range eyedropper); to a specic preset
color range (e.g., Reds, Yellows); or to a luminos-
ity range (Highlights, Midtones, or Shadows).
5.
If you chose Sampled Colors in the preceding
step, with the Eyedropper tool from the dialog,
click in either the dialog preview or the document
window to sample a color in the image.
A–B
6. To add more colors or shades to the selection,
Shift-click in the document or preview window;
or to remove colors or shades from the selection,
Alt-click/Option-click.
To expand or reduce the range of selected colors
and to control the number of partially selected
pixels, adjust the Fuzziness value.
C
7. Choose a Selection Preview option for viewing
the selection in the document window: None for
no preview, Grayscale to see a larger version of
the dialog preview, Black Matte to view the selec-
tion against a black background, or White Matte
to view the selection against a white background.
Choose one of the latter two options when you
need to see if the edges are properly selected.
B
In the preview, the white areas represent fully
selected pixels, the gray represent partially selected
pixels, and the black areas represent unselected pixels.
A
We chose the Color Range command, then with the
Eyedropper, clicked the blue sky at the top of the image.
C
To fully select the sky and background, we Shift-
clicked a lower section of the sky in the preview and
increased the Fuzziness value to 105.
ptg
Selections & Masks 157
8. Click OK.
A
Note: If you chose a preset color
range and the image contains only minimal levels
of that color, an alert dialog will inform you that
the selection marquee will be active but invisible.
➤ Press Ctrl/Cmd to toggle between the Selection
and Image previews in the dialog.
A
In the nal Color Range
selection, the entire blue sky and
distant background are selected,
including the noncontiguous
areas between the columns.
USING THE LOCALIZED COLOR CLUSTERS OPTION IN THE COLOR RANGE DIALOG
The Localized Color Clusters option in the Color Range
dialog creates a more accurate selection of colors
based on their proximity to the sampled color. Click
a layer, open the Color Range dialog, choose Select:
Sampled Colors, then with the Eyedropper tool, click
in the document window to sample a color.
B
Check
Localized Color Clusters, then use the Range slider
to control the distance from the sampled color (or
colors, if you Shift-clicked) within which similar
colors may become selected.
C
You can Shift-drag in
the preview or document to add more color areas to
the selection, within the current range,
D
or Alt-drag/
Option-drag to remove color areas.
E
C
We checked Localized Color
Clusters and lowered the Range value
to 15 to shrink the selection area.
D
Next, we Shift-dragged to select
more grapefruit colors, within the
current Range.
E
Finally, we dragged with Alt/
Option held down to remove some
color areas from the selection.
B
We chose the Color Range command, then with
the Eyedropper, clicked the grapefruit in the image.
ptg
158 Chapter 9
Hiding and showing selection edges
If your selection edges (those “marching ants”)
become distracting or annoying, you can hide them
from view. If you do so, remember that the selection
remains in eect even when you can’t see it!
To hide or show the edges of a selection:
Press Ctrl-H/Cmd-H or choose View > Extras. If
this command doesn’t work, make sure View >
Show > Selection Edges has a check mark.
A–B
Note: e Ctrl-H/Cmd-H shortcut hides or shows
all the options that are currently checked on the
Show submenu.
➤ Mac OS users: e rst time you press Cmd-H
after installing Photoshop and then opening
or creating your rst document, an alert dialog
will appear.
★
If you click Hide Photoshop,
the Cmd-H shortcut will be assigned to the
Photoshop > Hide Photoshop command; if you
click Hide Extras (as we do and recommend), the
shortcut will be assigned to the View > Extras
command. e alert won’t reappear unless you
reset all warning dialogs (see page 386).
➤ If an option is unchecked in the View > Show >
Show Extras Options dialog, you can turn it on
or o only via the Show submenu, not by using
the Ctrl-H/Cmd-H shortcut. For this reason, we
like to keep all the options checked in that dialog.
➤ To verify that there is an active selection in your
document, click the Select menu. If most of the
commands on the menu are available, you know
that there is an active selection.
➤ You can hide or show selection edges via the
shortcut while using the Adjustments panel and
while any of the Image > Adjustments dialogs
are open.
Swapping the selected and
unselected areas
To swap the selected and unselected areas:
Do either of the following:
With any tool chosen, press Ctrl-Shift-I/Cmd-
Shift-I (or choose Select > Inverse).
C–D
With any selection tool chosen, right-click in
the document and choose Select Inverse.
(Repeat either step above to switch back to the
original selection.)
B
…then we hid
the selection edges
to gauge the results.
A
We applied the
Texture > Grain lter
(Grain Type: Speckle)
to this selection…
C
i s i s t h e o r i g i n a l
selection.
D
And this is the inverse
of the same selection.
ptg
Selections & Masks 159
Creating a frame-shaped selection
With the Rectangular Marquee or Elliptical Marquee
tool, you can create a selection in the shape of a
frame, either at the edge of the canvas area or oat-
ing somewhere within it. You can then apply lters
or adjustment settings to the frame-shaped selec-
tion or turn it into an adjustment layer mask (don’t
worry, you’ll learn those tricks later in this book).
Your edits will aect only pixels within the frame-
shaped border.
To create a selection in the shape of a frame:
Method 1 (at the edge of the canvas area)
1.
Click a layer.
2.
Choose the Rectangular Marquee (M or
Shift-M).
3.
In the document window, drag a marquee to
dene the inner edge of the frame selection.
4.
Optional: To soften the edges of the selection,
click Rene Edge on the Options bar, choose On
White (W) from the View menu,
★
zero out all
the sliders, adjust the Feather value to achieve
the desired degree of softness, then click OK.
5.
Right-click in the document and choose Select
Inverse.
A–B
Method 2 (within the image)
1.
Click a layer.
2.
Choose the Rectangular Marquee or Elliptical
Marquee tool (M or Shift-M), then drag to dene
the outer edge of the selection.
3.
Alt-drag/Option-drag inside the rst selection
to create the inner edge of the frame selection.
C
Reposition the inner selection, if needed.
C
Alt-drag/Option-drag to create one rectangular
selection within another.
B
Finally, we added an editable type layer. e type is
easy to read because we lightened the background.
A
We created an inner selection with the Rectangular
Marquee tool on this 300 ppi image, applied a Feather
value of 25 px via Rene Edge, then chose Select > Inverse.
Next, we used a Levels adjustment layer to lighten the
area within the frame selection (see pages 206–207).