The Art of Poser and Photoshop- P7 ppsx
Bạn đang xem bản rút gọn của tài liệu. Xem và tải ngay bản đầy đủ của tài liệu tại đây (2.76 MB, 30 trang )
6. Change the gradient’s blend mode to Hard Light to give it a better sense of trans-
parency as well as to accentuate the effect. Duplicate this layer and use the Free
Transform tool (Ctrl+T/Command+T) to position light streaks so that they appear
to be spilling off in a circular direction from the model. See Figure 3.58.
The Art of Poser and Photoshop: The Official Guide168
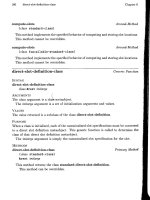
Figure 3.58
Apply the gra-
dient streaks
around the
perimeter of
the model
Give the Goddess Wings
1. Go to the tutorials/ch3 folder and open the left wing.psd file. Place this image below
the light effect layers so that glows appear to emanate from the wing. Use the Warp
command (choose Edit > Transform > Warp) and distort the wing so that it extends
forward from behind the light goddess. Next, apply a smart filter (choose Filters >
Convert to Smart Filters) to the layer of motion blur to give the wing some move-
ment. Use the mask associated with the smart filter to restrict the effect to the upper
half of the wing. See Figure 3.59.
2. Following the instructions in step 1, add a wing to the left side of the character. See
Figure 3.60.
3. Let’s add some hair to the character through a custom brush that you will create in
Photoshop. You are going to create a brush that will make straight hair (see Figure
3.61). If you clump straight hair together in your hand and take scissors and cut it
and look down at it, what shapes do you imagine you would see? You would see a
series of little circles. So, create a new file that is 2×2 inches and has a resolution of
100 PPI.
Chapter 3 ■ Posing and Perspective 169
Figure 3.59
Create the
wing and apply
a motion blur
and smart filter
Figure 3.60
Create a wing
for the other
side of the
character
Using the paintbrush, lay down a series of dots and make sure that your foreground
color is black. Photoshop will use black and white information to create a brush
from any shape where black is the color that Photoshop will designate as the shape.
Figure 3.62 is an example of the brush used for this exercise.
The Art of Poser and Photoshop: The Official Guide170
Figure 3.61
Create the
straight hair
brush
Figure 3.62
Stroke thumb-
nail view for
the straight
hair brush in
the Brushes
palette
If you go to the tutorials/ch3 folder, you’ll see an ABR file entitled hair brush.abr.
This is the custom straight hair brush that you can load into your Brushes palette
if you do not create your own. Simply go to your Brushes submenu and select Load
Brushes. Navigate to the folder and load hair brush.abr. Photoshop will ask you
whether to replace or to append your current brush preset file. Make sure that you
select Append, which will simply add the brush to your current set.
4. In this step you can use two techniques for creating the hair. One technique uses
the Smudge command to smudge the existing hair that was created by Poser. When
you use the Smudge tool, it is easier to apply the technique directly to the layer that
the hair is applied to. Notice on your Options bar, under the Mode drop-down
menu, you have the Lighten and Darken options. If you use Lighten only, the
brighter pixels will be affected by the smudge. The same is true if you choose
Darken—only the darker pixels will be affected by the Smudge tool. See Figure 3.63.
Chapter 3 ■ Posing and Perspective 171
Figure 3.63
Apply the
Smudge tool
with the
straight hair
brush
5. You can also use the same brush to continue to apply hair. Use the sampling tech-
nique (whereby you select a color from the image and apply it using the hair brush).
To do this, simply hold down the Alt/Option key to automatically switch to the
Eyedropper tool. Select the color on the hair region of the character and release the
Alt/Option key. You have now sampled that color. Now use the hair brush to paint
in the strands of hair where you would like them.
You can add color highlights to the outer edges of the hair to give the effect of rim
lighting, producing a glow along the edges. Just set the blend mode for the brush
to Color Dodge, select a lighter value of brown, and paint along the edges of the
hair to apply brighter and more luminous highlights to the hair. Conversely, use
the Multiply blend mode to apply deeper tonalities in the shadier regions. See
Figure 3.64.
The Art of Poser and Photoshop: The Official Guide172
Figure 3.64
Apply color
with the paint-
brush using
Color Dodge
and Multiply as
blend modes
Adding the Finishing Touches
Now you will add finishing touches—the greenish glow projected by the energy com-
ing from the palm of the goddess’ hand.
1. Create a custom gradient that begins with yellow and ends with a green hue. Create
two new layers directly above the light goddess layer and give these layers a blend
mode of Lighten. See Figure 3.65. Apply a circular gradient and position it over the
right half of the model as shown in Figure 3.66. Use the Transform tools to alter
the shapes of the color so that they extend the entire length of her body.
Next, associate these layers as clipping paths to the model so that these color high-
lights will be restricted to the form of the light goddess. Feel free to add in yellow
highlights along the outer edge of the right side of the model. Figure 3.66 also shows
an additional layer with the yellow color added to accentuate the edge highlights as
well as the surface of the wing to give it some warmth.
Chapter 3 ■ Posing and Perspective 173
Figure 3.65
Adding high-
lights to the
body
2. To improve upon the composition, use the same wing image used to create the orig-
inal wing composition to create an extension on the left side of the composition.
Use the Warp command to make it appear as if the wing is wrapping around the
body and coming forward to the viewer. Use a layer mask to integrate the two seam-
lessly. In addition, add motion blur by first committing the layer to a smart filter.
Restrict this blur to the tips of the wings using the mask.
3. To accentuate the wings that you’ve created, use Liquify (choose Filters > Liquify)
to pull out the tips of the feathers along the edges of the wings, as shown in Figure
3.67. This helps create a series of implied vectors that point toward the main com-
positional element, which of course is the light goddess. In addition, this helps make
the wings more visually dynamic.
4. Using the same techniques that you used to create the lighting effects in Figures
3.55 through 3.57, create a rectangular gradient that will be the basis of the energy.
This gradient should start with white in the center and end with green on the out-
side. Remember, it might be easier to make a vertical rectangle with your Marquee
tool and create the gradient inside it. When you’re done, apply the Transform tool
The Art of Poser and Photoshop: The Official Guide174
Figure 3.66
Create the
wing wrapping
around the
body
so that the energy coming from the hand appears to start small and widen toward
the bottom-right corner of the screen.
5. Now you have to add the light signature spilling from her hand as the energy leaves
her body. To do this, start with a new layer and simply create a circular gradient
using the same colors that you created for the energy bolt. Make sure that when
you apply the gradient, the Circular Gradient command is selected on the Options
bar. Change the blend mode for both of these layers to Lighten or Color Dodge.
Experiment with both. See Figure 3.68.
6. On top of all of your layers, create a new one and fill it with a purplish color simi-
lar to what you see in Figure 3.69. Change to blend mode of this layer to Linear
Burn. This will tint the entire image with a reddish hue. This will also help you
recede the other elements in the scene so that your character and the energy bolt are
the most dominating compositional elements that your viewer will be attracted to.
Apply the mask to this new layer and paint it black to reveal the original color of
the character in the energy bolt. When you’re done, lower the layer’s opacity to 51%.
Chapter 3 ■ Posing and Perspective 175
Figure 3.67
Apply Liquify
to the tips of
the wings
The Art of Poser and Photoshop: The Official Guide176
Figure 3.68
Create the
energy bolts
emanating
from the palm
of the light
goddess
Figure 3.69
Add color over-
lay to the entire
scene
7. Adding more detail to the hair is often best saved for the finishing steps. Once the
entire scene has been established, you can easily determine how you want the hair
to look and interact within the final scene. So create a new layer. Draw a series of
vertical black lines and apply a motion blur, as shown in Figure 3.70.
8. To assist you in shaping the lines, temporarily turn off the background. Use Warp
(choose Edit > Transform > Warp) to sculpt the lines so that they appear to flare
out into the wind. See Figure 3.71.
9. Repeat the previous two steps on several layers and shape them so that the hair over-
laps. Keep in mind that you can simply duplicate existing layers and apply Warp to
alter the look. When you have achieved the look that you want, merge all of the
hair layers. Next, Select the Smudge tool and set the opacity to 50%. Use the brush
that you created in Figure 3.72 and blend the stands of hair using an Opacity set-
ting of 50%. On the Options bar, select Darken or Lighten from the drop-down
menu to favor the lower or higher values. Now, change this layer into a smart object
(right-click and choose Convert to Smart Object) and add some motion blur to get
a feeling of movement. Use the mask to restrict the blur mostly to the tips of the
hair. Figure 3.73 shows the final result with the added hair details.
Chapter 3 ■ Posing and Perspective 177
Figure 3.70
Create vertical
lines and apply
a motion blur
The Art of Poser and Photoshop: The Official Guide178
Figure 3.71
Create vertical
lines and apply
motion blur
Figure 3.72
Create vertical
lines and apply
a motion blur
The next chapter takes a more in-depth view of texturing in Poser Pro by discussing its
powerful Nodal Texturing engine.
Chapter 3 ■ Posing and Perspective 179
Figure 3.73
Final result
What You Have Learned
This chapter covered the following topics:
■ How to apply the layer styles to get lighting effects
■ How to create a hair brush
■ How to import a background from Photoshop to assist with composing
■ How to use the Parameter dials to pose your character
■ You can get dynamic results through different lens focal lengths in Poser Pro
This chapter covers the following topics:
■ The creative use of nodes to texturize your character
■ Using digital images as a basis for the texture
■ Exporting images from Poser Pro to be used in CS4
■ Integrating paint techniques as part of your
composition
■ Integrating multiple characters
Chapter 4
Using the Nodal
Texture Engine
use two 3D layers in Photoshop and will create each one individually, export them as
OBJ files, and then import them into Photoshop’s 3D layering engine.
This chapter uses a fantasy concept of two human beings who have been petrified and
left behind in a concrete interior as permanent residence.
Creating the Initial Poser Figure
The first figure that you’ll create is as a relief coming out of the rear wall. Figure 4.1
shows the final pose that you will achieve in the following steps.
1. Access your character lists and import the Sydney G2 model. Use the Twist com-
mand to turn the body slightly to the right, as shown in Figure 4.2.
2. By default, inverse kinematics will be turned on, so select the right foot and bring
it upward to the shin area. Use Figure 4.3 as a guide.
3. Select the right collar and raise it upward slightly. A setting of –37 degrees is used
in Figure 4.4.
The Art of Poser and Photoshop: The Official Guide182
Figure 4.1 Example of the targeted pose Figure 4.2 Open the Sydney G2 model and turn it to the right
Chapter 4 ■ Using the Nodal Texture Engine 183
Figure 4.3 Adjust the foot upward Figure 4.4 Make a slight adjustment to the right collar
4. Select the right foot. Select the Direct Edit tool, as shown in Figure 4.5. This tool
will provide you with the visual axis for the heading, bank, and pitch of any selected
body part. Simply click and drag on any one of the axes to rotate the body part
along the chosen direction. Also note that there are yellow cubes along the cir-
cumference of each axis. Clicking and dragging any of the cubes will resize the
selected body part. This tool is very helpful for quickly manipulating multiple body
parts. You’ll continue to use this tool to pose the entire body.
5. Next, select the right forearm and bend it so that the hand comes up toward the
character’s forehead, as shown in Figure 4.6.
6. Rotate the forehead to the character’s right and bend it upward slightly, as if she is
trying to protect herself from something above. Also, use the Side to Side dial to
apply some tilt to the head so that the character doesn’t look so rigid, as shown in
Figure 4.7.
7. Let’s gently close the character’s eyes. In the Parameters tab for the head, access the
face’s morph features. Click the + icon next to the Eyes submenu to see the embed-
ded morph options for that part of the body. Apply the settings, as shown in Figure
4.8. The result will allow you to gently close the eyes.
The Art of Poser and Photoshop: The Official Guide184
Figure 4.5 Apply the Direct Edit tool to pose your
character
Figure 4.6 Bend the forearm toward the forehead
Figure 4.7 Apply the Side to Side, Rotation, and Bend
settings to the forehead
Figure 4.8 Apply morphs to the eyes to close them
8. Finally, select the waist and access its parameters. Apply a twist and bend with –10°
and –6° settings, respectively. See Figure 4.9.
Chapter 4 ■ Using the Nodal Texture Engine 185
Figure 4.9
Apply a twist
and a bend to
the waist
Again, it is important to experiment with posing your character. After you have the pose
that you’re looking for, you need to texture it. Because this figure is going to represent
a petrified shape coming out of a wall as a relief, you need to add some texture that
resembles concrete.
Editing Textures via Nodes
Poser Pro provides a powerful way of editing textures via nodes. Nodal-based editing
gives you great flexibility as well as a powerful means of adding and altering the textures
on your 3D models. In this section, you’re going to attach an image map that was altered
in Photoshop and apply to the model its color, specular qualities, and bump properties.
1. Go to the Material room and select the Advanced tab. By default, you’ll probably
see the skin texture used for the Sydney G2 character. Click on the skin texture
palette and press Delete to eliminate the texture from the body.
2. You are going to add your own textures that you will grab from the /tutorials/ch4
folder. Click and hold on to Diffuse_Color and navigate to New Node > 2D
Textures > image_map, as shown in Figure 4.10.
The Diffuse Color connector represents the actual color or image that will be placed
on the surface of the model. In this case, you’re going to use the concrete.jpg
image to surface the model in an effort to give an appearance that the figure is made
of stone. As you can see in Figure 4.11, a new node is now attached to the
Diffuse_Color connector. This panel displays several options that include resizing
or offsetting the image using the “U” (horizontal) and “V” (vertical) coordinates.
From this panel you can also tell the image to tile if you’re using a seamless image
map or just encompass the entire model using UV coordinates.
The Art of Poser and Photoshop: The Official Guide186
Figure 4.10
Add a new
image map
Note
The intensity of the channel uses floating-point technology. In other words, it uses values
from 0 to 1 to apply the strength of any chosen channel—0 represents no effect and 1
represents 100% of that effect. Anything beyond 1 multiplies the effect with greater
intensity. Now that you have a better understanding of how nodes are used, you can now
retrieve the image map.
3. At the top of your new node, you’ll see a layer entitled Image_Source. None is cur-
rently selected. Click on this option to access the Texture Manager. Navigate to the
tutorials/ch4 folder and choose the concrete.jpg file, as shown in Figure 4.12. Take
a look at your surface panel. Turn on the visual aspects by clicking the eye in the
top-right corner of your nodes. The image_map_2 node displays a visual of the
actual texture. The PoserSurface panel (see Figure 4.13) displays the texture as it is
being viewed in the 3D environment with lighting and all texture mappings applied.
4. Next, apply texture maps to the Specular_Color and Bump channels. There are two
images in the tutorials folder, called concrete-spec.jpg and concrete-bump.jpg.
Apply these to the Specular_Color and the Bump channels, respectively, as shown
in Figure 4.14.
Figure 4.15 shows how the final texture will look. Figure 4.16 shows an additional way
of achieving similar results using a single image. Figure 4.17 displays an example of the
model with the full texturing applied.
Chapter 4 ■ Using the Nodal Texture Engine 187
Figure 4.11
New node
created
The Art of Poser and Photoshop: The Official Guide188
Figure 4.12
Choose con-
crete.jpg as
your new tex-
ture
Figure 4.13
Display of the
PoserSurface
panel
Chapter 4 ■ Using the Nodal Texture Engine 189
Figure 4.14
Apply
images to the
Specular_Color
and the Bump
channels
Figure 4.16 View of an alternative example
Figure 4.15 Example of the final
texture
Exporting the Poser Model
Now that you’re finished texturing in Poser, you can export the model so that Photoshop
CS4 can use it within the 3D layers.
1. In Poser, go to File > Export Obj. The Export Range dialog box will appear, as
shown in Figure 4.18. Choose Single Frame from that dialog box and click OK.
The Art of Poser and Photoshop: The Official Guide190
Figure 4.17
View of full
texture applied
Figure 4.18
View of the
Export Range
dialog box
2. Next, select the 3D object that you want to export—in this case the Sydney G2.
Make sure that all of the body parts are chosen. Also, make sure that Ground is
unchecked. See Figure 4.19. Click OK when you’re ready.
3. Moving on, select your export options and click OK. In this case, leave the defaults
as they are, as shown in Figure 4.20.
4. Finally, navigate to where you want the file to be placed, as shown in Figure 4.21,
and click Save.
You can also export your objects into the OBJ format. Poser Pro has the Export CS3
Obj Command. Just go to Scripts > Export CS3 Obj. This is a script that will export
the model and all of its textures so that Photoshop will be able to easily import it into
its 3D layers. Although it was first created for CS3, it works very well with CS4.
Chapter 4 ■ Using the Nodal Texture Engine 191
Figure 4.19 Select the objects to
export
Figure 4.20 Select any export options
Figure 4.21 Place the file in a designated location
Creating the Environment in Photoshop CS4
Using Photoshop, you’re going to create the concrete interior where the petrified figure
will reside. You’re going to do this with the help of digital photographs. Let’s begin.
1. Create a new layer group and call it Background. Inside this group, you’ll place all
of the elements used to create the interior environment. Open the stairs.jpg image
in the tutorials/ch4 folder, as shown in Figure 4.22.
The Art of Poser and Photoshop: The Official Guide192
Figure 4.22
Open the
stairs.jpg image
2. Resize the background (choose Image > Canvas Size) so that the format is closer to
8×11 inches. Next, use Free Transform (Ctrl+T/Command+T) to restrict the stairs
to the lower half of the frame. Now, create a series of vertical lines across the entire
scene using the Line tool, as shown in Figure 4.23A. If you use the Shift key as a
modifier, each line will be constrained to the Y axis. You’re going to use these lines
to establish a custom single-point perspective. Use the Free Transform
(Ctrl+T/Command+T) command to establish a perspective line similar to what you
see in Figure 4.23B. Where these lines come together is the single point for these
perspective lines (thus the name “single-point perspective”). Make sure that the top
and front panels of the steps actually conform to your custom perspective lines. You
do so by using your Polygonal Selection tool to select each stair face and then cus-
tom transforming the faces so that each one matches the established perspective.
Figures 4.23C and 4.23D are examples of how each stair face has been selected and
transformed to accomplish what you see in Figure 4.23B. Bring in another image,
Concrete wall.jpg, from the same tutorials folder and apply a layer mask so that the
circular base becomes the upper platform of the stairs. Use Figure 4.23 as a guide.
Later, you will apply some shading to accentuate the curvature of the background.