Configuring Windows 7 (Training Kit) - Part 27 pot
Bạn đang xem bản rút gọn của tài liệu. Xem và tải ngay bản đầy đủ của tài liệu tại đây (277.36 KB, 10 trang )
Lesson 2: Managing Disks CHAPTER 4 233
4. To repair detected problems automatically, select the Automatically Fix File System
Errors check box. If you do not select this check box, the disk check reports problems
but does not fix them.
5. To perform a thorough disk check, select the Scan For And Attempt Recovery Of Bad
Sectors check box. The scan then attempts to find and repair physical errors on the
hard disk itself. Note, however, that this can take considerable time. Figure 4-33 shows
the Check Disk dialog box with both options selected.
FIGURE 4-33 Scanning for file errors and physical errors
6. Click Start.
7. If you selected Automatically Fix File System Errors and specified a disk that is in use
(for example, the partition that contains Windows), you are prompted to reschedule
the disk check for the next time you restart your computer. In this case, ensure that
your work is saved and all windows are closed and then restart your computer.
Setting Disk Policies with Local Group Policy Editor
Removable media is convenient, but it can also pose a security threat. Confidential company
data saved to a USB flash memory device can easily be lost or stolen, as can data downloaded
to an MP3 player or cell phone. If the computer can burn CD-ROMs or DVD-ROMs, these can
also be mislaid (they make very convenient bookmarks and get lost in libraries).
As an alternative to protecting your data with BitLocker, you can prohibit users from
writing data to removable media. You can also prevent users from downloading data and
running software stored on removable media, which could contain malware.
On a stand-alone client computer, you can do this through Local Group Policy Editor.
In an enterprise, you would edit domain Group Policy at a domain controller and apply it
to all clients in the domain. In Local Group Policy Editor, expand Computer Configuration
and then expand Administrative Templates. You next expand System and click Removable
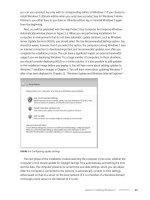
Storage Access. The policies that you can configure are shown in Figure 4-34. Note that “WPD
devices” refers to cell phones, media players, auxiliary displays, CE devices, and so on.
2 3 4 CHAPTER 4 Managing Devices and Disks
FIGURE 4-34 Configurable policies control the use of removable media.
You can enable, disable, or otherwise configure the following policies:
n
Time (In Seconds) To Force Reboot
n
CD And DVD: Deny Execute, Read, or Write Access
n
Custom Classes: Deny Read or Write Access
n
Floppy Drives: Deny Execute, Read, or Write Access
n
Removable Disks: Deny Execute, Read, or Write Access
n
All Removable Storage Classes: Deny All Access
n
All Removable Storage: Allow Direct Access In Remote Sessions
n
Tape Drives: Deny Execute, Read, or Write Access
n
WPD Devices: Deny Execute, Read, or Write Access
Most of these policies are self-explanatory. If you enable the Time (In Seconds) To Force
Reboot policy, for example, you need to specify the amount of time that you want the system
to wait until a reboot. If you disable or do not configure this setting, the system does not
force a reboot and any access right policies you configure do not take effect until the system
is restarted. Configuring the Custom Classes access rights policies lets you specify removable
storage classes by entering the class GUID.
The Removable Disks policies do not apply to CD-ROMs, DVD-ROMs, or floppy disks and
typically are used to control access to USB flash memory, portable media players, and cellular
phones. However, if you enable the All Removable Storage Classes: Deny All Access policy, this
Lesson 2: Managing Disks CHAPTER 4 235
denies execute, read, and write permission to all types of removable media and overwrites
any other configured removable media access rights policies. If you enable the All Removable
Storage: Allow Direct Access policy in remote sessions, remote users can access removable
storage devices in remote sessions.
Detailed step-by step instructions to disable downloads to USB flash memory are given in
the practice later in this lesson.
Changing Disk Type and Partition Style
Chapter 2, “Configuring System Images,” introduced the Disk Management tool and discussed
the new features of the tools that let you create, attach, mount, detach, and delete a VHD
file. In addition to these new features, you can use Disk Management to convert disks from
basic to dynamic (and less typically, from basic to dynamic) and change the partition style.
Windows 7 also provides the Diskpart command-line tool for disk management.
note FDISK
Windows 7 does not support the Fdisk tool that was used for disk management in earlier
versions of Windows.
You need Administrator or Backup Operator credentials to perform most Disk Management
tasks. You can use the tool for managing hard disks and the volumes or partitions that they
contain. You can initialize disks, create volumes, and format volumes with the FAT, FAT32, or
NTFS file systems. Disk Management lets you perform disk-related tasks without needing to
restart the system and most configuration changes take effect immediately.
Working with Partitions
Disk Management enables you to extend and shrink partitions directly from the interface.
When you right-click a volume in the Disk Management console, you can choose whether
to create a basic, spanned, or striped partition directly from the menu. If you add more than
four partitions to a basic disk, you are prompted to convert the disk to dynamic or to the GPT
partition style.
Disk Management allows you to change disks between various types and partition styles.
However, some of the operations are irreversible (unless you reformat the drive). You should
consider carefully the disk type and partition style that is most appropriate for your application.
You can convert between the following partition styles:
n
MBR can be converted to GPT if there are no volumes on the disk.
n
MBR can be converted to dynamic, but the disk may become unbootable.
n
GPT can be converted to MBR if there are no volumes on the disk.
n
GPT can be converted to dynamic, but the disk may become unbootable.
n
Dynamic can be converted to MBR if there are no volumes on the disk.
n
Dynamic can be converted to GBT if there are no volumes on the disk.
2 3 6 CHAPTER 4 Managing Devices and Disks
If you add a disk to a computer, it appears as Not Initialized. Before you can use a disk,
you must first initialize it. If you start Disk Management after adding a disk, the Initialize Disk
Wizard appears. You can also right-click an uninitialized disk and click Initialize Disk. The disk
is initialized as a basic disk and you can select whether to use the MBR or GPT partition style.
One advantage of GPT disks is that you can have more than four partitions on each disk.
GPT is also required for disks larger than 2 TB. You can change a basic disk from MBR to GPT
partition style so long as the disk does not contain any partitions or volumes. You first need
to back up the data on the MBR disk so you can restore it after the conversion.
You can use Disk Management to remove any volumes or partitions on the disk you want
to convert, and then to implement the conversion. Right-click each volume in turn, and then
click Delete Volume. When there are no volumes or partitions on the disk, right-click it and
click Convert To GPT Disk.
note REMOVABLE MEDIA
You cannot use the GPT partition style on removable media.
To use the Diskpart command-line utility to change a disk from MBR to GPT partition style,
perform the following procedure:
1. Back up the data on the basic MBR disk that you want to convert.
2. Open an elevated command prompt and enter diskpart.
3. At the DISKPART> prompt, enter list volume. Note all the volume numbers.
4. For each volume listed, at the DISKPART> prompt, enter select volume <volumenumber>.
5. For each volume, at the DISKPART> prompt, enter delete volume.
6. At the DISKPART> prompt, enter list disk. Note the disk number of the disk that you
want to convert.
7. At the DISKPART> prompt, enter select disk <disknumber>.
8. At the DISKPART> prompt, enter convert gpt.
You can also use both Disk Manager and the Diskpart utility to convert a GPT disk to an
MBR disk. The procedure is almost identical to converting an MBR disk to a GPT disk. You
must back up all data and then delete all volumes. In Disk Manager, you right-click the disk
and click Convert To MBR Disk. If you are using Diskpart, you enter the Diskpart command
convert mbr as the final command.
Using Basic and Dynamic Disks
Basic disks use the original MS-DOS-style MBR partition tables to store primary and logical
disk partitioning information. Dynamic disks use a private region of the disk to maintain
a Logical Disk Manager (LDM) database. The LDM database contains volume types, offsets,
memberships, and drive letters of each volume. The LDM database is also replicated, so
each dynamic disk knows about every other dynamic disk configuration. This feature makes
dynamic disks more reliable and recoverable than basic disks.
Lesson 2: Managing Disks CHAPTER 4 237
If you move dynamic disks between computers, however, you might not be able to move
the dynamic disks back to the original host. If you need to move dynamic disks, move all the
dynamic disks from a computer at the same time, and make sure that they are all online and
running on the destination computer before you try to import them. The disk group name
and the identity of the primary disk group of the host system is always retained if a dynamic
disk is present. If there are no dynamic disks already on the destination computer, that
computer ends up with the same disk group name as the source computer when the disks are
moved to it and you cannot then move the disks back to the source computer.
Microsoft recommends that before you convert basic disks to dynamic disks, you should
determine whether you require the features provided by dynamic disks, for example spanned
volumes, striped volumes, mirrored volumes, or RAID-5 volumes. If you do not intend to use
these features, it may be best to use basic disks. You can change a basic disk into a dynamic
disk using either Disk Management or the Diskpart command-line utility.
CautIon CONVERTING DISKS
Before you convert disks, close any programs that are running on those disks.
Quick Check
n
What partition type enables you to have more than four partitions on each disk?
Quick Check Answer
n
GPT
To convert a basic disk to a dynamic disk by using Disk Management, right-click the disk
you want to convert and click Convert To Dynamic Disk.
To convert a basic disk to a dynamic disk by using Diskpart, you first select the disk you
want to convert and then, at the DISKPART> prompt, enter convert dynamic. You do this in
the practice later in this lesson.
Once converted, a dynamic disk does not contain basic volumes. When you convert a basic
disk to a dynamic disk, any existing partitions or logical drives on the basic disk become
simple volumes on the dynamic disk. After you convert a basic disk to a dynamic disk, you
cannot change the dynamic volumes back to partitions. Instead, you must delete all dynamic
volumes on the disk and then convert the dynamic disk to a basic disk. If you want to keep
your data, you must first back it up or move it to another volume.
Converting a dynamic disk back to a basic disk is a much less common procedure and
can have serious implications (for example, the requirement to back up data and delete all
dynamic volumes). You can change a dynamic disk back into a basic disk using either Disk
Management or the Diskpart command-line utility.
To use Disk Management, you must first back up all volumes on the disk you want to
convert. Then, in Disk Management, right-click each volume and click Delete Volume on each
2 3 8 CHAPTER 4 Managing Devices and Disks
of them. When all volumes on the disk have been deleted, right-click the disk and then click
Convert To Basic Disk. A dynamic disk must not have any volumes nor contain any data if you
want to change it back to a basic disk. Figure 4-35 shows the Disk Management controls for
converting an MBR disk to a GPT disk and for converting a basic disk to a dynamic disk.
FIGURE 4-35 Controls for converting MBR and basic disks
To change a dynamic disk back to a basic disk using the Diskpart utility, perform the
following procedure:
1. Back up all volumes on the disk you want to convert.
2. Open an elevated command prompt and enter diskpart.
3. At the DISKPART> prompt, enter list disk. Note the number of the disk you want to
convert.
4. At the DISKPART> prompt, enter select disk <disknumber>.
5. At the DISKPART> prompt, enter detail disk <disknumber>.
6. For each volume on the disk, at the DISKPART> prompt, enter select volume=
<volumenumber> and then enter delete volume.
7. At the DISKPART> prompt, enter select disk <disknumber>.
8. At the DISKPART> prompt, enter convert basic.
Lesson 2: Managing Disks CHAPTER 4 239
Moving Disks to Another Computer
Before you move disks to another computer, you should use Disk Management to make sure
the status of the volumes on the disks is Healthy. If the status is not Healthy, you should repair
the volumes before you move the disks. To verify the volume status, check the Status column
in the Disk Management console.
Your next step is to uninstall the disks you want to move. In the Computer Management
Navigation pane (the left pane), open Device Manager. In the device list, double-click Disk
Drives. Right-click each of the disks you want to uninstall in turn and then click Uninstall. In
the Confirm Device Removal dialog box, click OK.
If the disks that you want to move are dynamic disks, right-click the disks that you want to
move in Disk Management, and then click Remove Disk.
After you have removed dynamic disks, or if you are moving basic disks, you can discon-
nect the disk drives physically. If the disks are external, you can now unplug them from the
computer. If they are internal, turn off the computer and then remove the disks.
If the disks are external, plug them into the destination computer. If the disks are internal,
make sure the computer is turned off and then install the disks in that computer. Start the
destination computer and follow the instructions on the Found New Hardware dialog box.
On the destination computer, open Disk Management, click Action, and then click Rescan
Disks. Right-click any disk marked Foreign, click Import Foreign Disks, and then follow the
on-screen instructions.
When you move basic volumes to another computer, they receive the next available drive
letter on that computer. Dynamic volumes retain the drive letter they had on the previous
computer. If a dynamic volume did not have a drive letter on the previous computer, it does
not receive a drive letter when moved to another computer. If the drive letter is already used
on the computer where it is moved, a volume receives the next available drive letter. If an
administrator has used the mountvol /n or the diskpart automount command to prevent new
volumes from being added to the system, volumes moved from another computer are not
mounted and do not receive a drive letter. To use the volume, you must mount it manually
and assign it a drive letter using Disk Management or the diskpart and mountvol commands.
If you are moving spanned, striped, mirrored, or RAID-5 volumes, move all disks containing
the volume at once. Otherwise, the volumes on the disks cannot be brought online and are
not accessible except to delete them.
You can move multiple disks from different computers to a single destination computer
by installing the disks, opening Disk Management, right-clicking any of the new disks, and
then clicking Import Foreign Disks. When importing multiple disks from different computers,
always import all of the disks from one computer at a time.
Disk Management displays the condition of the volumes on the disks before they are
imported. Review this information carefully, because it can indicate what will happen to each
volume on these disks once the disks have been imported.
2 4 0 CHAPTER 4 Managing Devices and Disks
Reactivating a Missing or Offline Dynamic Disk
A dynamic disk may become Missing when it is corrupted, powered down, or disconnected. It
may become Offline if it is corrupted or intermittently unavailable, or if you attempt to import
a foreign (dynamic) disk and the import fails. An error icon appears on the Offline disk. Only
dynamic disks display the Missing or Offline status and can be reactivated. You reactivate
a dynamic disk by right-clicking it in Disk Management and clicking Reactivate Disk.
You can also use the Diskpart utility. As in previous procedures, you list the disks and
identify the disk number of the disk you need to reactivate. You select the disk by its disk
number and enter the online command at the DISKPART> prompt.
You may instead choose to remove a missing dynamic disk. You first delete all volumes on
the missing disk using either Disk Management or the Diskpart utility. In Disk Management
you then right-click the disk and click Remove. If you are using Diskpart, you list the disks to
discover the disk number, select the disk by its number, and enter the delete disk command at
the DISKPART> prompt.
Managing Disk Volumes
Windows 7 enables you to expand and contract volumes without data loss and without
requiring a reboot. You can create simple volumes, spanned volumes, striped volumes,
mirrored volumes, and striped volumes with parity on dynamic disks. You can also create
simple volumes on basic disks. The options to use unallocated portions of the disk to create
volumes are shown in Figure 4-36.
FIGURE 4-36 Volume options
Lesson 2: Managing Disks CHAPTER 4 241
Creating a Simple Volume
In Windows 7 (and Windows Vista), simple volumes can include both partitions on basic
disks and simple volumes on dynamic disks. If all your requirements can be met by a simple
volume, Microsoft recommends that you use a basic disk.
To create a simple volume using Disk Management, perform the following procedure:
1. Open Disk Management.
2. Right-click an unallocated space on your chosen disks and choose New Simple Volume.
This starts the New Simple Volume Wizard.
3. On the Specify Volume Size page, enter the size in megabytes of the volume you want
to create. The default is the maximum space available on the disk.
4. On the Assign Drive Letter Or Path page, assign a drive letter or a mount point.
5. On the Format Partition page, choose the formatting options.
6. On the Summary page, read the information provided. If this is satisfactory, click Finish.
This procedure creates simple volumes on dynamic disks and primary partitions on basic
GPT disks. For basic MBR disks, the first three volumes created will be primary partitions.
The fourth simple volume on a basic MBR disk is created as an extended partition and
a logical drive. Further simple volumes on the basic MBR disk are logical drives.
If you create a simple volume using the Diskpart tool, you need to decide whether the disk
on which you intend to create the volume is a dynamic or basic disk. Using Diskpart, you must
create a partition on a basic disk and a volume on a dynamic disk. To create a simple volume
on a dynamic disk, enter a command with the following syntax at the DISKPART> prompt:
create volume simple [size=<n>] [disk=<n>]
Creating a Spanned Volume
A spanned volume uses the free space on more than one physical hard disk to create
a volume. The portions of disk used to create the volume do not need to be the same size and
can include more than one portion of free space on a single disk. A spanned volume increases
the risk of failure, leading to data loss. The failure of any disk involved in the spanned volume
makes the entire volume unavailable.
Spanned volumes offer no significant performance benefit. To achieve a speed benefit
with multiple disks, you must use striping, such as that provided by RAID arrays (for example,
RAID-0 or RAID-5). The advantage of a spanned volume is that the portions of disk space
need not be the same size and more than one of them can be on the same disk. RAID arrays
are discussed later in this lesson.
You create a spanned volume on dynamic disks. To create a spanned volume using Disk
Management, perform the following procedure:
1. Open Disk Management.
2. Right-click a free-space segment that you want to include in the spanned volume and
then select New Spanned Volume from the shortcut menu. The New Spanned Volume
Wizard starts.
2 4 2 CHAPTER 4 Managing Devices and Disks
3. On the Select Disks page, select the disks you want to include and then click Add to
add them to the spanned volume. Select each disk in the Selected column and specify
the amount of space to use on that disk for the spanned volume.
4. On the Assign Drive Letter Or Path page, the default is to assign the next available
drive letter to the new volume. You can also mount the volume on an empty NTFS
folder on an existing volume.
5. On the Format Volume page, choose the formatting options for the new volume.
Windows 7 supports only NTFS formatting from the Disk Management snap-in.
To format with FAT or FAT32, you need to use the Diskpart tool.
6. On the Summary page, read the information provided. If this is satisfactory, click Finish.
To create a spanned volume using Diskpart, you need to make sure that the disks to be
used are converted to dynamic. Then you create a simple volume on the first disk of the
spanned volume, extend the volume to the second disk, and then add any additional disks
involved in the span. Finally, you assign the volume to a drive letter or mount point.
The Diskpart routine to create a spanned volume depends on whether the disk selected
is basic or dynamic. On a basic disk, you can create a spanned volume only if you have
free space on the same disk as the selected volume and contiguous to it. You then enter
a command with the syntax extend [size=<n>]. If you omit the size parameter, the spanned
disk is as large as the available unallocated space permits. If you have a dynamic disk with
a simple or spanned volume, this can be spanned on to a second disk that has unallocated
space. After you select a volume you use a command with the syntax extend [size=<n>]
[disk=<n>]. If the disk parameter is omitted, the spanned volume is created on the same disk
as the selected volume. If the size parameter is omitted, the spanned volume is as large as the
amount of unallocated space allows.
Creating a Striped Volume (RAID-0)
A striped volume uses the free space on more than one physical hard disk to create the
volume. It enables the operating system to write across all disks in small blocks, or stripes,
distributing the load across the disks in the volume. Data is written to a stripe on the first disk,
the next block of data is written to a stripe on the next disk, and so on. The data can be split
into stripe-sized blocks and written to all the disks in the stripe set simultaneously. A striped
(RAID-0) volume requires at least two disks.
When data is read from the volume, it can be accessed simultaneously on all the disks
in the volume. RAID-0 therefore significantly improves both read and write performance.
The portions of disk used to create the volume need to be the same size; the size of the
smallest free space included in the striped volume is the determinant. A striped volume is not
fault-tolerant. If one disk fails, the entire volume fails.
You create a striped volume on dynamic disks. To create a striped volume using Disk
Management, perform the following procedure:
1. Open Disk Management.
2. Right-click a free-space segment that you want to include in the striped volume and
click New Striped Volume. The New Striped Volume Wizard opens.

