Photoshop 6 for Windows Bible- P7 pps
Bạn đang xem bản rút gọn của tài liệu. Xem và tải ngay bản đầy đủ của tài liệu tại đây (758.83 KB, 30 trang )
147
Chapter 4 ✦ Defining Colors
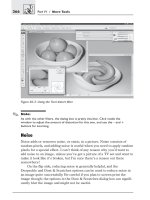
When you choose Image ➪ Mode ➪ Bitmap, Photoshop displays the Bitmap dialog
box, shown in Figure 4-5. Here you specify the resolution of the black-and-white
image and select a conversion process. The options work as follows:
✦ Output: Specify the resolution of the black-and-white file. If you want control
over every single pixel available to your printer, raise this value to match your
printer’s resolution. As a rule of thumb, try setting the Output value some-
where between 200 to 250 percent of the Input value.
Figure 4-5: The Bitmap dialog box converts images
from grayscale to black and white.
✦ 50% Threshold: Select this option from the Use pop-up menu to change every
pixel that is darker than 50 percent gray to black and every pixel that is 50
percent gray or lighter to white. Unless you are working toward some special
effect — for example, overlaying a black-and-white version of an image over
the original grayscale image — this option most likely isn’t for you. (And if
you’re working toward a special effect, Image ➪ Adjust ➪ Threshold is the
better alternative.)
✦ Pattern Dither: To dither pixels is to mix them up to emulate different colors.
In this case, Photoshop mixes up black and white pixels to produce shades of
gray. The Pattern Dither option dithers an image using a geometric pattern.
Unfortunately, the results are pretty ugly, as demonstrated in the top example
in Figure 4-6. And the space between dots has a tendency to fill in, especially
when you output to a laser printer.
148
Part II ✦ Painting and Retouching
✦ Diffusion Dither: Select this option from the Use pop-up menu to create a
mezzotint-like effect, as demonstrated in the second example in Figure 4-6.
Again, because this option converts an image into thousands of stray pixels,
you can expect your image to darken dramatically when output to a low-
resolution laser printer and when reproduced. So be sure to lighten the
image with something like the Levels command (as described in Chapter 17)
before selecting this option.
Figure 4-6: The results of selecting the Pattern Dither option (top) and the much
more acceptable Diffusion Dither option (bottom).
✦ Halftone Screen: When you select this option from the Use pop-up menu and
press Enter, Photoshop displays the dialog box shown in Figure 4-7. These
options enable you to apply a dot pattern to the image, as demonstrated in
Figure 4-8. Enter the number of dots per inch in the Frequency option box and
the angle of the dots in the Angle option box. Then select a dot shape from the
Shape pop-up menu. Figure 4-8 shows examples of four shapes, each with a
frequency of 24 lines per inch.
149
Chapter 4 ✦ Defining Colors
Figure 4-7: This dialog box appears when you select the
Halftone Screen option in the Bitmap dialog box.
Figure 4-8: Four random examples of halftone cell shapes. In all cases, the
Frequency value was set to 24.
Round Diamond
Line Cross
150
Part II ✦ Painting and Retouching
I cover screen patterns and frequency settings in more depth in the “Changing
the halftone screen” section of Chapter 18.
✦ Custom Pattern: If you’ve defined a repeating pattern using Edit ➪ Define
Pattern, you can use it as a custom dither pattern. Figure 4-9 shows two cus-
tom examples. I created the first pattern using the Twirl Pattern file, which is
stored in the Displacement Maps folder in the Plug-Ins folder. I created the
second pattern manually using the Add Noise, Emboss, and Ripple filters
(as discussed in the “Creating texture effects” section of Chapter A on the
CD-ROM for this book).
Figure 4-9: Two examples of employing repeating patterns (created with Edit➪
Define Pattern) as custom halftoning patterns.
For a complete guide to creating and defining patterns in Photoshop, see the
“Applying Repeating Patterns” section of Chapter 7.
Cross-
Reference
Cross-
Reference
151
Chapter 4 ✦ Defining Colors
To use a custom pattern, open the Custom Pattern palette in the Bitmap dia-
log box, as shown in Figure 4-5. Click the icon for the pattern you want to use.
If you don’t feel like creating your own patterns, use one of the preset patterns
that ship with Photoshop 6. A number of these patterns appear by default in
the palette; to access additional patterns, choose Load from the palette menu
(click the right-pointing triangle in the upper-right corner of the palette to dis-
play the menu). You can find the patterns in the Patterns folder, which lives
inside the Presets folder. To delete a pattern from the palette, click its icon
and choose Delete from the palette menu.
Photoshop lets you edit individual pixels in the so-called bitmap mode, but that’s
about the extent of it. After you go to black-and-white, you can neither perform any
serious editing nor expect to return to the grayscale mode and restore your original
pixels. So be sure to finish your image editing before choosing Image ➪ Mode ➪
Bitmap. Even more important, make certain to save your image before converting
it to black-and-white. Frankly, saving is a good idea prior to performing any color
conversion.
Using Photoshop’s Other Color Selection
Methods
In addition to the Color Picker dialog box, Photoshop provides a handful of addi-
tional techniques for selecting colors. The sections that finish out this chapter
explain how to use the Custom Colors dialog box, the Colors palette, and the eye-
dropper tool. None of this information is terribly exciting, but it will enable you to
work more efficiently and conveniently.
Predefined colors
If you click the Custom button inside the Color Picker dialog box, Photoshop dis-
plays the Custom Colors dialog box shown in Figure 4-10. In this dialog box, you
can select from a variety of predefined colors by choosing the color family from
the Book pop-up menu, moving the slider triangles up and down the color slider
to specify a general range of colors, and ultimately, selecting a color from the color
list on the left. If you own the swatchbook for a color family, you can locate a spe-
cific color by entering its number on the keyboard.
The color families represented in the Book pop-up menu fall into seven brands:
ANPA (now NAA, as I explain shortly), DIC, Focoltone, HKS, Pantone, Toyo, and
Trumatch, all of which get a big kick out of capitalizing their names in dialog boxes.
I honestly think one of these companies would stand out better if its name weren’t
capitalized. Anyway, at the risk of offending a few of these companies, you’re likely
to find certain brands more useful than others. The following sections briefly intro-
duce the brands in order of their impact on the American market—forgive me for
being ethnocentric in this regard — from smallest to greatest impact.
Caution
6
Photoshop
6
152
Part II ✦ Painting and Retouching
Figure 4-10: The Custom Colors dialog box enables you to select predefined
colors from brand-name libraries.
The color families represented in the Book pop-up menu fall into seven brands:
ANPA (now NAA, as I explain shortly), DIC, Focoltone, HKS, Pantone, Toyo, and
Trumatch, all of which get a big kick out of capitalizing their names in dialog boxes.
I honestly think one of these companies would stand out better if its name weren’t
capitalized. Anyway, at the risk of offending a few of these companies, you’re likely
to find certain brands more useful than others. The following sections briefly intro-
duce the brands in order of their impact on the American market—forgive me for
being ethnocentric in this regard — from smallest to greatest impact.
The number-one use for predefined colors in Photoshop is in the creation of duo-
tones, tritones, and quadtones (described in Chapter 18). You can also use prede-
fined colors to match the colors in a logo or some other important element in an
image to a commercial standard. And you can add an independent channel for a
predefined color and print it to a separate plate, as discussed later in this chapter.
Focoltone, DIC, Toyo, and HKS
Focoltone, Dianippon Ink and Chemical (DIC), Toyo, and HKS fall into the negligible
impact category. All are foreign color standards with followings abroad. Focoltone
is an English company; not English speaking (although they probably do), but
English living, as in commuting-to-France-through-the-Channel England. DIC and
Toyo are popular in the Japanese market, but have next to no subscribers outside
Japan. HKS formerly was provided only in the German and French versions of
Photoshop, but enough people asked for it to be included in other languages
that it now is available in all versions of the program.
Tip
153
Chapter 4 ✦ Defining Colors
Newspaper Association of America
American Newspaper Publishers Association (ANPA) recently changed its name to
NAA, which stands for Newspaper Association of America, and updated its color cat-
alog. NAA provides a small sampling of 45 process colors (mixes of cyan, magenta,
yellow, and black ink) plus 5 spot colors (colors produced by printing a single ink).
The idea behind the NAA colors is to isolate the color combinations that reproduce
most successfully on inexpensive newsprint and to provide advertisers with a solid
range of colors from which to choose, without allowing the color choices to get out
of hand. You can purchase a swatch book from NAA for $35. Members pay $25.
Trumatch
Trumatch remains my personal favorite process-color standard. Designed entirely
using a desktop system and created especially with desktop publishers in mind, the
Trumatch Colorfinder swatchbook features more than 2,000 process colors, orga-
nized according to hue, saturation, and brightness. Each hue is broken down into
40 tints and shades. Reducing the saturation in 15-percent increments creates tints;
adding black ink in 6-percent increments creates shades. The result is a guide that
shows you exactly which colors you can attain using a desktop system. If you’re
wondering what a CMYK blend will look like when printed, you need look no further
than the Trumatch Colorfinder.
As if the Colorfinder weren’t enough, Trumatch provides the ColorPrinter Software
utility, which automatically prints the entire 2,000-color library to any PostScript-
compatible output device. The utility integrates EfiColor and PostScript Level 2,
thereby enabling design firms and commercial printers to test the entire range of
capabilities available to their hardware. Companies can provide select clients with
swatches of colors created on their own printers, guaranteeing what you see is
darn well what you’ll get.
Pantone
On the heels of Trumatch, Pantone released a 3,006-color Process Color System
Guide (labeled Pantone Process in the Book pop-up menu) priced at $79. Pantone
also produces the foremost spot color swatchbook, the Color Formula Guide. Then
there’s the Solid to Process Guide, which enables you to figure out quickly if you
can closely match a Pantone spot color using a process-color blend or if you ought
to give it up and stick with the spot color.
Pantone spot colors are ideal for creating duotones and adding custom colors to an
image for logos and the like, both discussed in Chapter 18. Furthermore, Pantone is
supported by every computer application that aspires to the color prepress mar-
ket. As long as the company retains the old competitive spirit, you can, most likely,
expect Pantone to remain the primary color printing standard for years to come.
154
Part II ✦ Painting and Retouching
The Color palette
Another means of selecting colors in Photoshop is to use the Color palette, shown
in Figure 4-11. The Color palette is convenient, it’s always there, and it doesn’t hog
your screen like the Color Picker dialog box. Frankly, this is the tool I use most
often to select colors in Photoshop.
Figure 4-11: The Color palette as it appears normally (top) and with
the Web Color Sliders option selected (bottom).
To display the palette, choose Window ➪ Show Color or press the F6 key. If you
want, you can dock the palette in the Options bar palette well. For details on that
intriguing offer, flip back to Chapter 2. Either way, you use the elements and options
inside the palette as follows:
6
Photoshop
6
Alert triangle
Foreground color
Color bar
Background color
Slider
Alert cube Default color swatches
Option box
Palette menu
155
Chapter 4 ✦ Defining Colors
✦ Foreground color/background color: Click the foreground or background color
icon in the Color palette to specify the color you want to edit. If you click the
foreground or background color icon when it’s already highlighted —as indi-
cated by a double-line frame —Photoshop displays the Color Picker dialog box.
✦ Sliders: Drag the triangles in the slider controls to edit the highlighted color.
By default, the sliders represent the red, green, and blue primary colors when
a color image is open. You can change the slider bars by choosing a different
color model from the palette menu.
✦ Option boxes: Alternatively, you can enter numerical values into the option
boxes to the right of the sliders. Press Tab to advance from one option box to
the next; press Shift+Tab to go to the previous option.
✦ Alert triangle and cube: Photoshop displays the alert triangle when a color
falls outside the CMYK color gamut. The color swatch to the right of the trian-
gle shows the closest CMYK equivalent. Click the triangle or the color swatch
to replace the current color with the CMYK equivalent.
If you select the Web Color Sliders option from the palette menu, the alert
cube appears to indicate colors that aren’t included in the Web-safe palette.
The palette also displays the hexadecimal values for the color, as shown in
Figure 4-11. And as you drag the sliders, they automatically snap to Web-safe
hues. To limit the palette so that it displays Web-safe colors only, choose
Make Ramp Web Safe from the palette menu.
After you define a Web color, choose Copy Color as HTML from the palette
menu to save the hexadecimal code for the color to the Clipboard. You can
then paste the code into an HTML file by choosing Edit ➪ Paste in the Web
application.
✦ Color bar: The bar along the bottom of the Color palette displays all colors con-
tained in the CMYK spectrum. Click or drag inside the color bar to lift a color
and make it the current foreground or background color (depending on whether
the foreground or background icon is selected above). The sliders update as
you drag. Alt-click or drag to lift the background color if the foreground icon
is selected or the foreground color if the background color is selected.
You needn’t accept the CMYK spectrum in the color bar, however. To change
to a different spectrum, just choose the spectrum from the palette menu. Or
Shift-click the color bar to cycle through the available spectrums. You can opt
for the RGB spectrum, a black-to-white gradation (Grayscale Ramp), or a gra-
dation from the current foreground color to the current background color
(Current Colors). The color bar continuously updates to represent the newest
foreground and background colors.
Notice the black and white squares at the right end of the color bar? You can
click ’em to set a color to absolute black or white. But if all you want to do is set
the foreground color to black, don’t bother with the Color palette—just press
D. For white, press D and then X. The first shortcut restores the foreground and
background colors to black and white, respectively; pressing X swaps the col-
ors to make white the foreground color and black the background color.
6
Photoshop
6
Tip
156
Part II ✦ Painting and Retouching
The Swatches palette
Shown in Figure 4-12, the Swatches palette enables you to collect colors for future
use, sort of like a favorite color reservoir. You can use the palette also to set the
foreground and background colors.
Figure 4-12: You can create custom swatch collections in the Swatches palette
or in the new Preset Manager dialog box.
Here’s how to take advantage of the Swatches palette:
✦ Click a color swatch to make that color the foreground color. Alt-click to set
the background color.
✦ To add the current foreground color to the reservoir, Shift-click an existing
color swatch to replace the old color or click an empty swatch to append the
new color. In either case, your cursor temporarily changes to a paint bucket.
After you click, you’re asked to give the swatch a name. Type the name and
click OK. If you later want to change the name, just double-click the swatch to
redisplay the name dialog box.
You can bypass the dialog box and add an unnamed color to the palette by
Ctrl+Alt-clicking an empty swatch.
✦ To insert a color anywhere in the palette, Shift+Ctrl-click a swatch. The other
colors scoot over to make room.
✦ To delete a color from the panel, Ctrl-click a color swatch. Your cursor
changes to a pair of scissors and cuts the color away.
Tip
157
Chapter 4 ✦ Defining Colors
✦ The Swatches palette in Photoshop 6 includes a new icon and trash icon, simi-
lar to those you find in the Layers palette. The icons provide alternative meth-
ods of adding and deleting colors: Click the new icon to add a new swatch in
the current foreground color; Alt-click to display the name dialog box and then
add the color. Drag a swatch to the trash icon to delete it from the palette.
You can also save and load color palettes on disk using options in the pop-up menu.
Load Swatches appends swatches stored in a swatches file to the current set of
swatches; Replace Swatches replaces the current swatches with the ones in the file.
Save Swatches lets you create a new swatch collection and save it to disk.
The Presets folder, located inside the main Photoshop folder, contains folders for
all the available preset items, color swatches being one of them. The Color Swatches
folder, found inside the Photoshop Only folder of the Presets folder, contains palettes
for the major color libraries from Pantone, Trumatch, and others. In Version 6, you
can load these palettes by simply selecting them from the palette pop-up menu.
You ’re then given the choice of appending the swatches to the existing swatches or
replacing the current swatches altogether. Custom swatch sets that you create also
appear on the palette menu, but only after you close and restart Photoshop.
When a color library palette is loaded, positioning your cursor over a color swatch
displays a tool tip showing the name of that color. If you prefer to select colors by
using the color names, select Small List from the palette menu. Now you see a
scrolling list of colors instead of just the swatches.
Swatches presets
You can also create and manage swatch collections using the new Preset Manager.
Choose View➪ Presets and then select Swatches from the Preset Type pop-up menu
(or press Ctrl+2) to display the Swatches presets panel, shown in Figure 4-13. The
presets panel shows the current swatch set.
Many functions in the Swatches panel duplicate those offered by the Swatches
palette. If you click the arrow to the left of the Done button (see the figure), you
display a pop-up menu that’s nearly identical to the Swatches palette menu. You
can choose the Replace Swatches command on the pop-up menu to replace the
current swatch collection with another or choose Reset Swatches to return to
the default swatch collection. To append a collection, click the Load button.
Alternatively, click a collection name in the pop-up menu, in which case you have
the choice of appending or replacing the current collection with the new one.
In addition, you can click a swatch and then click Delete to remove the swatch or
Rename to change the color’s name. If you want to dump or rename a bunch of
swatches, Shift-click them and then click Delete or Rename. To select all swatches,
press Ctrl+A. You can also display the scissors cursor and then click a swatch to
delete it — but for some reason, you press Alt to get the scissors cursor in the
Preset Manager, not Ctrl as you do in the Swatches palette.
6
Photoshop
6
Tip
6
Photoshop
6
6
Photoshop
6
158
Part II ✦ Painting and Retouching
Figure 4-13: To easily create a new swatch collection using just some
colors from an existing collection, head for the Preset Manager.
Aside from being able to delete or rename a batch of swatches at one time, the
best reason for bothering with the Preset Manager — as opposed to working in
the Swatches palette — is to create a new swatch collection out of colors from an
existing set or sets. Load the collection(s) that you want to use as a basis for the
new set. Then Shift-click to select swatches for the new set — or press Ctrl+A to
select all swatches — and click Save Set. Give the collection a name and store it
in the Color Swatches folder.
Note that wherever you do your swatch set editing, you can’t overwrite any existing
preset files. Also, after you add a new swatch, you must save it as part of a swatch
collection, either via the palette pop-up menu or the Preset Manager. Otherwise,
Photoshop deletes the swatch if you replace the current swatch collection with
another.
The eyedropper tool
The eyedropper tool—which you can select by pressing I — provides the most
convenient and straightforward means of selecting colors in Photoshop. This is
so straightforward, in fact, it’s hardly worth explaining. But quickly, here’s how
the eyedropper tool works:
✦ Selecting a foreground color: To select a new foreground color, click the
desired color inside any open image window with the eyedropper tool. (This
assumes the foreground icon in the Color palette is selected. If the background
icon is selected, Alt-click with the eyedropper tool to lift the foreground color.)
You can even click inside a background window to lift a color without bringing
that window to the foreground.
Click for palette menu
159
Chapter 4 ✦ Defining Colors
✦ Selecting a background color: To select a new background color, Alt-click the
desired color with the eyedropper tool. (Again, this assumes the foreground
icon is selected in the Color palette. If the background icon is selected, click
with the eyedropper to lift the background color.)
✦ Skating over the color spectrum: You can animate the foreground color con-
trol box by dragging with the eyedropper tool in an image window or along
the color bar in the Color palette. As soon as you achieve the desired color,
release your mouse button. To animate the background color icon, Alt-drag
with the eyedropper tool. The icon color changes as you move the eyedrop-
per tool. Again, swap these procedures if the background color icon is
selected in the Color palette.
✦ Sampling multiple pixels: Normally, the eyedropper tool selects the color
from the single pixel on which you click. If you prefer to average the colors
of several neighboring pixels, however, choose either the 3 by 3 Average or
5 by 5 Average option from the Sample Size pop-up menu on the Options bar.
Or right-click with the eyedropper to display a pop-up menu of sampling
options near the cursor. In this case, you get one additional choice, Copy
Color as HTML, which works just as it does when you select it from the Color
palette pop-up menu. Photoshop determines the hexadecimal code for the
color and sends the code to the Clipboard so that you can use Edit➪ Paste
to dump the code into an HTML file.
To access the eyedropper tool temporarily when using the type, paint bucket, gra-
dient, line, pencil, airbrush, or paintbrush tool, press Alt. The eyedropper cursor
remains in force for as long as the Alt key is down. The eyedropper lifts whatever
color is active in the Color palette (foreground or background). To lift the other
color, switch to the eyedropper tool by pressing the I key and then Alt-click in an
image window.
The color sampler tool
Found in the same toolbox flyout as the eyedropper, the color sampler tool looks
like the eyedropper with a little crosshair target. But where the eyedropper lifts
foreground and background colors, the color sampler merely measures the colors
of pixels so that you can monitor how the pixels react to various color changes.
Select the color sampler and click somewhere inside the image window. Photoshop
adds a crosshair target to indicate the point you clicked. The program also brings up
the Info palette (if it isn’t up already) and adds a new color measurement item labeled
#1. This item corresponds to the target in the image, which is likewise labeled #1.
Click again and you add a second target and a corresponding item #2 in the Info
palette. You can add up to four targets to an image, as demonstrated in Figure 4-14.
Tip
160
Part II ✦ Painting and Retouching
Figure 4-14: The color sampler tool lets you measure the colors of four points
in your image, as indicated by the black arrows. You can also measure a fifth point
by merely moving the cursor around, as indicated by the white arrow.
The color sampler is primarily intended for printers and technicians who want
to monitor the effects of color corrections on specific points in an image. If you
apply Image ➪ Adjust ➪ Levels, for example, Photoshop constantly updates the
items in the Info palette to reflect your changes (as I explain in more detail in
Chapter 17). But you can also sample points in an image to monitor the effects
of filters (Chapters 10 and 11, as well as Chapter A on the CD-ROM), blend modes
(Chapter 13), and edit tools such as dodge and burn (Chapter 5). The color
sampler is just another way to monitor changes to an image.
Here are a few more techniques of interest when color sampling:
✦ Photoshop limits you to four color targets. If you try to create a fifth one, the
program generates an error message. If you want to measure a different point
in the image, you can either hover your cursor over the point and note the
top set of color values in the Info palette (as in Figure 4-14) or move one of
the targets.
✦ To move a target inside the image window, drag it with the color sampler tool.
You can also move a target by Ctrl-dragging it with the eyedropper tool.
161
Chapter 4 ✦ Defining Colors
✦ To delete a target, Alt-click it.
✦ The Info palette grows to more than twice its normal size when you start click-
ing with the color sampler. To hide the sampler information without deleting
targets, click the Info palette’s collapse box or choose Hide Color Samplers
from the palette menu. If you go the second route, you have to choose Show
Color Samplers to bring the samples back.
✦ By default, the sampler items in the Info palette measure colors in the active
color space. If you want to track a target in a different color space, click the
item’s eyedropper icon in the Info palette or right-click the target in the image
window. Either way, you get a pop-up menu of color space alternatives, includ-
ing Grayscale, RGB, and several others that you may recall from previous
explanations in this chapter.
To select the color sampler, press Shift+I when the eyedropper is active or Alt-click
the eyedropper icon. Or press I repeatedly to cycle between the eyedropper, color
sampler, and measure tool (add Shift if you activated the Use Shift Key for Tool
Switch option in the Preferences dialog box). You can also temporarily access the
color sampler any time the eyedropper is active by pressing Shift. This little trick
also works when a color correction dialog box such as Levels or Curves is open, as
explained in Chapter 17. It’s just the ticket when you’re in the middle of an adjust-
ment and you need to know how it’s affecting specific portions of the image.
Introducing Color Channels
After I’ve droned on for pages about color in Photoshop, it might surprise you when
I say that Photoshop is at its heart a grayscale editor. Oh sure, it offers an array of
color conversion features and it displays and prints spectacular full-color images.
But when it comes to editing the image, everything happens in grayscale.
This is because Photoshop approaches every full-color image not as a single collec-
tion of 24-bit pixels, but as three or four bands of 8-bit (grayscale) pixels. An RGB
file contains a band of red, a band of green, and a band of blue, each of which func-
tions as a separate grayscale image. A Lab image likewise contains three bands,
one corresponding to luminosity and the others to the variables a and b. A CMYK
file contains four bands, one for each of the process-color inks. These bands are
known as channels.
Channels frequently correspond to the structure of an input or output device. Each
channel in a CMYK image, for example, corresponds to a different printer’s plate
when the document goes to press. The cyan plate is inked with cyan, the magenta
plate is inked with magenta, and so on. Each channel in an RGB image corresponds
to a pass of the red, green, or blue scanner sensor over the original photograph or
artwork. Only the Lab mode is device independent, so its channels don’t corre-
spond to any piece of hardware.
Tip
162
Part II ✦ Painting and Retouching
Why you should care
But so what, right? Who cares how many planes of color an image comprises? You
want to edit the photograph, not dissect it. “Dammit, Jim, I’m an artist, not a doc-
tor!” Well, even if you don’t like to rebuild car engines or poke preserved frog
entrails with sharp knives, you’ll get a charge out of editing channels. The fact is,
channels provide you with yet another degree of selective control over an image.
Consider this example: Your client scanned a photograph of his gap-toothed daugh-
ter that he wants you to integrate into some goofy ad campaign for his car dealer-
ship. Unfortunately, the scan is downright rotten. You don’t want to offend the guy,
so you praise him on his fine offspring and say something to the effect of, “No prob-
lem, boss.” But after you take it back to your office and load it into Photoshop, you
break out in a cold sweat. You try swabbing at it with the edit tools, applying a few
filters, and even attempting some scary-looking color correction commands, but
the image continues to look like the inside of a garbage disposal. (Not that I’ve ever
seen the inside of a garbage disposal, but it can’t be attractive.)
Suddenly, it occurs to you to look at the channels. What the heck, it can’t hurt. With
very little effort, you discover that the red and green channels look okay, but the
blue channel looks like it’s melting. Her mouth is sort of mixed in with her teeth,
her eyes look like an experiment in expressionism, and her hair has taken on a
slightly geometric appearance. (If you think that this is a big exaggeration, take a
look at a few blue channels from a low-end scanner or digital camera. They’re fre-
quently rife with tattered edges, random blocks of color, stray pixels, and other
so-called digital artifacts.)
The point is, you’ve located the cancer. You don’t have to waste your time trying to
perform surgery on the entire image; in fact, doing so may very well harm the chan-
nels that are in good shape. You merely have to fix this one channel. A wave of the
Gaussian Blur filter here, an application of the Levels command there, and some
selective rebuilding of missing detail borrowed from the other channels—all of
which I’ll get to in future sections and chapters—result in an image that resembles
a living, breathing human being. Granted, she still needs braces, but you’re an
artist, not an orthodontist.
How channels work
Photoshop devotes 8 bits of data to each pixel in each channel, thus permitting 256
brightness values, from 0 (black) to 255 (white). Therefore, each channel is actually
an independent grayscale image. At first, this may throw you off. If an RGB image is
made up of red, green, and blue channels, why do all the channels look gray?
Photoshop provides an option in the Display & Cursors panel of the Preferences dia-
log box (Ctrl+K, Ctrl+3) called Color Channels in Color. When selected, this function
163
Chapter 4 ✦ Defining Colors
displays each channel in its corresponding primary color. But although this feature
can be reassuring—particularly to novices—it’s equally counterproductive.
When you view an 8-bit image composed exclusively of shades of red, for example,
it’s easy to miss subtle variations in detail that may appear obvious when you print
the image. You may have problems accurately gauging the impact of filters and
tonal adjustments. I mean, face it, red isn’t a friendly shade to stare at for a half
hour of intense editing. So leave the Color Channels in Color option off and tem-
porarily suspend your biological urge for on-screen color. With a little experience,
you’ll be able to better monitor your adjustments and predict the outcome of your
edits in plain old grayscale.
Images that include 256 or fewer colors can be expressed in a single channel and
therefore do not include multiple channels that you can edit independently. A
grayscale image, for example, is just one channel. A black-and-white bitmap permits
only one bit of data per pixel, so a single channel is more than enough to express it.
You can add channels above and beyond those required to represent a color or
grayscale image for the purpose of storing masks, as described in Chapter 9. But
even then, each channel is typically limited to 8 bits of data per pixel — meaning
that it’s just another grayscale image. Mask channels do not affect the appearance
of the image on screen or when it is printed. Rather, they serve to save selection
outlines, as Chapter 9 explains.
How to switch and view channels
To access channels in Photoshop, display the Channels palette by choosing
Window➪ Show Channels. Every channel in the image appears in the palette —
including any mask channels — as shown in Figure 4-15. Photoshop even shows
little thumbnail views of each channel so that you can see what it looks like.
To switch to a different channel, click a channel name in the Channels palette. The
channel name becomes gray — like the Blue channel in Figure 4-15—showing that
you can now edit it independently of other channels in the image.
To edit more than one channel at a time, click one channel name and then Shift-
click another. You can also Shift-click an active channel to deactivate it indepen-
dently of any others.
When you select a single channel, Photoshop displays just that one channel on
screen. However, you can view additional channels beyond those that you want to
edit. To specify which channels appear and which remain invisible, click in the far-
left column of the Channels palette. Click an eyeball icon to make it disappear and
hence hide that channel. Click where there is no eyeball to create one and thus dis-
play the channel.
Tip
Cross-
Reference
164
Part II ✦ Painting and Retouching
Figure 4-15: Photoshop displays tiny thumbnails of each color
channel in the Channels palette.
When only one channel is visible, that channel appears as a grayscale picture in the
image window (possibly colorized in accordance with the Color Channels in Color
check box in the Preferences dialog box). However, when more than one channel is
visible, you always see color. If both the blue and green channels are visible, for
example, the image appears blue-green. If the red and green channels are visible,
the image has a yellow cast, and so on.
In addition to the individual channels, Photoshop provides access to a composite
view that displays all colors in an RGB, CMYK, or Lab image at once. (The composite
view does not show mask channels; you have to specify their display separately.)
The composite view is listed first in the Channel palette and is displayed by default.
Notice that when you select the composite view, all the names of the individual color
channels in the Channels palette turn gray along with the composite channel. This
shows that all the channels are active. The composite view is the one in which you
will perform the majority of your image editing.
Eyeball icon
Active channelDelete channelChannel to selection
Selection to channel
New channel
165
Chapter 4 ✦ Defining Colors
Press Ctrl plus a number key to switch between color channels. Depending on the
color mode you’re working in, Ctrl+1 takes you to the red (RGB), cyan (CMYK), or
luminosity (Lab) channel; Ctrl+2 takes you to the green, magenta, or a channel;
and Ctrl+3 takes you to the blue, yellow, or b channel. In the CMYK mode, Ctrl+4
displays the black channel. Other Ctrl+key equivalents — up to Ctrl+9 — take you
to mask or spot-color channels (if there are any). To go to the composite view,
press Ctrl+tilde (~). Tilde is typically the key to the left of 1, or on some keyboards,
to the right of the spacebar.
When editing a single channel, you may find it helpful to monitor the results in both
grayscale and full-color views. Choose View➪ New View to create a new window for
the image, automatically set to the color composite view. Then return to the first
window and edit away on the individual channel. One of the amazing benefits to
creating multiple views in Photoshop is that the views may show entirely different
channels, layers, and other image elements.
The shortcuts are slightly different when you’re working on a grayscale image. You
access the image itself by pressing Ctrl+1. Ctrl+2 and higher take you to extra spot-
color and mask channels.
Trying Channels on for Size
Feeling a little mystified? Need some examples? Fair enough. Color Plate 4-2 shows
a woman in a bright yellow swimsuit on a bright red floatation device set against a
bright green ocean beneath a bright blue sky. These colors — yellow, red, green,
and blue — cover the four corners of the color spectrum. Therefore, you can expect
to see a lot of variation between the images in the independent color channels.
RGB channels
Suppose that the sunbathing woman is an RGB image. Figure 4-16 compares a
grayscale composite of this same image (created by choosing Image➪ Mode➪
Grayscale) compared with the contents of the red, green, and blue color channels
from the original color image. The green channel is quite similar to the grayscale
composite because green is an ingredient in all colors in the image, except for the
red of the raft. The red and blue channels differ more significantly. The pixels in
the red channel are lightest in the swimsuit and raft because they contain the high-
est concentrations of red. The pixels in the blue channel are lightest in the sky and
water because — you guessed it — the sky and water are rich with blue.
Tip
166
Part II ✦ Painting and Retouching
Figure 4-16: A grayscale composite of the image from Color Plate 4-2
followed by the contents of the red, green, and blue color channels.
Notice how the channels in Figure 4-16 make interesting grayscale images in and of
themselves? The red channel, for example, looks like the sky is darkening above our
bather, even though the sun is blazing down.
I mentioned this as a tip in the previous chapter, but it bears a bit of casual drum-
ming into the old noggin. When converting a color image to grayscale, you have the
option of calculating a grayscale composite or simply retaining the image exactly
as it appears in one of the channels. To create a grayscale composite, choose
Image ➪ Mode ➪ Grayscale when viewing all colors in the image in the composite
view, as usual. To retain a single channel only, switch to that channel and then
choose Image ➪ Mode ➪ Grayscale. Instead of the usual Discard color information?
message, Photoshop displays the message Discard other channels? If you click the
OK button, Photoshop chucks the other channels into the electronic abyss.
When the warning dialog box appears, select the Do not show again check box if
you don’t want Photoshop to ask for permission to dump color information or
channels when you convert to grayscale. If you miss the warning, click the Reset
All Warning Dialogs button on the General panel of the Preferences dialog box.
6
Photoshop
6
Grayscale composite Red
Green
Blue
167
Chapter 4 ✦ Defining Colors
CMYK channels
In the name of fair and unbiased coverage, Figures 4-17 and 4-18 show the channels
from the image after it was converted to other color modes. In Figure 4-17, I con-
verted the image to the CMYK mode and examined its channels. Here, the predomi-
nant colors are cyan (sky and water) and yellow (in the swimsuit and raft). Because
this color mode relies on pigments rather than light, as explained in the “CMYK”
section earlier in this chapter, dark areas in the channels represent high color inten-
sity. For that reason, the sky in the cyan channel is dark, whereas it’s light in the
blue channel back in Figure 4-16.
Figure 4-17: The contents of the cyan, magenta, yellow, and black
channels from the image shown in Color Plate 4-2.
Notice how similar the cyan channel in Figure 4-17 is to its red counterpart in Figure
4-16. Same with the magenta and green channels, and the yellow and blue channels.
The CMY channels have more contrast than their RGB pals, but the basic bright-
ness distribution is the same. Here’s another graphic demonstration of color the-
ory. In a perfect world, the CMY channels would be identical to the RGB channels —
one color model would simply be the other turned on its head. But because this
Cyan
Magenta
Yellow Black
168
Part II ✦ Painting and Retouching
is not a perfect world (you might have noticed that as you’ve traveled life’s bitter
highway), Photoshop has to boost the contrast of the CMY channels and throw in
black to punch up those shadows.
Lab channels
To create Figure 4-18, I converted the image in Color Plate 4-2 to the Lab mode.
The image in the luminosity channel looks very similar to the grayscale composite
because it contains the lightness and darkness values for the image. The a channel
maps the greens and magentas, while the b channel maps the yellows and blues, so
both channels are working hard to provide color information for this photograph.
Certainly there are differences — the a channel is hotter in the raft, while the b
channel offers more cloud detail — but the two channels carry roughly equivalent
amounts of color information.
Figure 4-18: The grayscale composite followed by the contents of the
luminosity channel and the a and b color channels after converting
the image shown in Color Plate 4-2 to the Lab mode.
Grayscale composite
Luminosity
a
(black is green; white is magenta)
b
(black is blue; white is yellow)
169
Chapter 4 ✦ Defining Colors
You can achieve some entertaining effects by applying commands from the Image ➪
Adjust submenu to the a and b color channels. For example, if I go to the a channel
in Figure 4-18 and reverse the brightness values by choosing Image ➪ Adjust ➪
Invert (Ctrl+I), the water turns a sort of salmon red and the raft turns green, as
demonstrated in the first example of Color Plate 4-3. If I apply Image ➪ Adjust ➪
Auto Levels (Ctrl+Shift+L) to the b channel, the sky lights up with brilliant blue
without altering so much as a color in the woman or her raft, as in the second
example. The third example in Color Plate 4-3 shows what happens when I apply
both Invert and Auto Levels to both the a and b channels. Now there’s the way I
want to vacation — on a different planet!
Other Channel Functions
In addition to viewing and editing channels using any of the techniques discussed
in future chapters of this book, you can choose commands from the Channels
palette menu and select icons along the bottom of the palette (labeled back in
Figure 4-15). The following items explain how the commands and icons work.
You’ll notice that I say “see Chapter 9” every so often when explaining these
options, because many of them are specifically designed to accommodate masks.
This list is designed to introduce you to all the options in the Channels palette,
even if you’ll need more background to use a few of them. After I introduce the
options, we’ll revisit the ones that have a direct effect on managing the colors in
your image.
✦ Palette Options: Even though this is the last command in the menu, it’s the
easiest, so I’ll start with it. When you choose Palette Options, Photoshop dis-
plays four Thumbnail Size radio buttons, enabling you to change the size of
the thumbnail previews that appear along the left side of the Channels palette.
Figure 4-19 shows the four thumbnail settings—nonexistent, small, medium,
and large.
Have you ever wondered what those thumbnail icons in the Palette Options
dialog box are supposed to show? They’re silhouettes of tiny Merlins on a
painter’s palette. How do I know that? Switch to the Layers palette and choose
Palette Options and you’ll see them in color. But how do I know they’re specif-
ically Merlins? Press Alt when choosing Palette Options to see the magician
up close. We’re talking vintage Easter egg, here—circa Photoshop 2.5.
✦ New Channel: Choose this command to add a mask channel to the current
image. The Channel Options dialog box appears, requesting that you name
the channel. You also can specify the color and translucency that Photoshop
applies to the channel when you view it with other channels. I explain how
these options work in the “Changing the red coating” section of Chapter 9.
An image can contain up to 24 total channels, regardless of color mode.
Tip
Cross-
Reference
170
Part II ✦ Painting and Retouching
Figure 4-19: The Palette Options command lets you select between four
thumbnail preview options and a Merlin.
You can also create a new channel by clicking on the new channel icon at
the bottom of the Channels palette. (It’s the one that looks like a little page.)
Photoshop creates the channel without displaying the dialog box. To force
the dialog box to appear on screen, Alt-click the page icon.
✦ Duplicate Channel: Choose this command to create a duplicate of the
selected channel, either inside the same document or as part of a new docu-
ment. (If the composite view is active, the Duplicate Channel command is
dimmed, because you can only duplicate one channel at a time.) The most
common reason to use this command is to convert a channel into a mask.
Again, you can find real-life applications in Chapter 9.
You can also duplicate a channel by dragging the channel name onto the new
channel icon. No dialog box appears; Photoshop merely names the channel
automatically. To copy a channel to a different document, drag the channel
name and drop it into an open image window. Photoshop automatically cre-
ates a new channel for the duplicate.
✦ Delete Channel: To delete a channel from an image, click the channel name in
the palette and choose this command. You can delete only one channel at a
time. The Delete Channel command is dimmed when any essential color chan-
nel is active, or when more than one channel is selected.
Tip
Tip
171
Chapter 4 ✦ Defining Colors
If choosing a command is too much effort, just drag the channel onto the
delete channel icon (which is the little trash icon in the lower right corner
of the Channels palette). Or you can just click the trash icon, in which case
Photoshop asks you if you really want to delete the channel. To bypass this
warning, Alt-click the trash icon.
✦ New Spot Channel: Photoshop lets you add spot color channels to an image.
Each spot color channel prints to a separate plate, just like spot colors in
Illustrator or QuarkXPress. When you choose the New Spot Color command,
Photoshop asks you to specify a color and a Solidity. Click the color square to
bring up the Custom Colors dialog box, from which you can select a Pantone
or other spot color (see Figure 4-20). The Solidity option lets you increase the
opacity of the ink, perfect for Day-Glo fluorescents and metallic inks.
To create a spot color channel without choosing a command, Ctrl-click the
page icon at the bottom of the Channels palette. For more information on
spot-color channels, read the “Spot-Color Separations” section at the end
of Chapter 18.
Figure 4-20: When creating a spot-color channel, Photoshop asks you to
select a color and specify the degree to which the spot color will cover up
other inks in the printed image.
Tip
Tip