Photoshop cs5 by steve Johnson part 2 pptx
Bạn đang xem bản rút gọn của tài liệu. Xem và tải ngay bản đầy đủ của tài liệu tại đây (738.39 KB, 6 trang )
ptg
10 Chapter 1
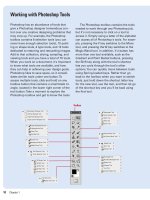
Photoshop has an abundance of tools that
give a Photoshop designer tremendous con-
trol over any creative designing problems that
may crop up. For example, the Photoshop
toolbox contains 8 selection tools (you can
never have enough selection tools), 10 paint-
ing or shape tools, 4 type tools, and 12 tools
dedicated to restoring and retouching images.
Add to that collection, slicing, sampling, and
viewing tools and you have a total of 70 tools.
When you work on a document, it's important
to know what tools are available, and how
they can help in achieving your design goals.
Photoshop likes to save space, so it consoli-
dates similar tools under one button. To
access multiple tools, click and hold on any
toolbox button that contains a small black tri-
angle, located in the lower right corner of the
tool button. Take a moment to explore the
Photoshop toolbox and get to know the tools.
The Photoshop toolbox contains the tools
needed to work through any Photoshop job,
but it's not necessary to click on a tool to
access it. Simply using a letter of the alphabet
can access all of Photoshop's tools. For exam-
ple, pressing the V key switches to the Move
tool, and pressing the W key switches to the
Magic Wand tool. In addition, if a button has
more than one tool available, such as the
Gradient and Paint Bucket buttons, pressing
the Shift key along with the tool's shortcut
lets you cycle through the tool's other
options. You can quickly move between tools
using Spring-loaded keys. Rather than go
back to the toolbox when you want to switch
tools, just hold down the shortcut letter key
for the new tool, use the tool, and then let go
of the shortcut key and you'll be back using
the first tool.
Working with Photoshop Tools
Toolbox
From the Library of Wow! eBook
ptg
Chapter 1 Getting Started with Photoshop CS5 11
You can refer to Adobe Photoshop CS5
Keyboard Shortcuts (available for download
on the Web at
www.perspection.com
) for
more information on all the letter assign-
ments for the various tools. To really get effi-
cient in Photoshop, you need to learn to use
both hands. Use one hand for your mouse or
drawing tablet, and the other on the keyboard
to make quick changes of tools and options.
Using the Options Bar
The Options bar displays the options for the
currently selected tool. If you are working
with the Shape Marquee tools, your options
include Feather, Style, Width, and Height.
When working with the Brush tools, available
tool options include Size, Mode, Opacity, and
Tol e r ance. The Air b r ush mode of the Bru s h
tool also includes Flow. The Pencil tool
options include Auto Erase along with the
standard Brush tool options. The Standard
Shape tool Options bar includes Fill Pixels,
Weight, Radius, Style, and Color. The impor-
tant thing to remember is that the Options
bar is customized based on the tool you have
selected. For more information on these
options, refer to Chapters 4, 6, and 9.
Currently selected tool
Options bar
Toolbox
(New!)
From the Library of Wow! eBook
ptg
12 Chapter 1
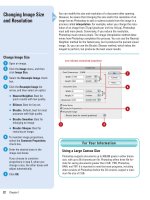
Creating a New
Document
Create a New Document
Click the File menu, and then click
New.
Type a name for the document.
IMPORTANT
Typing a name
does not save the document. You
still need to save your document
after you create it.
Click the Preset list arrow, and
then select a preset document, or
choose your own options to create
a custom document.
◆ Width and Height. Select from
various measurements, such as
points, centimeters, or inches.
◆ Resolution. Select a resolution,
such as 72 pixels/inch (ppi) for
online use and 300 ppi for print.
◆ Color Mode. Select a color
mode, such as RGB for color
and Grayscale for black/white.
◆ Background Contents. Select a
background color or a
transparent background.
Click OK.
4
3
2
1
Creating a new Photoshop document requires more thought than creat-
ing a new word processing document. For example, there are resolu-
tion and color mode considerations to keep in mind. You can create as
many new documents as you need for your current project. However,
since opening more than one document takes more processing power,
it's probably best to work on only one new document at a time. Once a
new document is created, you have access to all of Photoshop's design
and manipulation tools to create anything you can imagine.
4
2
3
Creating a Custom Preset Document
You may find that you use the same new document size over and
over again. To save time, you can save the settings as a preset. In
the New dialog box, click the Preset list arrow, click a setting, and
then change the various options to customize your new document.
To name yo ur customized pr eset, type a n ame in t he Name box, an d
then click Save Preset.
For Your Information
From the Library of Wow! eBook
ptg
Chapter 1 Getting Started with Photoshop CS5 13
Selecting Color Modes and Resolution
Selecting a Color Mode
A
color mode
, also known as
color space
,
determines how Photoshop displays and
prints an image. You choose a different color
mode (based on models used in publishing)
for different tasks. You can choose a color
mode when you create a new document or
change a color mode for an existing docu-
ment. The common color modes include:
Grayscale.
Best for printing black-and-white
and duotone images. This mode uses one
channel and has a maximum of 256 shades of
gray.
RGB (Red, Green, and Blue).
Best for online
and multimedia color images. Red, green, and
blue are also the primary colors on a monitor.
CMYK (Cyan, Magenta, Yellow, and Black).
Best for commercial printing of color images.
LAB (Luminosity, A and B channels).
Best for
performing image correction. This mode puts
all grayscale information on the L channel and
splits the colors to the A and B channels.
For more information on color, see Chapter 8,
"Understanding Colors and Channels."
Selecting Image Resolution
Photoshop works primarily with raster docu-
ments.
Raster
documents are images com-
posed of pixels. A
pixel
is a unit of
information that holds the color and detail
information of the image. Think of a
Photoshop document as a brick wall, with the
individual bricks in the wall representing the
individual pixels in the image. Documents
opened in Photoshop have a specific resolu-
tion. The
resolution
of the image, along with
its width and height, represents how many
pixels the image contains. Since pixels (the
bricks in the wall) represent information, the
more pixels a document contains, the more
information Photoshop has to manipulate or
enhance the image.
A typical 17-inch monitor displays pixels at
a resolution of 1,024 x 768 pixels per inch. You
can figure out how many pixels are present
on a 17-inch monitor by multiplying 1,024 x
768, which equals 786,432 pixels on the
screen. The resolution is equal to how many
pixels fit into each monitor inch, otherwise
known as
ppi
(pixels per inch). A typical moni-
tor displays pixels at 72 pixels per inch.
To det e rmine th e s i ze o f a n i m age in
inches, we divide the pixels by the ppi. For
example, an image 1,024 pixels wide at 72 ppi
would be 14.2 inches wide (1,024 / 72 = 14.2).
To det e rmine th e p i xels pr e sent in an im a g e,
you multiple the size by the ppi. For example,
a 3 inch image at 72 ppi would have a total of
216 pixels (3 x 72 = 216). As the image resolu-
tion drops, so does the output quality of the
image.
Pixelization
occurs when the resolu-
tion is so low that the edges of the pixel
begin to appear. The higher the resolution
(more pixels), the sharper your image will be.
However, the higher the resolution, the larger
the file size will become. To optimize your
image file size, you need to use the correct
resolution for the specific task. Use 72 ppi for
web pages, CD/DVDs, and multimedia; use
150 ppi for inkjet printers, 200 ppi for photo
printers, and 300 ppi for commercial printing.
When working with images, it's always a
good idea to start with a larger image size.
You can always reduce the size of the image
(subtract pixels) without losing any quality. If
you need to enlarge an image, you run the
risk of losing image quality. When you enlarge
an image, the number of pixels doesn't
increase as the image does, so the pixels
become larger, which results in a rougher, or
more pixelated, image.
From the Library of Wow! eBook
ptg
14 Chapter 1
When you create documents for specific purposes, such as, web, film,
video, or for use on a mobile device, you know the importance of creat-
ing documents that will perfectly match the output requirements of the
intended file destination. The preset file sizes available in the Preset
menu let you create images at a size and pixel aspect ratio that com-
pensate for scaling when you incorporate them into various output
modes. When you work with the Preset menu, the guesswork involved
in creating compatible photo, web, mobile device, film and video docu-
ments in Photoshop is a thing of the past.
Creating a New
Document Using
Presets
Create a New Document
Using Presets
Click the File menu, and then click
New.
Click the Preset list arrow, and
then select from the available
presets:
◆ Photo
◆ Web
◆ Mobile & Devices
◆ Film & Video
◆ Custom
Click the Size list arrow, and then
select the preset you want. The
options vary depending on the
type of document you want to
create.
◆ Photo. For example, Landscape
4 x 6.
◆ Web. For example, 640 x480.
◆ Mobile & Devices. For
example, 176 x 208.
◆ Film & Video. For example,
HDTV 1080p/29.97.
If you want, adjust the available
options.
Click OK.
5
4
3
2
1
2
5
3
4
Using a Video Preview Option
Photoshop now includes a Video Preview option that lets you pre-
view your documents on a display device such as a standard or DVD
screen. The device must be attached to your computer through the
use of a FireWire port. Once the device is attached, open a docu-
ment, click the File menu, point to Export, and then click Send Video
Preview to Device. To set output options before viewing your docu-
ment on the device, click the File menu, point to Export, and then
click Video Preview. The Video Preview option supports RGB,
grayscale, and indexed color images, in either 8 or 16 bits per chan-
nel. You can adjust the aspect ratio for proper display of images.
First, select the aspect ratio of the display device, either Standard
(4:3) or Widescreen (16:9), and then select a placement option, such
as Center or Crop to 4:3, for the image. To maintain an image's (non-
square) pixel aspect ratio, select the Apply Pixel Aspect Ratio To
Preview check box.
For Your Information
From the Library of Wow! eBook
ptg
Chapter 1 Getting Started with Photoshop CS5 15
Images displayed on a computer monitor are made up of square pixels.
Conversely, an image displayed on a video monitor is not composed of
pixels at all. Non-square pixels are most commonly used by encoding
devices for video production. When importing an image created by a
square-pixel graphics program into a video editing program such as
Adobe Premiere, the square pixels are automatically scaled to non-
square pixels for video encoding. This scaling results in a distorted
image. By default, non-square pixel documents open with Pixel Aspect
Ratio Correction enabled. This enables you to preview how the image
will appear on an output device such as a video monitor, and see how it
will appear when exported to an analog video device. In keeping with an
ever-changing industry, Adobe includes the following Pixel Aspect Ratio
options: DVCPRO HD 1080 (1.5) and HDV 1080/DVCPRO HD 720 (1.33).
Working with Non-
Square Pixels
Work with Non-Square Pixels
Click the File menu, and then click
New.
On the bottom of the New dialog
box, click the Pixel Aspect Ratio
list arrow, select any of the non-
square pixel settings, and then
click OK.
Click the Window menu, point to
Arrange, click New Window to
create a new window, and then
select the new window.
Click the View menu, point to
Pixel Aspect Ratio, and then
select a pixel aspect ratio that’s
compatible with the video format.
The original window shows the
corrected aspect ratio, and the
other one shows it without.
To re set th e pi xel as pect ra tio to
the default, click the View menu,
point to Pixel Aspect Ratio, click
Reset Pixel Aspect Ratios, and
then click OK (replaces) or Append
(replaces, yet retains any custom
values).
To re move the pixel aspe ct rati o,
click the View menu, point to Pixel
Aspect Ratio, click Delete Pixel
Aspect Ratio, select the aspect
ratio, and then click Delete.
6
5
4
3
2
1
Image with a non-square pixel ratio
4
5
6
From the Library of Wow! eBook
