Photoshop cs5 by steve Johnson part 27 pot
Bạn đang xem bản rút gọn của tài liệu. Xem và tải ngay bản đầy đủ của tài liệu tại đây (551.71 KB, 5 trang )
ptg
170 Chapter 7
Working with the
Spot Healing Brush
Use the Spot Healing Brush
Select the Spot Healing Brush
tool.
Select a soft round brush on the
Options bar.
Create a new layer above the layer
you want to modify.
Select the Sample All Layers
option.
Using small short strokes, carefully
drag over the areas you want to
change, then release your mouse
and move to the next area.
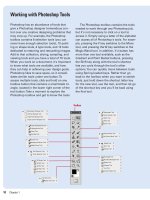
The Spot Healing brush works to
match the sample to the source.
5
4
3
2
1
A powerful tool in Photoshop's formidable arsenal of restoration and
correction tools is the Spot Healing Brush. With a name similar to the
Healing Brush, you might expect that the tools have similar features,
and you would be correct. The main difference between the two tools
is that the Spot Healing Brush does not require you to take a sample of
the area to heal. The Spot Healing Brush tool takes the area sample as
you work by sampling the surrounding pixels. The Spot Healing Brush,
as its name implies, works best on small spots and imperfections. To
heal larger areas, the standard Healing Brush, Patch tool, and even the
good old Clone Stamp tool are your best bets.
2
4
The Spot Healing
Brush smoothed out
some of the wrinkles.
Did You Know?
You can use the Clone Source panel to
set different sampling points.
The
Clone Source panel allows you to set
up to five different sampling source
points for the Clone Stamp tools or
Healing Brush tools. Click a clone
source button in the Clone Source
panel, and then click a sampling point.
To op en the Clone So ur ce panel, click
the Window menu, and then click
Clone Source. You can also scale or
rotate the clone source, or show an
overlay of the clone source.
1
From the Library of Wow! eBook
ptg
Chapter 7 Working with Adjustment Layers, Filters, and Tools 171
Working with the
Red Eye Tool
Use the Red Eye Tool
Select the Red Eye tool.
Select from the following options
on the Options bar:
◆ Pupil Size. Select the size of
the pupil in relation to the
amount of red eye.
◆ Darken Amount. Select how
much you want to darken the
pupil area of the eye.
Click in the middle of the red
portion of the eye, and release.
The red is removed, and the pupil
is darkened.
3
2
1
The Red Eye tool not only gives the digital restorer an excellent tool for
removing pesky red eye, it will also remove the green and white reflec-
tions in pet's eyes. The biggest generator of red eye is the onboard
flash on your camera. Actually, if they would simply rename a camera's
built-in flash, "red eye generator," it might help amateur photographers
pay more attention. However, until that day comes, designers will still
have to deal with images that contain red eye. The Red Eye tool per-
forms two operations: it desaturates the red values, and darkens the
pupil.
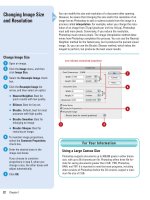
2
The red eye is removed
with the click of your
mouse.
3
1
From the Library of Wow! eBook
ptg
172 Chapter 7
The Levels adjustment lets you adjust the tonal range of an image by
giving you three sliders—one for shadows, midtones, and highlights.
Dragging the sliders precisely adjusts the tonal ranges of an image. In
addition, the Output sliders let you adjust the ink percentages used to
print during output. By adjusting the output ink levels, you avoid the
overly black images that sometimes plague images printed with high
dot-gain papers.
Controlling Tonal
Range
Control Tonal Range
Open a document in which you
want to change the tonal range.
Select the Layers panel, and then
select the layer to which you want
to apply the Levels adjustment.
Click the Create New Fill or
Adjustment Layer button, and then
click Levels or use the icon for
Levels from the Adjustments panel.
To use common Leve ls set ti ng s,
click the Levels list arrow, and
then select a preset. If you select
Auto, Photoshop will make a
Levels adjustment for you.
Click the Channel list arrow to
select whether to work on the
entire image, or just one of the
image’s default color channels
(useful for color correction).
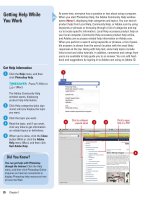
Drag the Shadow input slider to
the right to adjust the balance of
black in the image.
Drag the Midtone input slider left
or right to lighten or darken the
midtones of the image.
Drag the Highlight input slider to
the left to adjust the balance of
white in the image.
Drag the Black and White Output
Levels sliders left and right to
adjust the percentage of ink used
in printing the image.
9
8
7
6
5
4
3
2
1
1
4
6
7
8
9
5
3
From the Library of Wow! eBook
ptg
Chapter 7 Working with Adjustment Layers, Filters, and Tools 173
To load a pr ev iously saved Lev el s
adjustment, click Load Levels
Preset from the Levels options
menu, and then select and load
the file.
Click Save Levels Preset from the
Levels options menu to save the
current Levels adjustment.
Use the eyedropper tools to select
black, white, and midtone points
directly within the active image.
Use the available buttons to fine-
tune the adjustment and navigate
through the Adjustments panel.
◆ Left-pointing arrow moves you
back to the list of available
adjustment layer types.
◆ Folder icon with arrow toggles
the panel from Expanded view
to Standard view.
◆ The double circle icon creates
a clipping group.
◆ The eye icon toggles visibility of
the adjustment layer.
◆ The eye icon with an arrow
allows you to see the previous
state before the adjustment
was made.
◆ The circular arrow returns the
image to the default
adjustments.
◆ The trash can icon deletes the
adjustment layer.
13
12
11
10
To na l ch a ng e s a p pl i ed
Did You Know?
You can view the Levels Histogram
anytime.
Click the Window menu, and
then click Histogram. Photoshop opens
a Histogram panel that lets you view
tonal changes to the image as you
make them.
13
12
11
10
From the Library of Wow! eBook
ptg
174 Chapter 7
Photoshop's Histogram panel gives you many options for viewing tonal
and color information about the active image. The Histogram's default
display is the tonal range of the entire image. However, you can use
any of Photoshop's selection tools, select a portion of the active docu-
ment, and display a histogram for just that portion of the image. You can
also view a specific color channel or view all the channels at once. The
tonal range and color values for an image are vitally important to gen-
erating great graphics, and the Histogram panel is a great resource for
instant up-to-date information.
Working with the
Histogram Panel
Work with the Histogram Panel
Select the Histogram panel.
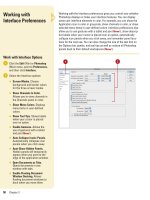
◆ Click the Window menu, and
then click Histogram.
Click the Histogram Options
button, and then select from the
following options:
◆ Uncached Refresh. Click to
refresh the image cache
(rescans the image).
◆ Compact View. Click to create
a small, panel-size view of the
Histogram panel.
◆ Expanded View. Click to create
an expanded view of the
Histogram panel. Includes
options to view specific
channels, luminosity settings or
color.
◆ All Channels View. Click to
view all the color channels.
◆ Show Statistics. Click to show
history statistics.
◆ Show Channels In Color. Click
to show the channels using
specific colors, such as red,
green, and blue.
2
1
1 2
All channels
in color
Expanded view
Viewing Information Using the Histogram Panel
You can view information about a specific pixel or pixel range using
the Histogram panel. Make sure the Expanded View option is select-
ed, and then place the pointer in the histogram to view information
about a specific pixel value. To view information about a range of
values, drag in the histogram to highlight the range.
For Your Information
From the Library of Wow! eBook


