adobe flash cs5 on demand part 18 doc
Bạn đang xem bản rút gọn của tài liệu. Xem và tải ngay bản đầy đủ của tài liệu tại đây (686.66 KB, 7 trang )
ptg
Chapter 3 Creating Graphics 105
Creating Gradients
Create a Multi-Color Gradient
With the Selection tool, select the
fill or stroke of a shape on the
Stage.
In the Color panel, click the Fill
Style Type list arrow, and then
click Linear Gradient or Radial
Gradient.
To select the gradient display style
(New!), click a Flow button:
Extend Color, Reflect Color, or
Repeat Color.
Position the pointer on the Color
Picker box to display a circle
pointer (New!).
Click in the Gradient bar to create
a color proxy indicated by a little
box with a triangle on top.
TIMESAVER
To remove a
proxy color indicator, drag it down.
Click one of the color proxy
indicators to select it.
Click a new color from the Color
Picker box above.
Drag the color proxy indicator
along the Gradient bar to adjust
the color placement.
Repeat steps 4-8 to add up to 15
more gradient colors.
9
8
7
6
5
4
3
2
1
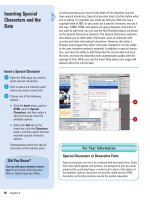
Flash can create a number of paint effects in addition to solid colors.
Gradients are made up of two or more colors that gradually fade into
each other. They can be used to give depth to an object or create real-
istic shadows. Two gradient modes are available: linear and radial.
Linear gradients are made up of parallel bands of color. Radial gradi-
ents radiate from a center focal point. Both can be edited for color,
alpha, and position within a fill or stroke. You can add up to 16 colors to
a gradient, precisely control the location of the gradient focal point,
and apply other parameters. A gradient behaves like any other fill or
stroke. It can be saved to the palette as a swatch using the Color panel
Options button, and added to other shapes with the Paint Bucket tool.
Example:
3-Color
Linear
Gradient
1
5
2
6
4
3
7
From the Library of Wow! eBook
ptg
106 Chapter 3
Using the Fill Lock
Lock Gradients
Create two simple shapes using
the Rectangle or Oval tool.
Select the first shape on the Stage
with the Selection tool.
Click the Paint Bucket tool on the
Tools panel.
TIMESAVER
Press K to select
the Paint Bucket tool.
Click the Lock Fill button in the
Options area of the Tools panel.
Select a Gradient from the Colors
area of the Tools panel or use the
Color panel or Property Inspector.
Click the Eyedropper tool on the
Tools panel, and then click on the
gradient fill in the first shape.
Click down on the second shape to
add the gradient fill.
7
6
5
4
3
2
1
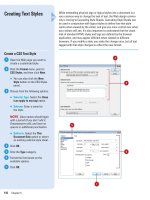
As you increase the complexity and number of shapes in your movie, it
can become tricky to edit each object separately. When using gradient
fills on several objects you can choose to span a gradient across sev-
eral of these objects or give each object its own discreet gradient. The
Lock Fill feature allows you to control how a fill is applied, essentially
locking its position so that depending on where the shapes are posi-
tioned relative to the gradient, the one gradient spans all of the shapes.
If you apply the same gradient to multiple shapes with the Fill Lock off,
the gradient is applied to each shape independently.
6
4
3
5
2 7
1
Shape 1 and 2
with Fill Lock
Shape 1 and 2
without Fill Lock
Did You Know?
You can quickly add a gradient that
spans all of your shapes.
Select all of
the objects you want to fill, and then
choose a gradient. Click the Paint
Bucket tool and make sure Fill Lock is
not selected. With your shapes still
selected, click them with the Paint
Bucket.
From the Library of Wow! eBook
ptg
Chapter 3 Creating Graphics 107
Using Paint Brush
Modes
Use Paint Brush Modes
Click the Brush tool on the Tools
panel.
Click the Brush Mode list arrow in
the Options area on the Tools
panel, and then select from the
following:
◆ Paint Normal. The brush paints
over everything including
strokes and other fills.
◆ Paint Fills. Painting only affects
existing fills and empty areas of
the Stage. Strokes are ignored.
◆ Paint Behind. The Paint Brush
only affects empty areas of the
Stage keeping existing lines
and fills intact.
◆ Paint Selection. Painting only
affects the selected areas you
define with any of the selection
tools.
◆ Paint Inside. The Paint Brush
only affects the fill of the shape
you started in, ignoring other
shapes and empty areas on the
Stage.
2
1
In addition to size, shape, and color settings for the Paint Brush tool,
you can control how the brush behaves when painting on existing
shapes and objects on the Stage. Paint Brush modes can restrict the
area affected by the tool to fills or selections, empty areas of the Stage
or specific shapes. When the Paint Brush tool is selected, a list arrow
menu appears on the Tools panel. Select from the following modes:
Paint Normal, Paint Fills, Paint Behind, Paint Selection, and Paint
Inside. Each performs a specific operation providing you with varying
levels of control as you paint. Flash previews your paint path as you
paint, but it only affects the areas you've specified in the Paint modes.
When you release the mouse, these previews disappear.
Paint Normal
Paint Fills
Paint Behind
Paint Inside
Paint Selection
Brush mode
options
1
2
From the Library of Wow! eBook
ptg
108 Chapter 3
Using the Spray
Brush Tool
Use the Spray Brush Tool
Click the Spray Brush tool on the
Tools panel.
Select a fill color for the default
spray of dots and other options in
the Property Inspector.
◆ Color Selector. Select a fill
color for the default spray
particle.
◆ Edit. Select a custom symbol
from the library. You can use
any movie clip or graphic
symbol in the library as the
spray particle.
◆ Scale. Scale the width and
height of a symbol used as a
spray particle.
◆ Random Scaling. Randomly
spray particles on the Stage
with different sizes.
◆ Rotate Symbol. Rotates the
symbol spray particle around a
center point.
◆ Random Rotation. Randomly
rotate spray particles on the
Stage.
◆ Width and Height. Specifies the
brush width and height.
◆ Brush Angle. Specifies the
spray angle of the particles.
Click or drag on the Stage where
you want the pattern to appear.
3
2
1
The Spray Brush tool allows you to spray particles onto the Stage using
the current fill color. If you want to create a more complex pattern, you
can also use a movie clip or graphic symbol from the library as a parti-
cle. You can adjust the spray pattern by selecting Symbol and Brush
options in the Property Inspector. The Symbol options include Scale,
Random scaling, Rotate symbol, and Random rotation, while the Brush
options include Width, Height, and Brush angle.
1
2
3
From the Library of Wow! eBook
ptg
Chapter 3 Creating Graphics 109
Using the Deco Tool
Use the Deco Tool
Click the Deco tool on the Tools
panel.
In the Property Inspector, click the
Drawing Effect list arrow, and then
select a drawing effect.
For the Vine Fill, Grid Fill, or
Particle System effect, select a fill
color for the default shape, or
select a symbol.
◆ Color Selector. Select a fill
color for the default pattern.
◆ Edit. Select a custom symbol
from the library. You can use
any movie clip or graphic
symbol in the library as the
pattern.
Specify the advanced options you
want for the different effects;
options vary depending on the
selected effect.
Click the Stage or within the shape
or symbol (Vine Fill, Grid Fill, and
Particle System) where you want
the pattern to appear.
5
4
3
2
1
The Deco tool allows you to apply a kaleidoscopic drawing effect to the
Stage or a selected object on the Stage. You can apply several effects
(New!): Vine Fill, Grid Fill, Symmetry Brush, 3D Brush, Building Brush,
Decorated, Fire Animation, Flame Brush, Flower Brush, Lightning Brush,
or Tree Brush. The Vine effect fills the Stage, symbol, object, or closed
area with a vine pattern. You can also use your own artwork (symbols)
for the leaves and flowers.The Grid effect fills the Stage, symbol,
object, or closed area with a symbol from the library. You can create
grid patterns, such as a tiled background or checkerboard. The
Symmetry effect arranges symbols symmetrically around a central
point, which you can control with a set of handles. You can create cir-
cular elements, such as a planet. The default symbol for the Symmetry
effect is a 25 x 25 pixel black rectangle with no stroke. You can use
other brushes (New!) to draw buildings, flames, lightning, trees, and
other effects to add fire and smoke animations (New!) or a particle
system (New!).
4
5
3
1
2
From the Library of Wow! eBook
ptg
110 Chapter 3
Drawing with the
Pen Tool
Use the Pen Tool to Create an
Open Path
Click the Pen tool on the Tools
panel.
TIMESAVER
Press P to quickly
select the Pen tool.
Click on the Stage.
An anchor point is created.
Move your pointer to another
position, and then click again.
Flash connects the two anchor
points.
Double-click to end the path.
TIMESAVER
Ctrl+click (Win) or
Command+click a blank area to
leave the path open.
4
3
2
1
The Pen tool is the basis for vector drawing. The Pen tool now behaves
similarly to the Illustrator Pen tool to provide consistency across Adobe
software. Flash provides a number of ways to draw and edit objects
that are unique to Flash, but the Pen tool utilizes procedures that will be
familiar to those who have used other vector drawing programs. The
Pen tool utilizes anchor points and Bézier handles to create lines and
shapes and behaves in a way that is familiar to those who have used
other programs such as Adobe Illustrator and Adobe FreeHand. You
can use the Pen tool arrow to select a different pen to add, delete, or
convert anchor points. You can edit the anchor points and vectors to
create the drawings you want.
2
3
Open path drawn
1
Pen tools
Did You Know?
You can end an open path using a key-
board shortcut.
Press A+click (Mac)
or Ctrl+click (Win).
See Also
See “Modifying Shapes with the Sub-
Selection Tool” on page 116 for infor-
mation on using tools.
From the Library of Wow! eBook
ptg
Chapter 3 Creating Graphics 111
Use the Pen Tool to Create a
Closed Path
Click the Pen tool on the Tools
panel.
TIMESAVER
Press P to quickly
select the Pen tool.
Click on the Stage.
An anchor point is created.
Move your pointer to another
position, and then click again.
Flash connects the two anchor
points.
Move the pointer to a third
position, and then click again.
Flash connects the second and
third anchor points.
Move the pointer back to the first
anchor point.
A small circle appears next to the
pen pointer indicating you can
close the path of the shape.
Click to close the shape.
6
5
4
3
2
1
2
3
1
4
5
Closed path drawn
Did You Know?
You can delete an anchor point with
the Pen tool.
Click the Pen tool arrow,
click Delete Anchor Point tool, and
then click the point you want to delete.
You can add an anchor point with the
Pen tool.
Click the Pen tool arrow, click
Add Anchor Point tool, and then click
where you want to add a point.
You can create horizontal, vertical,
and 45 degree lines while you draw.
Hold the Shift key while you draw to
constrain a line to horizontal, vertical,
and 45 degree angles.
Pointer Description
Initial Anchor Point First pointer to create the beginning of
a new path.
Sequential Anchor Creates an anchor point with a line
Point connecting the previous anchor point.
Add Anchor Point Adds an anchor point to existing path.
Delete Anchor Point Deletes an anchor point within a path.
Continue Path Extends a new path from an existing
anchor point.
Close Path Closes the path of a drawing on the
starting anchor point.
Join Paths Closes the path except not over the
starting anchor point.
Retract Bézier Handle Displays Bézier handles when you point
to an anchor. Click to retract the handles
and revert to straight segments.
Convert Anchor Point Converts a corner point without
direction lines to a corner point with
independent direction lines. Use Shift+C
modifier keys to toggle the pen.
Understanding Pen Pointers
From the Library of Wow! eBook