adobe dreamweaver cs5 on demand part 3 doc
Bạn đang xem bản rút gọn của tài liệu. Xem và tải ngay bản đầy đủ của tài liệu tại đây (503.27 KB, 5 trang )
ptg
16 Chapter 2
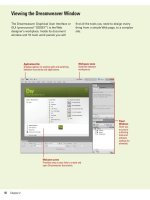
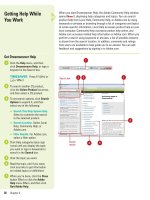
The Dreamweaver Graphical User Interface or
GUI (pronounced “GOOEY”) is the Web
designer's workplace. Inside its document
window and 19 main work panels you will
find all the tools you need to design every-
thing from a simple Web page, to a complex
site.
Viewing the Dreamweaver Window
Welcome screen
Provides easy access links to create and
open Dreamweaver documents.
Panel
Windows
Gives you
access to
authoring
tools and
attribute
settings for
elements.
Applications Bar
Displays options for working with and switching
between documents and applications.
Workspace menu
Switches between
workspaces.
From the Library of Wow! eBook
ptg
Chapter 2 Getting Started with Dreamweaver CS5 17
Document Window
Displays open Dreamweaver
documents along with the Document
bar and Related Files bar.
Document Bar
Displays buttons for viewing and
working with documents in
Dreamweaver.
Docking Channel
A place to attach and detach panels.
You can use the double-arrow button at
the top to collapse and expand panels.
Property Inspector
Displays information about the
properties and attributes of tools
and graphic elements.
From the Library of Wow! eBook
ptg
Before you create a Web site, you need to create a local root folder
where you’ll store all the elements that make up the site. Web sites are
more than just a bunch of Web pages. All the images, videos, naviga-
tional buttons, documents, scripts, etc., are separate files that must be
uploaded into those pages. Defining a Web site instructs Dreamweaver
that the local root folder is the folder location that contains all the ele-
ments of your site. In turn, Dreamweaver will keep track of the files
within the folder, automatically update them as needed, and give you
access to them, while you're working. The Site Setup dialog box (New!)
doesn’t force you to complete the site setup unless it’s required. As you
work on your site and a task needs information from the Site Setup dia-
log box, Dreamweaver opens it and highlights the required setting.
18 Chapter 2
Creating a Web Site
Create a New Web Site
Define a local root folder where
you’ll store all the elements that
you will use to build your Web site.
Start Dreamweaver.
Click the Site menu, and then click
New Site.
Dreamweaver gives you several
categories on the creation of a
Web site: Site, Servers, Version
Control, and Advanced Settings.
Click the Site category.
Name your site (Site names are
not file names, so feel free to use
any naming convention you wish).
Enter the location of your local
root folder, or click the Browse For
Folder icon, located to the right of
the input box, navigate to the
folder you want to use as the root
folder, and then click Select.
Click the Servers category.
To specify the server (
optional at
this point; you can do it later
) that
will host your pages on the web,
click the Add New Server button,
specify the server name, FTP
address, username and password,
and root directory on the Basic
tab, and then click Save.
8
7
6
5
4
3
2
1
4 5
6
87
From the Library of Wow! eBook
ptg
Chapter 2 Getting Started with Dreamweaver CS5 19
Click the Version Control category.
To use version control software
(
optional at this point; you can do it
later
), click the Access list arrow,
click Subversion, and then specify
the protocol type, server address
and settings, and username and
password.
Click the Advanced Settings
category.
A list of subcategories appears,
where you can set advanced
settings. We'll deal with Advanced
Settings in Chapter 20.
Click Save to complete the
process.
Dreamweaver creates a site
definition based on your options
and your choice of the local root
folder (In our example,
youtechtube).
When you define a site in
Dreamweaver, the Assets and
Files panels will now display a list
of all your folders and files.
12
11
10
9
See Also
See “Setting Advanced Site
Definitions” on page 474 for informa-
tion on using the Advanced tab in the
Site Definition dialog box.
Creating a Local Root Folder
The first step to a successful Web site is careful planning, and the cre-
ation of a local root folder. Since this is covered in Chapter 1, we'll
assume that you've already taken care of this very important part of the
design process. Remember, the local root folder contains all the ele-
ments that you use to build your Web site and all the individual pages
and parts that it contains. It's very possible that you've already put in a
lot of computer time before coming to this very important first step in
Dreamweaver. For example, you may have created many of the images
and graphics that you're going to use by working in Adobe Photoshop
and Illustrator. You may have designed some Adobe Flash animations,
and you might have even used Microsoft Word and Excel to generate
some text documents and spreadsheets. All of these elements would
be in the local root folder. In keeping with Chapter 1, we call this local
root folder,
youtechtube
. Now that you have your local root folder, the
next step is to inform Dreamweaver that this is the folder you'll be
using for the creation of this particular Web site.
For Your Information
9 10
1211
From the Library of Wow! eBook
ptg
Adobe Dreamweaver allows you to manage multiple sites. When you
open Dreamweaver it will load the Web site last used. If, however, you
need to work on another Web site it's a simple matter to redirect
Dreamweaver to the needed site using the Manage Sites dialog box,
which you can also use to create, edit, duplicate, remove, export, and
import sites.
20 Chapter 2
Opening a Web Site
Open Predefined Sites
Click the Site menu, and then click
Manage Sites.
Select the site from the listed
options.
Click Done.
Dreamweaver closes the first site
and loads all the assets for the
selected site.
3
2
1
2
3
From the Library of Wow! eBook
