adobe flash cs5 on demand part 31 ppsx
Bạn đang xem bản rút gọn của tài liệu. Xem và tải ngay bản đầy đủ của tài liệu tại đây (669.03 KB, 8 trang )
ptg
Chapter 5 Working with Text 185
Set a Text Box to Device Font
Select the text box you want to set
to the device font with the
Selection tool.
Click the Anti-Alias list arrow in
the Property Inspector, and then
click Use Device Fonts.
Choose a Built-In Flash
Device Font
Select the text box you want to set
to the device font with the
Selection tool.
Click the Family list arrow in the
Property Inspector or click the
Text menu, point to Font, and then
select one of the following fonts:
◆ _sans. Matches up with a sans-
serif font, such as Helvetica or
Arial.
◆ _serif. Matches up with a serif
font, such as Times or
Garamond.
◆ _typewriter. Matches up with a
typewritten-looking font, such
as Courier.
2
1
2
1
2
1
1
2
Did You Know?
You can test for missing fonts.
If there
is incomplete font information on your
computer, fonts may appear in the Font
list in Flash but will not embed in the
final movie. To test whether a font is
complete, click the View menu, point to
Preview Mode, and then click Anti-
alias Text. If the text appears jagged,
this means the font outlines are miss-
ing from the system.
From the Library of Wow! eBook
ptg
186 Chapter 5
When you create Classic text boxes in Flash, they default to static
boxes. A static box is for display only and is hard-coded in the .swf.
One cannot be changed unless you return to the Flash development
environment, edit it, and re-export the file. If you need your text to be
updatable from an outside source, such as a text document on a server
or if you need the user to input text for you to retrieve and process with
ActionScript, you can set your text box to enable this functionality.
Setting your text box to dynamic text turns it into an ActionScript object
that can be given an instance name or turned into a variable that can
be populated from some other source outside of the .swf. This is great
when you need to update content on the fly and would rather not have
to deal directly with Flash for each update. If you require the user to
enter a string of text, such as in a form, you can set a text box to input
text. This enables the user to enter information in the text box that can
be retrieved and processed.
Creating Classic
Dynamic Text and
Input Text
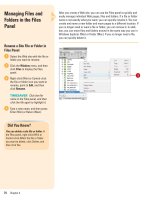
Set a Classic Text Box to be
Dynamic
Select the Classic text box you
want to be a dynamic box with the
Selection tool.
Click the Text Type list arrow in the
Property Inspector, and then click
Dynamic Text.
Select from the following
properties:
◆ Instance Name. Gives the text
box an instance name so it can
be controlled with ActionScript.
◆ Embed Options. Allows you to
choose which characters you
want to embed in the text.
◆ Letter Spacing. Changes
character position on a line.
◆ Render Text As HTML.
Preserves Rich Text Formatting,
allowing you to include
hyperlinks and HTML tags.
◆ Show Border. Displays a
border around the text box in
the exported movie.
◆ Variable Name. Gives the text
box a variable name for use
with ActionScript.
3
2
1
Show Border, Render Text As HTML
Variable Name
2
Instance Name
1
Embed Options
3
Line Type
Letter Spacing
Dynamic text boxes display in
a dashed bounding box.
From the Library of Wow! eBook
ptg
Chapter 5 Working with Text 187
Set a Classic Text Box to be an
Input Box
Select the Classic text box you
want to be an input box with the
Selection tool.
Click the Text Type list arrow in the
Property Inspector, and then click
Input Text.
Select from the following
properties:
◆ Instance Name. Gives the text
box an instance name so it can
be controlled with ActionScript.
◆ Embed Options. Allows you to
choose which characters you
want to embed in the text.
◆ Letter Spacing. Changes
character position on a line.
◆ Line Type. Choose from Single
Line and Multi-Line with or
without Wrap, and Password
(available only for Input text).
◆ Selectability. Allows or denies
the user the ability to select the
text in the exported movie.
◆ Show Border. Displays a
border around the text box in
the exported movie.
◆ Variable Name. Gives the text
box a variable name for use
with ActionScript.
◆ Maximum Characters. Limit the
amount of characters a user
can enter into the box.
3
2
1
Show Border, Render Text As HTML
Embed Options
Line Type
2
Instance Name
Maximum Characters
Input text boxes display in a
dashed bounding box.
3
1
Letter spacing
Did You Know?
You can create scrolling text.
Shift-
double-click the handle of dynamic and
input text to create text boxes that
don’t expand when you enter text on
the Stage.
Using Multiple Languages in a Document
When you're working with Classic text in a Flash document, don't for-
get the global community. Flash supports multi-language authoring.
You could create a document that displays text in Spanish and
English, using a variety of methods: The text can be written within an
external file and called using the #include ActionScript within a
dynamic or text input box, or the text can be inserted into the docu-
ment at runtime using an external XML (Extensible Markup Language)
file. This allows you to insert different languages that automatically
appear to the visitor. When you're working with multi-language Flash
documents, click the Window menu, point to Other Panels, and then
click Strings. The Strings panel lets you streamline the process of
localizing content into multiple languages, because it collects and
tracks all character strings throughout the development process in a
central place. In the Strings panel, you can select a language and
assign each text string, either a dynamic or input text box, in the
document with a unique ID. The Strings panel has been improved to
include multi-line support in the String box and the language XML file.
For Your Information
Variable Name
From the Library of Wow! eBook
ptg
188 Chapter 5
Flash includes a global spell-checker that is fully configurable. Search
the entire Flash document or isolate specific elements to search in the
Spelling Setup dialog box. You can choose from a variety of built-in dic-
tionaries as sources including a personal dictionary you can edit.
Additionally, you can choose which text characteristics to ignore, such
as words with numbers and internet addresses, as well as choose what
type of alternative suggestions you want Flash to provide.
Checking Spelling
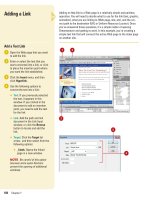
Set Up Spell Checking
Click the Text menu, and then click
Spelling Setup.
Select from the following options:
◆ Document Options. Specify
which elements in the Flash
document you want to spell
check. You can also specify
whether you want to live-edit
the document during the Check
Spelling process.
◆ Dictionaries. Select a built-in
dictionary as a source. At least
one dictionary must be
selected to activate Check
Spelling.
◆ Personal Dictionary. Specify an
option to use a dictionary
created and edited by you.
Navigate to a text document on
your hard drive or edit the
default one included by clicking
the Edit Personal Dictionary
button. Each new entry in the
personal dictionary must be on
a separate line.
◆ Checking Options. Set word-
level behaviors. You can have
Internet addresses ignored, find
duplicate words, or specify the
types of suggestions you want
displayed in the Check Spelling
window.
Click OK.
3
2
1
3
Set parameters
for Spell Check
Set new location
for Personal
Dictionary
Built-in
Dictionaries
Spell Check
Set locations to
Allow or deny on-the-fly
editing during Spell Check
From the Library of Wow! eBook
ptg
Chapter 5 Working with Text 189
Use Spell Checking
Click the Text menu, and then click
Check Spelling.
If Flash finds suspect words, the
Check Spelling dialog box opens.
Otherwise, Flash displays a
message that the Spell Check is
complete.
Word not found (*element*):
This identifies the suspect word
and what type of element it was
found in parenthesis.
Do one of the following:
◆ Add To Personal. Click to add
the word to your personal
dictionary.
◆ Ignore. Click the Ignore and
Ignore All buttons to not flag
this word again in this Check
Spelling session.
◆ Change. Click Change or
Change All. In the Change To
and Suggestions boxes, Flash
displays the closest altern-
atives to the suspect word.
◆ Delete. Click to delete the word
from the box that contains it.
Continue until Flash produces a
message that Check Spelling is
complete or click Close to stop the
Check Spelling process before it is
completed.
4
3
2
1
Ignore all incidences
of the word
Change all
incidences of the
word
Ignore the word
Delete the text box
from the document
Change the word to one from the
suggestion list or one you’ve typed in
Adds word to your
personal Library
Identifies the location (the
element) the misspelled
word is located in
Suggestions
generated from
built-in and
personal
dictionaries
Displays
Misspelled word
and allows you to
enter a new one to
replace it
2
3
Access
Spelling
setup
Did You Know?
You must access the Spelling Setup
once to activate Check Spelling.
You
need to activate Check Spelling to
select a dictionary. Click the Text
menu, and then click Spelling Setup.
4
From the Library of Wow! eBook
ptg
190 Chapter 5
Use Find and Replace to locate specific elements in your Flash docu-
ment. You can specify where to look, what to look for, and what to
replace it with. Choose to search the entire Flash document or the cur-
rently active scene. Each element you search for has its own config-
urable settings and options. Included is a log that shows the exact
locations of the found element.
Using Find and
Replace
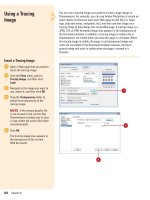
Locate Items with Find
and Replace
Click the Edit menu, and then click
Find And Replace.
TIMESAVER
Press
A
+F
(Mac) or Ctrl+F (Win) to quickly
open the Find and Replace
window.
Select where you want to search
from the Search In list arrow
menu.
Select which element from the For
list arrow menu you want to
search for in Flash:
◆ Text
◆ Font
◆ Color
◆ Symbol
◆ Sound
◆ Video
◆ Bitmap
Enter and/or select the parameters
you want for your search.
To find the elem ent with the
characteristics you've entered,
click Find Next or Find All.
To update the found element with
the new characteristics, click
Replace or Replace All.
6
5
4
3
2
1
5
6
2
4
3
From the Library of Wow! eBook
ptg
Chapter 5 Working with Text 191
Using Cascading Style Sheets with HTML Text
Cascading Style Sheets (CSS) contain sets of
formatting rules for HTML and XML text. CSS
allow you to define certain text attributes and
give them a style name. This style name,
called a selector, can be applied to any imple-
mented text. Each time you need to imple-
ment the defined style, you can refer back to
the CSS. This allows for more control over the
text displayed on your Web page. Load styles
from an external CSS or create them within
Flash using the Style Sheet Object. The
ActionScript class for CSS is described as:
Text Fi el d. St yl eS he e t. Th is is a n e w fu nc ti on al -
ity and it is only available to SWFs in the
Flash 7 Player or later.
Load an external CSS
In any text or HTML editor, place the follow-
ing code:
// External CSS File: styles.css
headline {
font-family: Arial, Helvetica, sans-serif;
font-size: 12 px;
}
bodyText {
font-family: Arial, Helvetica, sans-serif;
font-size: 10 px;
}
This code is typically found in a CSS. This
example defines two styles, one for a sans-
serif headline at 12 pixels, the other a sans-
serif body text at 10 pixels.
Select the first frame of your Flash movie.
Place the following code in the Actions panel:
var css_styles = new TextField.StyleSheet();
css_styles.load("styles.css");
css_styles.onLoad = function(ok) {
if(ok) {
// display style names
trace(this.getStyleNames());
} else {
trace("Error loading CSS file.");
}
}
The CSS you created, “styles.css” is loaded
into this object. A loader is created to ensure
the CSS is loaded properly. Make sure the
CSS and the swf are in the same directory.
Create a CSS in Flash
Select the first frame of your Flash movie. The
following code creates a text style for head-
line text and body text. Place the following
code in the Actions panel:
var styles = new TextField.StyleSheet();
styles.setStyle("headline",
{fontFamily: 'Arial,Helvetica,sans-serif',
fontSize: '12px'}
);
styles.setStyle("bodyText",
{fontFamily: 'Arial,Helvetica,sans-serif',
fontSize: '10px'}
);
This CSS code can now be placed in the
Actions panel in Flash. This example defines
two styles, one for a sans-serif headline at 12
pixels, the other a sans-serif body text at 10
pixels.
From the Library of Wow! eBook
ptg
This page intentionally left blank
From the Library of Wow! eBook