adobe dreamweaver cs5 on demand part 5 ppsx
Bạn đang xem bản rút gọn của tài liệu. Xem và tải ngay bản đầy đủ của tài liệu tại đây (1.01 MB, 8 trang )
ptg
28 Chapter 2
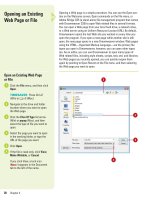
Opening a Web page is a simple procedure. You can use the Open sec-
tion on the Welcome screen, Open commands on the File menu, or
Adobe Bridge CS5 (a stand-alone file management program that comes
with Dreamweaver CS5) to open Web related files in several formats.
You can open a Web page from your local hard drive, a network drive,
or a Web server using an Uniform Resource Locator (URL). By default,
Dreamweaver opens the last Web site you worked on every time you
open the program. If you open a new page while another site is still
open, the new page opens in a new Dreamweaver window. Web pages
using the HTML—Hypertext Markup Language—are the primary file
types you open in Dreamweaver, however, you can open other types
too. As an editor, you can use Dreamweaver to open many types of
Web related files, including style sheets, scripts, text, xml, and libraries.
For Web pages you recently opened, you can quickly reopen them
again by pointing to Open Recent on the File menu, and then selecting
the Web page you want to open.
Opening an Existing
Web Page or File
Open an Existing Web Page
or File
Click the File menu, and then click
Open.
TIMESAVER
Press Ctrl+O
(Win) or
A
+O (Mac).
Navigate to the drive and folder
location where you want to open
the Web page.
Click the Files Of Type list arrow
(Win) or popup (Mac), and then
select the type of file you want to
open.
Select the page you want to open
in the working folder, or type the
URL of the page you want.
Click Open.
If the file is read-only, click View,
Make Writable, or Cancel.
If you click View, a lock icon
(New!) appears in the Document
tab to the left of the name.
6
5
4
3
2
1
2
4
5
3
From the Library of Wow! eBook
ptg
Chapter 2 Getting Started with Dreamweaver CS5 29
Open a Recently Opened
Document
◆ File Menu. Click the File menu,
point to Open Recent, and then
click the file you want to open.
◆ Welcome Screen. At the Welcome
Screen, click the file you want to
open under Open A Recent Item.
Click to open recently opened files
Click to access the Open dialog box
Did You Know?
You can open a recent file quickly
from the Start menu (Win).
Click the
Start button, point to Recent Items
(Vista) or My Recent Documents (XP),
and then click the file name you want
to open.
You can browse and open files in
Adobe Bridge.
Click the File menu,
click Browse In Bridge, select a work-
space display to view your files the
way you want, navigate to the drive or
folder where the file is located. To
open the file, double-click the file icon.
To retu rn bac k to Dre am we ave r, cli ck
the File menu, and then click Return To
Adobe Dreamweaver.
File Type Description
HTML Hypertext Markup Language (.html or .htm) files display
Web pages in a browser.
CSS Cascading Style Sheet (.css) files are used to format
and position HTML content in a consistent manner.
GIF Graphics Interchange Format (.gif) files are used for
graphics, such as logos, containing a max of 256 colors.
JPEG Joint Photographic Expert Group (.jpeg) files are used for
graphics, such as photographs, requiring more than 256 colors.
XML Extensible Markup Language (.xml) files contain data in raw
form that can be formatted using XSL.
XSL Extensible Stylesheet Language (.xsl or .xslt) files are used
to style XML data.
CFML ColdFusion Markup Language (.cfm) files are used to process
dynamic Web pages.
ASPX ASP.NET files (.aspx) files are used to process dynamic Web
pages.
PHP Hypertext Preprocessor (.php) files are used to process
dynamic Web pages.
Common Dreamweaver File Types
From the Library of Wow! eBook
ptg
30 Chapter 2
When you open a Web page, Dreamweaver
displays three view buttons on the Document
toolbar and uses View menu commands to
help you work more efficiently.
Code
view displays the HTML and any
embedded code for a page.
Split Code
view displays the screen in half
vertically (New!). Both halves display page
code. Only available on View or Layout menu.
Code and Design
view displays the screen in
half vertically (New!). One half displays the
current page in Code view and the other half
displays the current page in Design view.
Design
view displays Web pages in WYSIWYG
(What You See Is What You Get) for editing.
In a split screen display, you can change the
placement of the content. Click the View
menu, and then click Split Vertically (horizon-
tal when unchecked), or Design View on Left
or Design View on Top.
Working with Views
Code view
Split Code view
Design view
Code and Design view
From the Library of Wow! eBook
ptg
Chapter 2 Getting Started with Dreamweaver CS5 31
The tabs across the top of the Document window indicate the currently
open Web pages. You can click the tab to display the page or site you
want. Below the tab in the Document window, the view buttons—Code,
Split, and Design—appear for the current page. Design view displays
the page or site as it appears on screen, while Code view displays the
HTML code that makes up the page or site. Split (Code and Design)
view shows you Code view at the top and Design view at the bottom,
while Split Code view shows code at the top and bottom.
Switching Between
Pages and Views
Switch Between Web Pages
◆ Web Pages. Click the tab with the
name you want to display.
TIMESAVER
Press Ctrl+Tab or
Ctrl+Shift+Tab to cycle thru tabs.
Switch Between Page Views
◆ Switch Views. Click the Code,
Split, or Design button below the
tab on the Document toolbar in the
Document window, or click the
View or Layout menu, and then
click the view you want: Code,
Split Code, Design, and Code and
Design.
◆ The Split Code command (no
button available) displays code
in a split screen.
TIMESAVER
Press Ctrl+`
(accent above Tab key) to cycle to
the view you want.
Click tabs to switch between open files
Click to switch views
Did You Know?
You can view multiple documents in a
single Document window (Mac).
Control-click the tab, and then click
Move To New Window. To combine
separate documents into tabbed win-
dows, click the Window menu, and
then click Combine As Tabs.
Click to display the Layout menu
From the Library of Wow! eBook
ptg
32 Chapter 2
As you work on your site, you will probably want to see what individual
pages look like. Instead of previewing pages in an external browser, you
can view pages as they will appear in a browser in Dreamweaver using
Live view, a non-editable view. You switch to Live view from Design
view, which becomes frozen. However, you can still use Code view to
make changes and then refresh it back in Live view. In Live view, you
can set options (New!) to follow links in pages, type URLs using the
Browser Navigation bar (New!), and edit browsed pages from your site
in a new tab. In addition, you can also freeze JavaScript and the page in
its current state. This allows you to make and refresh changes to step
through different states of an interactive element, such as menus, which
you can’t do in Design view. While in Live view, you can also view Live
Code, which is a non-editable view of the executed code on the page.
When code states change, Live Code highlights the code in different
colors (New!) for easy viewing.
Previewing Pages in
Live View
Preview a Web Page in Live
View and Live Code View
Open the Web page you want to
view.
Switch to Design view or Code and
Design view.
Click the Live View button.
If you want, make changes in Code
view, in the CSS Styles panel, in an
external CSS style sheet, or in
another related file.
◆ You can open related files by
using the Related Files toolbar.
Click the Refresh button in the
Document toolbar or press F5 to
view any changes.
To go to Live Code view, click the
Live Code button.
Live code view appears displaying
browser code. The non-editable
code is highlighted in different
colors for code state changes.
To re tu rn back to Live view, click
the Live Code button again.
To re tu rn back to Desig n view,
click the Live View button again.
8
7
6
5
4
3
2
1
3
6
2
5
8
1
From the Library of Wow! eBook
ptg
Chapter 2 Getting Started with Dreamweaver CS5 33
Select Live View Options
Open the Web page you want to
view.
Switch to Design view or Code and
Design view.
Click the Live View Options button
on the Browser Navigation toolbar
(New!), or click the View menu,
point to Live View Options, and
then select any of the following:
◆ Freeze JavaScript. Freezes
elements that use JavaScript.
◆ Disable JavaScript. Displays the
page as if the browser doesn’t
have JavaScript enabled.
◆ Disable Plug-ins. Displays the
page as if the browser doesn’t
have plug-in enabled.
◆ Highlight Changes in Live Code.
Highlights code state changes in
different colors (New!).
◆ Show Browser Navigation Bar.
Use to navigate pages (New!).
◆ Edit the Live View Page in a
New Tab. Opens Live view page
in a new tab for editing (New!).
◆ Follow Link or Follow Links
Continuously. Allows you to
follow links in Live view (New!).
◆ Automatically Sync Remote
Files. Automatically updates
remote files (New!).
◆ Use Testing Server For
Document Source. Used for
dynamic pages. Uses the file
version on the site’s testing
server as the Live view source.
◆ Use Local Files For Document
Links. Used for non-dynamic
sites. Uses the local file version
as the Live view source.
◆ HTTP Request Settings. Allows
you to set advanced settings for
displaying live data.
3
2
1
3
21
Using the Browser Navigation Bar in Live View
The Browser Navigation bar (New!) allows you to navigate to
pages in Live view. The Browser Navigation bar includes similar
options to those in a Web browser. You can enter a URL in the
Address bar, and use the Back, Forward, Refresh, and Home buttons
to navigate to pages in Live view. The Home button displays your
original document. On the right side of the bar is the Live View
Options button, which you can use the display content in Live view
or Live Code view. To show or hide the Browser Navigation bar,
click the View menu, point to Live View Options, and then click
Show Browser Navigation Bar, or click the View menu, point to
Toolb ars, and the n cli ck Browser Nav ig ation.
For Your Information
Live View Options button
Browser Navigation Bar
From the Library of Wow! eBook
ptg
34 Chapter 2
As you work on the development of your site, you will probably want to
occasionally stop and see what the individual pages look like when pre-
viewed within a specific browser. One of the most used features for
testing your site is the Preview In Browser feature. This is one of the
most used when working in Dreamweaver. It lets you see what your site
will look like in a particular Internet browser. When testing a particular
Web page, it's a good idea to check it out in more than one browser,
and in more than one version of the browser on different operating sys-
tems. For example, it may look great in Safari on the Macintosh, and not
even work in Internet Explorer on Windows. If you don’t have access to
other browsers and operating systems, you can use Adobe Browser-
Labs, an online service that you can use from within Dreamweaver, to
view your Web pages.
Previewing Pages in
Browser
Preview a Web Page
Open the Web page you want to
view.
Click the File menu, point to
Preview In Browser, and then
select a browser from the
available options.
◆ Adobe BrowserLab. An online
service that allows you to view
using different browsers and
operating systems.
If the Web page needs to be
saved, you will be prompted to
save the page before continuing.
The Web page opens and displays
in the selected browser. Check the
page display and links.
When you’re done, close the
browser.
4
3
2
1
1
2
4
Preview in browser
Did You Know?
What it means when you get an error
previewing a Web page.
The preview
in browser function may return a "page
cannot be found" error if any of the
characters in the path of the local
folder have a different letter case than
the path of the testing server folder.
From the Library of Wow! eBook
ptg
Chapter 2 Getting Started with Dreamweaver CS5 35
Edit the Browser List in
Preferences
Click the File menu, point to
Preview In Browser, and then
click Edit Browser List.
Click the Plus (+) button to add
another browser to the list.
Give the new browser a name.
Click Browse, and then locate the
browser you want to add to your
list.
Select the browser, and then click
Open.
Select the Primary Browser or
Secondary Browser check box to
decide whether this new browser
is the primary or secondary
browser.
Click OK to return to the
Preferences dialog box.
Click OK to close the dialog box
and save your changes.
Click the File menu, and then point
to Preview In Browser.
Your new browser option is added
to the list.
9
8
7
6
5
4
3
2
1
8
4
7
3
6
Did You Know?
You can use keyboard shortcuts to
preview pages.
The Primary Browser
launches when you press the F12 key.
The Secondary Browser launches
when you press Ctrl+F12 (Win) or
A+F12 (Mac).
Using Adobe BrowserLab
Adobe BrowserLab is an online service that allows you to test pages
of your Web site using different browsers and operating systems.
You can use it as a standalone service or within Dreamweaver. In
Dreamweaver, you can preview local web content from your local
site, or from a remote or testing server. To set file location prefer-
ences, click the CS Live menu, click BrowserLab to open the panel,
click the Location list arrow, and then click Local or Server. You can
preview a page from Design or Live view. To preview a page, click
the File menu, point to Preview In Browser, and then click Adobe
BrowserLab, or click the Preview button in the Adobe BrowserLab
panel.
For Your Information
2
From the Library of Wow! eBook
