adobe flash cs5 on demand part 46 docx
Bạn đang xem bản rút gọn của tài liệu. Xem và tải ngay bản đầy đủ của tài liệu tại đây (711.73 KB, 9 trang )
ptg
280 Chapter 10
To create a shape tween you need to draw or place an editable shape
in a keyframe. Use any of Flash's drawing tools or import a vector
shape from another vector drawing program. If you want to apply a
shape tween to grouped artwork or a symbol, you can break apart the
group or enter symbol editing mode and apply the shape tween to any
editable shape in the symbol's Timeline. You can quickly view your ani-
mation by exporting it with the Test command (in Flash Professional).
By default, Flash loops animations in the Flash Player.
Changing Shape
Positions with Shape
Tweening
Animate a Ball with
Shape Tweening
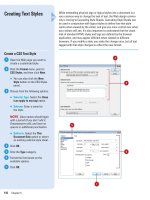
Create a new Flash document.
Select the Oval tool on the Tools
panel.
Set the Stroke Color to None.
On the first frame, draw a circle on
the left side of the Stage.
Select the first frame.
Click the Insert menu, and then
click Shape Tween.
Click frame 20 in the Timeline.
Click the Insert menu, point to
Timeline, and then click Keyframe.
Flash tints a shape-tweened span
a pale green.
TIMESAVER
Press F6 to add a
keyframe.
8
7
6
5
4
3
2
1
3
5
7
4
Circle position
on Frame 1
2
From the Library of Wow! eBook
ptg
Chapter 10 Animating with Shape Tweening 281
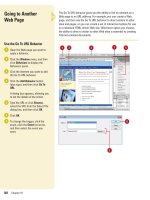
Select the Selection tool on the
Tools panel.
Select the circle on frame 20 and
drag it to the right side of the
Stage.
Click frame 40 in the Timeline, and
then add another keyframe.
Select the circle shape on frame
40 and drag it back to the left side
of the Stage.
Click the Control menu, point to
Test Movie, and then click Test.
The ball animates back and forth
across the screen.
13
12
11
10
9
9
10
13
Circle position on Frame 20
Circle position on Frame 40
11
From the Library of Wow! eBook
ptg
282 Chapter 10
Many of the same motion effects can be applied using either motion or
shape tweening. What differentiates shape tweening from motion
tweening is that shape tweening is applied to editable shapes. You can
change the form of the shape on either keyframe and these changes
will be applied gradually by Flash across the tween, slowly morphing
one into the other. Additionally, you can combine movement with this
tweening process, so your shape can change its shape as it changes
its location.
Changing Shape
Position and Form
Simultaneously
Combine Shape Tweening and
Movement in a Ball Animation
Create a shape tween of a moving
ball that begins on the left side of
the Stage, hits the right side of the
Stage, and then returns to the left.
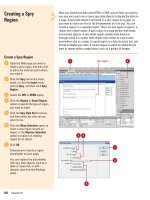
Click to place the playhead
between the first and second
keyframes in the shape tween.
Click the Insert menu, point to
Timeline, and then click Keyframe.
Select the Selection tool on the
Tools panel.
Place the pointer on the left edge
of the shape and pull it to create a
tail off the circle.
The shape must be deselected on
the Stage to pull the edges of the
shape.
5
4
3
2
1
4
5
Small curve icon indicates
editable curve.
New keyframe
placed at Frame 10.
Shapes must be deselected
to pull the edges.
2
1
From the Library of Wow! eBook
ptg
Chapter 10 Animating with Shape Tweening 283
Click to place the playhead
between the second and third
keyframes in the shape tween.
Click the Insert menu, point to
Timeline, and then click Keyframe.
With the Selection tool still
selected, place the pointer on the
right edge of the shape and pull it
to create a tail off the circle.
Click the Control menu, point to
Test Movie, and then click Test.
The ball stretches as it animates
back and forth across the screen.
9
8
7
6
6
New keyframe placed at Frame 30.
8
See Also
See "Changing Shape Positions with
Shape Tweening" on page 280 for infor-
mation on animating a moving ball.
From the Library of Wow! eBook
ptg
284 Chapter 10
When shape tweens are applied to keyframes, the Property Inspector
enables several options for controlling how Flash draws the tweened
frames. Settings such as easing in and easing out enable you to control
how the shape changes are distributed across the frames in the tween.
Frame Blending allows you to set preferences to let Flash know which
qualities to maintain during the tween.
Adjusting Shape
Tween Properties
Set Shape-Tween Properties
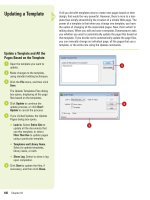
Click the Window menu, and then
click Properties to open the
Property Inspector.
Select a keyframe with shape
tween applied.
Choose from the following
settings:
◆ Ease. This sets the speed at
which your object eases in or
out of its motion. A positive
value eases in, a negative value
eases out.
◆ Blend. The Distributive option
smoothes out the tweened
shapes, while the Angular
option preserves corners and
straight lines in the shape
tweens.
3
2
1
1
3
From the Library of Wow! eBook
ptg
Chapter 10 Animating with Shape Tweening 285
Because shape tweening can only be applied to editable shapes, you
can't use the same color style effects that are available to instances.
Instead, you must make these changes directly to the shape using the
color palettes, the Color panel, or the Swatches panel. When shape
tweening is applied, differences in color and alpha are tweened along
with any shape changes. This applies to strokes as well as fills.
Changing Shape
Tweening Color and
Alpha Options
Change Shape-Tween Color
Select the beginning or ending
keyframe in a shape tween or
select the shape on the Stage.
Click the Window menu, and then
click Color, if necessary.
TIMESAVER
Press Shift+F9 to
open the Color panel.
Make changes to the shape's
stroke and fill colors by entering
values in the RGB, HSB, and Alpha
fields, or by using the list arrows to
the right of these fields.
Click the Control menu, point to
Test Movie, and then click Test.
The shape color changes as the
shape tweens.
4
3
2
1
Stroke Color
Fill Color
Did You Know?
You can use any palette available to
change the color of a shape in a
tween.
In addition to the Color Mixer,
there are palettes located on the Tools
panel, Property Inspector, and
Swatches panel.
1
See Also
See “Modifying Instance Color Styles
and Blends” on page 158-159 for more
information on working with color and
alpha options.
Color Picker
3
From the Library of Wow! eBook
ptg
286 Chapter 10
Sometimes it isn't possible to predict how some, more complicated,
shapes will tween. To exercise greater control over the tweening
process, you can set shape hints to guide how Flash draws the in-
between frames. You simply specify a beginning shape hint and then a
corresponding end shape hint. In this way, Flash will know which parts
of the shape in the first keyframe will transform into which parts in the
end keyframe. Even with shape hints enabled, the results can be unpre-
dictable, but you will have a greater control over the process.
Using Shape Hints
Set Shape Hints
Create a shape tween of a simple
shape into a complex shape.
Click to place the playhead on the
first frame of the shape tween.
Click the Modify menu, point to
Shape, and then click Add Shape
Hint.
A small red, circle with a small
letter on it appears in the center of
the shape. The first letter is "a".
Shape hints appear in alphabetical
order "a, b, c…". You can use up to
26 hints in one tween.
TIMESAVER
Press Shift+
A
+H
(Mac) or Ctrl+Shift+H (Win) to
insert a shape hint.
Drag the shape hint to an area of
the shape you want to control.
Click to place the playhead on the
last frame of the shape tween.
The corresponding shape hint
appears as a small green circle
with a corresponding letter that
matches the beginning hint.
5
4
3
2
1
Beginning
shape hint “a”
End shape
hint “a”
4
2
Place start shape hints
on problem areas.
Place end shape hints on
corresponding areas.
Did You Know?
You can show all shape hints.
Click
the View menu, and then click Show
Shape Hints.
5
From the Library of Wow! eBook
ptg
Chapter 10 Animating with Shape Tweening 287
Drag the corresponding end shape
hints to the part of the shape that
corresponds to the placement of
the beginning shape hint.
"a" should correspond with "a", "b"
should correspond with "b", etc.
Move the playhead back to the
first frame.
Repeat steps 3, 4, 5, 6, and 7 until
you have set and placed shape
hints on all areas of the shape you
want to control.
Click the Control menu, point to
Test Movie, and then click Test.
The shape hints help make
complex shape tweens more
predictable.
9
8
7
6
Animation without Shape Hints
Animation with Shape Hints
Did You Know?
You can remove shape hints.
Drag
shape hints off the Stage or click the
Modify menu, point to Shape, and then
click Remove All Hints.
You should place your shape hints
consecutively in a clockwise or
counter-clockwise direction.
Placing
shape hints out of order can confuse
Flash and often produces unwanted
results.
From the Library of Wow! eBook
ptg
288 Chapter 10
In addition to creating animation using the Timeline and Property Inspector, you can also use
ActionScript to animate movie clips, buttons, text, and components. You can animate any
instance name with ActionScript. For an ActionScript 3.0 example, see Project 4, “Modifying an
Object with ActionScript in the Workshops, available at
www.perspection.com
. For ActionScript
2.0, you can animate an object over time and change any ActionScript property, such as scale,
rotation, color, and transparency. ActionScript provides two events that work well for anima-
tion: onEnterFrame and setInterval. The onEnterFrame event is a continuously executing event
based on the frame rate of your movie until you stop (delete) it. The setInterval event is a contin-
uously executing event for only a certain period of time. The one disadvantage of these actions
is the large use of memory and CPU, so you need to clear it.
◆ onEnterFrame
event.
The following example is a frame script that animates a movie clip
to the right until it reaches the position it should be in:
myMovieClip.onEnterFrame=function()
{
if(this._x<300)
{
this._x+=10;
}
else
{
delete this. onEnterFrame;
◆ setInterval
event.
This event requires two parameters: funtionName and an interval
(amount of time in milliseconds between executions). If your interval is smaller than
your frame rate, the screen cannot refresh. If your interval is greater than your frame
rate, it executes as close as possible. The following example moves a TextArea
component to the right every 10 milliseconds until it has reached its final location:
myInternval=setInterval(textAreaMove, 10);
function textAreamove() {
if (textAreaInstance._x<300) {
textAreaInstance._x += 10;
} else
clearInterval(myInterval);
}
}
Creating Animation Using ActionScript
From the Library of Wow! eBook