Ebook Photoshop Easy-Hard part 9 pdf
Bạn đang xem bản rút gọn của tài liệu. Xem và tải ngay bản đầy đủ của tài liệu tại đây (64.04 KB, 5 trang )
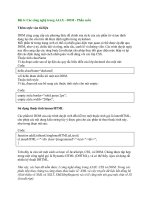
Cuối cùng là kết quả của tui khi dùng thêm chế độ blend mode là vivid light ( b
ằng
cách duplicate layer background lên và tại layer đó chọn blend mode là vivid light
nhớ giảm opacity xuống còn 25% )
Technical Support Forum :
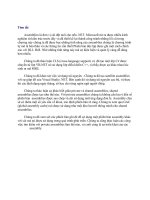
Background collage secrets Part 2: shapes and text
Click to download Wallpaper
As promised here is part 2.
Part 1 was very popular, in fact last week was a record with
4,000 new visitors in 1 week.
This week we are going to be adding text and the Hexagon shapes.
6-week Curriculum
1: BG Prep Grids, Blur and scanlines
2: shapes and text
3: blended clouds
4: 3D text
5: High Tech Shapes
6: Tiny Paragraph text
Do you like this idea of Super Tutorials? Or do you prefer quick tutorials? Tell us
at the cafe
By Colin Smith www.photoshopcafe.com
Add some white type with the text tool.
Some good fonts are available from www.1001freefonts.com I use
Gunship and courier.
The next thing I did was to make some huge letters using Futura
medium condensed.
To give a neat effect change the blending mode to Overlay and drop
the opacity to 33%.
Notice how it interacts with the background?
Drop the opacity of all the fonts and experiment with different
blending modes.
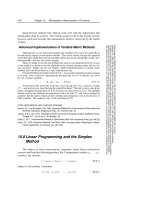
Now I will show you how I created my Hexagons.
Select the shape tool. In the drop down menu, select the Polygon tool.
On the top tool bar, choose these settings:
For sides, choose 6. The default is a five sided Pentagon.
Select the 3rd option on the far left. This will draw a filled shape rather
than a path.
Create a new layer.
Set the foreground color to white.
Draw the shape.
As soon as you release the mouse it will be filled.
Change to overlay mode and 26% opacity.
Now we want a solid white outline.
Create a new layer. (Layer 5)
Ctrl/Cmd+Click on the thumbnail of the hexagon layer. (Layer 4)
The selection will load. Make sure that the new layer (layer 5) is active
as shown.
Edit>stroke
Choose white, 1 pixel and center.
Press OK.
Now you have a semi transparent hexagon, with a solid white outline.
I really like this shape.
Link the shape and the outline.(Layers 4 and 5) together.
Select merge linked.
Now the shape and the outline are merged onto 1 layer.
To duplicate the shape press Alt/Option Click on the shape and drag
out a copy.
Do this as often as you want to keep duplicating the shapes. Tip:
Holding down the shift key will keep the bases aligned.
(Alt\Option+Shift)
Keep playing around with the shapes until you have something
that resembles this.
Technical Support Forum :
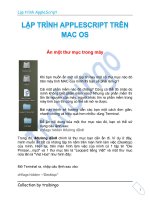
Background collage secrets Part 3: blended clouds
Click to download Wallpaper
This week we are going to add some depth and interest to our collage using the
clouds filter and blending.
6-week Curriculum
1: BG Prep Grids, Blur and scanlines
2: shapes and text
3: blended clouds
4: 3D text
5: High Tech Shapes
6: Tiny Paragraph text
Do you like this idea of Super Tutorials? Or do you prefer quick tutorials? Tell us
at the cafe
By Colin Smith www.photoshopcafe.com
The image part with relationship ID rId20 was not found in the file.