DHTML Utopia Modern Web Design Using JavaScript & DOM- P2 pdf
Bạn đang xem bản rút gọn của tài liệu. Xem và tải ngay bản đầy đủ của tài liệu tại đây (560.09 KB, 20 trang )
xiv
Licensed to
DHTML Technologies
1
The White Rabbit put on his spectacles. ‘Where shall I begin, please your Majesty?’ he
asked. ‘Begin at the beginning,’ the King said gravely, ‘and go on till you come to the end:
then stop.’
—Lewis Carroll, Alice’s Adventures in Wonderland
Dynamic HTML, called DHTML for short, is the name given to a set of Web
development techniques that are mostly used in Web pages that have non-trivial
user-input features. DHTML means manipulating the Document Object Model
of an HTML document, fiddling with CSS directives in style information, and
using client-side JavaScript scripting to tie everything together.
In this introductory chapter, I’ll provide a brief overview of some of the things
you’ll need to know about: the building blocks that make up DHTML Websites.
You’ll find it useful reading if you need to refresh your memory. If you already
know all these details, you might want to flick through the chapter anyway; you
may even be a little surprised by some of it. In the coming pages, we’ll come to
understand that DHTML is actually a combination of proper HTML for your
content, Cascading Style Sheets for your design, and JavaScript for interactivity.
Mixing these technologies together can result in a humble stew or a grandiose
buffet. It’s all in the art of cooking, so let’s start rattling those pots and pans!
Licensed to
HTML Starting Points
Websites are written in HTML. If you’re reading this book, you’ll almost certainly
know what HTML is and will probably be at least somewhat experienced with
it. For a successful DHTML-enhanced Website, it’s critical that your HTML is
two things: valid and semantic. These needs may necessitate a shift away from
your previous experiences writing HTML. They may also require a different ap-
proach than having your preferred tools write HTML for you.
Step up to Valid HTML
A specific set of rules, set out in the HTML recommendation
1
, dictate how HTML
should be written. HTML that complies with these rules is said to be “valid.”
Your HTML needs to be valid so that it can be used as a foundation on which
you can build DHTML enhancements. While the set of rules is pretty complex,
you can ensure that your HTML is valid by following a few simple guidelines.
Correctly Nest Tags
Don’t let tags “cross over” one another. For example, don’t have HTML that
looks like the snippet shown below:
Here is some <strong>bold and <em>italic</strong> text</em>.
Here, the <strong> and <em> tags cross over one another; they’re incorrectly
nested. Nesting is extremely important for the proper use of DHTML. In later
chapters of this book, we’ll study the DOM tree, and the reasons why incorrect
nesting causes problems will become clear. For now, simply remember that if you
cross your tags, each browser will interpret your code in a different way, according
to different rules (rather than according to the standard). Any hope of your being
able to control the appearance and functionality of your pages across browsers
goes right out the window unless you do this right.
Close Container Tags
Tags such as <strong> or <p>, which contain other items, should always be closed
with </strong> or </p>, or the appropriate closing tag. It’s important to know
which tags contain things (e.g. text or other tags) and to make sure you close
them. <p>, for example, doesn’t mean “put a paragraph break here,” but “a
1
/>2
Chapter 1: DHTML Technologies
Licensed to
paragraph begins here,” and should be paired with </p>, “this paragraph ends
here.”
2
The same logic applies to <li> tags as well.
Always Use a Document Type
A document type (or DOCTYPE) describes the dialect of HTML that’s been
used; there are several different options. In this book, we’ll use the dialect called
HTML 4.01 Strict.
3
Your DOCTYPE, which should appear at the very top of
every HTML page, should look like this:
<!DOCTYPE HTML PUBLIC "-//W3C//DTD HTML 4.01//EN"
" />That information can be typed on a single line, or with a line break after EN”.
Don’t worry, for the moment, about what this means: just be sure to place it at
the top of every page. The article Fix Your Site With the Right DOCTYPE!
4
, pub-
lished on A List Apart
5
, lists all the DOCTYPEs you might want to use, and why
you’d need to use them at all. I visit that article all the time to cut and paste the
one I need!
Validate your Page
The most important page creation step is to check that your HTML is valid.
There are numerous tools that you can download and run on your own computer
to test your code’s validity—some HTML editors even have such tools built in—or
you can use one of the many online validators, the most common of which is the
W3C’s own validator
6
. A validator will tell you how you need to adjust your
HTML in order to make it compatible with DHTML techniques. The ultimate
reference for what constitutes valid HTML is the HTML recommendation
7
. It’s
complex and detailed, but if you have any questions about how HTML should
be written, or whether a tag really exists, you’ll find the answers there. As men-
tioned above, browsers rely on a standard that describes how validated HTML
should be interpreted. However, there are no standards to describe how invalid
2
Those who know what they’re doing with container tags will be aware that HTML 4.01 does not
actually require that all container tags are closed (though XHTML still does). However, it’s never
invalid to close a container tag, though it is sometimes invalid to not do so. It’s considerably easier
to just close everything than it is to remember which tags you’re allowed to leave open.
3
If you’re thinking, “but I want to use XHTML!” then I bet you already know enough about DOC-
TYPEs to use them properly.
4
/>5
/>6
/>7
/>3
Step up to Valid HTML
Licensed to
HTML should be interpreted; each browser maker has established their own rules
to fill that gap. Trying to understand each of these rules would be difficult and
laborious, and you have better things to do with your time. Sticking to valid
HTML means that any problems you find are deemed to be bugs in that
browser—bugs that you may be able to work around. Thus, using valid HTML
gives you more time to spend with your family, play snooker, etc. which, if you
ask me, is a good reason to do it.
Step up to Semantic HTML
In addition to its validity, your HTML should be semantic, not presentational.
What this means is that you should use HTML tags to describe the nature of an
element in your document, rather than the appearance of that element. So don’t
use a <p> tag if you mean, “put a blank line here.” Use it to mean, “a paragraph
begins here” (and place a </p> at the end of that paragraph). Don’t use <block-
quote> to mean, “indent this next bit of text.” Use it to mean, “this block is a
quotation.” If you mark up your HTML in this way, you’ll find it much easier
to apply DHTML techniques to it further down the line. This approach is called
semantic markup—a fancy way of saying, “uses tags to describe meaning.”
Let’s look at a few example snippets. First, imagine your Website has a list of
links to different sections. That list should be marked up on the basis of what it
is: a list. Don’t make it a set of <a> tags separated by <br> tags; it’s a list, so it
should be marked up as such, using <ul> and <li> tags. It might look something
like this:
<ul>
<li><a href="index.html">Home</a></li>
<li><a href="about.html">About this Website</a></li>
<li><a href="email.html">Contact details</a></li>
</ul>
You’ll find yourself using the <ul> tag a lot. Many of the items within a Website
are really lists: a breadcrumb trail is a list of links, a menu structure is a list of
lists of links, and a photo gallery is a list of images.
Similarly, if your list contains items with which comments are associated, maybe
it should be marked up as a definition list:
<dl>
<dt><a href="index.html">Home</a></dt>
<dd>Back to the home page</dd>
<dt><a href="about.html">About this Website</a></dt>
4
Chapter 1: DHTML Technologies
Licensed to
<dd>Why this site exists, how it was set up, and who did it
</dd>
<dt><a href="email.html">Contact details</a></dt>
<dd>Getting in contact with the Webmaster: email addresses
and phone numbers</dd>
</dl>
Remember: the way your page looks isn’t really relevant. The important part is
that the information in the page is marked up in a way that describes what it is.
There are lots of tags in HTML; don’t think of them as a way to lay out inform-
ation on your page, but as a means to define what that information means.
If you don’t use HTML to control the presentation of your pages, how can you
make them look the way you want them to? That’s where Cascading Style Sheets
come in.
Adding CSS
Cascading Style Sheets (CSS) is a technique that allows you to describe the
presentation of your HTML. In essence, it allows you to state how you want each
element on your page to look. An element is a piece of HTML that represents
one thing: one paragraph, one heading, one image, one list. Elements usually
correspond to a particular tag and its content. When CSS styles are used, DHTML
pages can work on the appearance and the content of the page independently.
That’s a handy and clean separation. If you want to look good, you need to learn
how to dress up and go to the gym regularly!
A Simple CSS Example
Imagine you want your main page heading (an <h1> tag) to be displayed in big,
red, centered text. You should specify that in your style sheet as follows:
h1 {
font-size: 300%;
color: #FF0000;
text-align: center;
}
See the section called “Further Reading” at the end of this chapter for some links
to introductory tutorials on CSS, which should help if the above lines don’t make
a lot of sense to you.
5
Adding CSS
Licensed to
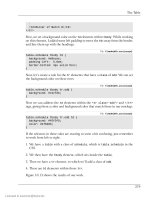
Here’s a simple HTML page before and after these styles have been applied:
Figure 1.1. That HTML’s stylin’!
The key point here is to remove the presentation aspects from your HTML and
put them into your style sheet. If , for example, you made your page heading
bigger by putting <font> tags in your HTML, then you’d need to paste those
tags into every page on which a header was used. By making your HTML semantic
and moving the page’s presentation into CSS, you can control the look of headings
across the whole site through a single style sheet. This makes your job as Website
developer much easier.
Of course, it’s not quite as easy as that. Although the full definition of CSS allows
you to do some fairly amazing things, and to control the presentation of your
pages to a high degree, not every browser supports everything that CSS has to
offer.
6
Chapter 1: DHTML Technologies
Licensed to
In order to know about the differences in browser support for CSS, you need to
know what CSS can do. There are two sorts of browser incompatibilities: things
that a given browser doesn’t implement, and things that it implements incorrectly.
Occasionally, browsers add their own “special features” as well, but we won’t be
worried about those in this book.
Missing implementations are relatively easy to deal with: don’t rely on such rules
if you want your CSS to work in browsers that have failed to implement them.
This can be a pain, especially since the most commonly used browser in the world,
Internet Explorer for Windows, has some serious holes in its CSS support; how-
ever, this “solution” is often a necessary compromise. Learning which rules you
can and can’t use is one of the steps on the path to CSS guru-hood.
Badly implemented standards are a bigger problem. In such cases, the browser
gets it wrong. Another step to CSS guru-hood is understanding exactly what each
browser does wrong, and how you can work around those failings. You don’t
need that knowledge to start with, though: you’ll pick it up as you go along.
Workarounds for CSS bugs in different browsers are usually achieved using CSS
hacks. These hacks take advantage of the bugs in a browser’s CSS parser to de-
liver it specific style sheet directives that work around its poor implementation
of the standards. A huge variety of these CSS hacks is documented for each
browser in various places around the Web; see the section called “Further Reading”
for more.
Learning to understand and adapt to the vagaries of CSS handling in various
browsers is part of the work that’s required to use CSS effectively. While it can
be a lot of work, many CSS bugs only become apparent with the complex use of
this technology; most CSS is handled perfectly across platforms and browsers
without the need for hacks or complex tests.
While CSS is powerful, it doesn’t quite give us true flexibility in presentation.
The capabilities of CSS increase all the time, and more “interactive” features are
constantly being added to the CSS specification. However, it’s not designed for
building truly interactive Websites. For that, we need the final building block of
DHTML: JavaScript.
Adding JavaScript
JavaScript is a simple but powerful programming language. It’s used to add dy-
namic behavior to your Website—the D in DHTML. HTML defines the page’s
structure, and CSS defines how it looks, but actions, the things that happen when
7
Adding JavaScript
Licensed to
you interact with the page—by clicking a button, dragging an image, or moving
the mouse—are defined in JavaScript. JavaScript works with the Document Object
Model, described in the next chapter, to attach actions to different events
(mouseovers, drags, and clicks). We’re not going to describe all the gory JavaScript
syntax in detail here—the section called “Further Reading” has some links to a
few JavaScript tutorials if you need them.
A Simple JavaScript Example
Here’s a simple piece of JavaScript that converts a text field’s value to uppercase
when the user tabs out of the field. First let’s see the old, bad way of doing it:
File: oldlisteners.html (excerpt)
<input id="street" type="text"
onchange="this.value = this.value.toUpperCase();">
In this book, we’ll recommend a more modern technique. First, the HTML:
File: newlisteners.html (excerpt)
<input id="street" type="text">
Second, the JavaScript, which is usually located in the <head> part of the page:
File: newlisteners.html (excerpt)
<script type="text/javascript">
function uppercaseListener() {
this.value = this.value.toUpperCase();
}
function installListeners() {
var element = document.getElementById('street');
element.addEventListener('change', uppercaseListener, false);
}
window.addEventListener('load', installListeners, false);
</script>
The first function does the work of converting the text. The second function
makes sure that the first is connected to the right HTML tag. The final line per-
forms this connection once the page has loaded in full. Although this means more
code, notice how it keeps the HTML content clean and simple. In future chapters,
we’ll explore this kind of approach a lot. Don’t worry about the mechanics too
much for now—there’s plenty of time for that!
8
Chapter 1: DHTML Technologies
Licensed to
Get Some Tools!
A good JavaScript development environment makes working with JavaScript far
easier than it would otherwise be. Testing pages in Internet Explorer (IE) can
leave something to be desired; if your page generates JavaScript errors (as it will
do all the time while you’re building it!), IE isn’t likely to be very helpful at dia-
gnosing where, or what, they are. The most useful, yet simple, tool for JavaScript
debugging is the JavaScript Console in Mozilla or Mozilla Firefox. This console
will clearly display where any JavaScript error occurs on your page, and what that
error is. It’s an invaluable tool when building JavaScript scripts. Mozilla Firefox
works on virtually all platforms, and it’s not a big download; it also offers better
support for CSS than Internet Explorer, and should be part of your development
toolkit. Beyond this, there’s also the JavaScript debugger in Mozilla, which is
named Venkman; if you’re the sort of coder who has worked on large projects in
other languages and are used to a debugger, Venkman can be useful, but be aware
that it takes a bit of setting up. In practice, though, when you’re enhancing your
site with DHTML, you don’t need anything as complex as a debugger; the
JavaScript Console and judicious use of alert statements to identify what’s going
on will help you through almost every situation.
Another tool that’s definitely useful is a good code editor in which to write your
Website. Syntax highlighting for JavaScript is a really handy feature; it makes
your code easier to read while you’re writing it, and quickly alerts you when you
leave out a bracket or a quote. Editors are a very personal tool, and you might
have to kiss a fair few frogs before you find your prince in this regard, but a good
editor will seriously speed and simplify your coding work. Plenty of powerful,
customizable editors are available for free, if you don’t already have a preferred
program. But, if you’re currently writing code in Windows Notepad, have a look
at what else is available to see if any other product offers an environment that’s
more to your liking. You’ll want syntax highlighting, as already mentioned; a way
to tie in the external validation of your pages is also useful. Crimson Editor
8
and
Textpad
9
are free and free-to-try (respectively), Windows-based editors that
cover the basics if you’re developing on a Windows platform; Mac users tend to
swear by BBEdit
10
; Linux users have gedit or Kate or vim to do the basics, and
there’s always Emacs.
JavaScript is the engine on which DHTML runs. DHTML focuses on manipulating
your HTML and CSS to make your page do what the user wants, and it’s Java-
8
/>9
/>10
/>9
Get Some Tools!
Licensed to
Script that effects that manipulation. Through the rest of this book, we’ll explore
that manipulation in more and more detail.
Further Reading
Try these links if you’re hungry for more on CSS itself.
/>SitePoint’s easy introduction to the world of CSS is a great place to start.
/>W3Schools’ CSS tutorials are helpful whether you’re learning, or simply
brushing up on your knowledge of CSS.
/>The CSS Zen Garden is a marvelous demonstration of the power of Cascading
Style Sheets alone. It has a real wow factor!
/>This comprehensive list of CSS hacks shows you which browsers will be af-
fected by a given hack, if you need to hide certain CSS directives (or deliver
certain directives) to a particular browser.
/>This site demonstrates CSS issues in various browsers and explains how to
work around them.
/>The CSS-Discuss mailing list is “devoted to talking about CSS and ways to
use it in the real world; in other words, practical uses and applications.” The
associated wiki
11
is a repository of useful tips and tricks.
/>If you’re after something more definitive, SitePoint’s book, HTML Utopia:
Designing Without Tables Using CSS
12
is a complete guide and reference for
the CSS beginner. The CSS Anthology: 101 Tips, Tricks & Hacks
13
is a perfect
choice if you prefer to learn by doing.
11
/>12
/>13
/>10
Chapter 1: DHTML Technologies
Licensed to
A lot of tutorials on the Web cover JavaScript. Some explore both DHTML and
the DOM, while others do not; you should try to find the former.
/>This tutorial provides an introduction to the basics of JavaScript for the total
non-programmer. Some of the techniques presented in this article aren’t as
modern as the alternatives presented in this book, but you’ll get a good feel
for the language itself.
/>Peter-Paul Koch’s list of JS techniques and scripts covers a considerable
amount of ground in this area.
Summary
In this chapter, we’ve outlined the very basic building-blocks of DHTML: what
HTML really is, how to arrange and display it in your documents using CSS, and
how to add interactivity using JavaScript. Throughout the rest of this book, we’ll
look at the basic techniques you can use to start making your Websites dynamic,
then move on to discuss certain advanced scripting techniques that cover specific
areas. On with the show!
11
Summary
Licensed to
12
Licensed to
The Document Object Model
2
One day someone came in and observed, on the paper sticking out of one of the Teletypes,
displayed in magnificent isolation, this ominous phrase:
values of will give rise to dom!
…the phrase itself was just so striking! Utterly meaningless, but it looks like what… a
warning? What is “dom?”
—Dennis M. Richie
1
A Web page is a document. To see that document, you can either display it in
the browser window, or you can look at the HTML source. It’s the same document
in both cases. The World Wide Web Consortium’s Document Object Model
(DOM) provides another way to look at that same document. It describes the
document content as a set of objects that a JavaScript program can see. Naturally,
this is very useful for DHTML pages on which a lot of scripting occurs. (The
quote above is a pure coincidence—it’s from the days before the Web!)
According to the World Wide Web Consortium
2
, “the Document Object Model
is a platform- and language-neutral interface that will allow programs and scripts
to dynamically access and update the content, structure and style of documents.
1
/>2
/>Licensed to
The document can be further processed and the results of that processing can be
incorporated back into the presented page.” This statement basically says that
the DOM is not just a novelty—it is useful for doing things. In the coming pages,
we’ll take a brief look at the history of the DOM before investigating more deeply
what it is and how we can use it. We’ll finish up with some example scripts that
demonstrate the power of this critical aspect of DHTML.
The Origins of the DOM
In Netscape Navigator 2, Netscape Communications introduced JavaScript (briefly
called LiveScript), which gave Web developers scripting access to elements in
their Web pages—first to forms, then, later, to images, links, and other features.
Microsoft implemented JavaScript in Internet Explorer 3 (although they called
it JScript) in order to keep up with Netscape.
By version 4, the two browsers had diverged significantly in terms of their respect-
ive feature sets and the access they provided to page content. Each browser
manufacturer implemented its own proprietary means of providing scripting access
to layers. Scripts that wanted to work in both browsers needed to contain code
for each method. The ill-fated “browser wars” were all about these proprietary
extensions to the Web, as each manufacturer strove to attract more developers
to its platform through the lure of new features. There was little regard for cross-
browser compatibility, although Microsoft copied and supported most of the
early innovations made by Netscape.
While all this was taking place, the W3C developed a specification for the Doc-
ument Object Model Level 1, which outlined a generic and standard method to
access the various parts of an XML document using script. Since HTML can be
thought of as a dialect of XML, the DOM Level 1 spec applied to HTML as well.
Both major browser manufacturers implemented the DOM Level 1 specification:
in Internet Explorer 5 and in Netscape 6. The previously existing proprietary
specifications were retrospectively titled; since the new standard was DOM Level
1, those old and now deprecated methods were called DOM Level 0. (Since then,
the W3C has also released the DOM Level 2 and DOM Level 3 specifications,
which add more features and are broken into separate modules.) There’s no
formal DOM Level 0 standard, though.
What is the DOM?
So, you know what the DOM used to be. Now let’s discuss what it is.
14
Chapter 2: The Document Object Model
Licensed to
Essentially, the DOM provides access to the structure of an HTML page by
mapping the elements in that page to a tree of nodes. Each element becomes an
element node, and each bit of text becomes a text node. Take this HTML snippet,
for example:
<body>
<p>
This is a paragraph, containing
<a href="#">
a link
</a>
in the middle.
</p>
<ul>
<li>
This item has
<em>
some emphasized text
</em>
in it.
</li>
<li>
This is another list item.
</li>
</ul>
</body>
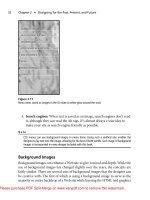
I added lots of extra indenting so that you can compare this snippet with the
matching DOM tree. Don’t do that in real life—I’m just trying to make things
clearer in this case. The matching DOM tree is shown in Figure 2.1.
As you can see, the a element, which is located inside the p element in the HTML,
becomes a child node, or just child, of the p node in the DOM tree. (Symmet-
rically, the p node is the parent of the a node. The two li nodes, children of the
same parent, are called sibling nodes or just siblings.)
Notice that the nesting level of each tag in the HTML markup matches the
number of lines it takes to reach the same item in the DOM tree. For example,
the <a> tag is nested twice inside other tags (the <p> and <body> tags), so the a
node in the tree is located two lines from the top.
15
What is the DOM?
Licensed to
Figure 2.1. An example of a DOM tree.
The Importance of Valid HTML
From this last example, we can see more clearly why valid HTML, including
properly nested elements, is important. If elements are improperly nested, prob-
lems arise. Take the following line:
<strong>These <em>elements are</strong> badly nested</em>.
The DOM tree that results from this incorrectly nested code won’t be a tree at
all: it would need to be malformed in order to express the invalid element layout
that this HTML requests. Each browser fixes malformed content in a different
way, which can generate such horrors as an element that is its own parent node.
Keeping your HTML valid avoids all these problems.
Walking DOM Trees
Trees of nodes turn up a lot in computing, because, among other things, they
have a very useful property: it’s easy to “walk the tree” (that is, to iterate through
16
Chapter 2: The Document Object Model
Licensed to
every one of the tree’s nodes in order) with very little code. Walking a tree is
easy because any element node can be considered as the top of its own little tree.
Therefore, to walk through a tree, you can use a series of steps, for example:
1. Do something with the node we’re looking at
2. Does this node have children? If so:
3. For each of the child nodes, go to step 1
This process is known as recursion, and is defined as the use of a function that
calls itself. Each child is the same type of thing as the parent and can therefore
be handled in the same way. We don’t do much with recursion ourselves, but we
rely quite heavily on the browser recursing through the page’s tree. It’s especially
useful when it comes time to work with events, as we’ll see in Chapter 3.
Finding the Top of the Tree
In order to walk the DOM tree, you need a reference to the node at its top: the
root node. That “reference” will be a variable that points to the root node. The
root node should be available to JavaScript as document.documentElement. Not
all browsers support this approach, but fortunately it doesn’t matter, because
you’ll rarely need to walk through an entire document’s DOM tree starting from
the root. Instead, the approach taken is to use one of the getElementsByWhatever
methods to grab a particular part of the tree directly. Those methods start from
the window.document object—or document for short.
Getting an Element from the Tree
There are two principal methods that can be used to get a particular element or
set of elements. The first method, which is used all the time in DHTML program-
ming, is getElementById. The second is getElementsByTagName. Another
method, getElementsByName, is rarely used, so we’ll look at the first two only
for now.
getElementById
In HTML, any element can have a unique ID. The ID must be specified with
the HTML id attribute:
<div id="codesection">
<p id="codepara">
17
Finding the Top of the Tree
Licensed to
</p>
<ul>
<li><a href=" id="splink"
>SitePoint</a></li>
<li><a href=" id="yalink"
>Yahoo!</a></li>
</ul>
</div>
Each non-list element in that snippet has been given an ID. You should be able
to spot four of them. IDs must be unique within your document—each element
must have a different ID (or no ID at all)—so you can know that a specific ID
identifies a given element alone. To get a reference to that element in JavaScript
code, use document.getElementById(elementId):
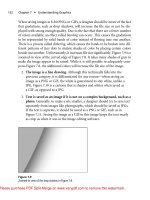
var sitepoint_link = document.getElementById('splink')
Now the variable sitepoint_link contains a reference to the first <a> tag in the
above HTML snippet. We’ll see a little later what you can do with that element
reference. The DOM tree for this snippet of HTML is depicted in Figure 2.2.
Figure 2.2. The snippet’s DOM tree.
18
Chapter 2: The Document Object Model
Licensed to
getElementsByTagName
The document.getElementsByTagName method is used to retrieve all elements
of a particular type. The method returns an array
3
that contains all matching
elements:
var all_links = document.getElementsByTagName('a');
var sitepoint_link = all_links[0];
The all_links variable contains an array, which contains two elements: a refer-
ence to the SitePoint link, and a reference to the Yahoo! link. The elements are
returned in the order in which they are found in the HTML, so all_links[0]
is the SitePoint link and all_links[1] is the Yahoo! link.
Note that document.getElementsByTagName always returns an array, even if
only one matching element was found. Imagine we use the method as follows:
var body_list = document.getElementsByTagName('body');
To get a reference to the sole body element in this case, we would need to use
the following:
var body = body_list[0];
We would be very surprised if body_list.length (the array’s size) was anything
other than 1, since there should be only one <body> tag! We could also shorten
the process slightly by replacing the previous two lines with this one:
var body = document.getElementsByTagName('body')[0];
JavaScript allows you to collapse expressions together like this. It can make your
code a lot more compact, and save you from declaring a lot of variables which
aren’t really used for anything.
There is another useful feature; getElementsByTagName is defined on any node
at all, not just the document. So, to find all <a> tags in the body of the document,
we could use the method like this:
var links_in_body = body.getElementsByTagName('a');
3
Technically, it returns a node collection, but this works just like an array.
19
Getting an Element from the Tree
Licensed to