DHTML Utopia Modern Web Design Using JavaScript & DOM- P6 pps
Bạn đang xem bản rút gọn của tài liệu. Xem và tải ngay bản đầy đủ của tài liệu tại đây (663.05 KB, 20 trang )
foo.offsetHeight does exist, but is equal to 0 (zero). This is possible because
JavaScript treats zero as meaning false. Testing whether a given item is defined
just got a little more complex (but only a little!).
If you are testing for the existence of function functionName, or method
methodName (on an object obj), use the function/method name without the
brackets to do so:
if (functionName) { }
if (obj.methodName) { }
Likewise, if you’re testing for a variable v, or for a DOM property prop of an
object, you can often use the variable or the DOM attribute’s property name
directly:
if (v) { }
if (obj.prop) { }
But, watch out! If the variable or property contains numbers or strings (as does
offsetHeight, for example) then use typeof, because a number might be 0
(zero), and a string might be the empty string "", both which also evaluate to
false:
if (typeof v != 'undefined') { }
if (typeof obj.prop != 'undefined') { }
Sniffing at Work: scrollImage
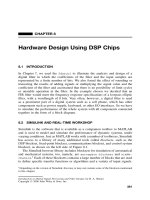
Lots of Websites contain photo galleries: pages listing thumbnails of photographs
that, when clicked on, display the photos at full size. An interesting enhancement
to such a site might be to let the user see the full-size photo without having to
click to load it. When the user mouses over the thumbnail, that thumbnail could
become a “viewing area” in which a snippet of the full-sized image is shown. This
technique is useful if your thumbnails aren’t detailed enough to enable users to
tell the difference between superficially similar images. It’s especially handy if
your thumbnails display something like a document, rather than a photo. Fig-
ure 4.1 shows the final effect:
80
Chapter 4: Detecting Browser Features
Licensed to
Figure 4.1. The thumbnail display implemented by the
scrollImage example.
We’ll describe what’s going on here in a moment. We’ll review the code first,
then see a demonstration before we get to the explanation.
Setting Up the Page
The HTML file for this technique is straightforward:
File: scrollImage.html
<!DOCTYPE HTML PUBLIC "-//W3C//DTD HTML 4.01//EN"
" /><html>
<head>
<title>ScrollImage demonstration</title>
<script src="scrollImage.js" type="text/javascript"></script>
<style type="text/css">
.scrollimage {
display: block;
float: left;
border: 1px solid black;
margin: 1em;
padding: 0;
}
81
Setting Up the Page
Licensed to
.scrollimage:hover {
position: relative;
}
.scrollimage img {
border: none;
}
.scrollimage:hover img {
display: none;
}
</style>
</head>
<body>
<h1>Scanned documents</h1>
<p>
<a href="1.jpg" class="scrollimage"
mainx="563" mainy="823" thumbx="82" thumby="120"
style="background: url(1.jpg); width: 82px;
height: 120px;"
><img src="1-thumb.jpg"></a>
<a href="2.jpg" class="scrollimage"
mainx="563" mainy="777" thumbx="87" thumby="120"
style="background: url(2.jpg); width: 87px;
height: 120px;"
><img src="2-thumb.jpg"></a>
<a href="3.jpg" class="scrollimage"
mainx="567" mainy="823" thumbx="83" thumby="120"
style="background: url(3.jpg); width: 83px;
height: 120px;"
><img src="3-thumb.jpg"></a>
<a href="4.jpg" class="scrollimage"
mainx="558" mainy="806" thumbx="83" thumby="120"
style="background: url(4.jpg); width: 83px;
height: 120px;"
><img src="4-thumb.jpg"></a>
<a href="5.jpg" class="scrollimage"
mainx="434" mainy="467" thumbx="112" thumby="120"
style="background: url(5.jpg); width: 112px;
height: 120px;"
82
Chapter 4: Detecting Browser Features
Licensed to
><img src="5-thumb.jpg"></a>
</p>
</body>
</html>
The content of this page is fairly obvious. Notice how the image elements are
hidden by CSS styles when the mouse moves over them. This page also in-
cludes—with the <script src="scrollImage.js"
type="text/javascript"></script> line—this JavaScript file:
File: scrollImage.js
// Based on findPos*, by ppk
// ( />function findPosX(obj) {
var curLeft = 0;
if (obj.offsetParent) {
do {
curLeft += obj.offsetLeft;
} while (obj = obj.offsetParent);
}
else if (obj.x) {
curLeft += obj.x;
}
return curLeft;
}
function findPosY(obj) {
var curTop = 0;
if (obj.offsetParent) {
do {
curTop += obj.offsetTop;
} while (obj = obj.offsetParent);
}
else if (obj.y) {
curTop += obj.y;
}
return curTop;
}
// cross-browser event handling for IE5+, NS6+ and Mozilla/Gecko
// By Scott Andrew
function addEvent(obj, evType, fn, useCapture) {
if (obj.addEventListener) {
obj.addEventListener(evType, fn, useCapture);
return true;
83
Setting Up the Page
Licensed to
} else if (obj.attachEvent) {
var r = obj.attachEvent('on' + evType, fn);
return r;
} else {
obj['on' + evType] = fn;
}
}
addEvent(window, 'load', scrollInit, false);
function scrollInit() {
if (!document.getElementsByTagName)
return;
var allLinks = document.getElementsByTagName('a');
for (var i = 0; i < allLinks.length; i++) {
var link = allLinks[i];
if ((' ' + link . className + ' ').indexOf(' scrollimage ') !=
-1) {
addEvent(link, 'mousemove', moveListener, false);
}
}
}
function attVal(element, attName) {
return parseInt(element.getAttribute(attName));
}
function moveListener(ev) {
var e = window.event ? window.event : ev;
var t = e.target ? e.target : e.srcElement;
var xPos = e.clientX - findPosX(t);
var yPos = e.clientY - findPosY(t);
if (t.nodeName.toLowerCase() == 'img')
t = t.parentNode;
if (t.nodeName.toLowerCase() == 'a') {
// scaleFactorY = (width(big) - width(small)) / width(small)
var scaleFactorY =
(attVal(t, 'mainy') - attVal(t, 'thumby')) / attVal(t,
'thumby');
var scaleFactorX =
(attVal(t, 'mainx') - attVal(t, 'thumbx')) / attVal(t,
'thumbx');
84
Chapter 4: Detecting Browser Features
Licensed to
t.style.backgroundPosition =
(-parseInt(xPos * scaleFactorX)) + 'px ' +
(-parseInt(yPos * scaleFactorY)) + 'px';
}
}
We’ll explore (and fix!) this code shortly. Finally, the page also contains images:
five at full-size, and five thumbnails. You can find them in the code archive for
this book.
Demonstrating the DHTML Effect
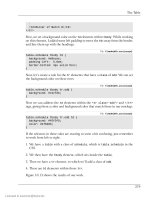
Let’s see how the page works. The HTML document shows five images as
thumbnails; in this example, they’re thumbnails of individual pages of a scanned-
in document. Figure 4.2 shows the page content under normal circumstances.
Figure 4.2. Thumbnails of a document.
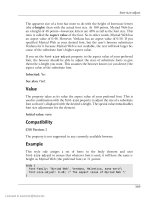
When we mouse-over a thumbnail image, though, the display of that thumbnail
changes to show the actual image to which it’s linked, as shown in Figure 4.3.
The thumbnail becomes a viewing area in which we can see a snippet of the full-
size image. As the cursor moves over the third image, we see the content of the
third image at full size through the viewing area. For a document thumbnail such
as this, we can use the cursor to move around the document within the viewing
area, so that we can read the content and see if it’s the document we want. This
technique can also be useful, as mentioned, in photo galleries containing images
that look similar when displayed at thumbnail size.
85
Demonstrating the DHTML Effect
Licensed to
Figure 4.3. Mousing over a thumbnail.
How the Code Works
Conceptually, the code works as follows: we set up the page so that every “scrol-
lable” image is made up of an <a> tag of class scrollimage, which contains an
<img> tag displaying the thumbnail. We apply the full-size image as the CSS
background image of the <a> tag. Then, when the user mouses over the a element,
we hide the img element entirely, allowing the a element’s background image to
show through. We then manipulate the position of that background image so
that it moves in accordance with the cursor.
3
This is all fairly advanced stuff, so we need to confirm that the running browser
supports all the features we need in order to make it work. We start by making
the script initialize on page load with the line:
File: scrollImage.js (excerpt)
addEvent(window, 'load', scrollInit, false);
We saw the addEvent method in Chapter 3, but, with what we’ve learned about
feature detection, its workings should now be much clearer to you. First, we check
for the existence of an addEventListener method on the passed object, to see
if the user’s browser supports the DOM Events model correctly:
3
We’re storing the dimensions of the larger image in custom attributes on the a element: mainx,
mainy, thumbx, and thumby. This is a slightly suspect technique: it will prevent the HTML from
validating, and should therefore be approached with caution. In this case, however, it is the easiest
way to tie the required values to each of the a elements.
86
Chapter 4: Detecting Browser Features
Licensed to
File: scrollImage.js (excerpt)
function addEvent(obj, evType, fn, useCapture) {
if (obj.addEventListener) {
obj.addEventListener(evType, fn, useCapture);
return true;
Failing that, we look for Internet Explorer’s proprietary attachEvent method on
the object.
File: scrollImage.js (excerpt)
} else if (obj.attachEvent) {
var r = obj.attachEvent('on' + evType, fn);
return r;
Failing that, we attach the event listener directly to the element, as an event
handler; this is required for IE5 on Macintosh.
File: scrollImage.js (excerpt)
} else {
obj['on' + evType] = fn;
}
This procedure caters for all the ways by which we might attach an event listener,
using feature sniffing to see which option is available.
The initialization function that sets up the scrolling effect, scrollInit, uses
document.getElementsByTagName to find all the a elements in the document.
Therefore, scrollInit checks for this method’s existence before proceeding:
File: scrollImage.js (excerpt)
function scrollInit() {
if (!document.getElementsByTagName)
return;
If the user’s browser doesn’t support document.getElementsByTagName, then
we return from the scrollInit function and don’t progress any further.
One extra trick in the feature sniffing code, as described in Chapter 3, addresses
the way in which we find the event object when we’re inside the moveListener
event listener. As we know, the DOM Events specification mandates that an
event object is passed to the event listener as an argument, whereas Internet Ex-
plorer makes the event object available as the global window.event. So, our code
checks for the existence of window.event, and uses it as the event object if it
87
How the Code Works
Licensed to
exists; the code falls back to the passed-in argument if window.event is not
present:
File: scrollImage.js (excerpt)
function moveListener(ev) {
var e = window.event ? window.event : ev;
Next, we need to get the event’s target from that event object; the DOM specifies
e.target, and Internet Explorer provides e.srcElement. Another feature-sniff
gives us the appropriate value:
File: scrollImage.js (excerpt)
var t = e.target ? e.target : e.srcElement;
This is a compressed, shorthand version of the code we saw in Chapter 3.
The next step is for the code to get the position of the mouse inside the thumbnail
image area. This is the code from the full listing above that is supposed to do
this:
var xPos = e.clientX - findPosX(t);
var yPos = e.clientY - findPosY(t);
In theory, e.clientX and e.clientY give the x- and y-coordinates of the mouse
within the browser window, respectively. By subtracting from these the x- and
y-coordinates of the target element, we obtain the mouse’s position within that
element.
Depending on your browser of choice, this might seem to work just fine at first
glance. Peter-Paul Koch’s findPosX and findPosY functions make short work of
getting the target element’s position.
4
Unfortunately, the clientX and clientY
properties of the event object are nowhere near as reliable.
clientX and clientY Problems
The code above is flawed: the event listener uses e.clientX and e.clientY to
ascertain the position of the mouse.
But that’s not a flaw, is it? After all, it’s in the DOM specifications!
4
For a complete description of how findPosX and findPosY work, visit Peter-Paul Koch’s page
on the subject at />88
Chapter 4: Detecting Browser Features
Licensed to
Well, it’s sort of a flaw—a flaw in the way browser manufacturers interpret the
specification. Peter-Paul Koch studies this problem in great detail in his compre-
hensive article, Mission Impossible—Mouse Position
5
. The problem occurs only when
the page is scrolled (which was not the case with the above page). When a page
is scrolled, the specification is rather vague on whether clientX and clientY are
returned relative to the whole document, or to the window (the part of the doc-
ument that is visible). Internet Explorer returns them relative to the window, as
does Mozilla, but all of Opera, Konqueror, and iCab return them relative to the
document. Netscape also provides pageX and pageY, which are mouse coordinates
relative to the document. (Ironically enough, Internet Explorer may be the only
browser which is fully compliant with the standard; the best reading of the spe-
cification is that clientX and clientY should be relative to the window.)
So, we need to use pageX and pageY if they exist, and clientX and clientY if
they do not; if we’re in Internet Explorer, however, we have to add to clientX
and clientY the amounts by which the page has been scrolled. But how do we
know if we’re in Internet Explorer? We use browser detection.
Browser Detection You Can’t Avoid
That spluttering noise you can hear in the background is the crowd rightly
pointing out that we consigned browser detection to the dustbin of history only
a few pages back, and they’re not wrong. However, there are occasions when
different browsers implement the same properties (in this case, clientX and
clientY) in different ways and when there are no other objects available for
sniffing that can us tell which of the different implementations is in use.
On such occasions, there is no alternative but to use the dreaded browser sniffing
to work out what to do. The mouse position issue described here is almost the
only such situation. The very thought that it might be necessary to use browser
detection should make all right-thinking DHTML developers shudder with guilt,
but, sadly, there’s nothing for it! We add the browser detection script to the code
just before we call addEvent to set up our window load listener:
File: scrollImage.js (excerpt)
var isIE = !window.opera && navigator.userAgent.indexOf('MSIE') !=
-1;
Note that, first, we check that window.opera is false or non-existent; Opera
sets this variable to make it easy for scripts to detect that it is the browser in use
5
/>89
Browser Detection You Can’t Avoid
Licensed to
(Opera also implements user-agent switching, so that, from a
navigator.userAgent perspective, it can appear to be Internet Explorer). Once
we’ve established that we’re not using Opera, we go on to look for “MSIE” in the
user agent string; if this is present, Internet Explorer is the browser in use.
Our updated moveListener event listener now looks like this:
File: scrollImage.js (excerpt)
function moveListener(ev) {
var e = window.event ? window.event : ev;
var t = e.target ? e.target : e.srcElement;
var mX, mY;
if (e.pageX && e.pageY) {
mX = e.pageX;
mY = e.pageY;
} else if (e.clientX && e.clientY) {
mX = e.clientX;
mY = e.clientY;
if (isIE) {
mX += document.body.scrollLeft;
mY += document.body.scrollTop;
}
}
var xPos = mX - findPosX(t);
var yPos = mY - findPosY(t);
// the rest as before
Note that we check first for pageX and pageY (for Mozilla), then fall through to
clientX and clientY. We handle Internet Explorer by checking the isIE variable;
if it’s true, we add the document’s scroll amounts as required. We’re using the
browser detect as little as possible; specifically, Netscape/Mozilla provide the
pageX and pageY properties, and we look for them through feature sniffing, not
by performing browser detection for Mozilla.
Calculating Screen Positions
The last section of our code has little to do with browser detects, but, having
spent all this time to get the right X and Y coordinates, it makes sense to under-
stand how to use them.
90
Chapter 4: Detecting Browser Features
Licensed to
The last part of the moveListener function starts with a couple of ifs, which
ensure that we have in hand a reference to the <a> tag surrounding the thumbnail
<img> of interest. No surprises there, so we grab the required DOM element:
File: scrollImage.js (excerpt)
if (t.nodeName.toLowerCase() == 'img')
t = t.parentNode;
if (t.nodeName.toLowerCase() == 'a') {
Next, we have the first of two sets of calculations:
File: scrollImage.js (excerpt)
// scaleFactorY = (width(big) - width(small)) / width(small)
var scaleFactorY =
(attVal(t, 'mainy') - attVal(t, 'thumby')) / attVal(t,
'thumby');
var scaleFactorX =
(attVal(t, 'mainx') - attVal(t, 'thumbx')) / attVal(t,
'thumbx');
Code like this is liable to be specific to each DHTML effect you undertake, but
the mind-bending you have to do to come up with the code is similar in all cases.
Take a deep breath: here we go!
With the large background image showing through the viewing area, what should
appear when the cursor is in the top-left corner of that viewing area? The top-
left corner of the big image should be in the top-left corner of the viewing area:
that’s straightforward. Now, what should appear when the cursor is located at
the bottom-right corner of the viewing area? Should the bottom-right corner of
the full-sized image be in the top-left corner of the viewing area? That’s what
would happen if the big image were moved by its full size across the viewing area
as the cursor was moved the full distance across the viewing area. Think about
it carefully; you might like to try experimenting with two pieces of paper, one of
which has a rectangular hole in it. The big image would eventually disappear off
the top-left corner of the viewing area! If the background image were tiled (the
default), additional copies of the image would be visible at this bottom-right
corner—a very odd result.
We don’t want the image to move that far. If we move the cursor to the extreme
bottom-right of the viewing area, we want the big image to move by almost its
entire size—but not quite! We want the bottom-right corner of the big image to
move only as far as the bottom-right corner of the viewing area, and not move
any further towards the top-left.
91
Calculating Screen Positions
Licensed to
Now, to make the big image move, we have to calculate a distance by which to
move it. Take some example figures: suppose the big image is ten times the size
of the thumbnail. Let’s suppose the image is 500 pixels on each side, and the
thumbnail’s 50 pixels on each side. For every pixel by which the cursor moves,
the big image should move 500/50: ten times as fast. So the “scale factor” is ten.
But, wait a minute! If the cursor moves 50 pixels left, the big image will move
500 pixels left: right off the left edge of the viewing area. That’s too far. We want
it to move at most 500 minus 50 pixels, so that it’s always “inside” the viewing
area. Therefore, the real scale factor is (500 – 50) / 50 = 9. The full-sized image
should move nine times as fast as the cursor. That’s what the first set of calcula-
tions does, except that it calculates scale factors in both dimensions, since most
images are rectangles, not squares.
Next, we want to move the big image. Here’s the second set of calculations:
File: scrollImage.js (excerpt)
t.style.backgroundPosition =
(-parseInt(xPos * scaleFactorX)) + 'px ' +
(-parseInt(yPos * scaleFactorY)) + 'px';
Now, if (for example) we move the mouse from the top-left towards the bottom-
right, we’re scanning diagonally across the viewing area. As we move, we want
new areas of the big image to come into view. So the big image had better slide
in the opposite direction to the mouse: up towards, and beyond, the top left. It’s
like using a negative margin to bleed text to the left and top of a page. And that’s
what we do by calculating negative pixel amounts.
This idea may seem back-to-front initially. Think of it as though you were
shooting a scene for a movie. The camera (the thumbnail viewing area) is fixed
into place, so it must be the scene at which the camera points that moves if there’s
to be any panning effect. Alternately, imagine yourself looking out of the window
of a moving train without turning your head. It’s the same effect again, provided
the train goes backwards!
Summary
In this chapter, we’ve learned that browsers don’t always support all the DOM
features we’d like, and discussed how feature sniffing helps us as DHTML de-
velopers to code defensively around this issue. Browser sniffing allows us to de-
liver dynamic features to browsers that can handle them and, at the same time,
to avoid crashing or throwing errors in browsers that can’t. We looked at the old
method, browser sniffing, and explained why it shouldn’t be used if at all possible.
92
Chapter 4: Detecting Browser Features
Licensed to
We then explored one occasion on which feature sniffing can’t provide everything
we need, leaving us the old method as a last resort.
93
Summary
Licensed to
94
Licensed to
Animation
5
Anyone can now enter the lucrative field of animated cartoons with the new Tom and Jerry
Cartoon Kit. This kit contains everything needed for quiet, sophisticated humor—one mean,
stupid cat; one sweet, lovable mouse; and assorted deadly weapons. The coffee and cigarettes
are for the cartoonists.
—The Tom and Jerry Cartoon Kit, 1962
Adding animation to your DHTML pages can really boost usability. Animation
lets the user know that something is happening (think of a progress bar, or an
hourglass), it can provide context for something that’s happening (think of a
drop-down menu; you know that the contents of the menu are related to the
header of the menu), and it does look pretty cool when it’s used correctly. Here,
we’ll consider the principles of the appropriate use of animation, then we’ll see
how to use it smoothly and well. Animation is fun! It’s the cherry on the top of
the Web development pie, so grab the opportunity to use it when an decent excuse
comes along.
Tastefulness and Usability
Animated elements of a page draw the user’s eye like nothing else. This is an
important thing to know; if you want to draw the user’s eye to an element, anim-
ating it is a good way to do so. But it is vital to remember that an animated ele-
ment will draw attention away from everything else on the page. Frivolous anim-
Licensed to
ations will divert your users’ focus from valuable content. When implemented
subtly and tastefully, though, animation can tie the disparate parts of your page
together very neatly. It is therefore very important not to overuse animation
techniques. Apply animation with a light hand.
Animation Basics
Animation in DHTML falls into two categories: causing an element to change
its appearance while remaining still, and causing an element to move. Both of
these approaches rely on having the transition occur in numerous little steps
(small movements, or small changes of appearance), which occur in quick succes-
sion. Each step builds on the previous step until, at the end of the animation,
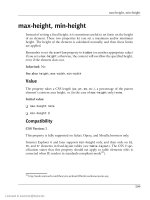
the item has fully changed or moved to its final position. So, to make a block of
text change color, from black to white, each little step would make the text a
slightly lighter shade of grey than the previous step, until the text reaches white
and the animation stops. This effect is shown in Figure 5.1 below.
Figure 5.1. The text fades in steps.
Each step takes place without any prompting from users; they are not required
to do anything to make the steps execute. Let’s see how we can make these steps
occur one after the other.
I’ll provide a full working example in this chapter, but if you’re impatient, you
can check out the effect in action
1
. This project management site lets you exper-
iment with its services for free. Enroll, create a test project, go to the project home
page, and click the Messages tab (or click “All Messages”). The first time you
add a message, the effect might occur too quickly for you to spot, but add a
second message, and you’ll see how the fading effect provides an excellent remind-
er of the content that was just added.
The setTimeout Function
Almost all timed activity in JavaScript takes place through the use of the
setTimeout function (this is actually a method, which belongs to the window
1
/>96
Chapter 5: Animation
Licensed to
object). We pass a string containing JavaScript code and a number of milliseconds
(one millisecond being one thousandth of a second), and that code will be run
once the specified number of milliseconds has elapsed. So, to pop up an alert two
seconds from now, we could use the following:
setTimeout('alert("Hello, world!")', 2000);
The first argument is a string that contains code; it’s not the code stated literally.
If we leave out the single quotes in the above, the code will be run immediately
and its return value will be used as the code that’s run in two seconds’ time. Since
executing the JavaScript expression 2 (if that happens to be the return value)
doesn’t do much (it evaluates 2 to mean 2, then throws it away!), this is probably
not what you want. You must be careful to remember to pass the code in correctly
as a string.
2
Since it is a string, you must also be careful about quoting: quotes
inside the string might need to be escaped:
setTimeout('alert("Why oh why didn\'t I take the blue pill?")',
2000);
Note that the apostrophe in “didn’t” is escaped, to prevent it from ending the
entire string early. It’s a good idea use one type of quote mark (say, single quotes)
for the whole string, then use the other kind of quote mark (double quotes)
wherever they’re needed inside the string. The example above does that, but we’re
also stuck with an extra single quote that’s literally required for “didn’t”, so it
needs to be escaped with a backslash.
This extra quoting may be quite a difficult concept to get your head around, but
it’s vital that you understand it: we pass a string containing code, not the code
itself. We put quotes around the whole code, even if it contains quotes already.
Because the timed code is stated outside the normal flow of code, and because
it’s executed later, it’s best to try to keep the timed code simple. Make timed
code short; make it do its job, then finish up quickly. Complex timed code just
leads to a big, tangled mess. Vote against JavaScript spaghetti code by using short
timed code!
Passing in a Function
Using a string that contains JavaScript code does create a fairly serious problem,
though: how do you use an existing object or a variable in that string? For example,
imagine this code:
2
Of course, this can be useful; you could call a function directly, which returns some code to be run.
97
The setTimeout Function
Licensed to
function testSetTimeout() {
var myVariable = 'A string';
setTimeout('alert(myVariable)', 1000);
}
testSetTimeout();
What will that do?
What it won’t do is present a dialog box containing the words, “A string.” Instead,
we get a JavaScript error: “myVariable is not defined.” Why is this?
The string passed to setTimeout is evaluated in the context of the window object.
It is not evaluated in the context of the function or method from which it was
called. What this means is that, although our myVariable exists inside the
testSetTimeout function, it doesn’t exist as a global variable, but that’s what
the window object contains: global variables. If you use a variable in code passed
to setTimeout, it has to be a global variable. If it isn’t, when the code runs, it
won’t be able to find the variable.
Fortunately, there is a better solution. Instead of a string, we can pass a function
to setTimeout, and that function will be executed when the timeout occurs (but
beware of really old browsers, in which this won’t work). If this function is defined
within another function, it will be able to access the variables inside that outer
function. In other words, the context (or home) of our timed function is its parent
function, so the parent function’s variables are available in the timed code. That’s
what we want!
As with event listeners, we pass a function to setTimeout by supplying its name:
function testSetTimeout() {
var privateVar = 'A string';
function bar() { alert(privateVar); }
window.setTimeout(bar, 1000);
}
testSetTimeout();
This will display the text “A string” in a dialog box, as expected. Both bar and
privateVar have the same context—the function testSetTimeout. In fact, we
need not even assign the function a name: we can define the function inline as
an anonymous function:
function testSetTimeout() {
var privateVar = 'A string';
98
Chapter 5: Animation
Licensed to
window.setTimeout(function() { alert(privateVar); }, 1000);
}
testSetTimeout();
Surrounding the actual code with function() { … } is a quick hack that gives
us access to the variables we need. It also allows us to put our timer setup in a
custom function, which can be called after the page is loaded.
setTimeout Runs Later On
An animation would not be a useful enhancement if the rest of the browser locked
up while the animation was running. To avoid this problem, setTimeout itself
is asynchronous: when you call it, it returns immediately. That means the browser
continues to respond immediately to user input. Nothing is “stopped” while
waiting for the timed event to occur. After the defined period, the browser runs
the timed code as soon as it isn’t busy doing something else. You may call
setTimeout as many times as you wish, and each scheduled piece of code will
run in turn after the allotted time without further prompting.
Some programming languages offer sleep, select or wait functions that pause
everything for the specified amount of time. Such functionality is impossible in
a Web page. All you can do is schedule pieces of code to run at some time in the
future, then finish up what you were doing. The scheduled piece of code will
come back at the right time, like a boomerang. So, learn to duck!
Canceling Timed Code
A call to setTimeout returns a value. If you want the option to cancel the
scheduled code before it runs, you can store this value and pass it to the
clearTimeout function.
Here’s an example of a simple cancelled timing system at work. It provides a
tooltip, otherwise known as flyover help. First, here’s the HTML:
File: cancelTips.html
<!DOCTYPE HTML PUBLIC "-//W3C//DTD HTML 4.01//EN"
" /><html>
<head>
<script type="text/javascript" src="cancelTips.js"></script>
<style type="text/css">
#explain {
float: right;
99
The setTimeout Function
Licensed to