DHTML Utopia Modern Web Design Using JavaScript & DOM- P15 pot
Bạn đang xem bản rút gọn của tài liệu. Xem và tải ngay bản đầy đủ của tài liệu tại đây (431.16 KB, 20 trang )
li.className = 'draggable';
var s = '';
for (var j = 0;
j < fileNodes[i].firstChild.nodeValue.length; j += 5) {
s += fileNodes[i].firstChild.nodeValue.substr(j, 5);
s += '<wbr>';
}
li.setAttribute('path', path + '/' +
fileNodes[i].firstChild.nodeValue);
li.innerHTML = s;
ul.appendChild(li);
}
files.appendChild(ul);
setTimeout(fM.setUpDraggables, 100);
},
receiveFilenames receives the XML returned by the server in the form of a
Sarissa DomDocument object (xmlhttp.responseXML in loadFiles), and constructs
from it a slice of HTML—a document fragment. Here’s an example of that frag-
ment, based on two retrieved files: file1.html and longfilename.html:
<ul>
<li class="draggable"
path="www.example.com/html/file1.html">file1<wbr>.html</li>
<li class="draggable"
path="www.example.com/html/file1.html"
>longf<wbr>ilena<wbr>me.htm<wbr>l</li>
</ul>
Essentially, receiveFilenames creates an unordered list of filenames, and adds
to each list item a class of draggable (ensuring that our drag script, later, will
know that this is a draggable item). It also adds a custom path attribute with the
full path of the file (to make life easier on the drag script). Finally, it breaks the
filename into five-character chunks and inserts a <wbr> tag after each chunk. The
<wbr> tag indicates a point at which a word may be broken for wrapping at the
end of a line. This is used to ensure that the filename can be word-wrapped, so
that it doesn’t break the layout.
3
3
<wbr> is a nonstandard tag, the use of which may well engender some guilty feelings. However,
there is no cross-browser way to say, “break up this word wherever you need to in order to get it to
fit into a box properly.” The other possibilities are ­, the soft hyphen, which is unsupported
by Mozilla, and the official solution: zero-width space ​, which has patchy support. MSIE
also has the nonstandard CSS word-wrap property, but there is no cross-browser equivalent.
260
Chapter 9: Communicating With The Server
Licensed to
If you work through the method slowly, you’ll see that three document hierarchies
are at work: the page itself, the XML document fragment returned from the
server, and the document fragment being built up for insertion into the page.
The method clears the contents of the document element that has the ID files
(which is a container div that will be used to display the file list), and puts the
newly-created list structure into it.
Finally, it calls fM.setUpDraggables, which we’ll look at later, to make the new
filename elements draggable.
Server Control Commands
Now that we’ve got a list of server files to work with, we’ll need to be able to
manipulate them: to tell the server what to do with the files. Control instructions
will pass from browser to server. In this application, we have only one control
instruction: “move file A to directory B.”
Sending a command to the server can be achieved using XMLHttpRequest in ex-
actly the same way as we’d use it to retrieve data. The mechanics of sending a
communication to the server are the same, it’s just that the focus has changed.
Before, we were conceptually sending a request for data, and getting back some
data; now, we send a command and retrieve a success or failure message. Here,
the browser tells the server what to do, rather than asking the server for inform-
ation.
The server code should achieve the following:
1. It should accept two query string parameters: path and file. The file para-
meter is the full path of the file that we want to move (again, relative to the
root); the path parameter is the relative path to the directory to which the file
should be moved.
2. It should be paranoid, and check that:
❑
the directory is under the root path
❑
the file is under the root path
❑
the directory is a directory and the file is a file.
3. It should move the file into the directory.
261
Server Control Commands
Licensed to
Here’s the PHP server-side code:
File: moveFiles.php
<?php
$ROOT = realpath($_SERVER['DOCUMENT_ROOT'] . '/test');
$path = isset($_GET['path']) ? $_GET['path'] : '/';
$rp = realpath($ROOT . $path);
// Be paranoid; check that this is a subdir of ROOT
if (strpos($rp, $ROOT) === 0) {
$fname = isset($_GET['file']) ? $_GET['file'] : '';
$fn = realpath($ROOT . $fname);
if (strpos($fn, $ROOT) === 0) {
if (is_dir($rp) && file_exists($fn)) {
$fileonly = basename($fn);
rename($fn, $rp . '/' . $fileonly)
or die('Moving file failed');
echo 'OK';
} else {
echo 'File or directory bad';
}
} else {
echo 'Bad filename';
}
} else {
echo 'Bad directory';
}
?>
As with getFiles.php, this script is paranoid: it does not allow the user to exploit
it in order to move files around outside the $ROOT directory. Since we know that
our designed client-side code will only pass legitimate parameters to the server
code, any non-legitimate parameters that are detected must have been sent by
someone who’s trying to exploit the script. Therefore, the error messages are in-
tentionally not particularly helpful (but at least there are error messages; the
script itself does not throw an error).
The client code that uses this server move script is the moveFileHere method.
It is passed the element that was dragged (which will be an element describing a
file, with a path attribute). It also has access to the folder that’s the drag-n-drop
target in the variable this (the current object).
File: fileman.js (excerpt)
moveFileHere: function(dragged) {
var file = dragged.getAttribute('path');
262
Chapter 9: Communicating With The Server
Licensed to
var path = this.getAttribute('path');
var xmlhttp = new XMLHttpRequest();
var qs = '?path=' + escape(path) + '&file=' + escape(file);
var url = 'moveFiles.php' + qs;
xmlhttp.open('POST', url, true);
xmlhttp.onreadystatechange = function() {
if (xmlhttp.readyState == 4) {
fM.receiveMoveDetails(xmlhttp.responseText, dragged);
}
};
xmlhttp.send(null);
},
This code extracts the source and destination locations in its first two lines, then
tells the server what to do. Although we still use the URL query string to pass
instructions to the server, we use a POST request, rather than a GET request, to
indicate that we wish to perform some kind of action on the server—not just re-
trieve information. Again, the server response is sent to an anonymous callback
function, which calls receiveMoveDetails:
File: fileman.js (excerpt)
receiveMoveDetails: function(data, dragged) {
if (data == 'OK') {
dragged.parentNode.removeChild(dragged);
} else {
alert('There was an error moving the file:\n' + data);
}
},
This method deletes the dragged element from the HTML, so that it appears
that the drag target beneath the dragged item has “swallowed” the dragged item.
Now, let’s see how the dragging is achieved.
Implementing Drag-and-Drop
We’ve now done all the required client-server interaction, but this time, unlike
Chapter 8, the server requests are hidden under a thick layer of user interface:
the collapsible menu, and the drag-n-drop system. Let’s look at the latter of those
two interface elements. Figure 9.2 shows the user interface halfway through a
drag action.
263
Implementing Drag-and-Drop
Licensed to
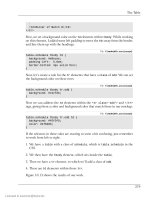
Figure 9.2. Dragging a file to a folder.
The user has left-clicked and held the mouse button down on the index1.html
item; the user then dragged the mouse to the left, carrying the item with it. Since
the item’s not on top of any of the listed directories, none of them is highlighted
as the current drag target.
Basic Drag-and-Drop with DOM-Drag
Making elements draggable is, in concept, a pretty simple thing to implement
via DHTML. It works like this:
1. When the user holds the mouse button down over a draggable element, set
variable dragMode to true and record which element fired the mousedown
event.
2. When the user releases the mouse button, set dragMode to false.
3. If the mouse moves, and dragMode is true, change the position of the recor-
ded element to the position of the mouse.
That’s it, in concept. However, it can be a fiddly thing to get right. Fortunately,
other people have already done the heavy lifting on this; unobtrusive JavaScript
libraries are available that make the implementation of draggable elements easy.
One of the best is Aaron Boodman’s DOM-Drag
4
.
5
Usage of DOM-Drag is pretty simple, First, we include the library:
4
/>5
Aaron says “DOM-Drag was written for you. Because I care about you.” That’s the spirit!
264
Chapter 9: Communicating With The Server
Licensed to
File: fileman.html (excerpt)
<script type="text/javascript" src="dom-drag.js"></script>
<script type="text/javascript" src="sarissa.js"></script>
<script type="text/javascript" src="fileman.js"></script>
Then, add initialization calls for each draggable element:
Drag.init(element);
Additionally, any element that you want to drag must use absolute or relative
positioning in the style sheet:
File: fileman.css (excerpt)
.draggable {
position: relative;
}
Once you’ve loaded the DOM-Drag library, you’ve succeeded in added basic
dragging functionality to an element. We’ll use this method in our script to make
elements draggable.
That explains how we’ll do the dragging, but what about the dropping?
Simple Drag Target Tactics
DOM-Drag provides no facility for knowing whether the user is currently dragging
one element over another, so we’ll need to build this ourselves. At first examina-
tion, it sounds simple:
1. Attach mouseover and mouseout listeners to all potential drop target elements.
A drop target is an element on which the user can drop a dragged element.
If a dragged element is dropped anywhere other than a drop target, it should
“snap back” to its original position.
2. The mouseover listener on a drop target element must check if dragMode is
true (i.e. if a dragging operation is in progress). If it is, then set a class hover
on this target element (so that it can be highlighted with CSS).
3. The mouseout listener on a drop target element should remove the hover
class.
4. When a dragged element is dropped (step 2 in the simple description of
dragging above), check if any target has class hover. If one has, then the
265
Implementing Drag-and-Drop
Licensed to
dragged element must have been dropped on that target element, so call
moveFileHere, from above, for that target.
This approach is fine in theory, but sadly, it’s not quite as simple as that.
Smarter Drag Target Tactics
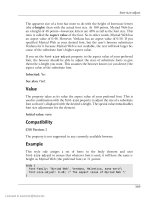
When an element is being dragged, mouseovers on any dragged-over drop target
elements will not fire in Mozilla-based browsers. The reason for this is that the
cursor isn’t over the target element; it’s over the dragged element. Figure 9.3 il-
lustrates this point.
As shown in Figure 9.3, the cursor is on a plane of its own, on top of the dragged
element. The cursor and the dragged element move together on top of the drop
target element. The cursor is never over the drop target element itself, because
the dragged element is in between the two. This means that the target’s mouseover
event never fires.
Figure 9.3. Mouse, element, and target layers.
266
Chapter 9: Communicating With The Server
Licensed to
One way to solve this problem is with a proxy element. Imagine that every drop
target element is actually two elements: the drop target itself, and an invisible a
element that’s the same size and position as the drop target, and exactly on top
of it. This structural alteration would have no effect on the page’s appearance.
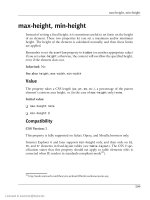
With careful manipulation of the z-index of each element, we can create a situ-
ation where the invisible proxy element lies on top of the dragged element. To
do this, leave the drop target’s z-index unset (so it defaults to zero), set the
dragged element’s z-index to 999, and set the invisible proxy’s z-index to 1000.
The elements will then stack up as shown in Figure 9.4.
Now, the cursor is immediately on top of the invisible proxy element. That means
the proxy element will receive mouse events. The dragged element, when moved,
slides underneath the proxy (but you can’t tell, because the proxy is invisible) and,
hence, does not receive events. The proxy never moves. This use of proxy elements
isn’t restricted to DHTML; elsewhere in user interface development it’s sometimes
called a hotspot.
Figure 9.4. The transparent proxy element layer.
A better procedure for dragging an element, including the new proxy elements,
might be:
267
Implementing Drag-and-Drop
Licensed to
1. When the user holds the mouse button down over a draggable element:
❑
Set a variable dragMode to true.
❑
Record which element fired the mousedown event.
❑
Create invisible proxy elements for each target element in the document
(note that this is done every time a drag starts, not just once at document
creation).
❑
Each proxy element should have a mouseover and mouseout event
listener; the mouseover listener must apply the hover class to the real
element corresponding to this proxy (not the proxy itself).
❑
The mouseout listener should remove the hover class from the real element
corresponding to this proxy.
2. When the user releases the mouse button, set dragMode to false. Remove
the transparent proxy targets. If a target is of class hover, call the
moveFileHere method for that element.
3. If the cursor moves, and dragMode is true, change the position of the recorded
element to reflect the position of the cursor.
That’s the right recipe for highlighting drag targets.
Creating Proxy Drag Targets
The creation of proxy targets will be triggered whenever the user starts to drag a
draggable element. We’ll see how this is set up in a moment, but for now, let’s
look at the process itself, which is completed by the createProxyTargets
method:
File: fileman.js (excerpt)
createProxyTargets: function() {
fM.PROXY_TARGETS = [];
var targets = document.getElementsByTagName('*');
for (var i = 0; i < targets.length; i++) {
var t = targets[i];
if (t.className.search(/\btarget\b/) != -1) {
var proxyTarget = document.createElement('a');
proxyTarget.className = 'proxyTarget';
proxyTarget.style.left = fM.findPosX(t) + 'px';
268
Chapter 9: Communicating With The Server
Licensed to
proxyTarget.style.top = fM.findPosY(t) + 'px';
proxyTarget.style.width = t.offsetWidth + 'px';
proxyTarget.style.height = t.offsetHeight + 'px';
proxyTarget.href = '#';
proxyTarget.realElement = t;
fM.PROXY_TARGETS[fM.PROXY_TARGETS.length] = proxyTarget;
document.body.appendChild(proxyTarget);
fM.addEvent(proxyTarget, 'mouseover', fM.targetOver,
false);
fM.addEvent(proxyTarget, 'mouseout', fM.targetOut, false);
}
}
},
This method iterates through each drop target element t, and dynamically creates
a new a element with a CSS class of proxyTarget. We use this in our style sheet
to style the proxy element as required:
File: fileman.css (excerpt)
.proxyTarget {
cursor: crosshair;
position: absolute;
background-color: white;
z-index: 1000;
opacity: 0;
filter: alpha(opacity=0);
}
In addition to changing the mouse cursor, our proxy objects are given a back-
ground color so that they occupy the entire rectangular area of the drop target.
The z-index of 1000 ensures that they will float over the draggable elements.
Finally, we render the proxy objects invisible by setting an opacity of zero (the
filter property is required to do this in Internet Explorer).
The createProxyTargets method calculates the drop targets’ sizes and positions,
and copies them to this proxy element. A reference to the proxy’s associated real
target element is stored in proxyTarget.realElement, so that it can be retrieved
later if the proxy is moused over. The proxy element is then added to
fM.PROXY_TARGETS (a list of all proxy elements), as well as the document. Finally,
the proxy gets its own listeners that will respond to the mouseover and mouseout
events. They’re discussed in the next section.
269
Implementing Drag-and-Drop
Licensed to
Once dragging is finished, the proxy elements need to be removed from the doc-
ument. Again, we’ll get around to discussing how this is triggered shortly, but
here’s the method that will do the job:
File: fileman.js (excerpt)
removeProxyTargets: function() {
for (var i = 0; i < fM.PROXY_TARGETS.length; i++) {
var tt = fM.PROXY_TARGETS[i].realElement;
tt.className = tt.className.replace(/\bhover\b/, '');
document.body.removeChild(fM.PROXY_TARGETS[i]);
}
fM.PROXY_TARGETS = [];
},
In addition to removing from the document all of the proxy elements that were
stored in the fM.PROXY_TARGETS array, and emptying this array, this method also
performs a little cleanup for the mouseover event listener. The method removes
the hover CSS class (discussed in the previous section) if the event listener has
set it on any of the drop target elements.
Highlighting a Drag Target
The specification says that dragging a file onto a folder should highlight the folder
while the cursor is over it. In our planning, we decided that a moused-over target
should have the hover CSS class applied to produce this effect. The
createProxyTargets method above sets targetOver and targetOut as the
mouseover and mouseout listeners for a proxy element. It’s these proxy methods,
combined with a little CSS, that do the highlighting work.
File: fileman.js (excerpt)
targetOver: function(e) {
var t = window.event ? window.event.srcElement : e ?
e.target : null;
if (!t) return;
var tt = t.realElement;
tt.className += ' hover';
},
targetOut: function(e) {
var t = window.event ? window.event.srcElement : e ?
e.target : null;
if (!t) return;
var tt = t.realElement;
270
Chapter 9: Communicating With The Server
Licensed to
tt.className = tt.className.replace(/\b ?hover\b/, '');
},
Remember that the mouseover event is fired by the proxy element, but the hover
class should be applied to the corresponding drop target element. So targetOver
obtains the element that fired the event, which is the proxy, gets the proxy’s
corresponding real drop target element, and applies the hover class to that ele-
ment. targetOut, similarly, removes the hover class from the drop target element.
Highlighting the target element is then a trivial application of CSS, since all targets
have a class of target, and currently-hovered targets also have a class of hover:
File: fileman.css (excerpt)
.target.hover {
background-color: #999;
color: red;
}
Note the combined class CSS selector: there is no space between .target and
.hover, meaning that it selects any element that has both classes.
Dropping onto the Drag Target
Lovely highlighting effects aside, the primary reason why the proxy elements exist
is so that when the user releases a draggable element over a drop target, that drop
target will be tagged with the hover CSS class. We can now use that class to
identify and process completed drag-and-drop operations.
Our library’s elementDropped method will be called whenever the user releases
a draggable element. As with createProxyTargets and removeProxyTargets,
we won’t worry about how this method is called just yet. Let’s just look at the
code:
File: fileman.js (excerpt)
elementDropped: function(draggedObj, x, y) {
var elements = document.getElementsByTagName('*');
for (var i = 0; i < elements.length; i++) {
var t = elements[i];
if (t.className.search(/\btarget\b/) != -1 &&
t.className.search(/\bhover\b/) != -1 && t.onDroppedOn)
{
t.onDroppedOn(draggedObj);
}
271
Implementing Drag-and-Drop
Licensed to
}
},
This method receives a reference to the draggable element (as well as the mouse
coordinates, which we won’t use).
In our application, the action that is taken as a result of a drag-and-drop operation
will be controlled by the drop target. Each drop target will store its action as a
handler function stored in an onDroppedOn property. The elementDropped
method, therefore, searches through all the elements in the document, looking
for an element with both the target and hover CSS classes. That element will
be the drop target over which the cursor was positioned when the draggable ele-
ment was released, so elementDropped calls its onDroppedOn handler function,
passing to it the reference to the draggable element.
It’s up to the init method of our script to set up the onDroppedOn handlers for
each of the drop targets in the document. Now’s a good time to take a look at
that method:
File: fileman.js (excerpt)
init: function() {
if (!document.getElementById ||
!document.getElementsByTagName || !Drag || !Drag.init)
return;
// Make the targets remove the element when dropped upon
var elements = document.getElementsByTagName('*');
for (var i = 0; i < elements.length; i++) {
var t = elements[i];
if (t.className.search(/\btarget\b/) != -1) {
t.onDroppedOn = fM.moveFileHere;
}
}
// Make folders clickable to list that folder's files
var fs = document.getElementById('folders').
getElementsByTagName('a');
for (var i = 0; i < fs.length; i++) {
fM.addEvent(fs[i], 'click', fM.openFolder, false);
// Safari
fs[i].onclick = function() { return false; };
}
// Load the initial fileset
272
Chapter 9: Communicating With The Server
Licensed to
fM.loadFiles('/');
},
After checking for the features required by the script, init loops through all
elements in the document, looking for those with the CSS class target—the
drop targets. To each of those, it assigns the moveFileHere method as its
onDroppedOn handler function. Remember, this is not a standard DHTML
property; it’s just a convenient property name we’ve chosen for use by the
elementDropped method.
The rest of the init method has to do with setting up the file listing. It adds the
openFolder method as a click event listener to each of the folder names on the
page; this will cause a click on a folder name to load the contents of the associated
folder into the file list. Since this listener can’t cancel the click event in Safari,
we also assign an old-style event handler to do that.
Finally, the root directory ('/') is loaded by calling loadFiles directly to create
the initial file listing on the page.
Handling Drag-and-Drop Events
We’ve now written a slab of code that hinges on the dragging functionality
provided by the DOM-Drag library. To make it all work, we need to hook that
library into our script. We need to tell the library which elements should be
draggable; we need it to do things when a drag operation begins
(createProxyTargets), and we need it to do things when a drag operation ends
(elementDropped, removeProxyTargets). We’ll implement all of this with the
last method in our script, setUpDraggables.
setUpDraggables is called by the receiveFilenames method after it has received
the list of filenames from the server and added them to the document as li ele-
ments of class draggable:
File: fileman.js (excerpt)
receiveFilenames: function(xml, path) {
files.appendChild(ul);
setTimeout(fM.setUpDraggables, 100);
},
setUpDraggables starts by finding all such elements, and making them draggable
using the DOM-Drag library:
273
Implementing Drag-and-Drop
Licensed to
File: fileman.js (excerpt)
setUpDraggables: function() {
var elements = document.getElementsByTagName('*');
for (var i = 0; i < elements.length; i++) {
var draggable = elements[i];
if (draggable.className.search(/\bdraggable\b/) != -1) {
Drag.init(draggable);
Once an element has been made draggable using DOM-Drag, you can provide
handler functions to be called whenever a drag operation starts or finishes. Do
this simply by assigning functions to the draggable elements’ onDragStart and
onDragEnd properties. Again, these are special property names used by the DOM-
Drag library, not standard DOM events.
Here’s the onDragStart handler for this application:
File: fileman.js (excerpt)
draggable.onDragStart = function(x, y) {
document.body.className += ' dragging';
fM.createProxyTargets();
this.ZINDEX = this.style.zIndex;
this.style.zIndex = 999;
this.SAVED_POSITION = [x, y];
};
First of all, this handler adds a CSS class of dragging to the body element. Our
style sheet will use this to change the cursor while a drag-and-drop operation is
in progress:
File: fileman.css (excerpt)
body.dragging {
cursor: move;
}
Next, it calls createProxyTargets, which creates proxy objects for all of the drop
targets on the page.
The draggable element’s original z-index is stored into a ZINDEX property on
the object, before a new value of 999 is applied, so that it floats just below the
proxy objects. Finally, the draggable object’s starting position—as provided by
the x and y arguments to the handler function—is stored in a SAVED_POSITION
property.
274
Chapter 9: Communicating With The Server
Licensed to
When the user releases the mouse button, completing the drag operation, DOM-
Drag calls the onDragEnd handler:
File: fileman.js (excerpt)
draggable.onDragEnd = function(x, y) {
this.style.left = this.SAVED_POSITION[0];
this.style.top = this.SAVED_POSITION[1];
this.style.zIndex = this.ZINDEX;
fM.elementDropped(this, x, y);
fM.removeProxyTargets();
document.body.className =
document.body.className.replace(/\b ?dragging\b/,
'');
};
}
}
},
This function starts by moving the draggable element back to its starting position
and z-index, which were stored in the SAVED_POSITION and ZINDEX properties,
respectively. This causes dragged filenames to “snap” back if they aren’t dropped
on a valid target.
Next, the function calls our elementDropped method, which checks if the element
was dropped on a valid target, and, if so, triggers the file move operation.
It then cleans up the proxy elements by calling removeProxyTargets, and finally
removes the dragging CSS class from the document body.
Expanding and Collapsing Lists
At this point, we have a working file manager, which allows the user to drag files
to folders; the element showing the filename is removed from the HTML and a
command is sent to the server to move the file on the server’s file system. The
remaining requirement is to allow the folder list to be expanded and collapsed.
Fortunately, this can be implemented with very little extra work, using my own
aqtree3 script
6
. To make a set of nested, unordered lists expand and collapse,
simply load the aqtree3 JavaScript and CSS files in the HTML:
6
/>275
Expanding and Collapsing Lists
Licensed to
File: fileman.html (excerpt)
<script type="text/javascript" src="aqtree3clickable.js">
</script>
<script type="text/javascript" src="dom-drag.js"></script>
<script type="text/javascript" src="sarissa.js"></script>
<script type="text/javascript" src="fileman.js"></script>
<link rel="stylesheet" href="aqtree3clickable.css">
<link rel="stylesheet" href="fileman.css">
Then, change the folder list <ul> tag to have class aqtree3clickable:
File: fileman.html (excerpt)
<ul class="aqtree3clickable">
As it turns out, this doesn’t quite work. If you loaded the page at this stage, you’d
find yourself unable to expand the folder list to view the subfolders. Can you
guess why?
To ensure compatibility with Safari, I wrote the aqtree3 script using old-style
event handlers instead of event listeners. In particular, the onclick event handler
of each of the folder links is used to expand and collapse the folder tree. Our file
manager script overwrites this event handler with its own onclick handler, de-
signed to cancel the click event in Safari:
File: fileman.js (excerpt)
// Safari
fs[i].onclick = function() { return false; };
This is an example of clashing event handlers, which is the reason modern DOM
event listeners were created. You can assign as many listeners as you want to an
event, but only one event handler. In a more sophisticated script, we might detect
the existing event handler and call it from our own event handler, but since the
aqtree3 script does a fine job of cancelling the click event with its own event
handler, we can simply not assign our event handler when an existing one is
found:
File: fileman.js (excerpt)
if (!fs[i].onclick) {
// Safari
fs[i].onclick = function() { return false; };
}
The number of free, unobtrusive DHTML scripts designed to drop into place in
your pages grows daily. Scripts like this file manager application are precisely the
276
Chapter 9: Communicating With The Server
Licensed to
purpose for which they’re designed. These scripts enhance functionality and are
easy to implement, so save yourself sweat and toil and enjoy the convenience.
Just be sure to watch out for clashes—until such time as all browsers fully imple-
ment the DOM standard for events, scripts written for maximum compatibility
may not be strictly unobtrusive.
With all that code in place, the file manager is finished. Looking back on the
specification, everything in it is complete. This is another good reason to have a
clear specification up front: it lets you know when to stop coding!
Using XML-RPC
Some Web applications—front and back ends—are built as one unit, like the file
manager example. In such cases, the developer can choose to implement the set
of methods that are called in the back end, and the way in which those methods
are called, using any approach that seems appropriate. This list of methods,
combined with the ways in which they’re called, forms the back end’s API, or
application programming interface.
Sometimes, instead of implementing both the front and back ends together, you
may want to write an API for other developers to call via HTTP requests from
their own applications. One way to write such an API is to use XML-RPC—a
simple standard for Web-accessible APIs, commonly called Web services.
A service that provides (exports) an XML-RPC API, when used with an XML-
RPC client library, can be called as if it were a local set of methods, even though
it is not. The complexity of sending requests and receiving responses over HTTP
is completely hidden.
For example, the Blogger
7
API is an XML-RPC API presented by the Blogger
weblogging application, which provides the functionality to maintain a journal,
or Weblog. It offers methods such as editPost, newPost, and getUserBlogs.
The data that you pass to a given method (such as editPost) is passed over
HTTP to a remote server on which the method is executed. The return value is
passed back by HTTP to your code. Your code does not have to concern itself
with details of network connectivity; those and similar details are all taken care
of by the XML-RPC client library. This gives the technology the second part of
its name: RPC stands for Remote Procedure Call, the idea being that one can
call a method that takes effect on a remote server as if it were a local method. Pro-
7
277
Using XML-RPC
Licensed to
cedure is an old name for function or subroutine. Figure 9.5 illustrates this ar-
rangement.
Figure 9.5. Local methods vs. XML-RPC remote methods.
In Figure 9.5, the user code (in the boxes on the left) calls
document.getElementById and blogger.getUsersBlogs in identical ways, as
if both were local methods. The blogger.getUsersBlogs method, however, is
actually provided by the JavaScript XML-RPC client library, because it is acting
as a proxy for the blogger.getUsersBlogs method on a remote server. The two
methods are called identically from user code.
The first part of XML-RPC’s name comes from the method it uses to pass your
function call over HTTP; it converts the method call and the passed parameters
to XML. You do not need to know the detail of how this works in order to use
it; in fact, the whole point of XML-RPC is that you can call remote methods
without having to worry about how that call happens. Those who are curious, or
278
Chapter 9: Communicating With The Server
Licensed to
don’t have enough to do, can find more detail than they will ever need in the
XML-RPC specification
8
.
Calling XML-RPC APIs
Let’s continue with the Blogger example. The Blogger API, as mentioned above,
is an API that allows the editing and creation of posts on a Weblog, and it’s a
fully documented XML-RPC API
9
. This means that any program that can act as
an XML-RPC client can use the API to edit posts on a Weblog. The relevant
methods in the API are blogger.getRecentPosts, which returns a list of recent
posts, blogger.newPost, which adds a new post to the Weblog, and
blogger.editPost, which supplies new content for an existing post.
To use the API from JavaScript, a JavaScript XML-RPC client is needed. There
are a few around; one of the best is the xmlrpc module of jsolait
10
. Using the
client is simple. First, include the library in your code with a <script> tag:
File: editblog.html (excerpt)
<script type="text/javascript" src="jsolait/init.js"></script>
Everything else occurs in custom JavaScript that you must write for each page.
Start by loading the xmlrpc module using jsolait’s importModule function:
var xmlrpc = importModule('xmlrpc');
Next, create an object to represent the particular XML-RPC API you wish to call.
You can either get jsolait to create the object for you, and auto-detect all the
methods it makes available using the ServerProxy class:
var remoteAPI = new xmlrpc.ServerProxy(URL);
or you can create the object yourself and use the XMLRPCMethod class to create
methods that call the XML-RPC API. The advantage here is that you can name
your local methods whatever you like:
var remoteAPI = {
getRecentPosts: new xmlrpc.XMLRPCMethod(URL,
'blogger.getRecentPosts'),
editPost: new xmlrpc.XMLRPCMethod(URL, 'blogger.editPost')
};
8
/>9
/>10
/>279
Calling XML-RPC APIs
Licensed to