Professional ASP.NET 1.0 Special Edition- P7 docx
Bạn đang xem bản rút gọn của tài liệu. Xem và tải ngay bản đầy đủ của tài liệu tại đây (1.19 MB, 40 trang )
be using in the page.
<%@ Register tagprefix="wrox" Tagname="footer" Src="standardFooter.ascx" %>
Next, we need to add it to the page where we want this information to be displayed.
<wrox:footer runat="server" />
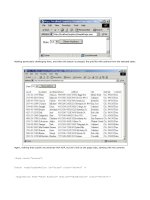
When we view the page in the browser, we will see this on the page:
Converting a Page to a User Control
Now that we can see how easy it is to create a user control from scratch, let's look at the more common way of creating
a user control. As you are developing your ASP.NET web application, you will probably come across sections of code that
you are using on multiple pages. In the past, your options were to create an include file that kept the code in a single
location, or maybe creating a design-time control for Visual Studio. But neither of these methods was really that simple
or straightforward to use. And all developers know that if something isn't simple and straightforward, then chances are it
won't get used. But now with user controls, we can take that code segment from our existing page and turn it into a
control that can be easily reused in multiple pages.
At the beginning of this chapter, we saw an example that enabled you to select from a list of shipping methods. This page
included the database code to retrieve the list as well as the controls to display the list. If we can package that logic into
a reusable control, then we can ensure that wherever we need a list of shippers in our application (or applications) the
data will be retrieved and displayed in the same way. A similar technique is used in Chapter 8 to build a control that
returns data.
The first part of our control will be the display. The selection list is a drop-down list server control. We will leave what to
do with the data in the control up to the page that is hosting the control. Since the server control is using data binding,
the code that makes up the display will be quite simple.
<asp:DropDownList id="ShipMethod" runat="server"/>
The main work of the page is done in the code that sets up the page. Since in effect the user control is a page, we can still
perform the work to read from the database in the Page_Load event that we used in the original page. We also need to
check to see if the page we are converting into a user control has an @Page directive. If it does, then we will need to
change this to a @Control directive.
<%@ Control Language="Visual Basic" %>
<script language="VB" runat="server">
Sub Page_Load(Source As Object, E As EventArgs)
If Not Page.IsPostBack Then
Dim myConnection As SqlConnection
Dim myCommand As SqlCommand
Dim myReader As SqlDataReader
Dim SQL As String
Dim ConnStr As String
SQL = "SELECT * FROM Shippers"
ConnStr = "server=localhost;uid=sa;pwd=;database=Northwind"
myConnection = New SqlConnection(ConnStr)
myConnection.Open()
myCommand = New SqlCommand(SQL, myConnection)
myReader = myCommand.ExecuteReader()
ShipMethod.DataSource = myReader
ShipMethod.DataBind()
End If
End Sub
</script>
As you can see, this is exactly the same code that we had in our ASP.NET page. Since there are references to other .NET
assemblies in our code, we need to add an @Import directive to our user control. We can't necessarily rely on the page
hosting this control to have imported these references. It doesn't matter to the compiler if these references are imported
twice- but it will complain if they aren't there at all.
<%@ Import Namespace="System.Data" %>
<%@ Import Namespace="System.Data.SqlClient" %>
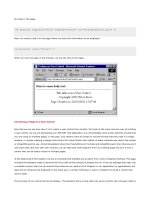
When we view a page that contains this control, we will see:
If we examine the HTML that this produces you can see that nothing special is happening on the client:
<html>
<head>
<title>Testing our User Control - Part 2</title>
</head>
<body>
<form name="ctrl0" method="post" action="UserControl2.aspx" id="ctrl0">
value="dDwzNzA5NjI5Njk7dDw7bDxpPDE+Oz47bDx0PDtsPGk8MT47PjtsPHQ8O2w8aTwwPjs+O2w8d
Dx0PDtwPGw8aTwwPjtpPDE+O2k8Mj47PjtsPHA8U3BlZWR5IEV4cHJlc3M7MT47cDxVbml0ZWQgUGFja
2FnZTsyPjtwPEZlZGVyYWwgU2hpcHBpbmc7Mz47Pj47Pjs7Pjs+Pjs+Pjs+Pjs+QCtfh/cNp+z/JarjD
m/wQX8mmtA=" />
<strong>Here is some body text.</strong>
<P>Please choose a shipping method: <select name="ctrl1:ShipMethod" id="ctrl1_ShipMethod">
<option value="1">Speedy Express</option>
<option value="2">United Package</option>
<option value="3">Federal Shipping</option>
</select>
</P>
<hr>
<table border=0 align=center>
<tr><td colspan=2 align=center>This table is in a User Control</td></tr>
<tr><td align=right>Copyright: </td><td>2002 Wrox Press</td><tr>
<tr><td align=right>Page Created on: </td><td>22/01/2002 15:48:09</td></tr>
</table>
</form>
</body>
</html>
The user control behaves just like any other control. The Page_Load runs and any content is transmitted to the parent
page. The difference is that this user control can be dropped onto other pages.
The @ Control Directive
This directive is used to assign control-specific attributes that are used by the Web Forms page parser and compiler to
affect how the user control is created. There can only be one @ Control directive in a single file.
Attribute
Values (default in bold) Used for
AutoEventWireup True or False
ClassName
Valid class name
CompilerOptions Valid compiler options
Indicates whether the page's events are automatically enabled
Class name that this control is compiled as.
List of compiler options to be used when the page is compiled.
Attribute
Values (default in bold) Used for
Debug
True or False
Compiles the page with debugging enabled.
Description
n/a
Description of the page - ignored by ASP.NET.
EnableViewState True or False
ViewState for this user control is maintained during round-trips.
Explicit
True or False
Uses the Visual Basic Option Explicit mode.
Inherits
Valid class name
Code-behind class that this control inherits.
Language
Valid .NET Language name Language used to compile all sourcecode on the page.
Src
Valid source file name
File name of the Code-Behind class used by this page.
Strict
True or False
Uses the Visual Basic Option Strict mode.
WarningLevel
0, 1, 2, or 4
Compiler warning level at which compilation should be aborted.
User Control Properties
You can interact with your user control by exposing a set of properties for it. This will allow you to programmatically
change the behavior of the control from the page that is hosting it. It also makes it much easier to build a control that can
be used on multiple pages, even if the data being displayed is somewhat different.
There are three steps to using properties with user controls. First, you need to expose the properties from your user
control. This is done using the standard property syntax that we have already seen in the book. If we take our previous
example, we can add to it to expose some properties.
<%@ Import Namespace="System.Data" %>
<%@ Import Namespace="System.Data.SqlClient" %>
<script language="VB" runat="server">
Private ConnStr As String
Property ConnectionString() As String
Get
return ConnStr
End Get
Set
ConnStr = value
End Set
End Property
Sub Page_Load(Source As Object, E As EventArgs)
If Not Page.IsPostBack Then
Dim myConnection As SqlConnection
Dim myCommand As SqlCommand
Dim myReader As SqlDataReader
Dim SQL As String
SQL = "select * from Shippers"
If ConnStr = "" Then
ConnStr = "server=localhost;uid=sa;pwd=;database=Northwind"
End If
myConnection = New SqlConnection(ConnStr)
myConnection.Open()
One of the ways that we can make our user control more extensible is to not hardcode the database connection string. If
we make the connection string a property of the control, then the page that is using the control can pass in the proper
connection string. In the code above you can see that no matter what page the control is used in, a default connection
string will be used if none is provided.
The first thing to do is to create a variable to hold the connection string value. Since the property assignment statement
is called before Page_Load, we need to have a place to hold the value before it is used to actually open the database.
Private ConnStr As String
The next step is to allow the user of the control to set a value for the property, as well as read the value contained by the
property. This is done using the Property statement. We provide a Get method to allow for the retrieval of the value,
and a Set method to allow the property value to be set.
Property ConnectionString() As String
Get
return ConnStr
End Get
Set
ConnStr = value
End Set
End Property
Finally, we need to use the connection string to open the database. Since we can't guarantee that a user will have set the
Property value, we need to have a default value that is used if there is no value present. Alternatively, if we wanted to
require that a value be set, then we could throw an exception at this point if there is no value set. But in this case, we will
use a default value.
If ConnStr = "" Then
ConnStr = "server=localhost;uid=sa;pwd=;database=Northwind"
End If
The last step is to use this revised user control in our ASP.NET page. To pass a property to a user control, you simply add
the property name and value as a parameter when you add the user control to the page. These parameters can also be
set dynamically in code if you want.
runat="server" />
User Control Events
The key thing that you need to remember when dealing with user control events, is that the event needs to be handled
in the user control itself, and not in the page. In this way, all of the event handling for a user control is encapsulated within
the control. You should not try to include event handlers for controls within a user control in the page that is hosting the
user control(that is, the parent page) - the events will not be passed to the page, so the event will never be processed.
Since event handlers within a user control are handled in the same way as event handlers for server controls within pages,
it is pretty similar to what we looked at earlier in the chapter to add an event handler to a user control. We will add to our
current user control an event that will be fired when the user selects an item from the drop-down list. This event will cause
the user's selection to be displayed in a label control just below the selection.
Sub ShipMethod_Change(Source As Object, E As EventArgs)
SelectedMethod.text = "You have selected " & _
ShipMethod.SelectedItem.Text & _
" as your shipping method."
End Sub
</script>
OnSelectedIndexChanged = "ShipMethod_Change"
id="ShipMethod" runat="server"/>
<BR><asp:Label id="SelectedMethod" runat="server"/>
We've made two changes to the DropDownList control that is part of our User Control. First, we need to let ASP.NET
know that we want to automatically trigger a postback when the selection in the drop down list is changed. This is done
by setting the AutoPostBack attribute to true. The second change is to define what method will be called whenever the
user selects an item from the drop down list. The name of the event that is fired is OnSelectedIndexChanged and when
that event is fired, we will call the ShipMethod_Change event.
We will then need an event handler within the user control that will be called when the selection is made. This event
handler will grab the text value of the selected item from the control, and use that to populate a label control for display
back to the user.
Sub ShipMethod_Change(Source As Object, E As EventArgs)
SelectedMethod.text = "You have selected " & _
ShipMethod.SelectedItem.Text & _
" as your shipping method."
End Sub
The SelectedItem property of the DropDownList control identifies the particular item object from the list that is
currently selected. The Text property of this object contains the actual text that was in the drop down list. We can grab
this value and use it to build a prompt to display for the user.
Code Behind with User Controls
Earlier in this chapter, we saw how we can use the Page class to create an object that will handle all of the code for our
page. Then by placing that class definition into its own file, we can separate the code from the layout. This is the same as
the code behind technique we used earlier. Since user controls are very similar to ASP.NET pages, we can also use
code-behind when creating our user controls as well.
Imports System
Imports System.Web.UI
Imports System.Web.UI.WebControls
Imports System.Data
Imports System.Data.SqlClient
The first step is to import the necessary namespaces for the user control. The System and System.Web.UI namespaces
are required. Since we are using ASP.NET Server Controls, we also need to import the System.Web.UI.WebControls
namespace. And, in order to retrieve our data from a database, we need to import the System.Data.SqlClient
namespace as well.
The next step is to declare a class that we will use to define our user control. To provide the necessary functionality, this
class needs to inherit from the UserControl class. This class will contain the same initialization code, object interface
code, and event handling code that is in the user control we have already created. One important difference is that we
must declare Public variables for each of the server controls that our user control needs.
Public Class shipMethodClass
Inherits UserControl
Private ConnStr As String
Public ShipMethod As DropDownList
Public SelectedMethod As Label
When we save our code-behind file, it is important to use the proper filename extension. This is the only way to inform the
ASP.NET compiler what language our code-behind file is written in. If you don't use the proper extension, then the
compiler will fail when trying to display this page.
<%@ Control Inherits="shipMethodClass" Src="shipMethod.vb"
ClassName="shipMethod" %>
Finally, we need to remove the VB code from our user control and then add a @Control directive to attach the user
control to the codebehind file. There are three attributes in the @Control directive that we need to use. The Inherits
attribute defines the name of the class that contains the codebehind code. The Src attribute defines the source file that
actually contains the code-behind sourcecode. The ClassName attribute defines a class name for the control, which we
will need if we dynamically create the control on a page.
Partial Page Caching with User Controls
As we saw earlier in this chapter, you can use caching to reduce the number of processing cycles required to deliver a page
when it is requested by the client. By storing the output from a page on the server, and then outputting that information
to a client when the same page is requested again, we eliminate the need to execute the page again. We can use a very
similar concept to allow us to cache parts of a page.
If you are wondering, "how can I tag part of the page to be cached?" then think about what user controls do. They are
basically separate page sections that are embedded into another page. If we could cache the output of a user control, and
then insert it into a page when it is requested, then we can again achieve the benefits of caching. This technique is called
partial page caching, or fragment caching.
The key to using fragment caching is through user controls. You must place the portions of the page that you wish to cache
into a user control, and then indicate that the user control should be cached. To do this, you use the @OutputCache
directive, just like we did when we cached the entire page.
<%@ OutputCache Duration="time" VaryByParam="none" %>
To see how fragment caching works, we will add caching to the user control that we have been looking at in this chapter.
This specific user control, since it is performing database access, will gain great performance benefits by being cached.
Since the data that is being displayed does not change very frequently, it would be of great benefit if we didn't have to go
to the database each time the control is used.
<%@ Import Namespace="System.Data" %>
<%@ Import Namespace="System.Data.SqlClient" %>
<%@ OutputCache Duration="10" VaryByParam="none" %>
<script language="VB" runat="server">
Sub Page_Load(Source As Object, E As EventArgs)
Dim NowTime As DateTime
Dim Expires as DateTime
NowTime = DateTime.Now
Expires = NowTime.AddSeconds(10)
CreatedStamp.InnerHtml = NowTime.ToString("r")
ExpiresStamp.InnerHtml = Expires.ToString("r")
If Not Page.IsPostBack Then
Dim myConnection As SQLConnection
...
The one line that enables fragment caching is the @OutputCache directive. We have set the cache to hold the page for
10 seconds. By setting the VaryByParam attribute to none we have the same cached value regardless of the parameters
or browser making the request.
The rest of the code that we have added to the user control is simply to help us identify that the cache is actually working.
We want to display the time at which the user control was run, and when the cache expires, 10 seconds afterwards. There
are two Label server controls that will display that information for us.
<HR>Fragment Cache created: <Font color="red">
<B id="CreatedStamp" runat="server"></B></Font>
<BR>
Fragment Cache expires: <Font color="red">
<B id="ExpiresStamp" runat="server"></B></Font>
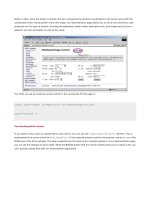
When we view the page in the browser, we can see the time that the page was created, the time that the user control was
created, and when the cached version of the user control will expire. Here we see that the time the page was loaded was
15:48:45 - the same time shown on the fragment cache.
If we hit F5 to refresh the browser, we can then see that the page creation time changes (it's now 15:49:24), but the user
control creation time and cache expire time doesn't change- it is being drawn from the cache.
Summary
In this chapter, we have taken a look at the core for ASP.NET- the page. Whether you refer to it as a Web Form or as an
ASP.NET page, the page is the central part of all that you will do with ASP.NET. The page is what embodies the interface
that the user has to interact with, on your web site or web application. The page gives us plenty of power to do things, like
generate non-text files such as images, or be separated into smaller segments called user controls. But with this power
also comes complexity. The nice thing though about the Page object and all that it represents is that you can just work
with the tip of the iceberg and still function. But when you need to delve deeper, the Page object, and all that it
encompasses, has the power that you need.
In this chapter, we looked at:
The old way of doing ASP pages, and contrasted that with the new ASP.NET style of pages.
The Page class itself and the object model that it supports.
The steps that the page goes through in its lifetime.
How to use Code Behind to separate code from layout.
How output caching can be used to increase performance.
How to create and use user controls.
In the next chapter, we will begin to dive deeper into the world of server controls. As we have already seen with user
controls, the ability to embed complex functionality into a control, and then drop that control onto a Web Form page with
one tag is one of the revolutionary aspects of ASP.NET.
Server Controls and Validation
We have already used server controls in many of the examples of building ASP.NET pages in previous chapters. In this,
and the next two chapters, we are going to be looking in more depth at exactly what server controls are and how we can
use them. In fact, we will be examining all the different types of server controls that are supplied with the standard .NET
installation.
Server controls are at the heart of the new ASP.NET techniques for building interactive web forms and web pages. They
allow us to adopt a programming model based around serverside event handling that is much more like the structured
eventdriven approach we are used to when building traditional executable programs.
Of course, as the .NET framework is completely extensible, we can build our own server controls as well, or just inherit
from existing ones and extend their behavior. We will look at how we can go about building our own server controls later
in this book. In the meantime, we will stick to those that come as part of the standard .NET package.
The topics we will cover in this chapter are:
What are server controls?
How we can build interactive forms and pages using them.
The server controls that are supplied with .NET.
A detailed look at the HTML and Input Validation controls.
We start with the obvious question; 'What are server controls?'
What are Server Controls?
As we saw in Chapter 4, ASP.NET is designed around the concept of server controls. This stems from the fundamental
change in the philosophy for creating interactive pages. In particular, with the increasing power of servers and the ease
of building multi-server web farms, we can circumvent the problems of handling the increasing range of different client
devices by doing much more of the work on the server.
We also end up with a client interface that looks and behaves much more like a traditional application. However, to
understand how the use of server controls affects the way we build applications, it is important to grasp the way that the
new ASP.NET 'page' model changes the whole approach to web page design.
The ASP.NET Page Model Revisited
In previous versions of ASP, we have gotten quite used to the traditional way of creating pages dynamically:
•
Capture the request in IIS and pipe it through a parsing engine like the ASP interpreter. This is achieved by
setting the script mappings in IIS to direct all requests for .asp pages to the ASP ISAPI DLL named asp.dll.
•
Within the interpreter (asp.dll), examine the page for server-side script sections. Non-script sections are
simply piped back out to the client through the response. Script sections are extracted and passed to an instance
of the appropriate scripting engine.
•
The scripting engine executes the code and sends any output that this code generates to the response, at that
point in the page.
•
The problem is that the code usually ends up resembling spaghetti. It is really hard to get a well- structured design when
all we are doing is interpreting the blocks of script that can be placed almost anywhere in the page.
ASP.NET Pages are all about Events
Instead, if we think about how a traditional Windows executable application is created, it all depends on events. We create
a form or window for the user to work with, and place in it the controls they will use to accomplish the required task.
Events are raised as the user interacts with the controls and the page, and we create handlers for these events. The code
in each event handler is responsible for updating the page or controls, creating output, or carrying out whatever task is
required:
The great thing with ASP.NET is that, in conjunction with server controls and the new 'page' model, we can build web
pages and web applications that work in just the same way. In other words, we now have a proper event-driven
architecture.
ASP.NET is Compiled Code
Much of the theory of this new page structure was covered in previous chapters, so we will confine ourselves to the actual
server controls themselves in this chapter. However, the important concept to grasp is that the whole page, including all
of the HTML, text, and other content, is compiled into a class. This class can then be executed to create the output for the
client.
All the static or client-based content (text, HTML, client-side script, and so on) is sent to the client through the response
when the class is executed. We have no interaction with it on the server. However, all controls or elements that are
marked with the runat="server" attribute are themselves created as objects within the page class. This means that we
can write code that uses these objects. Or, to put it more simply, if we mark an element or control as being
runat="server", we can access its properties, call its methods, and react to the events it raises on the server. This
works because ASP.NET uses <form> elements to create the postback architecture we described in earlier chapters. In
the postback architecture, the page and its contents are posted back to the same ASP.NET file on the server when the user
interacts with the controls on that page.
Server Controls are Event-Driven
When a user clicks a button on a page, the values of the controls on that page are posted back to the server and an event
is raised (on the server). We react to this event using an event handler. For example, we can define a button control in the
following way:
<input type="submit" value="Go" onserverclick="MyFunction" runat="server" />
Then, on the server, we react to the click event (notice that the attribute name is onserverclick, not onclick, which
is defined in HTML 4.0 to raise a client-side event):
<script language="VB" runat="server">
Sub MyFunction(objSender As Object, objArgs As EventArgs)
... code to handle the event here ...
End Sub
</script>
Server Controls are Objects Within the Page
Another point that might seem obvious, but which is again at the heart of the new page design, is that each server control
is compiled into the page class as an object that is globally available within the page. This means that, within an event
handler, we can access all the controls on the page. So, as in a traditional application, we can access the values in other
textboxes, buttons, list controls, and so on, then take the appropriate actions and/or create the appropriate output. Here
is an example where the Page_Load event is used to collect values from several server controls:
<div id="divResult" runat="server" />
...
<script language="VB" runat="server">
Sub Page_Load()
Dim strResult As String
strResult = "MyTextBox.ID = " & MyTextBox.ID & ""
strResult += "MyTextBox.Value = " & MyTextBox.Value & ""
strResult += "MyCheckBox.Checked = " & MyCheckBox.Checked
divResult.InnerHtml = strResult
End Sub
</script>
And, of course, we can also set the value of the controls:
<script language="VB" runat="server">
Sub Page_Load()
Dim datToday As Date = Now()
MyTextBox.Value = datToday
End Sub
</script>
Experimenting with Server Controls
To show how the various server controls work, we have provided a simple example application that shows the output
generated in the browser by each of the controls. You can also set the values of the common properties for each control
and see the results.
The example is included in the samples that you can download for this book from
or run on-line at
/>The application is in the folder named server-controls, and has a default.htm page to start it:
The gray background section in the main page displays the actual HTML output that the selected control generates. This
is done with some client-side JScript, which creates an instance of the XMLHTTP object (an integral part of IE 5) and uses
it to fetch the same page again as a string, after it has finished loading into the right-hand frame of our application. The
code then parses out the section containing the output of the server control and displays it (you can view the source of the
page to see this code). This means that you will only be able to use IE 5 or above to view this particular example. However,
this was felt to be a valid course of action in order to show the actual output of the server controls.
We could simply have queried the OuterHtml property of the element itself to get the HTML content, but this is actually
different from the HTML that the browser receives from the server. The IE HTML DOM parses the incoming HTML and sorts
and simplifies the attributes, so you wouldn't see a true picture of the server control's output in this case.
As you can see from the previous screenshot, the left-hand frame contains a collapsible tree listing all the server controls.
For each one, you can specify the values for several of the most useful properties for that control. For example, in the next
screenshot we have selected the HTML Anchor control and set the Title, Href, Name, and Target properties, and then
clicked the Update button. You can see the effect this has on the output of the control:
We will be using this application throughout this, and the next, chapter to demonstrate the various controls. We don't
have room to exhaustively examine all the methods and properties for all of the controls, but you can experiment with it
yourself to see what effect each of the properties has on the output created by the different server controls.
By comparing the output that is generated to the property settings you make, you can get a feel for how these controls
can be used. OK, so it is a relatively simple onetoone connection between the properties you set and the attributes that
are created with the HTML controls. However, as we will see in the next chapter (particularly with the rich controls
described there), the results from the other sets of server controls can be quite different.
About the Example Application
Although we won't be describing how the example application works in this chapter, the sourcecode is available for you to
look through if you want to learn more. Basically, all it does is create an instance of the selected control and then display
a set of input elements for the properties specific to that control. As the page loads, it reads the values of these properties
and inserts them into the input elements. When we set one or more of the properties and click the Update button, the
server control is updated to reflect these property values.
We haven't provided inputs for all the properties, as there are a large number that are generic to many controls, and which
are not commonly used. Where the property value is taken from an enumeration, such as the Align property for an
ASP:Image control, we provide a drop-down list containing the enumeration values. To set the property when the page
is submitted, we use the integer value of that enumeration member as stored in the value attribute of the list box item.
We will discuss this in more detail when we look at the ASP.NET Web Form controls in the next chapter. However, you can
see how this works if you examine the sourcecode for the page (asp_image.aspx).
Some of the server controls demonstrated in the application (such as textboxes and lists) are interactive. However, note
that any changes you make within the control itself (the control we are demonstrating) are not reflected in the property
values shown in the controls where you set these values. For example, if you change the text in the HtmlInputText
control at the top of that particular demonstration page, it is reset to the value shown in the Value property input control
when you click Update. At any time you can return the control to its original state by clicking the Reset button.
When Should I Use Server Controls?
One very important topic to consider is when we should choose server controls over 'normal' HTML elements. For example,
if we want a textbox on a form, should we use a server control or a normal <inputtype="text"> element? In fact, to
create a textbox we have three options. We can just use an ordinary HTML element that is displayed as a textbox in the
browser:
<input type="text" name="mytext" />
We can also use an HtmlInputText server control. Again, we set the type attribute to "text", but this time we include
the runat="server" attribute as well:
<input type="text" id="mytext" runat="server" />
Or we can use an ASP TextBox control (we will discuss the pros and cons of these controls in the next chapter):
<asp:TextBox id="mytext" runat="server" />
Adding the runat="server" attribute to an HTML element, or using one of the ASP Web Form controls (which must
always include the runat="server" attribute in their definition) causes that control to be compiled into the page, and
executed on the server each time the page is requested. This is obviously more resource-intensive than just including
some HTML in the page output, as would be the case with an element that does not contain the runat="server"
attribute.
However, if we want to be able to access the element's properties, methods, or events in our server-side code, we have
to create it as a server control. It is always worth considering which elements actually do need to be server controls when
we build a page, though. For example, the following situations do not require a server-side control:
When the element is only used to run some client-side script. For example, a button that opens a new browser
window, interacts with a client-side ActiveX control or Java applet, or calculates some value for display in the
page using DHTML or in an alert dialog.
When the element is a Submit button that is only used to submit a form to the server. In this case, the code in
the Page_Load event handler can extract the values from the other controls.
When the element is a hyperlink that opens a different page or URL and there is no need to process the values
for the hyperlink on the server.
Any other times when access to the element's properties, methods, or events in server-side code is not required.
Remember that we can still use the Request.Form and Request.QueryString collections in the same way as in
previous versions of ASP if we wish, with both ordinary HTML control elements and with server controls. HTML control
elements that are on a <form> but which are not marked with runat="server" (in other words they are not server
controls), will still send their values to the server in the Request.Form and Request.QueryString collections when
the form is submitted.
In general, a page that uses server controls instead of HTML elements results in something like a 30 percent drop in
performance each time the page is generated. However, this is only an average - you don't get a compounded 30 percent
penalty hit for every control. Besides, if you use server-side code to set the values of controls using traditional ASP
techniques, you generally get worse performance compared to using the ASP.NET server controls.
The Controls Available in ASP.NET
We are now in a position to appreciate the advantages we get with server controls:
HTML output that creates the elements to implement the control in the browser
An object within the page that we can program against on the server
Automatic maintenance of the control's value (or state)