Professional ASP.NET 1.0 Special Edition- P16 pdf
Bạn đang xem bản rút gọn của tài liệu. Xem và tải ngay bản đầy đủ của tài liệu tại đây (1.18 MB, 40 trang )
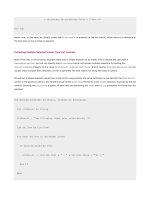
'now we can check if the values are valid
If objRow("ISBN", DataRowVersion.Proposed) > "1999999999" Then
objRow.CancelEdit()
Else
objRow.EndEdit()
End If
'then display the contents again
dgrResult3.DataSource = objTable.DefaultView
dgrResult3.DataBind()
To demonstrate the effect of the EndEdit method, the next section of code just repeats the whole process - but this time
it sets the value of the ISBN field to a number less than "1999999999" so that the test succeeds. This means that this
time the EndEdit method is called. Again, the contents of the table are displayed during and after the edit process:
The Original, Current, and Proposed Column Values
If you were on your toes when reading the previous code listing, you'll have seen that we used a special syntax when
accessing the value of a column:
If objRow("ISBN", DataRowVersion.Proposed) > "1999999999" Then ...
As we'll see in more detail in the next chapter, every column in every row of a table maintains three values for that item.
These values are defined in the DataRowVersion enumeration, and they are used to help maintain concurrency when
updating data:
The value that was in the column when the DataTable was created and filled with data. It is compared to the
Original value in the original database table when an update is performed, to see if another user or process has
changed the value since the DataTable data was created.
Proposed The proposed value for this column after changes have been made following BeginEdit, but before
EndEdit¸ CancelEdit, AcceptChanges* or RejectChanges* has been executed.
The actual column value after changes have been made to it, and after these changes have been accepted
Current
(after EndEdit or AcceptChanges* has been executed).
* The AcceptChanges and RejectChanges methods are described next.
Accepting and Rejecting Changes in a Row, Table, or DataSet
As we saw earlier, we can access any of the three values that are stored for every column in every row of a table at any
time to get the appropriate value for a comparison test, or to check whether values in a row have been changed or are in
the process of being changed.
As well as using the BeginEdit, EndEdit, and CancelEdit methods to manage updates to a table row, we can also
use the AcceptChanges and RejectChanges methods. Their actions are self-explanatory, with AcceptChanges
effectively calling EndEdit on any rows that are currently being edited, and RejectChanges effectively calling
CancelEdit on any rows that are currently being edited.
As far as the DataRow object is concerned:
After execution of the BeginEdit method, if you change the value in any column, the Current and Proposed
values of all the columns become accessible. The Proposed value is the same as the Current value until you
edit that particular column.
After execution of the EndEdit method, the Current value for each column is replaced by the Proposed
value.
After execution of the CancelEdit method, the Proposed value is discarded and the Current value is
unchanged.
After execution of the AcceptChanges method, the Original value for each column is replaced by the
Current value.
After execution of the RejectChanges, the Current value is discarded and the Original value is unchanged.
Notice that the effects of the AcceptChanges and RejectChanges methods are subtly different from BeginEdit,
EndEdit, and CancelEdit. The AcceptChanges and RejectChanges methods affect the Current and the
Original values (rather than the Current and Proposed values).
The AcceptChanges and RejectChanges methods can also be used at DataTable and DataSet level. After
execution of the DataTable (rather than the DataRow) object's AcceptChanges method, the Original value for
every column in all rows in the table is set to the same as the Current value. After execution of the DataSet object's
AcceptChanges method, the Original value for every column in every row in all tables in the Dataset is set to the
same as the Current value.
It's important not to call these methods on a DataSet or a DataTable if you intend to update the original source data
from the DataSet object, as it depends on the difference between the Original and Current values to be able to
correctly detect any concurrency errors. We look at this topic in detail in the next chapter.
The RowState Property of the DataRow Object
Each row in a table exposes another useful property named RowState. This is related to inserting, editing, and deleting
rows in a table, and provides a useful indication of the current state of each row. The DataRowState enumeration
provides the following values:
Value
Description
No changes have been made to the row since it was created or since the last call to the AcceptChanges
Unchanged
Added
method of the row, table, or DataSet.
The row has been added to the table and AcceptChanges has not yet been executed.
At least one value or property of the row has been changed since the last call to the AcceptChanges
Modified
method of the row, table, or DataSet.
The row has been deleted from the table using the Delete method and AcceptChanges has not yet been
Deleted
executed.
The row has been created with the NewRow method but has not yet been added to the table with the Add
Detached
method. Hence, it is not actually classed as being a row within that table.
We can access the RowState property at any time to see the state of any row. However, it is most useful when we come
to update the original source data. We'll see this in the next chapter.
Deleting and Removing Rows from a DataTable
Deleting a row from a table is easy - we just call the Delete method of the DataRow object we want to delete. We can
specify the index of the row to delete within the Rows collection:
'delete first and third rows in table referenced by objTable
objTable.Rows(0).Delete()
objTable.Rows(2).Delete()
Or we can use a reference to the actual DataRow object we want to delete:
objThisRow.Delete()
objOtherRow.Delete()
The rows we delete remain in the table. All the Delete method does is set the RowState property to
DataRowState.Deleted (as we saw in the previous section). However, next time we call AcceptChanges for the table,
or for the DataSet object that contains the table, the row is removed from the table. This means that we can "undelete"
rows simply by calling RejectChanges instead of AcceptChanges.
So, we can write code to delete some rows (or update and insert rows for that matter) in a table, and then carry out some
comparison tests to decide whether to accept or reject all the changes in one go. Of course, (as we saw a little earlier) we
can access the appropriate DataRowVersion for each column as we do so to get the Original, Current, or Proposed
value.
Removing Versus Deleting Rows
As an alternative to deleting a row in a table, we can remove it instead. This is an entirely different process from deleting
a row. When we execute the Remove method we immediately and irretrievably remove the row from the table in the
DataSet. It isn't marked as deleted - it just disappears from the table. As a result, the row indices also change to reflect
the new "row positions" as they all shuffle up to fill the gap left by the row that was removed:
'remove the third row from the table
objTable.Rows.Remove(2)
'using the Remove method on row 2 (rather than marking it as deleted
'with the Delete method) means that the next row then becomes row 2
'so, to remove the next row from the table as well we repeat the use of
objTable.Rows.Remove(2)
If you intend to use the DataSet to update the original data store, avoid using Remove to delete rows. Always use the
Delete method so that the rows remain in the table but are marked as being deleted. These "deletes" will then be made
in the original data source when you call the Update method.
Notice the difference in syntax. The Delete method is a member of the DataRow object. The Remove method is a
member of the Rows collection. To see how the Delete and Remove methods work, you can try the example "Removing
versus Deleting Rows in a DataTable" (remove-delete-rows.aspx):
The Code for the Delete versus Remove Example
The code in this example is relatively straightforward. We create a new DataSet and insert three rows into it using the
same kind of code as in earlier examples:
'create a new empty Table object
Dim objTable As New DataTable("NewTable")
'fill table with three new rows using code here
'...
All these rows will now have a RowState property of DataRowState.Added. So we next call the AcceptChanges
method to "fix" (accept) these changes - which updates the RowState property of all the rows to
DataRowState.Unchanged. Then we display the contents of the table:
'call AcceptChanges to accept the changes to the table so far
objTable.AcceptChanges()
'assign the DataTable's DefaultView object to the DataGrid control
dgrResult1.DataSource = objTable.DefaultView
dgrResult1.DataBind() 'and bind (display) the data
Now we call the Delete method on the second row, and then display the contents again. The RowState property of the
deleted row is set to DataRowState.Deleted and it disappears from view:
'now Delete the second row and display the contents again
objTable.Rows(1).Delete()
dgrResult2.DataSource = objTable.DefaultView
dgrResult2.DataBind()
However, the next line of code calls the RejectChanges method of the table, and then displays the contents again. The
RowState property of the deleted row is set back to DataRowState.Unchanged and it reappears in the table:
'call RejectChanges to restore the deleted row
objTable.RejectChanges()
dgrResult3.DataSource = objTable.DefaultView
dgrResult3.DataBind()
Now we call the Remove method of the Rows collection of the table, specifying the second row as the one to be removed.
Then we display the contents of the table again to show that it has been removed:
'now Remove the second row from the table
'note that this is a method of the Rows collection not the Row object
objTable.Rows.Remove(1)
dgrResult4.DataSource = objTable.DefaultView
dgrResult4.DataBind()
Finally, we call the RejectChanges method of the table. However, this time, the row does not reappear. It has been
permanently removed from the table and cannot be restored:
'call RejectChanges - the deleted row is not restored
objTable.RejectChanges()
dgrResult5.DataSource = objTable.DefaultView
dgrResult5.DataBind()
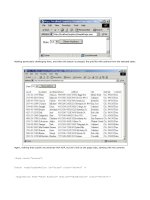
Working with DataTable Events
The DataTable object exposes a series of events that we can use to monitor changes to the content of a table in a
DataSet. The ColumnChanging event is raised for a column in a row that is being edited, before the change is applied
to that column (allowing the change to be cancelled). The ColumnChanged event is raised after the column has been
changed and the change has been persisted to the column.
There are also events that occur for the row as a whole, rather than for each column in a row. The RowChanging and
RowChanged events are raised when the content of any row in the table is changed - the first event occurring before the
change is applied to the row (allowing the change to be cancelled) and the second event occurring after the change has
been persisted in the table.
Finally, there are two events that occur when a row is deleted from a table. The RowDeleting event occurs before the
row is deleted, allowing the deletion to be cancelled, and the RowDeleted event occurs after the row has been deleted
from the table. We don't have room to demonstrate all these events - however, we will show you an example of how they
can be used.
Using the RowUpdated Event
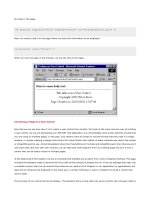
The example page "Validating Edits in a Table with the RowUpdated Event" (update-check-errors.aspx)
demonstrates how we can use the RowUpdated event of a DataTable object to validate the values that are entered into
each row. Code in this page fills a DataSet object with data from our sample database and then changes the values in
two rows. It then displays the changed rows in a DataGrid:
At the bottom of the page, you can see that two errors have been reported. We placed an event handler in the page that
detects when a row is updated, and it applies a couple of simple validation rules to the data in the row. Code in the page
then checks the data for errors, and summarizes any it finds.
The Code for the Validating Edits Example
We've used the same techniques as most of the earlier examples to fill our DataSet with a table named "Books"
containing details of several books from our example database. We aren't repeating this code here. After filling the
DataSet, we call the AcceptChanges method to "fix" the current contents:
'accept changes to "fix" current state of the DataSet contents
objDataSet.AcceptChanges()
Now we can set up the event handler we need to react to the RowChanged event. We use the AddHandler method in
Visual Basic, specifying the event we want to react to and the name of the event handler ("OnRowChanged") that is
defined elsewhere in the page:
'set up event handler to react to changes to rows in the table
Dim objTable As DataTable = objDataSet.Tables("Books")
AddHandler objTable.RowChanged, _
New DataRowChangeEventHandler(AddressOf OnRowChanged)
In C#, we would add the same event handler using:
objTable.RowChanged += new DataRowChangeEventHandler(OnRowChanged)
This event handler will be called when any row is updated, after the changes have been applied to it. In our handler code
we apply our simple validation rules. If the update is not valid, we need to be able to flag this up - though we don't actually
want to do it at this point. We want to be able to detect errors at some point in the future, perhaps before we submit the
DataSet back to the database to update the original data.
If we only wanted to flag up errors at the point when the user entered them, we could validate the values in the page
where they were entering the data.
Row Errors and DataRow Actions
Each DataRow object has a RowError property, which is basically just a String value. We can write an error message
to this string property, and then detect later if there is an error in the row (and retrieve this error message). So, all our
event handler has to do if it detects an invalid value is write this error message to the RowError property of the row that
has just been updated.
The event handler receives a DataRowChangeEventArgs object that contains details of the row that is being updated.
This includes a reference to the DataRow object that has changed, and the Action that is being taken on the row. The
Action can be one of the DataRowAction enumeration values shown in the next table:
Value
Description
Add
The row has been added to the table
Change
One or more column values in the row have been changed
Delete
The row has been deleted from the table
Nothing
The row has not changed
Commit
The changes to the row have been committed as part of a database transaction
Rollback The changes to the row have been abandoned following the rolling back of a database transaction
The OnRowChanged Event Handler
As you can see from the previous table, the RowChanged event is actually raised in several circumstances, not just when
values in a row are modified. Therefore, in our example page event handler, we need to ensure that we only react to the
event when the Action is DataRowAction.Change. This is the complete code for the event handler:
Sub OnRowChanged(objSender As Object, objArgs As DataRowChangeEventArgs)
'only react if the action is "Change"
If objArgs.Action = DataRowAction.Change Then
'validate a new title
If InStr(objArgs.Row("Title"), "Amateur") > 0 Then
objArgs.Row.RowError = "'Amateur' is not a recognized " _
& "book series prefix"
End If
'validate a new publication date
If objArgs.Row("PublicationDate").DayOfWeek = 0 _
Or objArgs.Row("PublicationDate").DayOfWeek = 6 Then
objArgs.Row.RowError += "Publication date must be a weekday"
End If
End If
End Sub
You can see that the code applies two simple validation tests and sets the appropriate value(s) in the RowError property
if one or both of the tests fail.
Back to the Page_Load Event Code
Having seen what happens if an edit produces an invalid value in the row, we'll go back to where we were in the
Page_Load event code that runs when the page is opened from the server. So far we've created the DataSet and filled
a table within it, and set up the event handler that will validate the values in the rows as they are edited. So, the next step
is to perform some edits:
'now change some records in the Books table
objTable.Rows(0)("Title") = "Amateur Theatricals for Windows 2000"
objTable.Rows(2)("PublicationDate") = "11-02-2001"
As these edits are applied to the rows, the RowChanged event is fired and the validation tests are carried out in our
OnRowChanged event handler. The values we're using will cause a validation error in both rows, and so the RowError
property will be set to a text description of the error for these rows.
Next we display the contents of the changed rows in the page using a DataGrid as before. To display just the changed
rows, we create a DataView based on the table and then set the RowStateFilter property of the DataView to
DataRowState.Modified (we'll also be looking at data row states in detail later in this chapter and in the next chapter):
'declare a variable to hold a DataView object
Dim objDataView As DataView
'get DataView and set to show only modified rows
objDataView = objDataSet.Tables(0).DefaultView
objDataView.RowStateFilter = DataRowState.Modified
'display the contents of the modified rows
dgrResult.DataSource = objDataView
dgrResult.DataBind()
Checking for Invalid DataRows
Finally we can check our data to see if any of the rows contain an error. Thankfully, we don't have to query the RowError
property of every row in all the tables in a DataSet to find any errors. Both the DataSet and each of the DataTable
objects it contains provide the HasErrors property, which is True if any row in that DataSet or DataTable has a
non-empty value for its RowError property.
So, in our example page, we first query the HasErrors property of the DataSet to see if there are any errors at all. If
so, we iterate through the Tables collection looking at the HasErrors property of each DataTable because we then
know that one (or possibly more if there are several tables) contains a row that has an error:
Dim strResult As String = "" 'to hold the result
'see if there are any update errors anywhere in the DataSet
If objDataSet.HasErrors Then
'check each table for errors in each table
Dim objThisTable As DataTable
For Each objThisTable In objDataSet.Tables
If objThisTable.HasErrors Then
strResult += "One or more errors found in table '" _
& objThisTable.TableName & "'
"
Once we've narrowed down the search to the appropriate table, we iterate through each row checking if it contains an
error. We can use the HasErrors property of each row here, which is much faster than comparing the string value of the
RowError with an empty string. When we find a row with an error we add the value of the RowError property to our
output message string:
'check each row in this table for errors
Dim objThisRow As DataRow
For Each objThisRow In objThisTable.Rows
If objThisRow.HasErrors Then
strResult += "* Row with ISBN=" & objThisRow("ISBN") _
& " has error " & objThisRow.RowError & "
"
End If
Next 'row
Having completed this table, we can go round and look for the next table that contains errors. After we've extracted all the
error messages, we display them in a <div> at the bottom of the page:
End If
Next 'table
End If
outResult.InnerHtml = strResult 'display the result
An alternative approach is to use the GetErrors method of each DataTable object to get an array of all the rows in that
table that contain an error. This is also somewhat more efficient if there is only a small percentage of the total number of
rows where an error has occurred.
The DataTable events we've looked at here are very useful for validating data when we have a remoted DataSet object.
There are also similar events that are raised by the DataAdapter object when we come to update the original data
source from our DataSet. We'll look at these in the next chapter.
Using Table and Column Mappings
The next topic we want to consider while we're looking at working with DataSet and DataTable objects is how we can
specify custom mappings for columns and tables. When we fill a table in a DataSet from a data source such as a relational
database, we can specify the name we want the table to have within the DataSet as the (optional) second parameter of
the DataAdapter object's Fill method. For example, in this code we're naming the table "Books":
objDataAdapter.Fill(objDataSet, "Books")
However, in this case we have no direct control over the names of the columns in the newly filled table. They automatically
adopt the names of the columns returned by the stored procedure, table name, or SQL statement that fills the table.
One way round this is to specify the column names within the SQL statement or stored procedure. For example, in a SQL
statement, we can change the column names like this:
SELECT ISBN AS BookCode, Title AS BookTitle, PublicationDate AS Published
FROM BookList WHERE ISBN LIKE '18610053%'
Now the data set returned by the SQL statement will have the "new" names for the columns, and these will be used for
the table's column names within our DataSet:
However, it's convenient to be able to specify the names of both the tables and the columns within our DataSet
independently. That way, we can create reusable code that automatically maps data to the correct column and table
names. It also allows us to push the changes to the data back into the database by simply calling the Update method something we wouldn't be able to do if we renamed the columns in the SQL statement or stored procedure.
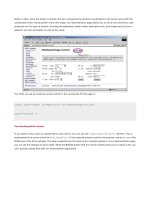
The example page "Using Default and Specific Table and Column Mappings" (table-mappings.aspx) demonstrates
how we can use table and column mappings to manage the "connection" between the original table and its column names
in the database with the table and column names in the DataSet:
The code and data used to build the DataSet shown in the screenshot is the same as in many of the examples used earlier
in this chapter. However, the names of the tables and the columns in each table are different from the ones we got in these
earlier examples. All these are defined as custom mappings, and the conversion from the default to the custom name is
automatically applied when we load the data.
All the mappings for both table names and column names are stored in the DataAdapter object that we use to fill the
DataSet. This means that we can create multiple DataAdapter objects for a DataSet object with different mappings,
and use the one that meets the requirements of the current task.
Note that the two objects we use to create custom mappings are members of a different namespace to the other objects
we've used so far. To be able to create these objects, we have to add a reference to the System.Data.Common
namespace to our page:
<%@Import Namespace="System.Data.Common" %>
The Code for the Table and Column Mappings Example
Our example page uses the now familiar code to access the database and extract subsets of rows from the BookList and
BookAuthors tables. Along the way, it creates a new instance of a DataAdapter object to use for accessing the
database and pushing the values into the DataSet:
'create a new DataAdapter object
Dim objDataAdapter As New OleDbDataAdapter()
...
It's at this point, before we call the Fill method to actually fetch the data, that we create our custom mappings for both
the tables and the columns within them. We'll create a default table mapping, so that any call to Fill that doesn't specify
the name of the table (in the second parameter) will create a table named "DefaultBookList". We first declare a
variable to hold a DataTableMapping object:
'declare a variable to hold a DataTableMapping object
Dim objTableMapping As DataTableMapping
Now we can call the Add method of the DataAdapter object's TableMappings collection. The Add method takes two
parameters: the name of the source table that will be specified in the Fill method, and the name to use for the new table
in the DataSet instead of the source table name. For a default mapping, we use the value "Table" for the first parameter:
'add the default table mapping "Table" - this table name will be used
'if you don't provide a table name when filling the DataSet
objTableMapping = objDataAdapter.TableMappings.Add("Table", "DefaultBookList")
Note that the names we use in the mappings are case-sensitive for the "OleDb"-prefixed objects, but not for the
"Sql"-prefixed objects.
Specifying the Column Mappings
Now that we've created the TableMapping object, we can access its ColumnMappings collection to create the column
mappings. The simplest syntax is to use the With construct. We call the Add method of the ColumnMappings collection
to create each column mapping, specifying the name of the column in the data source and the name we want that column
to have in the table within the DataSet:
'now add the column mappings for this table
With objTableMapping.ColumnMappings
.Add("ISBN", "BookCode")
.Add("Title", "BookTitle")
.Add("PublicationDate", "Published")
End With
Now we do the same to create the custom mappings for the AuthorList table. We've already got a default table
mapping (using the value "Table") so we can only create specific table mappings now. We first specify that a table in the
data source named BookAuthors will create a table in the DataSet named AuthorList:
'add a table mapping so that data from the table named "BookAuthors" in
'the database will be placed in a table named "AuthorList"
objTableMapping = objDataAdapter.TableMappings.Add("BookAuthors", "AuthorList")
Then we finish up by specifying the column mappings from the source database table to the new table in the DataSet:
'add the column mappings for this table
With objTableMapping.ColumnMappings
.Add("ISBN", "BookCode")
.Add("FirstName", "Forename")
.Add("LastName", "Surname")
End With
Using the Column Mappings
One point to be aware of is that the mapped table and column names are now the ones that must be used for all operations
with the DataSet and its contents. When we create a relationship between the tables, for example, we must use the
mapped table names:
'create a Relation object to link the two tables
'note that it uses the new mapped table and column names
objRelation = New DataRelation("BookAuthors", _
objDataSet.Tables("DefaultBookList").Columns("BookCode"), _
objDataSet.Tables("AuthorList").Columns("BookCode"))
The same applies, of course, when we come to access tables and columns in the DataSet in code. The only other issue
is that we must be sure to specify the same table and column mappings in the DataAdapter that we use when we come
to update the original data source. If not, the DataAdapter will not be able to associate the tables and columns in the
DataSet with the ones in the source data store or database. We'll see how all this works in the next chapter.
Sorting and Filtering Data
To finish off this chapter, we'll look at one more topic concerned with DataTable and DataView objects. Once we've
loaded a DataTable or a DataView object with data, we don't really want to go back to the data store and reload it every
time we want to sort the rows into a different order, or filter the rows so that only a subset is displayed. Thankfully, both
the DataTable and DataView provide sorting and filtering features, even if the way this works is fundamentally
different for the two objects. We'll look at both next.
Sorting and Filtering in a DataTable Object
The example page "Sorting and Filtering in a DataTable Object" (select-in-table.aspx) demonstrates how we can
sort and filter data that is stored in a DataTable object. For example, in the next screenshot we've loaded the page and
then clicked the "By Date" button to sort the rows into order by the values in the PublicationDate column and then by
the values in the Title column. You can see from the message in the page that our code executed the Select method
of the DataTable object with two parameters: an empty string and a string containing the two column names for the sort
operation:
As you can see in the screenshot, the page also provides a "Search" feature. We can enter the text ASP in the textbox and
click the Find button to give the result shown in the next screenshot:
The DataTable.Select method was executed again, and this time the first parameter is the expression "Title LIKE
'*ASP*'", while the second is an empty string. Only rows containing the text "ASP" anywhere within the Title column
appear in the page.
You'll notice that in our example page we are recreating the DataSet and its content each time we change the sort order
or perform a search. This is only because we don't persist the data elsewhere between requests. If you remote the
DataSet to another tier of your application, or receive it from something like a Web Service, you do not need to recreate
it each time. Instead, you simply execute the Select method on the table within your cached DataSet object.
The DataTable.Select Method
It's clear from the example that the DataTable object's Select method takes two parameters - an expression that
filters the rows and a list of column names by which the rows are sorted:
DataTable.Select(filter-expression, sort-order)
Our example page only uses one of these parameters at a time, but you can of course use both together - for example:
objDataTable.Select("Title LIKE '*ASP*'", "PublicationDate DESC, Title")
Notice that we use the same syntax for the sorting parameter as most other data access techniques - we add DESC to
force reverse sort order. The second parameter is also optional, so we can use the following code if we want to filter the
rows but we don't want to sort them:
DataTable.Select("Title LIKE '*ASP*'")
Specifying the DataRowState
There is also a third optional parameter supported by the Select method. This is used to specify the
DataViewRowState that should be used. By using the value of each row's RowState property, this allows us to include
in the result only rows that are unchanged, new, modified, deleted, or all rows. For example, the following code will only
include rows that have not been changed or deleted:
DataTable.Select("Title LIKE '*ASP*'", "Title", DataViewRowState.Unchanged)
The default for this parameter if we don't specify a different value is DataViewRowState.None, and the result reflects
the current state of all the rows in the table. The full set of values for the DataViewRowState enumeration is:
Value
Description
CurrentRows
Includes unchanged, new, and modified rows
OriginalRows
Includes only unchanged and deleted rows
ModifiedCurrent
Includes the current values of any modified rows
ModifiedOriginal Includes the original values of any modified rows
Unchanged
Includes only unchanged rows
Added
Includes only new rows added to the table
Deleted
Includes only deleted rows
None
No filtering on the RowState of the rows is applied
The Filter Expression Syntax
In general, the expression syntax used in the first parameter of the Select method is much as you'd expect - following
the expression syntax of the .NET languages. For example, simple comparison expressions are:
"Lastname = 'Jones'" 'string literals in single quotes
"StockQty > 1000" 'numbers are not in quotes
"PublicationDate > #10/10/99#" 'special syntax for date/time
The supported comparison operators are: <, >, <=, >=, <>, =, IN and LIKE.
For numeric column values, the operators that can be used are: +, -, *, /, % (modulus).
String concatenation is always with the '+' character. Case-sensitivity during string comparisons depends on the current
setting of the parent DataSet object's CaseSensitive property. This property value can be changed in code as
required.
The LIKE operator supports wildcards for string comparisons. The '*' or '%' character (these characters are equivalent)
can be used to represent any series of characters, and can be used at the start, at the end, or at both the start and end
of other literal text. They cannot be used within the text of a search string:
"Lastname LIKE 'Peter%'" is the same as "Lastname LIKE 'Peter*'"
"Lastname LIKE '%Peter'" is the same as "Lastname LIKE '*Peter'"
"Lastname LIKE '%Peter%'" is the same as "Lastname LIKE '*Peter*'"
To include the wildcards where they are part of the literal text in the search string, they must be escaped with a preceding
backslash:
"WebWord LIKE '\*BOLD\*'" 'filters on the string "*BOLD*"
The AND, OR, and NOT operators are supported, with AND having precedence unless you use parentheses to force a
different evaluation order: