Professional ASP.NET 1.0 Special Edition- P24 pdf
Bạn đang xem bản rút gọn của tài liệu. Xem và tải ngay bản đầy đủ của tài liệu tại đây (546.23 KB, 40 trang )
Although the compilation settings allow us to control how the application is compiled, they do not allow us to control how
the application is run. To control the identity of the process that ASP.NET uses for compiling, processing, and servicing
requests of our ASP.NET application, we have the identity settings.
Controlling the Identity of Execution
We can use the <identity> setting of machine.config (note that identity can be set in web.config files as well)
to define which Windows user to impersonate when making requests from the operating system.
This is separate from the trust level assigned to a particular application. The trust level, set in the configuration system for
an application, determines what a particular application may or may not do. Trust levels are used to sandbox applications.
We have three attributes used with
<identity>:
impersonate - The impersonate attribute of <identity> is a Boolean value that determines the Windows
NT user the ASP.NET worker process runs under. If
impersonate="true", ASP.NET will run under the identity
provided by IIS. If set to
true, this would be IUSR[server name], or whatever identity that IIS is configured
to impersonate. However, if Windows NT authentication is enabled on the web server, ASP.NET will impersonate
the authenticated user. Alternatively, we can name a Windows NT user and password for the ASP.NET process to
run as. The default setting of
impersonate is False.
userName - Available when impersonate="true", the name value names a valid Windows NT account to
impersonate.
password - Complementary to name, the password of the user to impersonate.
As mentioned above, the default setting is
impersonate="false". Let's look at some examples where ASP.NET runs
with impersonate="true" allowing the impersonation to flow from IIS, as well as configuring the user/password for
ASP.NET to run as.
Impersonating the IIS User
To impersonate the user that IIS uses, we first need to set
impersonate="true":
<configuration>
<system.web>
<identity impersonate="true" />
</system.web>
</configuration>
To test impersonation, we can use the following ASP.NET page, written in Visual Basic .NET:
<%@ Import Namespace="System.Security.Principal" %>
<Script runat="server">
Public Sub Page_Load(sender As Object, e As EventArgs)
lblIdentity.Text = WindowsIdentity.GetCurrent().Name
End Sub
</Script>
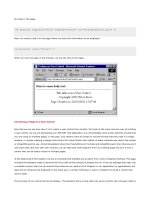
Current identity is: <asp:label id="lblIdentity" runat="server" />
This code simply uses the WindowsIdentity class's GetCurrent() method to return the name of the Windows user
the request is processed as.
On my server, when
impersonate="false" the result of a request to this page is:
Current identity is: NT AUTHORITY\SYSTEM
When
impersonate="true" the result is:
Current identity is: RHOWARD-LAPTOP\IUSR_RHOWARD-LAPTOP
ASP.NET is impersonating the Windows user that IIS is using to process the request. In the above case, this is the
IUSR_[machine name] Windows account that IIS uses for anonymous requests. If we configured IIS to use a different
anonymous account, or enabled IIS security to support NTLM authentication, we would see a different result.
For example, if we enable NTLM authentication for the server (see Chapter 14 for details on NTLM authentication), when
I run the code I see:
Since NTLM authentication is enabled, as is impersonation with ASP.NET, ASP.NET impersonates the Windows users that
IIS NTLM authenticates. In this case, the user RHOWARD in the domain REDMOND.
The last option we can configure with identity is to explicitly name a username and password. Note that the username and
password values are stored in clear text in the configuration system:
<configuration>
<system.web>
<identity impersonate="true"
username="ASPNET_Anonymous"
password="93%dk12"
/>
</system.web>
</configuration>
In the above example we've identified a user ASPNET_Anonymous as the user for ASP.NET to impersonate.
Keep in mind that the user impersonated needs to have the necessary file access permissions, in other words
ASPNET_Anonymous needs to have access to the necessary ASP.NET files and common directory paths. Please see the
next chapter for more details on ASP.NET security.
Controlling the identity of the impersonation account used by ASP.NET allows us to have granular system-level control
over what any particular user may or may not do. However, we also have to provide the impersonation account with the
appropriate levels of access to be able to accomplish meaningful work in our system.
Extending ASP.NET with HTTP Handlers
ASP.NET builds upon an extensible architecture known simply as the HTTP runtime. The runtime is responsible for
handling requests and sending responses. It is up to individual handlers, such as an ASP.NET page or web service, to
implement the work to be done on a request.
Much as IIS supports a low-level API, known as ISAPI, for letting developers implement custom solutions, such as building
a JSP implementation that runs on IIS, ASP.NET implements a similar concept with HTTP Handlers. A request is assigned
to ASP.NET from IIS, ASP.NET then examines entries in the
<httpHandlers> section, based on the extension, .aspx for
example, of the request to determine which handler the request should be routed to.
The most common entry used is the .aspx extension. Below is the entry in
machine.config for the HTTP Handler used
for the .aspx extension (as well as several other familiar extensions):
<configuration>
<system.web>
<httpHandlers>
<add verb="*" path="*.aspx"
type="System.Web.UI.PageHandlerFactory,System.Web" />
<add verb="*" path="*.asmx"
type="System.Web.Services.Protocols.WebServiceHandlerFactory,
System.Web.Services" validate="false"/>
<add verb="*" path="*.ascx"
type="System.Web.HttpForbiddenHandler,System.Web" />
<add verb="*" path="*.config"
type="System.Web.HttpForbiddenHandler,System.Web" />
</httpHandlers>
</system.web>
</configuration>
In the above configuration code, four common handlers are identified (note, the actual machine.config file identifies
about 18 entries). We have the HTTP handlers for pages (
.aspx), web services (.asmx), user controls (.ascx), and
configuration (
.config).
Both page and web services map to actual classes, while user controls and configuration map to a special handler called
HttpForbiddenHandler. This handler explicitly denies access to these extensions when requested directly, so a
request for Address.ascx or
web.config will send back an access denied reply.
As mentioned above, HTTP Handlers are the ASP.NET equivalent of IIS ISAPI extensions. However, unlike ISAPI, which
was only accessible to developers who could code C++, HTTP Handlers can be coded in any .NET language - Visual
Basic .NET developers can now author the equivalent of an ISAPI extension.
Let's look at a simple HTTP Handler written in Visual Basic .NET:
Imports System
Imports System.Web
Public Class HelloWorldHandler
Implements IHttpHandler
Sub ProcessRequest(ByVal context As HttpContext) _
Implements IHttpHandler.ProcessRequest
Dim Request As HttpRequest = context.Request
Dim Response As HttpResponse = context.Response
Response.Write("<html>")
Response.Write("<body>")
Response.Write("<h1> Hello " + _
Request.QueryString("Name") + "</h1>")
Response.Write("</body>")
Response.Write("</html>")
End Sub
Public ReadOnly Property IsReusable As Boolean _
Implements IHttpHandler.IsReusable
Get
Return True
End Get
End Property
End Class
Above, we have written a Visual Basic .NET class, HelloWorldHandler, that implements the IHttpHandler interface.
This interface requires that we implement a single method,
ProcessRequest(), as well as a single property,
IsReusable. Within the ProcessRequest() method, which is responsible for processing the request, we
Response.Write() some simple HTML. Within the body of the HTML we use the Request to access the Name
parameter passed on the query string.
To register this handler, we first must build it using either the command line compilers or Visual Studio .NET. We then can
deploy the compiled .dll file to an ASP.NET bin directory and add the entry into our configuration file (in this particular
case we are using a
web.config file). We use the <add> tag of <httpHandlers>.
Adding Handlers
The
<add> tag is used to name a class that implements either the IHttpHandler or the IHttpHandlerFactory
interface. All HTTP Handlers must implement one of these two interfaces so that the HTTP runtime knows how to call them.
Below is the format that we use for this tag:
<configuration>
<system.web>
<httpHandlers>
<add verb="[HTTP Verb]" path="[Request Path]" type="[.NET Class]"/>
</httpHandlers>
</system.web>
</configuration>
There are three attributes within the <add> tag that tell ASP.NET how the HTTP Handler is to be interpreted:
verb - The verb attribute instructs the HTTP runtime about the HTTP verb type that the handler services
request. Values for the
verb attribute include asterisks (*), which instructs the HTTP runtime to match on all
HTTP verbs, or a string value that names an HTTP verb. For example, the HTTP
Get verb, verb="Get", or a
string value of semi-colon separated HTTP verbs. For example,
verb="Get; Post; Head".
path - The path attribute instructs the HTTP runtime as to the request path, for example /MyApp/test.aspx,
that this HTTP Handler is executed for. Valid values for the
path include asterisks (*) with an extension
(
*.aspx), which instruct the HTTP runtime to match only resources that match the extension, or a string value
with an extension. We can name one resource that maps to an HTTP Handler. A good example here is the
Trace.axd HTTP Handler, which uses the path value of path="trace.axd".
type - The type attribute names the .NET class that implements the HTTP Handler code. The value for type
follows the format
[Namespace].[Class], [Assembly name].
If we compile the above sample,
HelloWorldHandler.vb, to an assembly named Simple.dll, we could make the
following entry in a configuration file:
<configuration>
<system.web>
<httpHandlers>
<add verb="*" path="HelloWorld.aspx"
type="HelloWorldHandler, Simple"/>
</httpHandlers>
</system.web>
</configuration>
The above configuration entry names an assembly, Simple, that contains a class HelloWorldHandler. ASP.NET will
assume that
HelloWorldHandler implements the IHttpHandler interface. We then identify the path and verb that
the ASP.NET HTTP runtime uses to route to this handler. In this case, we have told the HTTP runtime that we wish to route
on all verbs (via the
*) and that we will service requests for HelloWorld.aspx.
We could use a custom extension, such as
*.wrox, but this would further require us to map this .wrox extension to
ASP.NET in ISS Manager - as we discussed in the previous chapter.
We are now ready to service requests for this handler. If we open a web browser, and point it to the web application that
contains bin\Simple.dll as well as the above
web.config file that we defined, we can make a request
for
/HelloWorld.aspx?Name=Rob:
ASP.NET maps the request HelloWorld.aspx to the HTTP Handler we built called Simple.dll. The result is that the HTTP
Handler is executed and our request is served. This is a somewhat simple example, but it is easy to envision the types of
applications that could be created.
What if this HTTP Handler was declared in
machine.config, and we decided that we didn't want a given application to
have access to it? In that case, we can use the
<remove> tag of the <httpHandlers> section.
Removing Handlers
The
<remove> tag can be used to override <add> entries that are either inherited or declared within the same
configuration file. This is useful for removing HTTP Handlers from some web applications, or commenting out HTTP
Handlers so that the functionality is unavailable to end users:
<remove verb="[http verb | *]" path="[path]"/>
A good example is the trace.axd HTTP Handler used for tracing, which we may decide not to support in all of our web
applications.
machine.config defines the following entry for the trace.axd:
<configuration>
<system.web>
<httpHandlers>
<add verb="*"
path="trace.axd"
type="System.Web.Handlers.TraceHandler,System.Web"
/>
</httpHandlers>
</system.web>
</configuration>
We could remove support of this handler in web applications by creating a web.config file and making the following
entry using the
<remove> tag:
<configuration>
<system.web>
<httpHandlers>
<remove verb="*" path="trace.axd"/>
</httpHandlers>
</system.web>
</configuration>
The web application using the above web.config file will generate a file not found error when a request is made for
trace.axd.
HTTP Handlers allow us, at a low-level, to handle the application request. We can build a simple example, such as the
HelloWorld example above, or we could write more complex examples that take over well-known extensions such
as .jpg to add additional functionality, so for example, a request for chart.jpg?x=10&y
=13 could draw a graph. The
opportunities are endless! However, what happens in the case where we simply want to look at the request? Rather than
replace the functionality that ASP.NET pages provide us with, we simply want to examine the request before or after the
HTTP Handler processes it. For this we have HTTP Modules.
Extending ASP.NET with HTTP Modules
Whereas HTTP Handlers allow us to map a request to a specific class to handle the request, HTTP Modules act as filters
(note that HTTP Modules are similar in function to ISAPI filters) that we can apply before the handler sees the request or
after the handler is done with the request.
ASP.NET makes use of modules for cookieless session state, output caching, and several security-related features. In the
Advanced Topics discussion in Chapter 20, we will look at an HTTP Mod ule that authenticates web service requests. Before
the request is 'handled' by the appropriate .asmx file, our HTTP Module looks at the request, determines if it is a SOAP
message, and if it is a SOAP message, it extracts out the username and password values from the SOAP header.
As it relates to configuration, we have the same three settings as we found for HTTP Handlers;
<add>, <remove>, and
<clear>. <add> is the only tag that differs from HTTP Handlers.
Adding Modules
The
<add> entry for <httpModules> simply names the module and references the class that implements the
IHttpModule interface and the assembly the class exists within. Just as HTTP Handlers implement a common interface,
IHttpHandler, we have an interface that modules implement.
Below is an <httpModules> entry for the OutputCache module from machine.config:
<configuration>
<system.web>
<httpModules>
<add name="OutputCache"
type="System.Web.Caching.OutputCacheModule,System.Web" />
</httpModules>
</system.web>
</configuration>
Similar to HTTP Handlers, HTTP Modules require us to implement an interface. In this case, that interface is IHttpModule.
If we implement this interface, we can build a simple HTTP Module.
Handlers and modules are definitely an advanced feature of ASP.NET. They give us complete control over the request and
allow us to look at the request as it comes in, execute the request, and then look at the request again as it goes out.
The
machine.config file gives us access to a number of advanced configuration features, such as the two we just
examined. Another of the configuration options found in
machine.config is the process model setting. The process
model settings allow us to configure the ASP.NET Worker Process.
Configuring the ASP.NET Worker Process
Unlike ASP, ASP.NET runs in a separate process from IIS. When code misbehaved in ASP-say we forgot to free memory
in a COM object - the leak could degrade the server performance and even possibly crash the process ASP ran in. In some
cases, this could crash the IIS process, and if the IIS process is unavailable, the application is not servicing requests!
ASP.NET, on the other hand, was designed to take into account the errors that can and will occur within the system.
Rather than running in process with IIS, ASP.NET runs in a separate worker process,
aspnet_wp.exe. ASP.NET uses IIS
only to receive requests and to send responses (as a request/response broker). IIS is not executing any ASP.NET code.
The ASP.NET process can come and go, and it doesn't affect the stability of IIS in any way.
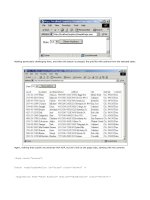
We can view the ASP.NET process (
aspnet_wp.exe) through the Windows Task Manager after a request for an ASP.NET
resource has been made, as the process starts when ASP.NET applications are being used.
To view the process, first request an ASP.NET resource and then open up the Windows Task Manager (press
Control-Shift-Escape simultaneously). Once the Task Manager is open, switch to the Processes tab and look for
aspnet_wp.exe in the Image Name column:
In the screenshot above we see the process, aspnet_wp.exe, the process ID (PID) of 1744, the CPU usage as a percentage
0%, CPU time, and memory usage in KB.
The
<processModel> section of machine.config is used to configure ASP.NET process management. These settings
can only be made in machine.config, as they apply to all ASP.NET applications on that machine. Within the
<processModel> settings, we can configure options such as which processor each ASP.NET worker process should
affinitize with, and we can additionally configure settings such as automatically recycling the process after n requests or
n amount of time. Below is the default
machine.config settings:
Note, an important but subtle change in the final released version of ASP.NET is the Windows identity that
the ASP.NET worker process runs as. In previous beta versions it was the
慡
ystem?account. The final version
uses a special Windows account created when the .NET Framework is installed: aspnet. For more details on
the implications of these changes please see the chapter on security. This of course is still configurable using
the username/password attributes of the <processModel ?gt; settings.
<configuration>
<system.web>
<processModel
enable="true"
timeout="Infinite"
idleTimeout="Infinite"
shutdownTimeout="0:00:05"
requestLimit="Infinite"
requestQueueLimit="5000"
restartQueueLimit="10"
memoryLimit="60"
webGarden="false"
cpuMask="0xffffffff"
userName="machine"
password="autogenerate"
logLevel="Errors"
clientConnectedCheck="0:00:05"
comAuthenticationLevel="Connect"
comImpersonationLevel="Impersonate"
responseRestartDeadlockInterval="00:09:00"
responseDeadlockInterval="00:03:00"
maxWorkerThreads="25"
maxIoThreads="25"
serverErrorMessageFile="[Not Configured]"
/>
</system.web>
</configuration>
As you can see, there are 21 options that we can configure. Let's examine each in detail, starting with the enable option.
Enabling the ASP.NET Worker Process
The
enable attribute is a Boolean setting used to determine if ASP.NET should run in a separate worker process, the
default, or in-process with IIS. If we set it to
false, the <processModel> settings are ignored:
enable="[true | false]"
If we do set enable="false", we won't see the aspnet_wp.exe show up in the task manager, it's now loaded
in-process with IIS.
Note that IIS has to be stopped and restarted if the
enable option is changed.
It is recommended that this setting be left as
true so our applications can reap the benefits that the ASP.NET worker
process provides.
Timing Out the Process
The timeout attribute determines how long the worker process will live before a new worker process is created to take
its place. The default value is
Infinite. However, we can also set this value to a time using the format, HH:MM:SS:
timeout = "[Infinite | HH:MM:SS]"
This value can be extremely useful if a scenario exists where the application's performance starts to degrade slightly after
running for several weeks, such as in the case of a memory leak. Rather than having to manually start and stop the
process, ASP.NET can restart automatically:
<configuration>
<system.web>
<processModel
enable="true"
timeout="336:00:00"
idleTimeout="Infinite"
shutdownTimeout="0:00:05"
requestLimit="Infinite"
requestQueueLimit="5000"
restartQueueLimit="10"
memoryLimit="60"
webGarden="false"
cpuMask="0xffffffff"
userName="machine"
password="autogenerate"
logLevel="Errors"
clientConnectedCheck="0:00:05"
comAuthenticationLevel="Connect"
comImpersonationLevel="Impersonate"
responseRestartDeadlockInterval="00:09:00"
responseDeadlockInterval="00:03:00"
maxWorkerThreads="25"
maxIoThreads="25"
serverErrorMessageFile="[Not Configured]"
/>
</system.web>
</configuration>
In the above setting, the ASP.NET worker process will recycle itself automatically after approximately 336 hours (two
weeks). The clock starts ticking on the life of the process when the process is started (on the first request after the
changes have been made).
Shutting Down the Process Automatically
We can shut down the ASP.NET worker process automatically using the
idleTimeout option. idleTimeout is used to
shut down the worker process when it has not served any requests within a given period of time. By default, it is set to
Infinite and once started, will not shut down. We can also set this value to a time using the format, HH:MM:SS:
idleTimeout = "[Infinite | HH:MM:SS]"
Starting a process for the first request can make a performance hit on the server. Two scenarios for use of idleTimout
include:
When we want to release resources that ASP.NET is using when we're not actively servicing requests.
To recycle processes during down time. We could configure idleTimout to shutdown after 20 minutes of no
requests. For example, if we don't receive requests between the hours of midnight to 3am, ASP.NET can quietly
exit the process. When a new request comes in, we start a new process.
Graceful Shutdown
The
shutDownTimeout attribute is used to specify how long the worker process is given to shut itself down gracefully
before ASP.NET calls the kill command on the process- kill is a low-level command that forcefully removes the process. By
default,
shutDownTimeout is set to five seconds, but this is configurable:
shutDownTimeout = "[HH:MM:SS]"
This is a very useful configuration setting for processes that have crossed some threshold and appear to have crashed.
ASP.NET can kill the process after it is given the opportunity to shutdown gracefully.
Recycling the Process after n Requests
requestLimit allows us to configure ASP.NET to recycle after a certain number of requests are served. The default
value is Infinite, no request limit, but we can also set it to a number:
requestLimit = "[Infinite | int]"
If we notice that the performance of our application degrades after a certain number of requests, for example 5000, we
can configure the
requestLimit property to a threshold of 5000. ASP.NET will then recycle the process after 5000
requests.
We can take this example a step further and show the
requestLimit being enforced by ASP.NET. If we:
Set the requestLimit to 5
Save our machine.config file
Open the Windows Task Manager, view the aspnet_wp.exe process, and take note of the process ID
Next, if we make more than five requests for an ASP.NET application file, ASP.NET will recycle the process. To see this go
back and check the process ID of
aspnet_wp.exe; after five requests, we will have a new process ID.
Recycling the Process if Requests are Queued
The
requestQueueLimit option instructs ASP.NET to recycle the worker process if the number of queued requests limit
is exceeded. ASP.NET uses threads within a process to service user requests. If a thread is blocked or is unable to service
requests, requests can be queued. The
requestQueueLimit option gives us the opportunity to detect if requests are
queued and recycle the process if the queued requests exceed the allowed limit. The default setting is 5000:
requestQueueLimit = "[int]"
Recycling the Process if too Much Memory is Consumed
The
memoryLimit option determines how much physical memory the worker process is allowed to consume before it is
considered to be misbehaving. The default value is 60 (representing 60 percent):
memoryLimit = "[int]"
We should never 'leak' memory in a .NET application, since the CLR is performing garbage collection (memory
management) for us. However, since .NET also supports the use of native code, and is able to interoperate with COM, it
is possible to leak memory if either the native code or the COM object is mismanaging memory.
The simplest way to demonstrate the use of
memoryLimit is with a simple ASP.NET page that fills application state
memory with useless information - this simulates a memory leak. The following page is written in Visual Basic .NET:
<%@ Import Namespace="System.Diagnostics" %>
<%@ Import Namespace="System.Text" %>
<script runat=server>
Sub Page_Load(Sender as Object, E as EventArgs)
Dim i As Integer
Dim garbage As New StringBuilder
If Application("garbage") Is Nothing Then
Dim c As Integer
For c=1 to 1000
garbage = garbage.Append("xxxxxxxxxx")
Next c
Application("garbage") = garbage
Else
garbage = Application("garbage")
End If
For i=1 to 500
' Make sure we create a unique entry
Application(i.ToString + DateTime.Now.ToString("r")) = _
(garbage.ToString() + DateTime.Now.ToString("r"))
Next i
Dim p as ProcessInfo
p = ProcessModelInfo.GetCurrentProcessInfo()
ProcessID.Text = p.ProcessID.ToString()
End Sub
</script>
<html>
<body>
<h2>The Process ID serving this request is:
<asp:label id="ProcessID" forecolor=red runat=server/>
</h2>
<h2>There are <%=Application.Count.ToString()%>
items in Application state memory.
</h2>
</body>
</html>
We can then set memoryLimit to a very low threshold, such as 5 percent:
<configuration>
<system.web>
<processModel
enable="true"
timeout="336:00:00"
idleTimeout="Infinite"
shutdownTimeout="0:00:05"
requestLimit="Infinite"
requestQueueLimit="5000"
restartQueueLimit="10"
memoryLimit="5"
webGarden="false"
cpuMask="0xffffffff"
userName="machine"
password="autogenerate"
logLevel="Errors"
clientConnectedCheck="0:00:05"
comAuthenticationLevel="Connect"
comImpersonationLevel="Impersonate"
responseRestartDeadlockInterval="00:09:00"
responseDeadlockInterval="00:03:00"
maxWorkerThreads="25"
maxIoThreads="25"
serverErrorMessageFile="[Not Configured]"
/>
</system.web>
</configuration>
Next, we make requests for our ASP.NET page that simulates a leak.
Again, we will open up the Windows Task Manager and watch the
aspnet_wp.exe worker process. As we request the
resource, we will see memory increase for the process. Finally, when 5 percent of memory has been utilized, we will see
a new process appear next to the old process, and then the old process will disappear. From the end user's perspective the
application just keeps running.
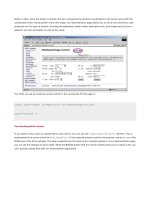
The screenshot below shows the process (
PID 1572) that has exceeded the memory threshold, and the new process (PID
1972
) that has just started:
This is also evident in our sample ASP.NET page since we display the process ID.
Supporting Multiple Worker Processes
There are usually two ways to scale an application; write tighter and better code, or simply add more hardware. The term
'web farm' is used to describe a collection of nearly identical web servers that can be used to service requests. As our user
base grows we simply add more servers into our 'server farm' and we are able to increase the scalability of our application.
This is very cost effective since adding a server is, in most cases, less expensive than re-writing the entire application.
When we build a server farm, all we are essentially doing is putting all the required hardware in place to host another
process that can service requests. A new option that ASP.NET now supports is a web garden, in other words multiple
processes on the same server.
A web garden lets us host multiple ASP.NET worker processes on a single server, thus providing the application with better
hardware scalability.
Web garden mode is only supported on multi-processor servers.
To support a web garden with ASP.NET, we use two inter-related
<processModel> configuration settings:
webGarden - The webGarden attribute determines whether web garden mode is enabled. The default setting is
false.
webGarden = "[true | false]"
cpuMask - The cpuMask, a hexadecimal value, is used to determine which processors should be affinitized to
ASP.NET worker processes when
webGarden="true". The default value is all processors, as 0xFFFFFFFF is a
bit mask of
11111111111111111111111111111111, in other words if the server had 32 processors each
would be affinitized to its own ASP.NET worker process.
cpuMask="0xffffffff"
The settings of
cpuMask do nothing if set webGarden="false".
Setting the Identity of the Process
The
username and password settings found in <processModel> are used to control the user that the ASP.NET Worker
process runs as. By default, it is a restricted Windows account ASPNET; however, by using these settings we can instruct
the process to execute under another Windows identity, or the System account.
For example, if we create a Windows user
ASPNET_WP with a password of &dotnet$12 we could set these as our
username and password values:
<configuration>
<system.web>
<processModel
enable="true"
timeout="336:00:00"
idleTimeout="Infinite"
shutdownTimeout="0:00:05"
requestLimit="Infinite"
requestQueueLimit="5000"
restartQueueLimit="10"
memoryLimit="5"
webGarden="false"
cpuMask="0xffffffff"
userName="ASPNET_WP"
password="&dotnet$12"
logLevel="Errors"
clientConnectedCheck="0:00:05"
comAuthenticationLevel="Connect"
comImpersonationLevel="Impersonate"
responseRestartDeadlockInterval="00:09:00"
responseDeadlockInterval="00:03:00"
maxWorkerThreads="25"
maxIoThreads="25"
serverErrorMessageFile="[Not Configured]"
/>
</system.web>
</configuration>
When we view the process information in the Windows Task Manager, we see that the process is executing as user
ASPNET_WP rather than aspnet.
To run as the system account, as previous Beta versions of ASP.NET did, we simply change the
username/password to the following values:
userName="System"
password="AutoGenerate"
Logging Process Events
The
logLevel attribute allows us to configure how the ASP.NET worker process logs events. The default setting is to log
only errors:
logLevel="[All | None | Errors]"
In addition to logging errors that occur, we can also configure to log all events or log none of the events. The events are
written to the Windows Application Event Log.