Professional ASP.NET 1.0 Special Edition- P25 ppt
Bạn đang xem bản rút gọn của tài liệu. Xem và tải ngay bản đầy đủ của tài liệu tại đây (1.97 MB, 40 trang )
We also learned that configuration files are inherited. The default settings in machine.config are inherited in
web.config files, unless overridden, as we saw in the
<sessionState> examples within this chapter.
After introducing configuration, we then spent the bulk of the chapter discussing various configuration settings used in
ASP.NET. We covered topics from internationalization, to HTTP Handlers, to process model settings. The settings covered
in this chapter should cover 90 percent of all the configuration settings we will want to use for our applications.
Finally, we discussed how we could author our own configuration section handler by implementing a class that inherited
from the
IConfigurationSectionHandler interface.
Securing ASP.NET Applications
Most of the pages that you create for a public Web site are designed to be accessible to any visitor, so the default settings
for ASP.NET pages are ideal - anyone can access the pages from anywhere on the network or the Internet. However, there
will always be some pages that you don't want to be publicly available. For example, you might want to limit access to a
complete site to users who have paid a subscription, or to limit access to administration pages to specific users only.
In previous versions of ASP, securing your pages was generally done in one of two ways. You could create a custom
security system that allowed users to login to your site or application (or a specific part of it). Alternatively, you could rely
on the security features of IIS and Windows itself to control which users could access specific pages, folders, or resources.
In ASP.NET our pages run under the .NET framework, and this introduces new concepts in managing security, while still
retaining existing security features. In this chapter, we'll overview all the features that control user access, and then
concentrate on the specific techniques designed for use with ASP.NET. The main topics of this chapter are:
An overview of the security model in Windows 2000 and IIS
An overview of the new security features in ASP.NET
The different types of access control that we can implement with ASP.NET
A detailed look at how we apply the ASP.NET security and access control features
A brief overview of the "trust" model
Windows 2000 and IIS Security Overview
As this book is about ASP.NET, we'll only be providing an overview of the features in the Windows operating system and
IIS for securing your Web pages and Web applications. Though we will be concentrating on Windows 2000 here, the
concepts, configuration, and usage of these features is virtually unchanged from previous versions of ASP. However, they
do provide the basis on which .NET security techniques are founded. If you are not familiar with the material in this section,
you may wish to consult other documentation or books to gain a broader understanding.
Securing your applications or Web sites is one of the most important factors when connecting your server to the Internet.
While the basics described here, and the techniques we use to control access, will provide a secure environment, you must
still implement all the other measures that are required for protecting your servers and applications against intruders.
This includes physical security (e.g. locked doors and windows), internal user security (e.g. keeping passwords secret and
monitoring usage), virus protection, prompt installation of operating system updates and patches, etc.
The Need for Security
When you come to secure your applications, you must first think about what it is you are actually trying to achieve. For
example, does your application contain highly sensitive information, or allow users to perform tasks that you absolutely
must protect against misuse - such as a bank providing on-line account access to clients. Or, is the information less
sensitive but still valuable, such as content that you want visitors to pay a subscription to access.
In the end, it all comes down to quantifying the risks involved and the effect of a security breach. Securing applications
is more difficult than allowing everyone access, and can involve using extra hardware to build complex multi-layer
systems with firewalls, demilitarized zones, and all kinds of other highly-secure features. However this type of approach
is normally used only when the highest levels of security are required, such as when you are protecting whole networks
from access by external intruders.
Security as it concerns our ASP.NET applications will normally be limited to the configuration of the machine(s) on which
they run, and the connected resources such as database servers, etc. This generally involves limiting access to specific
folders, files, components, and other resources, to only the appropriate users. These topics are the real focus of this
chapter.
If you are building an application that requires the utmost in protection from intruders, you must base the ASP.NET
servers in a secure environment, as well as configuring them correctly. This involves the kinds of extra equipment we
mentioned earlier, and a thorough understanding of the risks involved. Books such as Designing Secure Web-based
Applications for Windows 2000 (MS Press, ISBN 0-7356-0995-0) and Hacking Exposed - Second Edition (Osborne, ISBN:
0-07-212748-1) are useful. If in doubt, however, employ an experienced professional to design and secure your network
and servers as well.
Security Concepts
The basic concepts for securing your applications consist of four main topic areas:
Authentication is the process of discovering the individual identity of users, and making them prove that they are
who they say they are.
Authorization is the process of determining if a particular user is entitled to access the resource they've
requested.
Impersonation is the process whereby the resource is accessed under a different identity, usually the context of
a remote user.
Data or functional security is the process of securing the system through physical means, operating system
updates, and the use of robust software. We don't cover this topic in this chapter.
Many elements of the operating system, IIS, and the .NET Framework combine to provide the features required to
implement the first three of the topics we listed above. For example, Windows 2000 uses its own list of user accounts to
help identify and authenticate users. IIS also identifies users based on the information provided by Windows as they
access a Web site, and it passes this information on to ASP.NET where it can be used as part of the overall authorization
process.
To help you understand how the overall security process works, we'll look separately at each of the first three topics listed
above. Just remember, however, that they are all part of the same chain of events involved in allowing or denying users
access to resources.
Authentication
To be able to limit access to specific users, we have to be able to identify them. This doesn't mean we need to know
everything about them - as in some "big-brother" scenario - but we do need to be able to tell each user apart, and identify
those that should have access and those that should not.
Authentication involves challenging a user to prove that they are who they say they are - usually by means of a username
and password, a digital certificate, or perhaps even a "smart card" or a fingerprint reader. In theory, if they can provide
a valid username and password combination or some other user-specific "property" that can be identified, then they must
be who they say they are. We depend on only one person having access to that particular "property".
In the most common case, a user provides their username and matching password when prompted, either when they log
onto a machine or when they access the resource. If these details are valid, the user has been identified - they are
authenticated.
Authorization
Once we know who the user is, we can decide if they have permission to access the resource they requested. This is done
in a range of ways, depending on the resource. In Windows-based systems most resources have an Access Control List
(ACL), which lists the users that can access a resource. The list will usually also specify what kind of access each user has
(e.g. whether they can read it, write to it, modify it, delete it, etc.) For example, if they request an ASP page, the operating
system will check to see if they have Read access to the page. If so, it will allow IIS to fetch the page. However, IIS also
has authorization settings that control what a user can do with a resource. If it's an ASP page, they will only be able to
execute the script in that page if IIS has Script Execute permission set for the Web site, folder or page.
So, in traditional ASP environments, you can see how several "layers" can be involved in the authorization process. If the
identified user has permission to access the resource in the way that they've requested, the process succeeds: they have
been authorized. If not, they receive an error message of some type, generated by the "layer" that refused them access
to the resource.
Impersonation
There are times when a user will access a resource as though they were someone (or something) else. An example of this
is when there is no access control in place for a Web page - in other words it allows any users to access it. In fact, this is
an over-simplification, because Windows never allows anonymous access. All users must be authenticated and authorized
using an existing account.
For HTML pages, ASP pages, and components in version 3.0 and earlier, this is achieved through the two accounts named
IUSR_machinename and IWAM_machinename. These accounts are set up when IIS is installed, and are automatically
added to all the folders in every Web site on the server.
If we allow anonymous access to a resource in IIS, every user will look the same - we won't be able to tell who is who. But
we don't need to. When IIS receives a request for a Web page or other resource for which anonymous access is permitted,
it uses the
IUSR_machinename account to access the resources on the user's behalf. If the resource they request is an
ASP page that uses a COM or COM+ component, that component (by default) is executed under the context of the
IWAM_machinename account.
In contrast, ASP.NET - when impersonation is turned off - makes all access to resources under the context of a special
ASP.NET process account. When we turn impersonation on, ASP.NET executes every resource under the account of a
specified user that we authenticate when they make the request. As in a COM+ application running under Windows 2000
or in MTS under Windows NT4, we can specify the account that will be used. If we specify the
IUSR_machinename account,
then ASP.NET will behave like previous versions of ASP, as far as the permissions required for accessing resources is
concerned.
One vital point to bear in mind is that the authentication process used by ASP.NET only applies to resources that are
associated with ASP.NET. In other words, access control is only applied to files that are defined as "application" files in
Internet Services Manager's
Application Mappings dialog. By default this includes .aspx and .asax pages, .ascx
components,
.vb and .cs code files, Web Service files, and other resources that are mapped to aspnet_isapi.dll. It
does not apply to resources such as images, Word documents, zip files, PDF files, and other types of file. These types of
files must be protected using standard Windows techniques such as ACLs. You'll see all these topics discussed later in this
chapter.
Security Within ASP.NET
From the preceding chapters, you'll have seen how many of the configuration settings you used to make within IIS under
previous versions of ASP are now made through one or more instances of the new configuration file named
web.config.
This applies to most of the settings in the
Internet Services Manager interface (within the MMC), because web.config
replaces the metabase contents that this interface is used to manipulate.
However, security settings made in IIS are still effective in many areas. This is because, unlike the configuration of
application settings, custom errors, etc., IIS is still actively managing the request and performing the base security
process in conjunction with the operating system itself. In effect, a request for an ASP.NET page is received by IIS, which
uses the application mappings defined for the site containing that page to direct the request to ASP.NET.
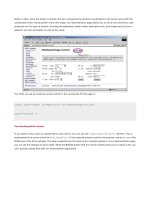
You can see the application mappings if you open the
Application Configuration dialog from the Home Directory page of the
Properties dialog for a site or directory in Internet Services Manager. The application mappings for all the ASP.NET
resource types point to a file named
aspnet_isapi.dll stored in the .NET frameworks folder:
As you can see from the screenshot, the application mappings rely on file extensions. This is why you can still run existing
ASP 3.0 pages on the same server as ASP.NET (they have a different file extension), and (of course) publish other
resources such as HTML pages, zip files, documents, etc. which aren't processed by ASP.NET.
If you hadn't realized it yet, this dialog proves that ASP.NET is an ISAPI DLL - as were ASP 3.0 and earlier. This DLL
captures the request, processes it using managed code within the .NET Framework, and then passes the response back
to IIS so it can be delivered to the client.
So, IIS first authenticates a user, and then passes the request on to ASP.NET where it can perform its own security
processes. The next schematic shows the overall flow of the request, and we'll briefly see how each part of the process is
carried out in the following sections of this chapter.
Authentication in Windows 2000
Windows 2000 maintains a list of users that are allowed to access resources on a machine. This is either stored on the
machine itself, or on a domain controller elsewhere. The list is managed through the
Computer Management tool, or
through the
Active Directory Users and Computers tool on a domain controller:
You can see the IUSR and IWAM accounts in the previous screenshot that are used by IIS when anonymous access is
enabled. Depending on the type of operating system and software you have installed, you'll probably see several other
accounts listed as well. Within the list you can see an account with the username
TestUser, which we created to
experiment with the security features in ASP.NET and Windows 2000.
User Groups
The
Properties dialog for this account shows that it is a member of two account groups - TestGroup and Users:
All accounts are automatically added to the Users group, but we created a new group named TestGroup and added the
TestUser account to it. You can see a list of groups in the Computer Management dialog as well:
By allocating users to groups, we provide a way of minimizing the amount of work required to change permissions. For
example, if we have 500 users who can access a particular set of resources, we can allocate them all to one group and then
give that group permission to access those resources. The alternative would be to add all 500 users to each resource
individually. And any changes to the permissions afterwards would mean changing them for all 500 users rather than just
once for the group as a whole.
Groups are also useful when we use "programmatic security". We can detect whether a user is a member of a specific
group, and make decisions based on the result. This means that we don't have to hard-code all of the usernames into our
application (just the group name), and we don't have to change the code to add or remove individual users. We just
configure the group in the ACL for the resource to add users to, or remove them from the group.
Authentication in IIS
When a user requests a resource over the Web, IIS receives the request and performs the initial authentication of the user.
IIS also performs other checks before deciding whether the user will be allowed access to the resource. We'll look at these
next.
IP Address and Domain Name Restrictions
In Windows 2000 Server and Windows NT4 (but not Windows 2000 Professional), you can specify the IP addresses or
domain names of clients that will be allowed access or denied access. This is achieved using the
IP Address and Domain
Name Restrictions
dialog, available from the Directory Security page of the Properties dialog for a site or directory. This
is useful if you always access the restricted site from a single machine, or if all your users come from a specific set of IP
addresses or set of domains:
Using Certificates to Authenticate Users
You can also use the Properties dialog to set up server certificates that are to be used for a site or directory. As well as
enabling secure communication through SSL, these certificates can be used in conjunction with client certificates to
identify the machine that is accessing your server. For example, the following screenshot shows a configuration where the
clients must provide a certificate to access the site. We've created a rule so that, if the organization that issued the
certificate to the client is our own Certificate Server, the user will automatically be authenticated using the
TestUser
account we created earlier:
You can also access the content of a client certificate using code in an ASP.NET page, through the
Request.ClientCertificate collection.
Specifying the Authentication Method
The third option in the
Directory Security page of the Properties dialog for a site or directory enables us to specify the
authentication method that should be used. The
Authentication Methods dialog provides four options:
Anonymous Access - Any user can access the WWW service provided that the settings for their IP address and
domain name restrictions don't prevent them. IIS then accesses resources on their behalf using the
IUSR
account (or the
IWAM account for components running out-of-process), and so they will be able to access all
resources for which these accounts are valid.
Basic Authentication - If anonymous access is disabled, users will be presented with a logon dialog generated by
their browser or their client-side user agent application. The username and password they provide are
Base64-encoded and passed to IIS. It then looks up this account in Windows (on the server), and will only allow
the user to access the resource if the account is valid and has the appropriate permission for that resource.
Base64 encoding is not very secure, and so this option is not suitable for high-security applications.
Digest Authentication - If anonymous access is disabled, users will be prompted for their credentials (their logon
information). The browser combines this with other information stored on the client, and sends an encoded hash
(or digest) of it to the server. The server already has a copy of this information, and so can recreate the original
details from its own hash and authenticate the user. This method only works with Internet Explorer and .NET
Web Services, but will pass through firewalls, proxy servers, and over the Internet. It is also very secure. The
user will be able to access the resource they requested only if the specified account exists in Windows, is valid,
and has appropriate permission for that resource.
Integrated Windows Authentication - This is the same method as is used when you log onto your local network.
Sometimes called "NTLM" authentication or "Challenge Response" authentication, it can work with Windows
NTLM or Kerberos. It also uses a hash algorithm to code and decode the client's credentials. It will not work
through most proxy servers and firewalls, or through some routers, and so is not generally suitable for use on the
Internet. However, it usually works fine on an Intranet or a corporate network. Like Digest Authentication, this
is also a very secure technique. The user will be able to access the resource they requested only if the specified
account exists in Windows, is valid, and has appropriate permission for that resource.
If anonymous access is disabled, and the other methods are all enabled, IIS will attempt to use Integrated Windows
Authentication first, followed by Digest Authentication, with Basic Authentication used only as a last resort if the client
does not support the other two methods.
We can also use the
Authentication Methods dialog to specify which account is used for anonymous access. You can see
that the default is our machine's
IUSR account:
When set, the checkbox marked
Allow IIS to control password specifies that IIS will automatically extract the correct
password for the
IUSR account from Windows and use it when requesting resources on behalf of the user. It is checked
by default, which means that you won't break the WWW service if you change the password for this account in the
Computer Management tool at some point in the future.
Authorization in Windows 2000
So, providing that our user has been successfully authenticated, what happens next? We mentioned in the previous
section that a user will only be able to access the resource they requested if the account they were authenticated with has
appropriate permission for that resource. These permissions are held in Access Control Lists (ACLs) that are allocated to
every resource.
ACLs are managed in a range of ways - for example,
Windows Explorer is used to manage the ACLs for files and folders
on local and network drives. Open the Properties dialog for any file or folder in Windows Explorer and select the Security
page. This shows the accounts and groups that have access to that file or folder, and the permissions for each one. The
Advanced button allows you to control the options in more detail, giving up to 13 different read/write/delete combinations,
and the ability to propagate the permissions to child objects and inherit permissions from parent folders:
Other applications and services also rely on Windows accounts. For example, Microsoft SQL Server allows permissions to
be set up for any Windows account. This means the account that the user is authenticated with can often be used to access
all the resources they need:
Authorization in IIS
There is one other area where security is applied to a Web application or Web site. IIS accesses resources on behalf of the
user with either its own anonymous access account (the
IUSR account) or with the account credentials that the user
provides when anonymous access is disabled. However, on a different level, it also decides what they can do with the
resource they have accessed.
The central section of the Home Directory page of the Properties dialog for a Web site or directory specifies the type of
operation that the user can perform within this site or directory. You can specify
Script source access, Read, and/or Write.
The default is just
Read:
Remember, however, that this is separate from the ACLs that Windows applies to that resource. And this setting is applied
on a Web site or directory basis, and not on a per-user basis. The settings here affect all users.
What they do offer is an added layer of protection. For example, by default, users are prevented from writing to a Web site
directory through IIS, and they are also prevented from downloading any script files. These can only be executed, so that
the source code is not visible. Of course, you can change these settings (and others shown in this dialog) to suit your own
application requirements.
However, if you decide to offer - for example -
Write access, you must also set the appropriate permissions on the
Windows ACL for the disk folders. As in all security scenarios, when settings for a resource conflict like this, the most
restrictive ones will be applied. In other words, if the ACL says you can't write to the folder, allowing
Write access in IIS
will have no effect.
ASP.NET Security Overview
Having briefly overviewed the security features provided by the operating system and IIS, the next step is to understand
how these relate to the security features available within ASP.NET. As we said earlier, the process of authenticating users
and authorizing their requests for resources is like a chain. The operating system and IIS have their own unique parts to
play initially, as the request arrives at the server. Afterwards, providing that access is not denied by IIS, the request is
passed to ASP.NET for processing and fulfillment.
The ASP.NET Security Process
The next schematic shows the process within ASP.NET in more detail. After IIS has checked the user's IP address and
domain to ensure that they are allowed access, it authenticates the user. Remember that the "user" may be the
IUSR
account if anonymous access is enabled. At this point IIS spawns an instance of the ASP application that holds the
resource the user requested, or passes the request into an already executing instance of the application:
ASP.NET Impersonation
The first step within ASP.NET is to see if the application is configured to use impersonation. This is a similar concept to the
way that IIS impersonates users with its own
IUSR account. However, in this case, impersonation is used to decide
whether the user's request should be executed under the context of their account, or that of the special account named
ASPNET that ASP.NET uses for anonymous requests.
This is a confusing concept to grasp at first. The added complexity comes from the fact that ASP.NET uses the dynamic
compilation features of the .NET Framework. It needs to write to the drive in various places to create temporary files and
compiled assemblies. The
IUSR account has only limited permissions on the local machine, and so is not suitable without
some reconfiguration. This is intentional because it is also the account used by IIS to access resources like HTML pages,
documents, and zip files that are not executed as part of the .NET framework.
The account that is actually used for executing ASP.NET resources when impersonation is not enabled is controlled by the
<processModel> element in the machine.config configuration file. The username and password attributes specify
which account is used. The defaults for normal use are
userName="machine" and password="AutoGenerate". We'll
look at this topic in more detail at the end of the chapter.
If impersonation is enabled in an ASP.NET application then:
If anonymous access is enabled in IIS (the default) the request is made under the context of the IIS anonymous
access account (
IUSR_machinename by default).
If anonymous access is not enabled in IIS, the request is made under the context of the authenticated user (their
own Windows account).
In either case, permissions for the account are checked in the Windows ACL for the resource(s) the user
requested, and the resource is only available if the account they are running under is valid for that resource.
If impersonation is not enabled in an ASP.NET application (the default) then:
If anonymous access is enabled in IIS (the default) the request is made under the context of the special ASP.NET
process account.
If anonymous access is not enabled in IIS, the request is made under the context of the authenticated user (their
own Windows account).
In either case, permissions for the account are checked in the Windows ACL for the resource(s) the user
requested, and the resource is only available if the account they are running under is valid for that resource.
Other security checks are also possible within ASP.NET. The availability of these checks depends on the type of security
specified. We'll overview the various options next, and look at these in more detail as we go through the chapter.
The ASP.NET Security Options
ASP.NET provides a range of different options for implementing security and restricting user access in a Web application.
All these options are configured within the
web.config file located in the root folder of the application. We looked at the
main features of
web.config and how it is used in Chapter 13. In this chapter, we'll focus on just the authentication and
authorization sections.
Important Points When Using Security in ASP.NET
Before we get too involved, however, there are a couple of things that we need to keep in mind when working with
ASP.NET security:
You don't have to change any of the default settings in Internet Services Manager, or change the permissions
assigned to files or resources when using the security features that are configured for ASP.NET in the
web.config file. The examples we use in this chapter work fine with the default settings. However, you can
tighten security by editing these settings as well, as we describe later in the chapter when we look at the various
configuration options.
Many of the options you configure within web.config are applied automatically to any directory in which you
place the
web.config file. This applies to the authorization settings you make in the <authorization>
section. However, this is not the case with the authentication security configuration settings in the
<authentication> section. To use the authentication techniques we describe here, you must place the
web.config file in the root folder of a Web site (the Home Directory) or configure the directory that contains the
web.config file as a virtual root or virtual application in Internet Services Manager. Afterwards, remember to
access the application through this alias.
The Types of Authentication and Authorization
ASP.NET provides three types of authentication and authorization, or you can just rely on IIS to do all the work for you.
The options are:
Type Name Description
Windows built-in
authentication
Windows
The initial authentication is performed by IIS through Basic, Digest, or Integrated
Windows authentication. The requested resources are then accessed under the context of
this account. The
web.config file can specify the accounts that are valid for the whole or
parts of the application.
Passport-based
authentication
Passport
This option uses a centralized Web-based authentication service provided by Microsoft,
which offers single-sign-on (SSN) and core profile services for member sites.
Forms-based
authentication
Forms
Unauthenticated requests are automatically redirected to an HTML form page using HTTP
client-side redirection. This is similar to custom authentication methods used in previous
versions of ASP, but it provides much of the functionality as part of the framework of
ASP.NET. The user provides their login credentials and submits the form. If the application
authenticates the request, the system issues a cookie that contains their credentials (in
fact, a key for re-acquiring the identity). The client browser then sends the cookie with all
subsequent requests, and the user can access the application while they retain this
cookie.
Default (IIS)
authentication
None
T
he default. Impersonation can still be used, but access control is limited to that specified
within IIS. Resources are accessed under the context of the special ASP.NET process
account, or the
IUSR account if impersonation is enabled.
To specify the type of authentication we want to use in an ASP.NET virtual application or virtual directory we provide the
Name shown above in the <authentication> section of the web.config file for that site of directory:
<configuration>
<system.web>
<authentication mode="Windows|Passport|Forms|None">
authentication options used for the application
</authentication>
<authorization>
users and roles that have access to the application
</authorization>
<identity>
if application should run under a different account
</identity>
</system.web>
</configuration>
The other two elements within the <system.web> section of web.config that we're interested in are used to specify the
details of how authentication should be carried out. The
<authorization> section is used to specify which users or
groups can and cannot access the application. The
<identity> section is used to specify if impersonation is enabled - in
other words, whether to run under the user (or
IUSR) account, the special ASP.NET process account, or a different
account that you specify. You'll see how we use these sections of the file when we look at each type of authentication in
more detail next.
Using Windows Authentication in ASP.NET
Windows authentication is best suited to situations like a corporate Intranet Web site or Web application where you know
in advance which users will be accessing your site. This is because you have to set up an account within Windows for each
user, and provide them with the username password (the login credentials) they'll need to access the site.
Of course, in an Intranet scenario, or an application where you can classify users into groups, you can set up an account
for each group and allow all users who know the relevant username and password to access the application under this
single account.
Note that we aren't referring to Windows account groups here - we're using the term "group" simply to signify several
users who will have the same access rights as each other.
An example would be to set up a Windows account named
siteadmins, and allow all administrators to log into the
application using this account. Just bear in mind that this will not allow you to audit the actions of each individual user, as
they will all be accessing resources under the same account credentials. However, this can be a suitable solution in many
scenarios.
Setting Up Windows Authentication
To set up an application or a section of an application to use Windows authentication, we simply specify this authentication
mode and then turn on impersonation within the
<identity> element:
<configuration>
<system.web>
<authentication mode="Windows" />
<identity impersonate="true" />
</system.web>
</configuration>
Now, each user will access resources under the context of the account that they logged into IIS with. The <identity>
element is only used with Windows authentication, and not with the other types of authentication that we'll meet later.
Specifying Users and Groups
As well as simply specifying Windows authentication, we can also provide a list of users and groups that will be able to
access the application. This is done within the
<authorization> section of the web.config file, with a series of
<allow> and <deny> elements.
The general form of each of these elements is:
<allow roles="comma-separated list of Windows account group names"
users="comma-separated list of Windows user account names"
verb="GET|POST|HEAD"
/>
<deny roles="comma-separated list of Windows account group names"
users="comma-separated list of Windows user account names"
verb="GET|POST|HEAD"
/>
The <allow> and <deny> element must contain either a roles or a users attribute. It does not have to contain both,
and the
verb attribute is always optional. To specify a domain user account, we include the domain name followed by a
backslash and the username, for example
MyDomainName\MyUserName. There are also special values that refer to
built-in account groups, such as Everyone, BUILTIN\Administrators, etc.
To specify a local (machine) account we just use the machine name in place of the domain name. There is no way to
specify a domain account without the actual domain (there is no short-cut that means "use the local domain"), so we have
to edit the list if we change the domain name or move the application to another domain.
There are also two special symbols that we can use:
An asterisk (*) means all users, roles, or verbs, depending on the attribute it is used in.
A question mark (?) means 'anonymous access'. In the case of Windows authentication, this is the account set
up in IIS for anonymous access. This character can only be used within the
users attribute.
The default configuration for a server is in the file
machine.config, stored in the directory
C:\WINNT\Microsoft.NET\Framework\ [version]\CONFIG\. It contains a single <allow> element that permits all users to
access ASP.NET resources:
<authorization>
<allow users="*" />
</authorization>
The <allow> and <deny> elements are merged for all configuration files in the application path, starting with the root
(default) configuration file
machine.config, and including all web.config files in folders below this application
directory. Rules that are higher up in the hierarchy (that is, nearer the application directory) take precedence over those
in
web.config files below them (nearer the root).
Once the merged list of
<allow> and <deny> elements is created, they are processed from top to bottom and the best
match for a user or role is selected. Processing doesn't just stop when the first match is found, but continues throughout
all the entries fine-tuning the selection. This means that a specific reference to a user will take precedence over a
role,
and over a wildcard rule that uses the asterisk character. The merge process also gives
<deny> elements precedence
over
<allow> elements, so that we can allow a Windows account group using <allow roles="xxxx" />, but deny
specific users that are within that account group using
<deny users="yyyy" />.
So, to control access to a specific application or a directory within an application we add a
web.config file to that
directory, perhaps containing something like this:
<configuration>
<system.web>
<authorization>
<allow roles="MyDomainName\SalesDept"
users="MyDomainName\billjones,MyMachineName\marthasmith" />
<deny users="*" />
</authorization>
</system.web>
</configuration>
This will permit access to the application for the domain-level account named billjones from the domain named
MyDomainName and the local (machine) account named marthasmith, plus all members of the domain-level account
group named
SalesDept. All other users will be denied access.
Specifying HTTP Access Types
We can also use the
<allow> and <deny> elements to control the type of HTTP action that a user can take when
accessing an application or directory by using the
verb attribute:
<configuration>
<system.web>
<authorization>
<allow verb="GET" users="*" />
<allow verb="POST" users="MyDomainName\marthasmith" />
<deny verb="POST" users="*" />
</authorization>
</system.web>
</configuration>
This will allow the domain-level account named marthasmith to send POST requests to the application (submit an HTML
form), but all other users will only be able to send "
GET" requests. And, of course, we can combine this access control
setting with the list of groups and users, by adding the
verb attribute to the previous example that used the roles and
users attributes.
We can also use the
<location> element to specify more than one <system.web> section, applying each of these
sections to a specific path or file. This is useful for setting different permissions for subfolders or files using a single
web.config file. For example we can specify that a file named mypage.aspx will have different authorization settings
from the rest of the files in a folder using:
<configuration>
<system.web> <! default for this application >
<authorization>
<allow verb="GET" users="*" />
<allow verb="POST" users="MyDomainName\marthasmith" />
<deny verb="POST" users="*" />
</authorization>
</system.web>
<location path="mypage.aspx"> <! only applies to this file >
<system.web>
<authorization>
<allow verb="GET" users="*" />
<allow verb="POST" users="MyDomainName\billjones" />
<deny verb="POST" users="*" />
</authorization>
</system.web>
</location>
</configuration>
Running Under Another Specific Account
Finally, we can instruct ASP.NET to access resources under a specific account, rather than the user account that was
authenticated by IIS or the special ASP.NET process account (which is normally used when impersonation is not enabled).
This is done within the
<identity> element:
<configuration>
<system.web>
<identity impersonate="true"
userName="MyDomainName\MyUserName
password="MyPassword" />
</system.web>
</configuration>
Here we're specifying that impersonation is enabled but, instead of using the ASP.NET process account, ASP.NET should
access all resources under the context of the domain-level account named
MyUserName from the domain named
MyDomainName. We also have to provide the password for the account so that ASP.NET can present it to the operating
system and other applications and services when it requires access to them.
Note that the password will be visible in the file, and this could introduce a security risk.
IIS and Windows Security Settings for Windows Authentication
Remember that access control using "
Windows" authentication depends on a Windows account being available for
ASP.NET to use to access the requested resources. You can tighten security by using the ACLs on resources to allocate
permission to just specific users, or to the accounts that the user will be running under. This isn't required, but does
provide a second level of protection.
To be able to do this, you must be aware of which account is actually being used to access the resource, and give that
account the appropriate permissions while removing any permissions that are not required. The following schematic
should help: