Professional ASP.NET 1.0 Special Edition- P44 ppsx
Bạn đang xem bản rút gọn của tài liệu. Xem và tải ngay bản đầy đủ của tài liệu tại đây (801.64 KB, 40 trang )
sqlAdapter1.Fill(products, "products");
return products;
}
public DataSet GetProductCategories() {
SqlConnection myConnection = new SqlConnection(m_ConnectionString);
SqlDataAdapter sqlAdapter1 = new SqlDataAdapter("SELECT DISTINCT "
+ "ProductType FROM Products", myConnection);
DataSet products = new DataSet();
sqlAdapter1.Fill(products, "products");
return products;
}
}
}
This class has four methods, including the constructor:
ProductsDB - Initializes the class with a data source string.
GetProduct - Returns a dataset containing details for a single product.
GetProducts - Returns a dataset containing the details for all products in a specified category.
GetProductCategories - Returns a dataset containing the list of product categories.
The first three lines of the component declare the namespaces we are using:
using System;
using System.Data;
using System.Data.SqlClient;
All of our class files have these lines and they indicate that we are using the standard system namespace, the namespaces
for ADO.NET, and the SQL Server-specific parts of ADO.NET (
System.Data.SqlClient). We use the SQL
Server-specific elements of ADO.NET because they provide high performance SQL Server access using TDS (Tabular Data
Stream) via the classes
SqlConnection and SqlDataAdapter. If we needed to support a different back-end database,
we could recode our classes to use the
OleDbConnection and OleDbDataAdapter classes, which perform database
access through OLEDB. These classes were discussed in Chapter 8.
One important point to note about all of the ADO.NET code in the business object is that it does not contain any exception
handlers. It is therefore up to the code that uses these classes to catch exceptions like
SqlException, which can be
thrown if any error occurs when performing the data access (such as the existence of duplicate rows, and so on) We
haven't included any exception handling in our ASP.NET pages to keep them terse, but the basic format is shown here:
try
{
someObject.SomeMethodUsingAdoDotNet()
}
catch (SqlException e)
{
if (e.Number == 2627)
Message.InnerHtml = "Record exists with the same primary key";
else
Message.InnerHtml = e.Message;
}
In this code, we are checking for a known SQL Server error code using the SqlException Number property. If the error
code we are checking for is matched, we display a custom error message. If the known error code is not encountered, we
display the exception's
Message property. The Message property of an exception object typically contains very
descriptive and helpful text that can help resolve a problem quickly. In your applications, you are unlikely to check for
specific error codes, unless you want to perform some type of action. For example, you may check for the error code
above if you want to delete a row that may already exist.
You should always proactively add exception handling code to your production applications. The ADO.NET classes
(including
SqlException) are located in the assembly System.Data.dll. Use the IL Disassembler (ildasm.exe)
tool, the WinCV class viewer, or the class browser example from the Quick Start to explore the classes in more detail.
The Connection String Constructor
The
ProductsDB class has a constructor that accepts the connection string used to establish a connection to the
back-end database. By passing the string in like this, we prevent people from forgetting to specify it, and hopefully we
prevent the business objects from containing hard-coded strings, which is always bad practice.
The string passed in is stored in the member
m_ConnectionString in the constructor code:
string m_ConnectionString;
public ProductsDB( string dsn ) {
m_ConnectionString = dsn;
}
The m_ConnectionString member is then used when constructing the SqlConnection object:
public DataSet GetProduct(string productCode) {
SqlConnection myConnection = new SqlConnection(m_ConnectionString);
SqlDataAdapter sqlAdapter1 = new SqlDataAdapter("SELECT * FROM "
+ "Products WHERE ProductCode='"+productCode+"'", myConnection);
DataSet products = new DataSet();
sqlAdapter1.Fill(products, "products");
return products;
}
Anybody using the ProductsDB business object (and any of the other business objects) must therefore pass the
connection string when creating an instance of the class:
IBuyAdventure.ProductsDBinventory=newIBuyAdventure.ProductsDB(getConnStr());
The getConnStr function in this example retrieves the connection string from the web.config file:
<configuration>
<appSettings>
<add key="connectionString"
value="server=localhost;uid=sa;pwd=;database=IBuyAdventure" />
<add key="specialOffer" value="AW048-01" />
</appSettings>
By using the web.config file to store the connection string for our components (and, in the example above, another
application-level value) we do not have connection strings duplicated throughout business objects and ASP.NET pages,
making it much easier to manage the connection string should we decide to rename the database or change any of the
connection string properties.
The
getConnStr function is implemented using a 'code behind' class that we will review later in this chapter. You could,
alternatively, use an include file to define such functions in your application, but the 'code behind' approach is my
preferred option.
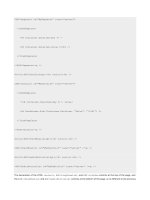
Now we have reviewed the
ProductsDB class, let's take a brief look at a couple of ILDASM screenshots showing the
methods for our other business objects.
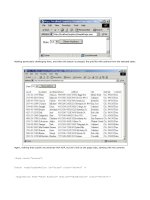
The ILDASM Output for IBuyAdventure.dll
The following screen shows the
ILDASM output for the IBuyAdventure.dll assembly:
The ILDASM Output for IBuyAdventureCart.dll
The following screen shows the ILDASM output for the IBuyAdventureCart.dll assembly:
Assemblies
As we discussed in Chapter 17, assemblies are the key deployment mechanism in ASP.NET applications. The business
objects for IBuyAdventure.NET are divided into two assemblies that are both dependent upon the
System.Data.dll
assembly, because they use ADO.NET:
The IBuyAdventureCart.DLL contains the CartDB business object, which is used for manipulating the shopping cart.
This is dependent upon the
ProductsDB class contained within the IBuyAdventure.DLL assembly.
Although assemblies have a
.dll extension, they are, for the most part, not DLLs! The extension was kept only to aid
interoperability between COM+ managed code and classic COM unmanaged code.
The
IBuyAdventureCart.dll assembly isn't strictly necessary, but it does show that partitioning classes into different
assemblies in an ASP.NET application isn't a difficult task. The decision as to when to create assemblies will typically be
influenced by a number of real life factors:
The functionality of the classes within the assembly - Assemblies should ideally contain functionally related
classes.
The number of developers working on an application - Assemblies are key units of deployment in ASP.NET
applications, so it makes sense for different development teams to create their own assemblies to ease
co-development.
Compiling the Assemblies
All of the business object sourcecode for the IBuyAdventure application is located in the
components directory. This
directory contains the file
make.bat that uses the C# command line compiler (csc.exe) to create the two assemblies:
csc /out: \bin\IBuyAdventure.dll /t:library productsdb.cs ordersdb.cs usersdb.cs
/r:System.Data.dll,System.dll,System.Xml.dll
csc /out: \bin\IBuyAdventureCart.dll /t:library cartdb.cs
/r:System.Data.dll,System.dll,System.Xml.dll /r: \bin\IBuyAdventure.dll
The first statement compiles the business objects ProductsDB, OrdersDB, and UsersDB, which are located within the
files
productdb.cs, ordersdb.cs, and usersdb.cs respectively. The output from this statement is the
IBuyAdventure.dll assembly. The second statement compiles the business CartDB, which is located in the file
cartdb.cs. The output from this is the IBuyAdventureCart.dll assembly. Both assemblies are compiled into our
ASP.NET application
bin directory so that they are available to our ASP.NET pages.
Naming Conventions
The IBuyAdventure business objects
ProductsDB, OrdersDB, and UsersDB are declared within the namespace
IBuyAdventure. This reflects the name of the assembly they are contained in, making it easy to locate and determine
what files to ship when it comes to deploying an application that contains pages that are dependent upon those classes.
The same naming convention applies to the
CartDB business object, which is declared within the namespace
IBuyAdventureCart, and contained in the assembly IBuyAdventureCart.dll. Microsoft also uses this naming
convention for most of its assemblies. The exceptions to the rule are core classes, such as strings, which tend to live in
assemblies called
mscor[*].dll.
The IBuyAdventure .NET Database
IBuyAdventure is driven by a SQL Server 7 or 2000 database, with four tables (Accounts, Products, ShoppingCarts,
and
Orders) as shown in the next diagram:
The business objects encapsulate each of these tables, so the ASP.NET pages never perform direct database access.
The Accounts Table
The
Accounts table is used to store the login information for registered customers and has the following structure:
Column Name Type Length Description
CustomerName nvarchar 50
The name or e-mail address of the registered user. This field is used as the key
against all of the tables, and should therefore be unique.
Password nvarchar 30
The password specified by the user during their registration.
The Orders Table
The
Orders table is used to store a summary of all the orders made by customers and has the following structure:
Column Name Type Length Description
CustomerName nvarchar 50
The name or e-mail address of the registered user. This field is used as the key
against all of the tables, and should therefore be unique.
Ordered datetime 8
The date the order was placed.
TotalValue float 8
The total value of the order.
When a user hits the Confirm Order button, and moves to the checkout page to confirm an order, an entry is added to this
table. The individual items within the shopping cart are not saved to the database when an order is confirmed, although
this would be a requirement for a commercial application.
The Products Table
The
Products table contains a list of all products that a customer can purchase from IBuyAdventure. The table has the
following structure:
Column Name Type Length Description
ProductID int 4
A unique ID for the product.
ProductCode nvarchar 10
The unique code for the product.
ProductType nvarchar 20
The category for the product.
ProductIntroductionDate smalldatetime 4
The date when the product was first added to the catalog.
ProductName nvarchar 50
The name of the product shown in the catalog.
Table continued on following page
Column Name Type Length Description
ProductDescription nvarchar 255
A description of the product.
ProductSize nvarchar 5
The size of the product.
ProductImageURL varchar 255
The URL of the image to display for the product.
UnitPrice float 8
The price for this product.
OnSale int 4
A flag to indicate whether or not the unit price is a sale price:
1 = on sale,
0 = not on sale.
Rating float 8
A rating out of five for this product in terms of overall quality.
IBuyAdventure has slightly less than 50 products, grouped in 12 categories.
The ShoppingCarts Table
The
ShoppingCarts table holds all of the current product details for each user's shopping cart. The table has the
following structure:
Column Name Type Length Description
ShoppingCartID int 4
Auto-generated ID field.
ProductCode nvarchar 10
The unique code for the product.
ProductName char 50
The name of the product.
Description nvarchar 255
A description of the product.
UnitPrice money 8
The price for this product.
Quantity int 4
The number of units wanted.
CustomerName nvarchar 50
The name or e-mail address of the registered user who currently has the
specified product in their basket. If the user is not currently registered or logged
in, this is a GUID to represent the anonymous user.
Every time an item is added to a user's shopping cart, an entry is added to this table.
The IBuyAdventure sample application does not clean up the database, or remove rows that are associated with sessions
that have expired. This would need to be done in a production application. You could handle the
Session_OnEnd event
and do your database cleanup there.
The Application User Interface
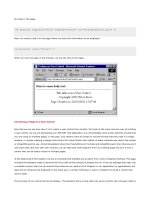
When a user first visits the IBuyAdventure site they are presented with an ASP.NET page that gives them a brief
introduction to the site contents, and provides all the standard promotion material, special offers, and navigation buttons
you'd expect from an ecommerce application:
The welcome page provides a fairly intuitive user interface that should enable customers to browse, register, and buy
goods. The top of the page contains the IBuyAdventure logo and navigation buttons that let the user register, log in, and
view their current/previous orders. The left-hand side of the screen details all of the product categories that are defined
in the IBuyAdventure database. The bottom of the screen contains the product advertising banner and the rest of the
screen's middle section contains the special offers.
All pages on the site have the same basic structure as the front page, so each page uses at least three user controls:
User Controls in IBuyAdventure .NET
The user controls are defined at the top of each page using the
@Register directive. As discussed in Chapter 4, this
allows you to associate a user control with an ASP.NET tag prefix (that is, an element namespace). When the ASP.NET
runtime finds these special tags, it knows to create the appropriate user control and render the necessary output.
The
@Register directives common to each page are shown here:
<%@ Page Language="C#" Inherits="IBuyAdventure.PageBase" src="components/stdpage.cs" %>
<%@ Register TagPrefix="IBA" TagName="Header" Src="UserControl\Header.ascx" %>
<%@ Register TagPrefix="IBA" TagName="Categories" src="UserControl\Categories.ascx" %>
<%@ Register TagPrefix="IBA" TagName="Special" src="UserControl\Special.ascx" %>
<%@ Register TagPrefix="IBA" TagName="Footer" src="UserControl\Footer.ascx" %>
The user controls we have registered are then inserted into a page in the same way as we have seen in previous chapters:
<IBA:Header id="Header" runat="server" />
Most of the pages in the IBuyAdventure application have the same basic format, containing an HTML table. We will
therefore review the complete page code for
default.aspx that shows all of the user controls being declared, the
language, 'code behind' page directive, the default output cache directive, and the basic HTML page structure:
<%@ Page Language="C#" Inherits="IBuyAdventure.PageBase" src="components/stdpage.cs" %>
<%@ Register TagPrefix="IBA" TagName="Header" src="UserControl\Header.ascx" %>
<%@ Register TagPrefix="IBA" TagName="Categories" src="UserControl\Categories.ascx" %>
<%@ Register TagPrefix="IBA" TagName="Special" src="UserControl\Special.ascx" %>
<%@ Register TagPrefix="IBA" TagName="Footer" src="UserControl\Footer.ascx" %>
<%@ OutputCache Duration="60" VaryByParam="*" %>
<script language="C#" runat="server" >
private String GetCustomerID() {
if (Context.User.Identity.Name != "")
return Context.User.Identity.Name;
else {
if (Session["AnonUID"] == null)
Session["AnonUID"] = Guid.NewGuid();
return Session["AnonUID"].ToString();
}
}
void Page_Load(Object sender, EventArgs e) {
if (Request.Params["Abandon"] == "1")
{
IBuyAdventure.CartDB cart = new
IBuyAdventure.CartDB(ConfigurationSettings.AppSettings["connectionString"]);
cart.ResetShoppingCart(GetCustomerID());
Session.Abandon();
FormsAuthentication.SignOut();
}
}
</script>
<html>
<head>
<title>IBuyAdventure Catalog</title>
</head>
<body background="images/back_sub.gif">
<form runat="server">
<font face="Verdana, Arial, Helvetica" size="2">
<table border="0" cellpadding="0" cellspacing="0">
<tr>
<td colspan="5">
<IBA:Header id="Header" runat="server"/>
</td>
</tr>
<tr>
<td colspan="3" align="left" valign="top">
<IBA:Categories id="Categories" runat="server"/>
</td>
<td>
</td>
<td align="left" valign="top">
<h3>Welcome to IBuyAdventure!</h3>
<p>
<font face="Verdana, Arial, Helvetica" size="2">
You know the drill: Proper equipment for your climb leads to
a successful ascent. IBuyAdventure gear has been tested in
the most extreme environments on earth, from the 8,000-meter
peaks of the Himalayas to the sub-arctic giants of Alaska.
<p>
<IBA:Special runat="server"/>
<p>
IBuyAdventure has all the gear you need for any excursion,
from a day hike to a major expedition. Shop with us, set up
camp with us, and take our challenge. Join the IBuyAdventure
expedition!
<br>
<br>
<br>
<IBA:footer runat="server"/>
</font>
</td>
</tr>
</table>
</font>
</form>
</body>
</html>
Although the appearance of the front page is fairly rich, the amount of code within the page is actually quite small because
much of the HTML and code is encapsulated within the three user controls.
default.aspx, like most pages, uses the
@OutputCache directive to specify that pages be cached for 60 seconds. This reduces database overhead, but you should
consider these issues:
Cached information is stored in memory so the amount of memory used by your application will be larger.
The same page will be cached multiple times if it has different query parameters, so you will have to allow for that
increase in the working set.
If a page is cached, then all the output for that page is also cached. This might sound obvious, but it does mean
that, for example, the
AdRotator control for the Adventure Work application doesn't rotate as often as a normal
site (the advert changes once every 60 seconds on the pages that use caching). If we wanted portions of the
page to be cached, while the rest is rendered afresh every time, we could use fragment caching. Fragment
caching works by caching the information in a user control - so that the .aspx page is rendered each time - but
when the time comes to add the contents of the user control to a page, those contents are drawn from the cache.
Only One Server-Side <form> Element
One important point to note about the
default.aspx page is that it contains a single <form> element with the
runat="server" attribute. This form contains the majority of the page's HTML. None of the user controls have a
server-side
<form> element. This is important because <form> elements cannot be nested, so the single form must
include all user control code. If you attempt to define a
<form> element with the runat="server" attribute anywhere
within the outer
<form> element, you will generate an error.
Using C# for the User Controls and Code
The first line of all our pages in IBuyAdventure contains the
@Page directive:
<%@ Page Language="C#" Inherits="IBuyAdventure.PageBase"
src="components/stdpage.cs" %>
We first saw this kind of directive in Chapter 4. The one we're using here informs the ASP.NET compiler of two key points
about our pages:
All of the page code is written using C#. (Although we could just as easily have used many other languages.)
Each page uses 'code behind', and derives from the .NET class PageBase that provides common functionality.
The main motivation for using C# to write the IBuyAdventure application was to show that it really isn't so different from
JScript and Visual Basic, and it is easy to read and understand. ASP.NET, itself, is written in C#, which indicates that it has
a solid future ahead of it. Since all .NET languages compile down to MSIL before they are executed. It really doesn't matter
which language the code is written in - as we said earlier in the book, you should use the one that you're most comfortable
with.
The 'code behind' class specified using the
Inherits and src attributes, causes the ASP.NET compiler to create a page
that derives from the class PageBase rather than Page. The implementation of PageBase is very simple:
using System;
using System.Collections;
using System.Web.UI;
using System.Web.Security;
using System.Configuration;
namespace IBuyAdventure
{
public class PageBase : Page
{
public string getConnStr() {
string dsn;
dsn = ConfigurationSettings.AppSettings["connectionString"];
return dsn;
}
}
}
By deriving each page from this class we make the getConnStr function available within each of our ASP.NET pages. This
function retrieves the database connection string from the
web.config file, and is called in our pages when constructing
business objects that connect to the back-end data source. The web.config file is cached, so accessing it frequently in
our pages should not have any detrimental effect on performance. Should you want to cache just the connection string
you could use the data cache to hold it, only accessing the
web.config file initially to retrieve the value when creating
the cache entry:
public String getConnStrCached() {
string connectionString;
// Check the Cache for the ConnectionString
connectionString = (string) Context.Cache["connectionString"];
// If the ConnectionString is not in the cache, fetch from Config.web
if (connectionString == null) {
connectionString =
ConfigurationSettings.AppSettings["connectionString"];
//store to cache
Cache["connectionString"] = connectionString;
}
return connectionString;
}
One point to consider when using the data cache is that the values held within it will be updated if somebody changes the
web.config file. ASP.NET automatically creates a new application domain and essentially restarts the web application to
handle all new web requests when the
web.config file is changed. As this results in a new data cache being created, the
new connection string will be cached after the first call to
getConnStrCached.
As discussed in Chapter 13, applications settings should always be stored in the
appsettings section of web.config.
Values within that section are cached automatically.
However, should you decide to store application configuration in another location (maybe your own XML file on a central
server) you can still invalidate the cache when your files change by creating a file dependency. This allows a cache item
to be automatically flushed from the cache when a specific file changes:
//store to cache
Cache.Insert("connectionString", connectionString,
new CacheDependency(Server.MapPath("\\someserver\myconfig.xml")));
File dependencies are just one of the cache dependency types ASP.NET supports. The other types supported include:
Scavenging - Flushing cache items based upon their usage, memory consumption, and rating.
Expiration - Flushing cache items at a specific time or after a period of inactivity/access
File and key dependencies - Flushing cache items when either a file changes or another cache entry changes.
For more details about caching see Chapter 12.
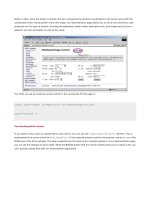
The Specials User Control - Special.ascx
As you might have noticed, the
default.aspx page we saw earlier, which implements the welcome page, actually uses
an additional user control (
UserControl\Special.ascx ) to display today's special product, so the page structure is
slightly more complex than it would otherwise be:
The product on offer is stored in the web.config file, making it easy for the site administrator to change the product
displayed:
<configuration>
<appSettings>
<add key="connectionString"
value="server=localhost;uid=sa;pwd=;database=IBuyAdventure" />
<add key="specialOffer" value="AW048-01" />
</appSettings>
</configuration>
The Special user control reads this value in its Page_Load event handler, retrieving the product information using the
ProductDB component and then updates the page using server-side controls:
<%@ Control Inherits="IBuyAdventure.ControlBase" src=" /components/stdctrl.cs" %>
<%@ Import Namespace="System.Data" %>
<%@ Import Namespace="System.Configuration" %>
<script language="C#" runat="server">
void Page_Load(Object sender, EventArgs e) {
// Obtain today's special product.
IBuyAdventure.ProductsDB inventory =
new IBuyAdventure.ProductsDB(getConnStr());
string specialOffer;
specialOffer = ConfigurationSettings.AppSettings["specialOffer"];
DataSet specialDetails = inventory.GetProduct(specialOffer);
// Update UI with product details
ProductImageURL.Src = Context.Request.ApplicationPath + "/images/" +
(String) specialDetails.Tables[0].Rows[0]["ProductImageURL"];
ProductName.Text =
(String) specialDetails.Tables[0].Rows[0]["ProductName"];
ProductDescription.Text =
(String) specialDetails.Tables[0].Rows[0]["ProductDescription"];
ProductCode.Text =
(String) specialDetails.Tables[0].Rows[0]["ProductCode"];
UnitPrice.Text = String.Format("{0:C}",
specialDetails.Tables[0].Rows[0]["UnitPrice"]);
OrderAnchor.HRef = Request.ApplicationPath +
"/ShoppingCart.aspx?ProductCode=" +
(String) specialDetails.Tables[0].Rows[0]["ProductCode"];
if ( (int) specialDetails.Tables[0].Rows[0]["OnSale"] == 0 )
sale.Visible = false;
}
</script>