Professional ASP.NET 1.0 Special Edition- P45 pdf
Bạn đang xem bản rút gọn của tài liệu. Xem và tải ngay bản đầy đủ của tài liệu tại đây (531.12 KB, 40 trang )
if (Request.Params["ProductCode"] != null) {
cart.AddShoppingCartItem(
GetCustomerID(), Request.Params["ProductCode"]);
}
PopulateShoppingCartList();
UpdateSelectedItemStatus();
}
}
The ProductCode parameter is optional because the shopping cart can also be displayed by clicking on the shopping cart
symbol shown in the navigation bar. If this is the method by which the page is accessed, then we don't want to add any
items to the shopping cart. The
CustomerID function used here returns the unique ID for the current customer, which is
then passed as a parameter to the
AddShoppingCartItem function. If the customer has not registered and logged in,
the ID returned by the
CustomerID function is the current ASP.NET session ID; otherwise it is the current user name:
String GetCustomerID() {
if (User.Identity.Name != "") {
return Context.User.Identity.Name;
}
else {
if (Session["AnonUID"] == null)
Session["AnonUID"] = Guid.NewGuid();
return Session["AnonUID"].ToString();
}
}
The implementation of the AddShoppingCartItem method of the CartDB business object is worth reviewing at this
point, because it contains two interesting sections of code:
public void AddShoppingCartItem(string customerName, string productCode) {
DataSet previousItem = GetShoppingCartItem(customerName, productCode);
if (previousItem.Tables[0].Rows.Count > 0) {
UpdateShoppingCartItem((int)
previousItem.Tables[0].Rows[0]["ShoppingCartID"],
((int)previousItem.Tables[0].Rows[0]["Quantity"]) + 1);
}
else {
IBuyAdventure.ProductsDB products;
products = new IBuyAdventure.ProductsDB(m_ConnectionString);
DataSet productDetails = products.GetProduct(productCode);
String description =
(String) productDetails.Tables[0].Rows[0]["ProductDescription"];
String productName =
(String) productDetails.Tables[0].Rows[0]["ProductName"];
double unitPrice =
(double) productDetails.Tables[0].Rows[0]["UnitPrice"];
String insertStatement = "INSERT INTO ShoppingCarts (ProductCode, "
+ "ProductName, Description, UnitPrice, CustomerName, "
+ "Quantity) values ('" + productCode + "', @productName, "
+ "@description, " + unitPrice + ", '" + customerName + "' , 1)";
SqlConnection myConnection = new SqlConnection(m_ConnectionString);
SqlCommand myCommand = new SqlCommand(insertStatement, myConnection);
myCommand.Parameters.Add(
new SqlParameter("@ProductName", SqlDbType.VarChar, 50));
myCommand.Parameters["@ProductName"].Value = productName ;
myCommand.Parameters.Add(
new SqlParameter("@description", SqlDbType.VarChar, 255));
myCommand.Parameters["@description"].Value = description;
myCommand.Connection.Open();
myCommand.ExecuteNonQuery();
myCommand.Connection.Close();
}
}
The first interesting point about the code is that it checks if the item is already in the shopping cart by calling
GetShoppingCartItem, and if it does already exist, it simply increases the quantity for that item and updates it in the
database using the
UpdateShoppingCartItem function.
The second interesting point comes about because the ADO.NET code that adds a new cart item uses the
SqlCommand
class. Since the IBuyAdventure product descriptions can contain single quotes, we need to ensure that any quotes within
the description do not conflict with the quotes used to delimit the field. To do this we use the
SqlCommand object to
execute our query, making use of parameters in our SQL, like
@description, to avoid any conflict. The values for the
parameters are then specified using the
Parameters collections of the SqlCommand object:
myCommand.Parameters.Add(
new SqlParameter("@description", SqlDbType.VarChar, 255));
Once the SQL statement is built, the command object can be connected, the statement executed, and then disconnected:
myCommand.Connection.Open();
myCommand.ExecuteNonQuery();
myCommand.Connection.Close();
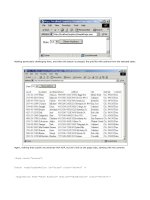
Displaying the Shopping Cart and Changing an Order
The shopping cart allows customers to specify a quantity for each product in the cart, and displays the price per item, and
total price for the quantity ordered. At any time, a customer can change the order quantity or remove one or more items
from the cart by checking the
Remove box and clicking Recalculate. An item will also be removed if the customer enters
a quantity of zero.
To implement this functionality, we have used the
asp:Repeater control. Implementing this functionality in straight ASP
pages isn't an easy task, and requires significant code. In ASP.NET it is fairly simple.
The
asp:Repeater control was used as the base for building the shopping cart as it doesn't need to use any of the
built-in selection and editing functionality provided by the other list controls such as the asp:DataList and
asp:DataGrid. All of the items are always checked and processed during a postback, and the cart contents (the dataset
bound to the
asp:Repeater control) is always generated during each postback.
The
asp:Repeater control is also 'lookless' (it only generates the HTML element that we specify using templates), which
fits in well with the design our shopping cart page - we don't need a complete table to be generated by the control (the
table's start and header rows are part of the static HTML).
Data Source/HTML/ASPX for the Shopping Cart
The shopping cart data source is provided by the
CartDB component, which is bound to the myList asp:repeater
control:
void PopulateShoppingCartList() {
IBuyAdventure.CartDB cart = new IBuyAdventure.CartDB(getConnStr());
DataSet ds = cart.GetShoppingCartItems(GetCustomerID());
MyList.DataSource = ds;
MyList.DataBind();
The HTML used to render the shopping cart, including the ItemTemplate rendered for each item in the
MyList.DataSource is shown next, although some parts of the HTML page formatting (for example the font settings)
have been removed to keep it short and easily readable:
<table colspan="8" cellpadding="5" border="0" valign="top">
<tr valign="top">
<td align="center" bgcolor="#800000">Remove</td>
<td align="center" bgcolor="#800000">Product Code</td>
<td align="center" bgcolor="#800000">Product Name</td>
<td align="center" bgcolor="#800000" width="250">Description</td>
<td align="center" bgcolor="#800000">Quantity</td>
<td align="center" bgcolor="#800000">Unit Price</td>
<td align="center" bgcolor="#800000">Unit Total</td>
</tr>
<asp:Repeater id="MyList" runat="server">
<itemtemplate>
<tr>
<td align="center" bgcolor="#f7efde">
<asp:checkbox id="Remove" runat="server" />
</td>
<td align="center" bgcolor="#f7efde">
<input id="ShoppingCartID" type="hidden"
value= '<%#DataBinder.Eval(Container.DataItem,"ShoppingCartID", "{0:g}")%>'
runat="server" />
<%#DataBinder.Eval(Container.DataItem, "ProductCode")%>
</td>
<td align="center" bgcolor="#f7efde">
<%#DataBinder.Eval(Container.DataItem, "ProductName")%>
</td>
<td align="center" bgcolor="#f7efde">
<%#DataBinder.Eval(Container.DataItem, "Description")%>
</td>
<td align="center" bgcolor="#f7efde">
<asp:textbox id="Quantity"
text='<%#DataBinder.Eval(
Container.DataItem, "Quantity", "{0:g}")%>' width="30"
runat="server" />
</td>
<td align="center" bgcolor="#f7efde">
<asp:label id="UnitPrice" runat="server">
<%#DataBinder.Eval(Container.DataItem, "UnitPrice", "{0:C}")%>
</asp:label>
</td>
<td align="center" bgcolor="#f7efde">
<%# String.Format("{0:C}", (((int)DataBinder.Eval(Container.DataItem, "Quantity"))
* ((double) DataBinder.Eval(Container.DataItem, "UnitPrice")) )) %>
</td>
</tr>
</itemtemplate>
</asp:Repeater>
<tr>
<td colspan="6"></td>
<td colspan="2" align="right">
Total is <%=String.Format(fTotal.ToString(), "{0:C}") %>
</td>
</tr>
<tr>
<td colspan="8" align="right">
<asp:button text="Recalculate" OnClick="Recalculate_Click" runat="server" />
<asp:button text="Go To Checkout" OnClick="Checkout_Click" runat="server" />
</td>
</tr>
</table>
The code shown above is similar to that which we have seen earlier, so it should be easy to follow. The important point to
note is that all the fields that need to be available when a postback occurs are marked with the
id and runat="server"
attributes. When the customer causes a postback by pressing the
Recalculate button, the ASP.NET page can access the
Remove checkbox control, the database cart ID hidden field control, and the Quantity field control for each list item, and
update the database accordingly.
For each row in the
ShoppingCarts table for this customer, the asp:Repeater control will contain a list item
containing these three controls, which can be programmatically accessed:
To associate each list item within the asp:Repeater control with a specific database cart item, a hidden field is used to
store the unique ID for the entry:
<input id="ShoppingCartID" type="hidden"
value='<%#DataBinder.Eval(
Container.DataItem, "ShoppingCartID", " {0:g}") %>'
runat="server">
As discussed earlier, the contents of the shopping cart are always stored in the SQL Server table named ShoppingCarts,
and manipulated using the business object named
CartDB. To populate the shopping cart with items, the ASP.NET page
invokes the
PopulateShoppingCartList function. This occurs when the page is loaded for the first time (that is, when
Page.PostBack is false), and after each postback that leads to the database being modified - items added, deleted,
or changed. To retrieve the cart items and data bind the
asp:Repeater control, this function uses the
GetShoppingCartItems method of the CartDB object:
void PopulateShoppingCartList() {
IBuyAdventure.CartDB cart = new IBuyAdventure.CartDB(getConnStr());
DataSet ds = cart.GetShoppingCartItems(GetCustomerID());
MyList.DataSource = ds;
MyList.DataBind();
Once the list is bound, the dataset is then enumerated to calculate the total value of the items within the cart:
DataTable dt;
dt = ds.Tables[0];
int lIndex;
double UnitPrice;
int Quantity;
for ( lIndex =0; lIndex < dt.Rows.Count; lIndex++ ) {
UnitPrice = (double) dt.Rows[lIndex]["UnitPrice"];
Quantity = (int) dt.Rows[lIndex]["Quantity"];
if ( Quantity > 0 ) {
fTotal += UnitPrice * Quantity;
}
}
}
The total stored in the fTotal parameter is defined as a Double earlier in the page definition:
// Total for shopping basket
double fTotal = 0;
and then referenced by inline code that executes just after the asp:Repeater control:
</asp:repeater>
<tr>
<td colspan="6"></td><td colspan="2" align="right">
Total is <%=String.Format("{0:C}", fTotal ) %>
</td>
</tr>
When customers change the order quantity for products in their cart, or marks items to be removed, they click the
Recalculate button. This button was created using the asp:button control with its OnClick event wired up to the
Recalculate_Click function:
<asp:button text="Recalculate" OnClick="Recalculate_Click" runat="server" />
The Recalculate_Click function updates the database based on the changes users made to the quantities, and the
items they have added or deleted. It then retrieves the updated cart items from the database, rebinds the repeater control
to the updated data set, and finally creates a status message informing the user how many items (if any) are currently in
the cart. These functions are, in turn, delegated within the event handler to three different functions:
void Recalculate_Click(Object sender, EventArgs e) {
// Update Shopping Cart
UpdateShoppingCartDatabase();
// Repopulate ShoppingCart List
PopulateShoppingCartList();
// Change status message
UpdateSelectedItemStatus();
}
The UpdateShoppingCartDatabase method is called first in the event handler, when the postback data for the
asp:Repeater control describing the cart, and any changes made, will be available. The function can therefore access
this postback data and make any database updates and deletions that may be required. Next, calling
PopulateShoppingCartList causes the shopping cart to be re-read from the database and bound to the
asp:Repeater control. This will cause the page to render an updated view of the cart to the user.
To perform the required database updates, the
UpdateShoppingCartDatabase function iterates through each of the
list items (the rows) within the asp:Repeater control and checks each item to see if it should be deleted or modified:
void UpdateShoppingCartDatabase() {
IBuyAdventure.ProductsDB inventory =
new IBuyAdventure.ProductsDB(getConnStr());
IBuyAdventure.CartDB cart = new IBuyAdventure.CartDB(getConnStr());
for (int i=0; i<MyList.Items.Count; i++) {
TextBox quantityTxt =
(TextBox) MyList.Items[i].FindControl("Quantity");
CheckBox remove =
(CheckBox) MyList.Items[i].FindControl("Remove");
HtmlInputHidden shoppingCartIDTxt =
(HtmlInputHidden) MyList.Items[i].FindControl("ShoppingCartID");
int Quantity = Int32.Parse(quantityTxt.Text);
if (remove.Checked == true || Quantity == 0)
cart.DeleteShoppingCartItem(
Int32.Parse(shoppingCartIDTxt.Value));
else {
cart.UpdateShoppingCartItem(
Int32.Parse(shoppingCartIDTxt.Value), Quantity );
}
}
This code takes a brute-force approach by updating every item in the shopping cart that isn't marked for deletion. In a
commercial application, you should consider having a hidden field that stores the original quantity and only updates items
when the two quantity fields differ. This could potentially reduce database I/O considerably if you have users who keep
changing their order quantities and deleting items. Another alternative would be to handle the
OnChange events for the
controls in the list, and only update the database when events are invoked.
Checkout Processing and Security
When customers are ready to commit to purchasing the goods that are currently in their shopping cart, they can click the
Go to Checkout button in the shopping cart page, or click the shopping basket image located on the navigation bar. The
security system used in IBuyAdventure takes advantage of forms-based authentication (also called cookie-based
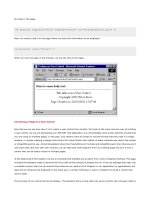
security), as introduced in Chapter 14. When a customer hits any of the pages that require authentication, if they haven't
already signed in, the page
login.aspx is displayed:
The ASP.NET runtime knows to display this page if a user is not logged in because all pages that require authentication are
located in a directory called
SECURE. It contains a web.config file, which specifies anonymous access is not allowed:
<configuration>
<system.web>
<authorization>
<deny users="?" />
</authorization>
</system.web>
</configuration>
Remember that '
?' means 'anonymous users'.
Using a specific directory to contain secure items is a simple yet flexible way of implementing security in ASP.NET
applications. When the ASP.NET runtime determines that an anonymous user is trying to access a page in a secure
directory of our application, it knows which page to display because the
web.config file located in the root directory has
a
cookie element with a loginurl attribute that specifies it:
<configuration>
<system.web>
<authentication mode="Forms">
<forms name=".ibuyadventurecookie" loginUrl="login.aspx"
protection="All" timeout="60">
</forms>
</authentication>
<authorization>
<allow users="*" />
</authorization>
</system.web>
</configuration>
This configuration basically says, if the .ibuyadventurecookie cookie is present and it has not been tampered with,
the user has been authenticated and so can access secure directions, if authorized; if not present, redirect to the URL
specified by
loginurl.
Forms-Based Authentication in Web Farms
For forms-based authentication to work within a web farm environment, the
decryptionkey attribute of the cookie
element must be set, and not left blank or specified as the default value of
autogenerate. The decryptionkey
attribute should be set the same on all machines within the farm. The length of the string is 16 characters for DES
encryption (56/64 bit), or 48 characters for Triple-DES encryption (128 bit). If you do use the default value it will cause
a different encryption string to be generated by each machine in the farm, and cause the session authentication to fail
between different machines as a user moves between servers. If this happens a
CryptographicException will be
thrown and the user will be presented with a screen saying the data is bad, or could not be decoded.
The Login.aspx Page Event Handlers
The
Login button on the login form is created using an asp:button control, which has the OnClick event wired up to
the
LoginBtn_Click event handler:
<td colspan="2" align="right">
<asp:button Text=" Login " OnClick="LoginBtn_Click" runat="server" />
</td>
When the button is clicked, the LoginBtn_Click event handler is invoked. It validates users, and then redirects them
to the original page. The validation and redirection code is shown here:
void LoginBtn_Click(Object sender, EventArgs e) {
IBuyAdventure.UsersDB users = new IBuyAdventure.UsersDB(getConnStr());
IBuyAdventure.CartDB cart = new IBuyAdventure.CartDB(getConnStr());
if (users.ValidateLogin(UserName.Text, Password.Text)) {
cart.MigrateShoppingCartItems(Session.SessionID, UserName.Text);
FormsAuthentication.RedirectFromLoginPage(
UserName.Text, Persist.Checked);
}
else {
Message.Text =
"Login failed, please check your details and try again.";
}
}
The code initially creates the two business objects that are required, using the 'code behind' function getConnStr to
collect details of the data source to connect to. Once the
UsersDB object is created, its ValidateLogin method is
invoked to determine if the user credentials are OK (the user details are stored in the
Account table rather than the
web.config file). If the details are invalid, the Text property of the Message control is updated to show the error. If the
login is successful, the following steps occur:
• The client is marked as authenticated by calling the RedirectFromLoginPage method of the
FormsAuthentication object, which we discussed in Chapter 14.
• This causes the cookie named .ibuyadventurecookie to be sent back to the client, so we know from here on
in that the client has been authenticated.
• The user is redirected back to the page that initially caused the login form to be displayed.
If customers have previously registered, they can login via the
Login page. This will then redirect them back to the original
page that caused the
Login page to be displayed. This redirection code is actually implemented by the Login page we have
created, and does require some extra work on our part. We will see this next.
Handling Page Return Navigation During Authentication
When the ASP.NET runtime determines that a secure item has been accessed, it will redirect the user to our
Login page,
and include a query string parameter named ReturnURL. As the name suggests, this is the page that we will redirect
users to once we are happy that they should be allowed access to it. When displaying our page, we need to save this value,
as it will be lost during the postbacks where we validate the user. The approach used in our page is to store the value in
a hidden field during the
Page_Load event:
void Page_Load(Object sender, EventArgs e)
{
// Store Return Url in Page State
if (Request.QueryString["ReturnUrl"] != null)
{
ReturnUrl.Value = Request.QueryString["ReturnUrl"];
((HyperLink)RegisterUser).NavigateUrl =
"Register.aspx?ReturnUrl=" + ReturnUrl.Value;
}
}
The hidden field is defined as part of the Login form, and includes the runat="server" attribute so that we can
programmatically access it in our event handlers:
<input type="hidden" value="/advworks/default.aspx"
id="ReturnUrl" runat="server" />
We have given the hidden field a default value, as it is possible for the user to go directly to the login page via the
navigation bar. Without a default value, the redirection code that is executed after login would not work.
So, when customers click the
Login button, we can validate their details and then redirect them to the page whose value
is stored in the ReturnUrl hidden control.
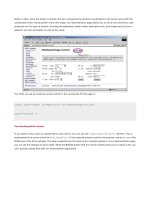
First Time Customer - Registration
If customers have not registered with our application before, they can click the
Registration hyperlink, and will be
presented with a user registration form to fill in:
We have kept the form simple for this case study, and only ask for an email address and password. In a commercial
application, this form would probably include additional information such as the name and address of the customer.
As the registration page (
Register.aspx) is opened from a hyperlink in the login page (login.aspx), we have to
ensure that we pass on the
ReturnUrl parameter, so that the registration page knows where to redirect users once they
have completed the form. To do this, we dynamically create the hyperlink in the registration form during the Page_Load
event of the login page:
((HyperLink)RegisterUser).NavigateUrl =
"Register.aspx?ReturnUrl=" + ReturnUrl.Value;
We also need to make sure that the hyperlink is marked as a server control in the login.aspx page:
<font size="2">
<asp:HyperLink NavigateUrl="Register.aspx" id="RegisterUser"
runat="server" />
Click Here to Register New Account
</asp:hyperlink>
</font>
Those of you with a keen eye will have spotted that customers can actually log in at any time by clicking the Sign In /
Register
hyperlink located in the page header. Once a user is successfully authenticated, this hyperlink changes to say
Sign Out:
The sign in or out code is implemented in the header user control (UserControl/header.ascx) where the Page_Load
event handler dynamically changes the text of the signInOutMsg control, depending on the authentication state of the
current user:
<%@ Import Namespace="System.Web.Security" %>
<script language="C#" runat="server">
private void Page_Load( Object Sender, EventArgs e ) {
updateSignInOutMessage();
}
private void SignInOut( Object Sender, EventArgs e ) {
if ( Context.User.Identity.Name != "" ) {
IBuyAdventure.CartDB cart =
new IBuyAdventure.CartDB(
ConfigurationSettings.AppSettings["connectionString"]);
cart.ResetShoppingCart(GetCustomerID());
FormsAuthentication.SignOut();
Response.Redirect("/IBuyAdventure/default.aspx");
}
else {
Response.Redirect("/IBuyAdventure/login.aspx");
}
}
private void updateSignInOutMessage() {
if ( Context.User.Identity.Name != "" ) {
signInOutMsg.Text = "Sign Out (" + Context.User.Identity.Name+ ")";
}
else {
signInOutMsg.Text = "Sign In / Register";
}
}
</script>
The updateSignInOutMessage function actually updates the text, and the SignInOut method is called when the user
clicks the sign in/out text. If a user is signing out, the
CookieAuthentication.SignOut function is called to invalidate
the authentication cookie. If signing in, the user is redirected to the login page.
The
SignInOut code is wired up as part of the control declaration:
<td>
<asp:linkbutton style="font:8pt verdana" id="signInOutMsg"
runat="server" OnClick="SignInOut" />
</td>
Checkout Processing
Once a customer is authenticated, they are taken to the checkout page (
secure/checkout.aspx), presented with their
shopping list, and asked to confirm that the list is correct:
The checkout page uses very similar code to the ShoppingCart.aspx page, except we have omitted the controls that
allow the customer to remove items or edit the order quantities. If the customer confirms an order by pressing the
Confirm
Order button, a new database record is created for the order containing the date, and the total order value. Then the
current shopping basket is cleared, and the customer is presented with a confirmation screen:
The code invoked for confirming an order is shown next:
void Confirm_Order(Object sender, EventArgs e) {
IBuyAdventure.CartDB cart = new IBuyAdventure.CartDB(getConnStr());
double totalOrderValue;
totalOrderValue = cart.GetOrderValueForCart(GetCustomerID());
IBuyAdventure.OrdersDB orders = new IBuyAdventure.OrdersDB(getConnStr());
orders.AddNewOrder(GetCustomerID(), DateTime.Now.ToString("G",
DateTimeFormatInfo.InvariantInfo), totalOrderValue );
cart.ResetShoppingCart( GetCustomerID() );
Response.Redirect("confirmed.aspx");
}