Learning Web Design Third Edition- P31 pot
Bạn đang xem bản rút gọn của tài liệu. Xem và tải ngay bản đầy đủ của tài liệu tại đây (596.12 KB, 10 trang )
Part III: CSS for Presentation
286
Floating
a b c d e f g h i j k l m n o p q r s t u v w x y z
Inline content reflows to fit the width of the block.
a b c d e f g h i j k l
m n o p q r s t u v
w x y z
Blocks fill the available width.
Blocks are layed out in the
order in which they appear in
the source.
Each block starts on a new line.
<p>
<h1>
<p>
<p>
<p>
<h1>
<p>
<p>
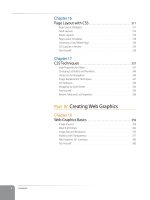
Figure 15-1. One more example of the normal flow behavior.
Objects in the normal flow affect the layout of the objects around them. This
is the behavior you’ve come to expect in web pages—elements don’t overlap
or bunch up, they make room for one another.
We’ve seen all of this before, but in this chapter we’ll be paying attention to
whether elements are in the flow or removed from the flow. Floating and
positioning changes the relationship of elements to the normal flow in dif-
ferent ways. Let’s first look at the special behavior of floated elements (or
“floats” for short).
Floating
Simply stated, the float property moves an element as far as possible to the
left or right, allowing the following content to wrap around it. It is not a posi-
tioning scheme per se, but a unique feature built into CSS with some interest-
ing behaviors. Floats are one of the primary tools of modern CSS-based web
design, used to create multicolumn layouts, navigation toolbars from lists,
and table-like alignment without tables. It’s exciting stuff. Let’s start with the
float property itself.
float
Values:
left
|
right
|
none
|
inherit
Default:
none
Applies to:
all elements
Inherits:
no
The best way to explain floating is to demonstrate it. In this example, the
float property is applied to an img element to float it to the right. Figure 15-2
shows how the the paragraph and the contained image is rendered by default
(top) and how it looks when the float property is applied (bottom).
Dealing with
Browser Bugs
This is a good time to address the
unfortunate topic of browser bugs.
This book presents the way CSS is
supposed
to work, but in reality,
browsers have bugs and uneven
support for the CSS2.1 standard that
make getting a layout to behave
consistently a major headache.
Although no browser is perfect, all
eyes turn to Internet Explorer for
Windows because it makes up the
lion’s share of web traffic (over 80%
as of this writing). It also has a host
of notorious bugs related to page
layout such as the IE5/5.5 Box Model
Problem, the “Guillotine Bug,” the
“Peekaboo Bug,” and the “Double
Float-Margin Bug,” just to name a
few.
Unfortunately, the techniques for
dealing with browser bugs are
beyond the scope of this book (in
fact, they could fill a small book
in themselves). In addition, bug
workaround best practices change
frequently, so information in a book
is likely to get stale.
However, I do encourage you to
become famiilar with the ways your
pages (especially those with floats
and positioned elements) are likely
to misbehave in popular browsers.
In many cases, you can adapt your
design to avoid the bug. There are
also techniques for giving specific
browsers the CSS rules they need (or
make sure they don’t get the ones
they don’t understand).
The following resources are good
starting places to get up to speed
on the browser issues developers
care about most, and what fixes are
available.
Floating
Chapter 15, Floating and Positioning
287
The markup
<p><img src="crown.gif" alt="" />They went down, down, </p>
The style sheet
img {
float: right;
}
p {
padding: 15px;
background-color: #FFF799;
border: 2px solid #6C4788;
}
image moves over and text wraps around it
Inline image in the normal flow
Inline image floated to the right.
space next to the image is held clear
Figure 15-2. The layout of an image in the normal flow (top), and with the float
property applied (bottom).
That’s a nice effect we’ve gotten rid of a lot of wasted space on the page,
but now the text is bumping right up against the image. How do you think
you would add some space between the image element and the surrounding
text? If you guessed “add a margin,” you’re absolutely right. I’ll add 10 pixels
of space on all sides of the image using the margin property (Figure 15-3). You
can begin to see how all the box properties work together in page layout.
img {
float: right;
margin: 10px;
}
. . . continued from previous page
Position Is Everything
www.positioniseverything.net
This site run by Big John and
Holly Bergevin explains browser
bugs and “interesting browser
behaviors.” Note that some of the
solutions on this site (the well-
known “Holly Hack” in particular)
are being reconsidered now that
the release of Internet Explorer
7 makes them obsolete or
problematic. Be sure to check the
home page for the latest updates
and information.
Quirksmode Bug Reports
www.quirksmode.org/bugreports/
Peter Paul Koch has created a
repository where anyone can
note browser bugs and discuss
workarounds. The archive of bugs
is searchable by browser version.
CSS-discuss Wiki
css-discuss.incutio.com
The css-discuss mailing list site
maintains an archive of links
to sites related to CSS “hacks.”
See css-discuss.incutio.com/
?page=CssHack and css-discuss.
incutio.com/?page=BrowserBugs
Web Standards Group
webstandardsgroup.org/resources/
The Web Standards Group keeps
a list of up-to-date links to CSS
browser bugs. Look for the link
on the Resources page.
IE5/Mac Bugs and Fixes
www.macedition.com/cb/
ie5macbugs/index.html
A good resource if your traffic
logs indicate you should provide
page layout support for IE5/Mac
(the most CSS-compliant browser
for Mac OS 9 users).
Part III: CSS for Presentation
288
Floating
Indicates outer margin edge
(this rule would not appear in the actual web page)
Figure 15-3. Adding a 10-pixel margin around the floated image.
Some key behaviors of floated elements are apparent in the previous two figures:
A floated element is like an island in a stream.
First and foremost, you can see that the image is both removed from its
position in the normal flow, yet continues to influence the surrounding
content. The subesquent paragraph text reflows to make room for the
floated img element. One popular analogy compares floats to islands in a
stream—they are not in the flow, but the stream has to flow around them.
This behavior is unique to floated elements.
Floats stay in the content area of the containing element.
It is also important to note that the floated image is placed within the
content area (the inner edges) of the paragraph that contains it. It does
not extend into the padding area of the paragraph.
Margins are maintained.
In addition, the margin is held on all sides of the floated image, as indi-
cated in Figure 15-3 by the blue, dotted line. In other words, the entire
element box, from outer edge to outer edge, is floated.
More floating examples
Those are the basics let’s look at more examples and explore some additional
floating behaviors. Before style sheets, the only thing you could float was an
image by using the deprecated align attribute. With CSS, it is possible to
float any (X)HTML element, both inline and block-level, as we’ll see in the
following examples.
Floating an inline text element
In the previous example, we floated an inline image element. This time, let’s look at
what happens when you float an inline text (non-replaced) element (Figure 15-4).
The markup
<p><span class="disclaimer">Disclaimer: The existence of silver, gold,
and diamond trees is not confirmed.</span>They went down, down, down,
till at last they came to a passage </p>
Floating
Chapter 15, Floating and Positioning
289
The style sheet
span.disclaimer {
float: right;
margin: 10px;
width: 200px;
color: #FFF;
background-color: #9D080D;
padding: 4px;
}
p {
padding: 15px;
background-color: #FFF799;
border: 2px solid #6C4788;
}
Figure 15-4. Floating an inline text (non-replaced) element.
From the looks of things, it is behaving just the same as the floated image,
which is what we’d expect. But there are some subtle things at work here that
bear pointing out.
Always provide a width for floated text elements.
First, you’ll notice that the style rule that floats the span includes the width
property. In fact, it is necessary to specify a width for floated text elements
because without one, the content area of the box expands to its widest pos-
sible width (or, on some browsers, it may collapse to its narrowest possible
width). Images have an inherent width, so we didn’t need to specify a width
in the previous example (although we certainly could have).
Floated inline elements behave as block elements.
Notice that the margin is held on all four sides of the floated span text,
even though top and bottom margins are usually not rendered on inline
elements (see Figure 14-16 in the previous chapter). That is because all
floated elements behave like block elements. Once you float an inline ele-
ment, it follows the display rules for block-level elements, and margins are
rendered on all four sides. Margins on floated elements do not collapse,
however.
And speaking of block-level elements
It is necessary to specify
the width for floated text
elements.
It is necessary to specify
the width for floated text
elements.
Part III: CSS for Presentation
290
Floating
Floating block elements
Let’s look at what happens when you float a block within the normal flow. In
this example, a whole paragraph element is floated to the left (Figure 15-5).
The markup:
<p>ONCE upon a time </p>
<p id="float">As he had a white skin, blue eyes, </p>
<p>The fact was he thought them very ugly </p>
The style sheet:
p#float {
float: left;
width: 200px;
margin-top: 0px;
background: #A5D3DE;
}
p {
border: 1px solid red;
}
Figure 15-5. Floating a block-level element.
I’ve added a red rule around all p elements to show their boundaries. In addi-
tion, I set the top margin on the float to 0 (zero) to override the browser’s
default margin settings on paragraphs. This allows the floated paragraph to
align with the top of the following paragraph. There are a few other things I
want to point out in this example.
Just as we saw with the image, the paragraph moves off to the side (left this
time) and the following content wraps around it, even though blocks nor-
mally stack on top of one another. There are two things I want to point out
in this example.
You must provide a width for floated block elements.
If you do not provide a width value, the width of the floated block will be
set to auto, which fills the available width of the browser window or other
containing element. There’s not much sense in having a full-width floated
box since the idea is to wrap text next to the float, not start below it.
Floating
Chapter 15, Floating and Positioning
291
Elements do not float higher than their reference in the source.
A floated block will float to the left or right relative to where it occurs in
the source allowing the following elements in the flow to wrap around it.
It will stay below any block elements that precede it in the flow (in effect,
it is “blocked” by them). That means you can’t float an element up to the
top corner of a page, even if its nearest ancestor is the body element. If you
want a floated element to start at the top of the page, it must appear first
in the document source.
Floating multiple elements
It’s perfectly fine to float multiple elements on a page or even within a single
element. When you float multiple elements, there is a complex system of
behind-the-scenes rendering rules that ensure floated elements do not over-
lap. You can consult the CSS2.1 specification for the details, but the upshot of
it is that floated elements will be placed as far left or right (as specified) and
as high up as space allows.
Figure 15-6 shows what happens when a series of sequential paragraphs are
floated to the same side. The first three floats start stacking up from the left
edge, but when there isn’t enough room for the fourth, it moves down and to
the left until it bumps into something; in this case, the edge of the browser
window. However, if one of the floats, such as “P2,” had been very long, it
would have bumped up against the edge of the long float instead.
The source
<p>P1</p>
<p class="float">P2</p>
<p class="float">P3</p>
<p class="float">P4</p>
<p class="float">P5</p>
<p>P6</p>
<p>P7</p>
<p>P8</p>
<p>P9</p>
<p>P10</p>
The style sheet:
p#float {
float: left;
width: 200px;
margin: 0px;
background: #CCC;}
p {border: 1px solid red;}
This lining-up effect is used strategically in CSS-based web design to create
multicolumn layouts and horizontal navigation bars out of floated list items.
We’ll look at these techniques in Chapter 16, Page Layout with CSS and
Chapter 17, CSS Techniques, respectively.
N o t e
Absolute positioning is the CSS method
for placing elements on a page regardless
of how they appear in the source. We’ll
get to absolute positioning in just a few
sections.
N o t e
Absolute positioning is the CSS method
for placing elements on a page regardless
of how they appear in the source. We’ll
get to absolute positioning in just a few
sections.
N o t e
The CSS Recommendation lists a set of
complicated rules dictating the behavior
of multiple floated elements. If you are
experiencing strange floating behaviors,
you may want to go right to the source
and learn how they should behave at
www.w3.org/www.w3.org/TR/CSS21/
visuren.html#floats and www.w3.org/
TR/CSS21/visuren.html#float-position.
Elements floated to the
same side line up. If
there is not enough
room, subsequent
elements move down.
Figure 15-6. Multiple floated elements
line up and do not overlap.
Elements floated to the
same side line up. If
there is not enough
room, subsequent
elements move down.
Figure 15-6. Multiple floated elements
line up and do not overlap.
Part III: CSS for Presentation
292
Floating
Clearing floated elements
The last thing you need to know about floated elements is how to turn the
text wrapping off and get back to layout as usual. This is done by clearing the
element that you want to start below the float. Applying the clear property
to an element prevents it from appearing next to a floated element, and forces
it to start against the next available “clear” space below the float.
clear
Values:
left
|
right
|
both
|
none
|
inherit
Default:
none
Applies to:
block-level elements ony
Inherits:
no
Keep in mind that you apply the clear property to the element you want
to start below the floated element, not the floated element itself. The left
value starts the element below any elements that have been floated to the
left. Similarly, the right value makes the element clear all floats on the right
edge of the containing block. If there are multiple floated elements, and you
want to be sure an element starts below all of them, use the both value to
clear floats on both sides.
In this example, the clear property has been used to make h2 elements start
below left-floated elements. Figure 15-7 shows how the h2 heading starts at
the next available clear edge below the float.
img {
float: left;
margin-right: 10px;
}
h2 {
clear: left;
margin-top: 2em;
}
Figure 15-7. Clearing a left-floated element
N o t e
The clear property replaces the depre-
cated clear attribute once used in the br
element to clear aligned images.
N o t e
The clear property replaces the depre-
cated clear attribute once used in the br
element to clear aligned images.
Floating
Chapter 15, Floating and Positioning
293
Notice in Figure 15-7 that although there is a 2-em top margin applied to the
h2 element, it is not rendered between the heading and the floated image.
That’s the result of collapsing vertical margins. If you want to make sure space
is held between a float and the following text, apply a bottom margin to the
floated element itself.
It’s time to give floating a try in Exercise 15-1.
In this exercise, we’ll make further improvements to the
JenWARE home page that we worked on in Chapter 14. If you
did not follow along with the exercises in the previous chapter,
there is a fresh copy in its most recent state, called jenware_
2.html, in the Chapter 15 materials (www.learningwebdesign.
com/materials).
Open the JenWARE home page document in a text editor
and browser (it should look like Figure 14-18 in the previous
chapter).
We’ll start by removing wasted vertical space next to the
product images by floating the images to the left. We’ll use
a contextual selector to make sure that we only float the
images in the “products” section of the page. While we’re
at it, let’s add a little margin on the bottom and right sides
using the
margin
shorthand property.
#products img {
float: left;
margin: 0 6px 6px 0;
}
Save the document and take a look at it in the browser. You
should see the product descriptions wrapping to the right
of the images.
Next, I’d like the “Go to the (product) page” links to always
appear below the images so they are clearly visible on the
left side of the products section. This change is going to
require a little extra markup, because we need a way to
target just the paragraphs that contain “go to” links. Scroll
down to the markup section of the document and add the
class name “goto” to each of the paragraphs that contain
links. Here is the first one:
<p class="goto"><a href="#">Go to the GlassWARE
page </a></p>
Now we can use a class selector to make those paragraphs
clear the floated images.
#products p.goto {
clear: left;
}
1.
2.
Time to take on that “testimonials”
div
box. Instead of taking
up valuable space “above the fold,” let’s move it off to the
side and let the products section move up into the spotlight.
Start by removing the
margin
property and changing the
width
from 500 to 150 pixels. Finally, float the
div
to the
right with the
float
property. Figure 15-8 shows the results.
#testimonials {
float: right;
width: 500px 150px;
margin: 2em auto;
border: 1px dashed #F26521;
padding: 1em;
padding-left: 60px;
background: #FFBC53
url(images/ex-circle-corner. gif) no-repeat
left top;
line-height: 1.2em;
}
Figure 15-8. The results of floating the testimonials div.
There are some interesting behaviors to observe here. First,
let’s keep in mind that although it looks a little like the the
“testimonials”
div
is being floated in the products box, it is
actually floated within the content area of the
body
element
(the nearest block-level ancestor). This is the same floated block
element behavior we saw in Figure 15-6.
3.
exercise 15-1
|
Floating elements
Part III: CSS for Presentation
294
Floating
Look at how the “products”
div
behaves: its content wraps
around the float, but its element box (indicated by the border
and white background color) is not reshaped around the float.
In fact, the background of the “products”
div
appears to be
behind or under the floated box. This is the normal behavior
for floats and wrapped content: the content reflows, but the
element box is not changed.
The other behavior of note here is that the “testimonials”
div
was floated relative to its position in the source it can’t float up
higher than the block-level paragraph element that preceded
it. The testimonials box moved off to the right edge of the
body
content area, and the following
div
moved up in its space.
There is one last change to make to this page that’s going
to make a big difference in its appearance. Let’s add some
space between the products and textimonial areas so they
don’t appear to overlap. We’ll do this by adding a margin
on the right of the “products”
div
that is wide enough to
accommodate the “testimonials” box.
4.
How wide does the margin need to be? We’ll need to
calculate the width of the “testimonials” element box.
150
pixel width +
2
pixels of border +
60
pixels left padding
+ approximately
12
pixels (1 em) right padding = approx.
224
pixels
Setting the right margin on the “products”
div
to 250 pixels
should do the trick.
#products {
margin-right: 250px;
border: double #FFBC53;
padding: 2em;
background-color: #FFF;
line-height: 2em;
}
The results are shown in Figure 15-9. Hey, look at that! your first
two-column layout, created with a float and a wide margin. This
is the basic concept behind many CSS-based layout templates
as you’ll see in Chapter 16.
Figure 15-9. A new two-column layout for the JenWARE home
page, created with a float and a wide margin on the following
content.
Positioning Basics
Chapter 15, Floating and Positioning
295
That covers the fundamentals of floating. Let’s move on to the other approach
to moving elements around on the page—positioning.
Positioning Basics
CSS provides several methods for positioning elements on the page. They can
be positioned relative to where they would normally appear in the flow, or
removed from the flow altogether and placed at a particular spot on the page.
You can also position an element relative to the browser window (technically
known as the viewport in the CSS Recommendations) and it will stay put
while the rest of the page scrolls.
Unfortunately, not all positioning methods are well supported, and inconsis-
tent and buggy browser implementation can make it challenging to achieve
the results you’re after. The best thing to do is get acquainted with the way
positioning should work according to the specification, as we’ll do in the fol-
lowing sections, starting with the basic position property.
Types of positioning
position
Values:
static
|
relative
|
absolute
|
fixed
|
inherit
Default:
static
Applies to:
all elements
Inherits:
no
The position property indicates that an element is to be postioned, and
specifies which positioning method should be used. I’ll introduce each key-
word value briefly here, then we’ll take a more detailed look at each method
in the remainder of this chapter.
static
This is the normal positioning scheme in which elements are positioned
as they occur in the normal document flow.
relative
Relative positioning moves the box relative to its original position in the
flow. The distinctive behavior of relative positioning is that the space the
element would have occupied in the normal flow is preserved.
absolute
Absolutely positioned elements are removed from the document flow
entirely and positioned relative to a containing element (we’ll talk more
about this later). Unlike relatively positioned elements, the space they
would have occupied is closed up. In fact, they have no influence at all on
the layout of surrounding elements.
N o t e
Positioning is another CSS feature that
can trigger unexpected browser behavior.
Consult the sites listed in the Browser
Bugs sidebar for known browser bugs
and workarounds.
N o t e
Positioning is another CSS feature that
can trigger unexpected browser behavior.
Consult the sites listed in the Browser
Bugs sidebar for known browser bugs
and workarounds.