Learning Web Design Third Edition- P40 doc
Bạn đang xem bản rút gọn của tài liệu. Xem và tải ngay bản đầy đủ của tài liệu tại đây (503.11 KB, 10 trang )
Part IV: Creating Web Graphics
376
Image Size and Resolution
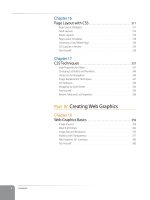
exercise 18-1
|
Resizing an image smaller in Photoshop
In this exercise, we’ll take a high-
resolution photo and size it to fit on a
web page. The source image, ninja.tif,
is available with the materials for this
chapter at www.learningwebdesign.
com/materials/.
Open the file ninja.tif in Photoshop.
A quick way to find the pixel
dimensions of the image is to open
the Image Size dialog box (Image
➝
Image Size) shown in Figure 18-17
A
. This image is 1600 x 1600 pixels,
which is too big for a web page.
Close the Image Size box for now
(we were only using it to peek at our
starting point). The Info window (not
shown) also shows pixel dimensions
when the whole image is selected.
Now we’ll resize the image and save
it as a JPEG in one fell swoop. Select
Save for Web & Devices from the
File menu. Because this image is a
photograph, select JPEG
B
from the
Formats pop-up menu. The default
High/60 compression setting is fine
for this example.
With the format chosen, it’s time
to get to the resizing. Click on the
Image Size tab in the bottom half
of the settings column
C
. Enter
the dimensions that you’d like the
final JPEG to be when it is saved.
I’m going to set the width to 400
pixels. When “constrain proportions”
is checked, the width changes
automatically when you enter the
new height.
Next, select the Quality
D
. I usually
go for Bicubic or Bicubic Sharper for
the best results then click Apply
E
.
You will see the resized image in the
Optimized Image view (select the
tab at the top if it isn’t already).
Click Save
F
, give the file a name,
and select a directory in which to
save it. You can close the original
image without saving, or save it to
preserve the Save for Web settings.
1.
2.
3.
4.
5.
A
You must click Apply to apply the
new dimensions. The Optimize view
shows the image at its new size.
The Image Size dialog box (Image
Image Size) is one way to view the
starting dimensions of the image. You
can also select the whole image and
look at the Info window (Window
Info, not shown)
Select the Image Size tab in the Save
for Web & Devices dialog box to enter
new dimensions for the exported
graphic.
B
C
D
E
F
Figure 18-17. Using the Save for Web & Devices dialog box to resize an image.
Working with Transparency
Chapter 18, Web Graphics Basics
377
Working with Transparency
Both GIF and PNG formats allow parts of an image to be transparent, allow-
ing the background color or image to show through. In this section, we’ll take
a closer look at transparent graphics, including tips on how to make them.
The first thing to know is that there are two types of transparency. In binary
transparency, pixels are either entirely transparent or entirely opaque, like an
on/off switch. Both GIF and PNG files support binary transparency.
In alpha (or alpha-channel) transparency, a pixel may be totally transparent,
totally opaque, or up to 254 levels of opaqueness in between (a total of 256
opacity levels). Only PNGs support alpha transparency. The advantage of
PNGs with alpha transparency is that they blend seamlessly with any back-
ground color or pattern, as shown back in Figure 18-11.
In this section, you’ll become familiar with how each type of transparency
works, and learn how to make transparent images using Photoshop.
How binary transparency works
Remember that the pixel colors for GIFs and PNG-8s are stored in an indexed
color table. Transparency is simply treated as a separate color, occupying a
position in the color table. Figure 18-18 shows the color table in Photoshop for
a simple transparent GIF. The slot in the color table that is set to transparent
is indicated by a checker pattern. Pixels that correspond to that position will
be completely transparent when the image displays in the browser. Note that
only one slot is transparent—all the other pixel colors are opaque.
Transparent pixels get a slot in
the indexed color table.
Figure 18-18. Transparency is treated as a color in the indexed color table.
Using Image Size
The disadvantage to the method
shown in Exercise 18-1 is that you
lose control over the quality of the
image. If you are an image quality
control freak (like me), you may
prefer resizing the image using the
Image Size dialog box (Figure 18-17
A
). In Fireworks, Modify
➝
Canvas
➝
Image Size gives you a similar set
of options.
Although you can set the pixel
dimensions right at the top, it is
better to take care of a few other
settings first.
Be sure that Resample Image and
Constrain Proportions are checked
at the bottom, select Bicubic (or
Bicubic Sharper) as the Quality
setting, then set the Resolution to 72
pixels/inch. Then enter the desired
final pixel dimensions at the top
of the box and click OK. Double-
clicking on the magnifying glass
tool (not shown) displays the resized
image at 100%.
Now you can apply sharpening
filters and other effects and use Save
For Web to output the image in a
web format.
I find that resizing a very large image
in a couple of steps helps preserve
quality. First, I resize it to an in-
between dimension and sharpen it
with a sharpening filter. Then I resize
it to its final dimensions and sharpen
again. You can’t do that with the
Save For Web method.
Remember that the Image Size
settings resize the
original
image.
Don’t save it, or you’ll lose your high-
quality version! Be sure to “Save As” in
order to keep a copy of your original.
Part IV: Creating Web Graphics
378
Working with Transparency
How alpha transparency works
RGB images, such as JPEGs and PNG-24s, store color in separate channels,
one for red, one for green, and one for blue. PNG-24 files add another chan-
nel, called the alpha channel, to store transparency information. In that chan-
nel, each pixel may display one of 256 values, which correspond to 256 levels
of transparency when the image is displayed. The black areas of the alpha
channel mask are transparent, the white areas are opaque, and the grays are
on a scale in between. I think of it as a blanket laid over the image that tells
each pixel below it how transparent it is (Figure 18-19).
Black areas in the alpha channel
correspond to transparent image areas;
white areas are opaque; and grays are
variable levels of transparency in between.
Original transparent image
Alpha
Red
Green
Blue
Figure 18-19. Transparency information is stored as a separate (alpha) channel in 24-bit
PNGs.
Making transparent GIFs and PNGs
The easiest way to make parts of an image transparent is to design them that
way from the start and preserve the transparent areas when you create the
GIF or PNG version of the image. Once again, Photoshop’s Save for Web &
Devices feature or Firework’s Optimize panel are perfect tools for the job.
It is possible to add transparent areas to a flattened opaque image, but it
may be difficult to get a seamless blend with a background. We’ll look at
the process for making portions of an existing image transparent later in this
section.
But first, follow along with the steps in Exercise 18-2 that demonstrates how
to preserve transparent areas and guarantee a good match with the back-
ground using Photoshop’s Save for Web & Devices dialog box. There are some
new concepts tucked in there, so even if you don’t do the exercise, I recom-
mend giving it a read, particularly steps 5, 6, and 7.
Internet Explorer
and Alpha
Transparency
Alpha transparency is really cool, but
unfortunately, it comes with one
major headache—it is not supported
in Internet Explorer 6 and earlier for
Windows. Users with those browsers
(and there are a
lot
of them) will see
the PNG as entirely opaque.
There is a workaround using
Microsoft’s proprietary
AlphaImageLoader filter. The details
of the process are beyond the scope
of this chapter, but these resources
are good places to start if you want
to ensure cross-browser support for
your transparent PNGs.
Start with the AlphaImageLoader
filter documentation on the MSDN
(Microsoft Developers Network) site
at msdn.microsoft.com/workshop/
author/filter/reference/filters/
alphaimageloader.asp.
These articles introduce variations
and alternative techniques:
“Cross-browser Variable Opacity
with PNG: A Real Solution,” by
Michael Lovitt at www.alistapart.
com/articles/pngopacity.
“PNG Behavior,” webfx.eae.net/
dhtml/pngbehavior/pngbehavior.
html.
N ot e
The principles and settings outlined in
Exercise 18-2 are nearly identical in
Fireworks, so the same general instruc-
tions apply, although the interface is
slightly different.
N ot e
The principles and settings outlined in
Exercise 18-2 are nearly identical in
Fireworks, so the same general instruc-
tions apply, although the interface is
slightly different.
Working with Transparency
Chapter 18, Web Graphics Basics
379
In this exercise, we’re going to start from scratch, so you’ll get
the experience of creating a layered image with transparent
areas. I’m going to keep it simple, but you can apply these
techniques to fancier designs, of course.
Launch Photoshop and create a new file (File
➝
New ).
There are a few settings in the New dialog box (Figure 18-
20) that will set you off in the right direction for creating
transparent web graphics.
First, make your new graphic 500 pixels wide and 100
pixels high to match the example in this exercise
A
.
Set the resolution to 72 pixels/inch because web
graphics are low-resolution
B
.
Make sure the color mode is RGB Color, 8-bit
C
.
Finally, and most importantly for this exercise, select
Transparent from the Background Contents options
D
. This option creates a layered Photoshop file with a
transparent background. It is much easier to preserve
transparent areas in an image than to add it later. The
transparent areas (in this case, the whole area, since we
haven’t added any image content yet) is indicated by a
gray checkerboard pattern
E
.
A
B
E
D
C
Figure 18-20. Creating a new image with a transparent
background.
1.
Now we’ll add some text and give it a drop shadow (Figure
18-21, following page).
Use the type tool
F
and type your name. Open the
Character window
G
(Window
➝
Character) to change
the look of the font. With the text selected, choose a
bold typeface (something chunky) and set the size large
enough to fill the space, as shown in the example. Click
the swatch next to Color, and use the Color Picker to
choose a color for the text that is not too light and not
too dark. I’m using a medium pink.
Next, add a soft drop shadow to the text. Open the
Layers window
H
(Window
➝
Layers) if it isn’t open
already. You will see the layer containing your text in
the list. Add a drop shadow by clicking the Layer Style
button (it looks like an FX) at the bottom of the Layers
window and select “Drop Shadow ”
I
. In the Layer Style
dialog box
J
, you can play around with the settings, but
I recommend setting the Distance and Size to at least 5
to get the most out of the rest of the exercise. When you
are done, click OK.
Save the image as a Photoshop file to preserve the layers for
easier editing later, if necessary. I’m naming mine jennifer.
psd (use the .psd suffix). With a nice source image saved, we
are ready to start making the web versions.
With the new file still open, select Save for Web & Devices
from the File menu. Click on the 4-Up tab at the top to
compare the original image to several other versions (Figure
18-22, following page). Note, your previews may display in a
grid instead of a stack.
Let’s see how the image looks as a GIF with and without
transparency. Click on the second preview to select it, then
set the file type to GIF and set the number of colors to 32.
Now, toggle the checkmark next to Transparency off and on
(Figure 18-23 on page 381).
When Transparency is off (not checked, as shown on the
left), the Matte color is used to fill in the transparent areas
of the original image. Set the Matte color to white to
match my example.
When Transparency is on (checked, as shown on the
right), a checker pattern appears in the transparent areas
of the image, indicating where the background color or
pattern of the web page will show through. If you look
carefully at the drop shadow area, you will see that the
shades of gray are blended with the white Matte color.
Try changing the Matte color and watch what happens
in the drop shadow area.
2.
3.
4.
5.
exercise 18-2
|
Creating transparent images
Part IV: Creating Web Graphics
380
Working with Transparency
F G
H J
I
Figure 18-21. Adding text with a soft drop shadow.
Figure 18-22. The “4-up” tab in the Save for Web &
Devices dialog box allows you to compare four different
versions of the same image.
Working with Transparency
Chapter 18, Web Graphics Basics
381
Leave the GIF preview alone for a moment and select the next preview. Set the
file type to PNG-8 and try toggling the Transparency checkbox. As expected, it
behaves exactly the same as the GIF because both formats use binary
transparency. The previews should look like those shown in Figure 18-23.
Now select the fourth preview,
make it a PNG-24, and toggle the
Transparency checkbox (Figure 18-
24). When it is unchecked (left), the
Matte color fills in the transparent
areas of the original image. But
when Transparency is checked
(right), the checkerboard pattern
shows through the drop shadow
blend. So, too, will the background
of a web page. When Transparency
is selected, the Matte tool is no
longer available, because there is
no need to specify the background
color of the page the PNG with
alpha transparency will blend with
anything.
Take a moment to note the file
size of the transparent PNG-24.
Mine is nearly 10.6 KB, while my
transparent GIF version is 5 KB, and
the transparent PNG-8 came in at
just 3.3 KB. The significantly larger
file size is the price you pay for the
versatility of the alpha transparency.
Save the PNG-24 with Transparency
turned on and name the file with
the .png suffix (mine is jennifer.
png). Open the Save for Web dialog
box again and save a GIF version
of the image with Transparency
turned on (make sure that Matte
is set to white). Name the file with
the .gif suffix. We’ll be using these
graphics again in the next section.
6.
7.
8.
The translucent grays in the drop shadow get blended
with the color specified by the Matte setting
Figure 18-23. Previews of transparency
turned off (left) and on (right) in a GIF.
The translucent grays in the drop shadow will stay translucent in the PNG-24.
Figure 18-24. Previews of Transparency
turned off (left) and on (right) in a PNG-24.
The trick to getting a transparent GIF to blend seamlessly with a background is
to use the RGB values from the web page’s background color (or the dominant
color from a background image) for the Matte color. If your page background
is a multi-colored pattern or is otherwise difficult to match, opt for a Matte
color that is slightly darker than the predominant background color.
D e S I G n t I P
N ot e
Fireworks gives you a choice of Index or
Alpha Transparency for PNG-8 graphics.
See the PNG-8 “Alpha” Transparency
sidebar for details.
Part IV: Creating Web Graphics
382
Working with Transparency
Avoiding “halos”
Now that I’ve got some transparent graphics, I’m going to try them out on a
minimal web page with a white background. If you want to work along, open
a text editor and create an HTML document like the one shown here (I’ve
omitted the DOCTYPE and character set information to save space):
<html>
<head>
<title>Transparency test</title>
<style type="text/css">
body {
background-color: white;
}
</style>
</head>
<body>
<p><img src="jennifer.png" alt="" /></p>
<p><img src="jennifer.gif" alt="" /></p>
</body>
</html>
When I open the file in a browser, the graphics look more or less the same
against the white background (Figure 18-25, left). But, if I change the back-
ground color of the web page to teal (background-color: teal;), the differ-
ence between the alpha and binary transparency becomes very clear (right).
PNG-24
(Alpha)
GIF
(Binary)
Figure 18-25. The difference between binary and alpha transparency becomes very clear
when the background color of the page changes.
Anti-aliasing
Anti-aliasing is a slight blur applied
to rounded edges of bitmapped
graphics to make smoother
transitions between colors. Aliased
edges, by contrast, have stair-
stepped edges. Anti-aliasing text and
graphics can give your graphics a
more professional appearance.
t e R m I n O l O G y
PNG-8 “Alpha” Transparency
Technically, variable levels of transparency are
not
limited to 24-bit PNGs. PNG-
8 files can do it too. Instead of using an alpha channel, they store different
transparency levels in multiple slots in the index color table. The resulting file
size is potentially smaller than the same image saved as a PNG-24 with an alpha
channel.
As of this writing, only Fireworks allows you to create PNG-8s with multiple levels
of transparency, and browser support is poor. Most browsers display them as
though they have simple binary transparency. For now, this is another cool PNG
feature that remains virtually untapped due to lagging software support.
Working with Transparency
Chapter 18, Web Graphics Basics
383
When the background color changes, the GIF no longer matches the back-
ground, resulting in an ugly fringe commonly called a halo. Halos are the
result of anti-aliased edges that have been blended with a color other than the
background color of a page. They are a potential hazard of binary transpar-
ency, whether GIF or PNG-8.
Prevention is the name of the game when it comes to dealing with binary
transparency and halos. As you’ve just seen, the Matte color feature in
Photoshop and Fireworks makes it easy to blend the edges of the graphic to a
target background color. If the background color changes, you can re-export
the GIF or PNG-8 with the new Matte color. See the Matte Alternative sidebar
for options if your tool doesn’t have a Matte setting.
Another option is to save your image as a PNG-24 with variable transparency.
That way, you don’t have to worry about the background color or pattern, and
it will be no problem if it changes in the future. The trade-off, of course, is the
larger file size to download. In addition, alpha transparency does not work in
Internet Explorer 6 and earlier without the aid of some proprietary and/or
JavaScript workarounds (see the Internet Explorer and Alpha Transparency
sidebar earlier in this chapter). This will become less of an issue of course as
those versions go away.
Adding transparency to
flattened images
It is possible to add transparent areas to
images that have already been flattened
and saved as a GIF or PNG. The GIF
containing a yellow circle on a purple
background in Figures 18-25 and 18-27
blends in fine against a solid purple
background, but would be an obvious
square if the background were changed
to a pattern. The solution is to make the
purple areas transparent to let the back-
ground show through. Fortunately, most
graphics tools make it easy to do so by
selecting a pixel color in the image, usu-
ally an eyedropper tool, that you’d like to
be transparent.
In Photoshop, the transparency eyedrop-
per is found on the Color Table dialog
box (Image ➝ Mode ➝ Color Table).
Click on the eyedropper, then on a pixel
color in the image, and it magically turns
transparent (Figure 18-26). To save the new transparent graphic, use the Save
For Web & Devices feature as demonstrated earlier.
Matte Alternative
If you are using a graphics tool that
doesn’t have the Matte feature,
create a new layer at the bottom
of the layer “stack” and fill it with
the background color of your page.
When the image is flattened as a
result of changing it to Indexed
Color, the anti-aliased edges blend
with the proper background color.
Just select that background color
to be transparent during export to
GIF or PNG format and your image
should be halo-free.
Photoshop (versions 6 and higher)
Use the transparency eyedropper in
the Color Table dialog box to turn a
pixel color transparent.
Figure 18-26. Making a color transparent
in Photoshop.
Photoshop (versions 6 and higher)
Use the transparency eyedropper in
the Color Table dialog box to turn a
pixel color transparent.
Figure 18-26. Making a color transparent
in Photoshop.
Part IV: Creating Web Graphics
384
Working with Transparency
In Fireworks, the transparency eyedropper is located at the bottom of the
Optimize panel (Figure 18-27). The Add to Transparency tool allows you to
select more than one pixel color to make transparent. The Subtract from
Transparency dropper turns transparent areas opaque again. When you are
finished, export the transparent graphic (File ➝ Export).
Fireworks
Transparency eyedropper tools
Figure 18-27. Making colors transparent in Fireworks.
If you look closely, you can see that there is a fringe of pixels still anti-
aliased to purple, which means that this graphic will work well only against
purple backgrounds. On other background colors, there will be a pesky halo.
Unfortunately, the only way to fix a halo in an image that has already been
flattened is to get in there and erase the anti-aliased edges, pixel by pixel. Even
if you get rid of the fringe, you may be left with unattractive stair-stepped
edges. You could also select the image area (the yellow circle in this example)
with a marquee tool that has the “feathering” set to 1 or 2 pixels. Copy the
image area and paste it to a new transparent layered image file, then use Save
for Web & Devices to output a new graphic with the Matte set to match the
background color.
If you are concerned with the professional appearance of your site, I’d say it’s
better to recreate the graphic from scratch, taking care to prevent halos, than
to waste time trying to fix them. This is another reason to always save your
layered files.
Web Graphics 101 Summary
Chapter 18, Web Graphics Basics
385
Web Graphics 101 Summary
If I’ve done my job, you should now have a good foundation in web graphics,
including where to find an image, what file format to save it in, and how to
resize it so it is appropriate for the Web. You also know the difference between
binary and alpha transparency, and how to make graphics that blend well
with the background of a web page.
In Chapter 19, we’ll take graphics production to the next level and explore all
the ways to make images as small as possible for faster downloads. But first,
a little quiz.
Test Yourself
Answer the following questions to see if you got the big picture on web
graphics. The answers appear in Appendix A.
What is the primary advantage to using rights-managed images?
What does ppi stand for?
Which graphic is more appropriate for placement on a web page: a 7-
inch wide graphic at 72 ppi or a 4-inch wide graphic at 300 ppi?
What is “indexed color?” What file formats use it?
How many colors are in the color table for an 8-bit graphic? For a 5-bit
graphic?
Name two things you can do with a GIF that you can’t do with a JPEG.
JPEG’s lossy compression is cumulative. What does that mean? Why is it
important to know?
1.
2.
3.
4.
5.
6.
7.