Microsoft WSH and VBScript Programming for the Absolute Beginner Part 22 potx
Bạn đang xem bản rút gọn của tài liệu. Xem và tải ngay bản đầy đủ của tài liệu tại đây (354.81 KB, 10 trang )
190
‘Main Processing Section
‘Generate a random number
Randomize
intRandomNo = FormatNumber(Int((100 * Rnd) + 1))
‘Loop until either the user guesses correctly or the user clicks on Cancel
Do Until strOkToEnd = “yes”
‘Prompt user to pick a number
intUserNumber = InputBox(“Type your guess:”,cGreetingMsg)
intNoGuesses = intNoGuesses + 1
‘See if the user provided an answer
If Len(intUserNumber) <> 0 Then
‘Make sure that the player typed a number
If IsNumeric(intUserNumber) = True Then
‘Test to see if the user’s guess was correct
If FormatNumber(intUserNumber) = intRandomNo Then
MsgBox “Congratulations! You guessed it. The number was “ & _
intUserNumber & “.” & vbCrLf & vbCrLf & “You guessed it “ & _
“in “ & intNoGuesses & “ guesses.”, ,cGreetingMsg
strOkToEnd = “yes”
End If
‘Test to see if the user’s guess was too low
If FormatNumber(intUserNumber) < intRandomNo Then
MsgBox “Your guess was too low. Try again”, ,cGreetingMsg
strOkToEnd = “no”
End If
‘Test to see if the user’s guess was too high
If FormatNumber(intUserNumber) > intRandomNo Then
MsgBox “Your guess was too high. Try again”, ,cGreetingMsg
strOkToEnd = “no”
End If
Microsoft WSH and VBScript Programming for the Absolute Beginner, Second Edition
191
Chapter 6 • Processing Collections of Data
Else
MsgBox “Sorry. You did not enter a number. Try again.”, , _
cGreetingMsg
End If
Else
MsgBox “You either failed to type a value or you clicked on “ & _
“Cancel. Please play again soon!”, , cGreetingMsg
strOkToEnd = “yes”
End If
Loop
Okay, it’s time to run the script and see whether it works as promised (don’t worry, it will).
After testing to see whether the script works as expected, retest it to see whether you can
break it. For example, try feeding it special characters or letters instead of numbers. Once
you’re satisfied with the operation of the script, keep reading. I have one more little goodie
for you in this chapter.
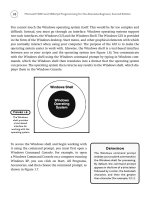
Creating Shortcuts for Your Game
Up until now you have been running your scripts in one of two ways. One is by opening the
Windows Command Console and typing in the name of an execution host, followed by the
path and filename of your scripts at the Windows Command Prompt. The other is by locat-
ing the folder in which the script resides and opening it (that is, double-clicking on it).
Windows provides shortcuts as a convenient alternative for executing Windows applications
and scripts from the Windows desktop. A shortcut provides access to a Windows resource
without requiring the user to find or even know the actual location of the resource that it
represents. For example, just about any new application that you install on your computer
automatically adds an application shortcut to the Programs menu located on the Windows
Start Menu. In addition, most application installation
procedures offer to add a shortcut for the application
on the Windows desktop. Some application install
processes go a step further and add a shortcut for the
application on the Windows Quick Launch toolbar.
Definition
Shortcuts are links or pointers to
Windows objects. These objects
can be just about anything, includ-
ing Windows applications, folders,
files, printers, disk drives, and
scripts.
Using VBScript and the WSH, you can
create a setup script that configures
shortcuts for your VBScript games in
any of these locations. Of course, you
can always manually create shortcuts
for your scripts, but the advantage of
scripting their setup is that, once writ-
ten, you can re-create these shortcuts
on any computer. For example, if you
purchase a new computer, all you’d have to do is copy your VBScripts from your older com-
puter and then run your VBScript setup script, and all your shortcuts would be re-created.
Likewise, if you give copies of your VBScript games to all your friends, all they’d have to do
to set up shortcuts for the scripts is to run the setup script.
Examining Shortcut Properties
Windows shortcuts are identified by a small black arrow in the lower-left side of the icon
that represents them. Shortcuts contain information, in the form of properties, about the
Windows resources that they are associated with. The most important of these properties is
the path and name of the Windows resources that the shortcut represents.
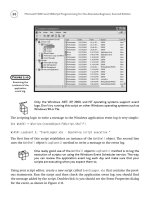
You can view the properties associated with any shortcut by right-clicking on the shortcut
and selecting Properties. The shortcut’s Properties dialog appears. Click the Shortcut property
sheet to view these properties, as shown in Figure 6.12.
192
Microsoft WSH and VBScript Programming for the Absolute Beginner, Second Edition
Definition
The Windows Quick Launch toolbar is an optional
toolbar located on top of the Windows taskbar. It
provides single-click access to Windows applications.
Applications typically found on this toolbar include
Internet Explorer, Outlook Express, and Windows
Media Player.
Figure 6.12
Examining the
properties
associated with
a shortcut to
the Windows
Notepad
application.
Creating Desktop Shortcuts
As you will see, you can create a desktop shortcut in just five simple steps. To demonstrate,
let’s create a shortcut for the
GuessANumber.vbs game on the Windows desktop.
The first step in creating the game’s shortcut is to establish an instance of the
WshShell
object. The script will need to use this object’s SpecialFolders property to access the folder
that represents the Windows desktop. In addition, you’ll need to use the
WshShell object to
instantiate the
WshShortcut object in order to set shortcut properties.
The following statement establishes an instance of the
WshShell object:
Set objWshShl = WScript.CreateObject(“WScript.Shell”)
The second step in creating the shortcut is to set up a reference to the folder where the
shortcut is to reside. In Windows, everything, including the Windows desktop and Start
Menu, is represented as a folder. Therefore, to add a shortcut to the Windows desktop, all
you have to do is save the shortcut in a special folder called
Desktop by specifying a value for
the
WshShell object’s SpecialFolder property.
strDesktopFolder = objWshShl.SpecialFolders(“Desktop”)
The third step required to set up the desktop shortcut is to use the WshShell object’s
CreateShortcut() method to define the shortcut and instantiate the WshShortcut object.
Set objNewShortcut = objWshShl.CreateShortcut(strDesktopFolder & _
“\\GuessANumber.lnk”)
strDesktopFolder
provides a reference to the location of the Windows desktop and
\\GuessANumber.lnk is the name to be assigned to the shortcut.
The fourth step in creating the new shortcut is to
configure properties associated with the shortcut.
The
WshShortcut object provides access to these prop-
erties, which are listed in Table 6.1.
Only the
TargetPath property must be set to create
a shortcut. Configuration of the remaining short-
cut properties is optional. The following statement
configures the
TargetPath property by setting it to
C:\GuessANumber.vbs:
objNewShortcut.TargetPath = “C:\ GuessANumber.vbs”
193
Chapter 6 • Processing Collections of Data
Definition
Special Folders are a Windows man-
agement tool that is used to organize
and manage the contents of a number
of Windows features, including the
Start Menu, the Quick Launch toolbar,
and desktop.
194
Microsoft WSH and VBScript Programming for the Absolute Beginner, Second Edition
Property Description
Arguments Sets arguments to be passed to the application or script associated with the
shortcut
Description Adds a comment to the shortcut
Hotkey Sets a keyboard keystroke sequence that can be used to activate the
application associated with the shortcut
IconLocation Sets the shortcut’s icon
TargetPath Sets the path and file name of the object associated with the shortcut
WindowStyle Sets the window style used when the application associated with the
shortcut is opened (e.g., normal, minimized, or maximized)
WorkingDirectory Sets the default working directory or folder for the application associated
with the shortcut
TABLE 6.1 PROPERTIES OF THE WSHS HORTCUT OBJECT
Examples of how to set other properties are
objNewShortcut.Description = “Guess a Number Game”
objNewShortcut.Hotkey = “CTRL+Alt+G”
The first of these two statements adds a description to the shortcut. Once created, this
description can be viewed by moving the pointer over the shortcut’s icon for a few moments.
The second statement defines a keyboard keystroke sequence that, when executed, will acti-
vate the shortcut and thus open its associated Windows resources (that is, run your script).
In this case, pressing the CTRL, ALT, and J keys at the same time will run the VBScript.
The fifth and final step in creating the shortcut is to save it using the
WshShortcut object’s
Save() method, like this:
objNewShortcut.Save()
Let’s put all five of these statements together to complete the script.
Set objWshShl = WScript.CreateObject(“WScript.Shell”)
strDesktopFolder = objWshShl.SpecialFolders(“Desktop”)
Set objNewShortcut = objWshShl.CreateShortcut(strDesktopFolder & _
“\\GuessANumber.lnk”)
objNewShortcut.TargetPath = “c:\GuessANumber.vbs”
objNewShortcut.Save()
195
Chapter 6 • Processing Collections of Data
It’s just as easy to delete a shortcut using VBScript and the WSH, as it is to create
one. For example, create and run the following script to delete the shortcut the
previous script created:
Set objWshShl = WScript.CreateObject(“WScript.Shell”)
strTargetFolder = objWshShl.SpecialFolders(“Desktop”)
Set objFsoObject = CreateObject(“Scripting.FileSystemObject”)
Set objNewShortcut = objFsoObject.GetFile(strTargetFolder & “\\GuessANumber.lnk”)
objNewShortcut.Delete
The first statement establishes an instance of the WshShell object. The second
statement uses the WshShell object’s SpecialFolders property to identify the
location of the shortcut. The third statement creates an instance of the
VBScript FileSystemObject. The fourth statement uses the FileSystemObject
object’s GetFile() method to instantiate the File object and create a reference
to the shortcut, and the final statement deletes the shortcut using the File
object’s Delete() method.
Understanding How to Work with Special Folders
Windows operating systems use folders for a number of purposes. For example, folders are
used to store system files. You also use folders to store your own personal files. As you just
learned, the Windows desktop is a special folder. Windows XP is loaded with special folders
as shown in the following list:
• Desktop
• Start Menu
• Programs
• Favorites
• Fonts
• NetHood
• PrintHood
• SendTo
• Recent
• Startup
• Templates
• My Documents
TRICK
196
By adding and removing shortcuts to and from Windows special folders you can change
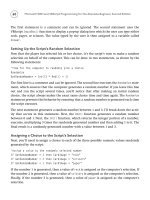
their contents. Finding special folders is easy, just right-click on the Windows XP Start but-
ton and click on Explore. Windows displays the Explorer folder as demonstrated in Figure
6.13. The Document and Settings folder is automatically expanded. A folder containing your
personal user profile settings is also expanded. From here you can view numerous special
folders, including the Desktop and Start Menu special folders.
So far, all the special folders that you’ve seen are associated with just one person—you.
That’s why they were stored in your personal profile. What’s nice about this is that someone
else who shares your computer can have his or her own custom profile settings without
affecting you or any other user of your computer. Windows also lets you make configuration
changes that can be applied to all users of your computer. To do this you must make the con-
figuration changes to one of a collection of special folders that are shared by all users. You
can find these shared special folders by expanding the All Users folder as demonstrated in
Figure 6.14.
Microsoft WSH and VBScript Programming for the Absolute Beginner, Second Edition
Figure 6.13
You can manually
configure the
Desktop by
dragging and
dropping
shortcuts into
the Desktop
special folder.
A shortcut to the
Windows Script 5.6
documentation
A shortcut to the
Windows Script 5.6
documentation
stored in the
Desktop special
folder
Shared special folders are not as easy to identify as other special folders. To locate them you
must first know their names, as shown in the following list.
• AllUsersDesktop. Stores items visible on every user’s desktop.
• AllUsersStartMenu. Stores items visible on every user’s Start Menu.
• AllUsersPrograms. Stores items visible on every user’s All Programs menu.
• AllUsersStartup. Stores items that are automatically started any time a user logs on
to the computer.
If you look closely at each of these folder’s names, you will see that they can be derived by
appending
AllUsers to the beginning of the folder names shown in Figure 6.14.
Using Shortcuts to Add Your Script to the Windows Start Menu
To work with the folders that make up the Windows Start Menu, you need to create a refer-
ence to the
StartMenu special folder. Using the following script, you can programmatically
configure this menu:
Set objWshShl = WScript.CreateObject(“WScript.Shell”)
strTargetFolder = objWshShl.SpecialFolders(“StartMenu”)
197
Chapter 6 • Processing Collections of Data
Figure 6.14
Any changes to
one of the shared
special folders
affect every user
of the computer.
198
Set objNewShortcut = objWshShl.CreateShortcut(strTargetFolder & “\\GuessANumber.lnk”)
objNewShortcut.TargetPath = “c:\ GuessANumber.vbs”
objNewShortcut.Save
As you can see, other than specifying a different special folder name, this script is no dif-
ferent than the script that created the desktop shortcut. Create and run this script. Figure
6.15 shows the new menu entry added by this script on a computer that runs Windows XP.
Using Shortcuts to Add Your Script to the Programs Menu
You can just as easily add shortcuts for your VBScripts to other menus located off the Windows
Start Menu. For example, the following script adds a menu entry for the
GuessANumber.vbs
script on the Programs menu.
Set objWshShl = WScript.CreateObject(“WScript.Shell”)
strTargetFolder = objWshShl.SpecialFolders(“Programs”)
Set objNewShortcut = objWshShl.CreateShortcut(strTargetFolder & “\\GuessANumber.lnk”)
objNewShortcut.TargetPath = “c:\ GuessANumber.vbs”
objNewShortcut.Save
Again, the only thing that changed in this script is the name of the special folder that rep-
resents the Programs menu. Figure 6.16 demonstrates how the Programs menu now looks
with its new shortcut.
Microsoft WSH and VBScript Programming for the Absolute Beginner, Second Edition
Figure 6.15
Examining the
Start Menu after
adding a shortcut
to the GuessA
Number.vbs
game.
Guess a Number
Using Shortcuts to Add Your Script to the Quick Launch Toolbar
The Windows Quick Launch toolbar is an optional toolbar located on the Windows taskbar
of computers running Windows 98, Me, 2000, and XP. It provides single-click access to Win-
dows resources. The next script demonstrates how to add a shortcut for the
GuessANumber.vbs
script to the Quick Launch toolbar. For the most part, this script is no different than any of
the previous examples. There is one key difference, however, which I have highlighted in bold.
Set objWshShl = WScript.CreateObject(“WScript.Shell”)
strQuickLaunchToolbar = objWshShl.SpecialFolders(“AppData”)
strAppDataPath = strQuickLaunchToolbar + _
“\Microsoft\Internet Explorer\Quick Launch”
199
Chapter 6 • Processing Collections of Data
Figure 6.16
Examining the
Programs Menu
after adding a
shortcut to the
GuessA
Number.vbs
game.
Guess a Number