Microsoft WSH and VBScript Programming for the Absolute Beginner Part 43 ppt
Bạn đang xem bản rút gọn của tài liệu. Xem và tải ngay bản đầy đủ của tài liệu tại đây (223.12 KB, 10 trang )
400
The WSH currently supports XML version 1.0. Version 1.0 supports both upper-
case and lowercase spelling of tag elements. However, lowercase spelling is
preferred, and I recommend that you do use only lowercase spelling. This way, if
lowercase spelling becomes a requirement in a future version of XML, you will
not have to retrofit your Windows Scripts Files for them to continue to run.
Examining WSH Supported XML Tags
XML represents an extensive and powerful multipurpose markup language. XML is therefore
often used in many environments, including the WSH. In this chapter, I’ll introduce you to
a number of commonly used XML tags, and I’ll provide examples of how they’re used to
build Windows Script Files.
To begin, take a look at Table 12.1, which shows the XML tags that you’ll see demonstrated
in this chapter’s examples.
TRICK
Microsoft WSH and VBScript Programming for the Absolute Beginner, Second Edition
Tag Description
<?job ?>. Enables or disabled error handling and debugging for a specified job.
<?XML ?>. Specifies the Windows Script File’s XML level.
<comment> </comment>. Embeds comments within Windows Script Files.
<script> </script>. Identifies the beginning and ending of a script within a Windows
Script File.
<job> </job>. Identifies the beginning and ending of a job inside a Windows Script File.
<package> </package>. Enables multiple jobs to be defined within a single Windows Script File.
<resource> </resource >. Defines static data (constants) that can be referenced by script within
a Windows Script File.
TABLE 12.1 XML TAGS C OMMONLY U SED
IN
W INDOWS S CRIPT FILES
Using the <?job ?> Tag
The <?job ?> tag allows you to enable or disable error reporting and debugging within your
Windows Script Files. The use of this tag is optional. Unlike most tags, the
<?job ?> tag does
not have a closing tag. The syntax for this tag is as follows:
<?job error=”flag” debug=”flag” ?>
Both error and debug are Boolean values. By default, both are set equal to false. Setting
error=“true” turns on error reporting, thus allowing syntax and run-time error messages to
be reported. Setting
debug=“true” turns on debugging for Windows Script Files, allowing
them to start the Windows script debugger.
To take advantage of the <?job ?> tags’ debug capability, you’ll need to install
the Microsoft Windows script debugger utility. This utility is designed to assist
programmers in debugging script errors. To learn more about this utility, check
out msdn.microsoft.com/scripting.
The following example demonstrates how to use the <?job ?> tag within a Windows Script
File:
<job>
<?job error=”true” debug=”true”?>
<script language=”VBScript”>
MsgBox “Error handling and debugging have been enabled.”
</script>
</job>
As you can see, both error reporting and script debugging have been enabled.
Using the <?XML ?> Tag
The <?XML ?> tag is used to specify the version of XML required to support a Windows Script
File. As with the
<?job ?> tag, the use of this tag is optional.
When used, the
<?XML ?> tag must be the first tag defined as the first statement in the Win-
dows Script File. The syntax for the
<?XML ?> tag is as follows:
<?XML version=”version” standalone=”DTDflag” ?>
Version
specifies the version of XML required to support the Windows Script File. The cur-
rent version is 1.0. Standalone is used to specify an external Document Type Definition,
which is a feature not currently supported by the WSH. However, you can still include it if
you want, but you’ll have to specify it as having a value of
Yes (but it will still be ignored).
When used, the
<?XML ?> tag enforces stricter interpretation of all XML statements; it also
enforces case-sensitivity, while requiring that all values be specified within either single or
double quotes. Omitting this tag provides for a less restrictive syntax. Let’s look at the fol-
lowing example, which demonstrates the placement of a
<?XML ?> tag at the beginning of a
small Windows Script File.
TRICK
401
Chapter 12 • Combining Different Scripting Languages
402
<?XML version=”1.0” standalone=”yes” ?>
<job>
<?job error=”true” debug=”true”?>
<script language=”VBScript”>
MsgBox “Error handling and debugging have been enabled.”
</script>
</job>
The <comment> </comment> Tags
You can document the XML statements used within your Windows Script Files using the
XML
<comment> and </comment> tags. Using these tags, you can spread comments over multiple
lines. The syntax for the
<comment> and </comment> tags is as follows:
<comment> Comment Text </comment>
The following example demonstrates the use of the XML <comment> and </comment> tags.
<?XML version=”1.0” standalone=”yes” ?>
<job>
<?job error=”true” debug=”true”?>
<comment>The following VBScript displays an information message</comment>
<script language=”VBScript”>
MsgBox “Error handling and debugging have been enabled File. “
</script>
</job>
The <job> </job> Tags
To embed a script into a Windows Script File, you must first define a pair of root tags. The
<job> and </job> tags provide one type of root tag pair.
All Windows Script Files are composed of at least one job. The beginning and ending of a job
are identified by the
<job> and </job> tags. The syntax for the tags is as follows:
<job [id=JobID]>
. . .
</job>
When only one job is defined within a Windows Script File, the id=JobID parameter can be
omitted from the opening
<job> tag. However, if two or more jobs are defined within a single
Windows Script File, each must be given a unique
ID assignment. This assignment allows
you to execute any job within the Windows Script File.
Microsoft WSH and VBScript Programming for the Absolute Beginner, Second Edition
The following example shows a Windows Script File that contains a single job. The job itself
is made up of two different scripts:
<?XML version=”1.0” standalone=”yes” ?>
<job>
<?job error=”true” debug=”true”?>
<comment>The following VBScript displays a information message</comment>
<script language=”VBScript”>
MsgBox “VBScript has displayed this message.”
</script>
<comment>The following JScript displays an information message</comment>
<script language=”JScript”>
WScript.Echo(“JScript has displayed this message.”);
</script>
</job>
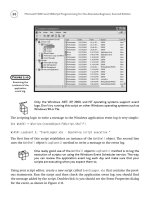
If you double-click on the file, you’ll see two pop-up dialogs appear, as shown in Figures 12.6
and 12.7. The VBScript generates the first pop-up dialog, and the JScript generates the other.
To place more than one job within a Windows Script File, you must use the
<package> and
</package> tags, which I’ll explain next.
403
Chapter 12 • Combining Different Scripting Languages
Figure 12.6
A pop-up dialog
displayed by the
Windows Script
File’s VBScript.
Figure 12.7
A pop-up dialog
displayed by the
Windows Script
File’s JScript.
404
The <package> </package> Tags
To place more than one job within a Windows Script File, you must enclose the jobs within
the
<package> and </package> tags. The syntax for these tags is as follows:
<package>
. . .
</package>
To understand their use, look at the following example:
<?XML version=”1.0” standalone=”yes” ?>
<package>
<comment>The following job contains a VBScript and a JScript</comment>
<job id=”job1”>
<?job error=”true” debug=”true”?>
<comment>The following VBScript displays an information message</comment>
<script language=”VBScript”>
MsgBox “A VBScript has displayed this message.”
</script>
<comment>The following JScript displays an information message</comment>
<script language=”VBScript”>
WScript.Echo “A JScript has displayed this message.”
</script>
</job>
<comment>The following job contains one VBScript</comment>
<job id=”job2”>
<script language=”VBScript”>
MsgBox “A second VBScript has displayed this message.”
</script>
</job>
</package>
In this Windows Script File, the <package> and </package> tags are used to define two jobs.
The first job is assigned an
ID of job1, and the second job has been assigned an ID of job2.
Microsoft WSH and VBScript Programming for the Absolute Beginner, Second Edition
The <resource> </resource> Tags
You have already learned about the advantages of defining constants within your VBScripts.
However, these constants are only available within the script that defines them. Using the
XML
<resource> and </resource> tags, you can define constants within your Windows Script
Files that can then be accessed by every script located within the same job. Therefore, when
used, these tags must be placed within the
<job> and </job> tags.
The syntax of the
<resource> and </resource> tags is as follows:
<resource id=”resourceID”>
. . .
</resource>
Id
specifies the name of the constant whose value is then assigned when you type it between
the opening and closing tags, as demonstrated in the following example:
<job>
<resource id=”cTitleBarMsg”>TestScript.wsh</resource>
<script language=”VBScript”>
Set objWshShl = WScript.CreateObject(“WScript.Shell”)
MsgBox “Greetings”, , getResource(“cTitleBarMsg”)
</script>
</job>
The <script> </script> Tags
You’ve already seen the <script> and </script> tags in action a number of times in this
chapter. They are used to mark the beginning and ending of individual scripts embedded
within jobs in Windows Script Files. The syntax for these tags is as follows:
<script language=”language” [src=”externalscript”]>
</script>
405
Chapter 12 • Combining Different Scripting Languages
406
language specifies the scripting language used to create a script. The src argument is used
to specify an optional reference to an external script. If used, the external script is called and
executed just as if it were embedded within the Windows Script File.
Let’s look at an example of how to create a Windows Script File that includes both an embed-
ded VBScript and one that is externally referenced. As you can see, the following Windows
Script File includes a reference to two VBScripts:
<job>
<script language=”VBScript”>
MsgBox “This message is being displayed by an embedded VBScript”
</script>
<script language=”VBScript” src=”TestScript.vbs” />
</job>
The embedded VBScript simply displays a text message stating that it has executed. Similarly,
the external VBScript might consist of a single statement that uses the
MsgBox() function to
display a similar message.
MsgBox “This message is being displayed by an external VBScript”
If you create both of these scripts and then double-click on the Windows Script File, you’ll
see that both scripts will execute and display their pop-up dialog in sequence.
Microsoft WSH and VBScript Programming for the Absolute Beginner, Second Edition
In the Real World
In the real world, time is money. Saving time during script development means that you can get
more done in less time. One of the ways that experienced programmers save time is by creat-
ing reusable code. You can use Windows Script Files to save development time by externalizing
scripts that perform common tasks. This way, you can set up a reference to those scripts in any
number of Windows Script Files without having to reinvent the wheel. In addition, you’ll save
yourself a lot of maintenance work because if you ever need to modify a commonly used exter-
nal script, you’ll only have to make the change to the script once. This is preferable to making
the same change over and over again in any scripts where you embedded copies of the script.
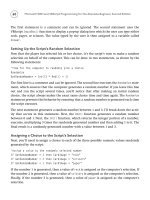
Executing Your Windows Script Files
As you know, you can run a Windows Script File by double-clicking on it. When started this
way, the Windows Script File runs the first job that has been defined. If more than one job
has been defined within the Windows Script File, you can execute any job by running the
script from the Windows command prompt and specifying the job’s
ID, as demonstrated
next. Of course, every script contained within the job that is run will be executed.
Let’s look at some examples of how to run Windows Script Files from the Windows com-
mand prompt. To run the first script in a Windows Script File that contains two jobs, just
type the name of an execution host, followed by the name of the Windows Script File.
cscript TestWsfScript.wsf
If the two jobs in the Windows Script Files have been assigned job IDs of job1 and job2, you
can selectively execute either job by specifying its
ID.
wscript TestWsfScript.wsf //job:job2
Back to the VBScript Game Console
The VBScript Game Console project is actually a Windows Script File designed to display a
list of VBScript games that is dynamically generated based on the contents of a game folder.
Once started, the VBScript Game Console gives the user easy access to any VBScript games
that you have stored in the game folder.
The VBScript Game Console is actually made up of three different scripts, two written in
JScript, and the other, written in VBScript. The rest of this chapter explains how the
VBScript Game Console is built.
Designing the Game
The VBScript Game Console consists of three different scripts written using two different
WSH-supported scripting languages, VBScript and JScript. Because JScript is a full-featured
scripting language in its own right, I won’t be able to go into great detail about its syntax
or structure. However, I’ve tried to organize this Windows Script File in such a way as to
ensure that the JScript you see is not overly complex. Hopefully, given the comments that I
have added to each script, you will be able to understand what’s happening in each JScript.
The VBScript Game Console will be created in four stages:
• Stage 1: Create a
.wsf file and add the XML statements required to define the script’s
structure.
407
Chapter 12 • Combining Different Scripting Languages
408
• Stage 2: Create the first JScript, which will be responsible for displaying the VBScript
Game Console’s initial splash screen and determining whether the user wants to
open the console.
• Stage 3: Design the Windows Script File’s VBScript, wherein the logic that controls
the operation of the game console is stored.
• Stage 4: Create a second JScript, which is responsible for displaying the VBScript
Game Console’s closing splash screen.
Using XML to Outline the Script’s Structure
The first stage in developing the VBScript Game Console involves two activities. First, create
a new file and save it with a
.wsf file extension, thus creating a new Windows Script File.
Second, add the XML tags required to outline the overall structure of the Windows Script
File, like this:
<package>
<comment>This .WSF file builds a VBScript Game Console</comment>
<job>
<resource id=”cTitlebarMsg”>VBScript Game Console</resource>
<script language=”JScript”>
</script>
<script language=”VBScript”>
</script>
<script language=”JScript”>
</script>
<script language=”JScript”>
</script>
</job>
</package>
Microsoft WSH and VBScript Programming for the Absolute Beginner, Second Edition
The <package> and </package> tags were not required because this Windows Script File only
contains one job. I added them anyway, just in case I ever decide to expand the script by
adding another job. For example, if script configurations are ever migrated to the Windows
registry, it might be helpful to define a second job to the Windows Script File specifying a
setup script.
The
<comment> and </comment> tags were added to help document the function of the Win-
dows Script File. The opening
<job> and closing </job> tags define the Windows Script File’s
only job. As only one job was defined, I did not bother to add the
<job> tag’s ID attribute.
Finally, three separate sets of
<script> and </script> tags have been created, marking the
location at which each script that makes up the Windows Script File will be placed.
Writing the First JScript
Because the focus of this book is on VBScript as a WSH scripting language and not on
JScript, I’m not going to attempt to explain in detail the following JScript. This script is rel-
atively simple, and you should be able to tell what’s going on by looking at the comments
embedded within the script itself.
//*******************************************************************
//Script Name: N/A
//Author: Jerry Ford
//Created: 12/20/02
//Description: This JScript displays the .WSF file’s initial splash
// screen
//*******************************************************************
//Initialization Section
var objWshShl = WScript.CreateObject(“WScript.Shell”);
var strWelcome;
var strInstructions;
var intResults;
var intReply;
var strTitleBarMsg;
strWelcome = “Welcome to the VBScript Game Console. “;
strInstructions = “Click on OK to play a VBScript game!”;
409
Chapter 12 • Combining Different Scripting Languages