Học JavaScript qua ví dụ part 39 pps
Bạn đang xem bản rút gọn của tài liệu. Xem và tải ngay bản đầy đủ của tài liệu tại đây (703.58 KB, 7 trang )
ptg
350 Chapter 11 • Working with Forms and Input Devices
11.4.3 Naming Forms and Buttons
How JavaScript References a Form by name or id. The <form> tag has a name
attribute that allows you to give your form a name. It is somewhat easier and more read-
able to reference a form by its name than by using the array syntax, such as forms[0] and
forms[1]. You will need the name attribute if you are submitting the form to a server-side
program as discussed in Section 11.4.1.
Any object, including the form, can also be referenced by using its unique ID and the
getElementById() method of the document, standardized by the W3C DOM.
In Example 11.6, two HTML forms are created: One contains a textbox, and the other
a button. Each of the forms is given a name with the name attribute and an id. In the
JavaScript program, the two forms are accessed by using the name and the id of the form
and its elements.
Table 11.7 Properties of the elements Object
Property What It Describes
form The name of the form object where the element was defined (read-
only).
name The name of the input device as specified in the HTML name attribute
(read-only).
type The type of input device, such as radio, checkbox, password, and so
on (read-only).
disabled A Boolean value; if true the element is disabled so that it can’t be
modified; even if it contains a value, data from a disabled form field is
not sent back to the server.
value The text that is associated with the input device, such as the text
entered into the text area or textbox, the text that appears in a button,
and so on (read/write).
EXAMPLE 11.6
<html>
<head><title>Naming Forms object</title></head>
<body>
1 <form name="form1" id=”first_form”>
Enter your name:
2 <input type="text"
id="namefield"
name="namefield"
value="Name: " />
3 </form>
From the Library of WoweBook.Com
ptg
11.4 JavaScript and the form Object 351
4 <form name="form2" id="second_form">
5 <input type="button" value="Press here">
6 </form>
<big>
7 <script type="text/javascript">
// DOM Level 0. How do we reference the form in JavaScript?
// Go down the document tree: window/document/form.property
// The window object can be left off, because it is at the top
document.write( "The first form is named: " +
8 window.document.forms["form1"].name);
document.write( ".<br />The second form is named: " +
9 document.forms["form2"].name);
document.write(".<br />Also can be referenced as: <em>" +
'document["form2"].name'+".</em><br />");
document.write("Another way to reference a form: <em>" +
'document.form2.name' +".</em><br />");
10 // DOM Level 1. The standardized W3C DOM way
document.write("<br />Using the id attribute to get the form \
name,<br />");
11 var f1 = document.getElementById("first_form");
// define variables
var f2 = document.getElementById("second_form");
12 document.write("The first form is named " + f1.name +
".<br />");
document.write("The first form is named " + f2.name +
".<br />");
</script>
</big>
</body>
</html>
EXPLANATION
1 The name of the first HTML form in the document is form1. The id attribute is as-
signed first_form.
2 The input type for this form is a text field with a default value “Name: ”.
3 This tag ends the first form.
4 The name of the second form is form2. Its id is second_form.
5 The input type for this form is a button with the value “Press here”, which will ap-
pear as text in the button.
6 This tag ends the second form.
7 The JavaScript program starts here.
Continues
EXAMPLE 11.6 (CONTINUED)
From the Library of WoweBook.Com
ptg
352 Chapter 11 • Working with Forms and Input Devices
8 To display the name of the first form, descend the JavaScript tree, starting at the
window, to the document, to the first form object named form1, to its name property.
We could write document.forms[0].name or document.form1.name, but by using the
form object as a property of the document and the associative array notation with
its name in square brackets, it is easier to identify the object as a form object by
name if there are a number of forms on the page.
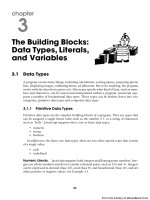
9 To display the name of the second form, descend the JavaScript tree as in line 8.
This time we left out the window object, which is fine because JavaScript knows
that the window is always at the top of the tree. See Figure 11.13.
10 Although this chapter focuses on the JavaScript legacy DOM 0 when working
with forms, all HTML elements are accessible via the DOM Level 1, the standard-
ized DOM, which all modern browsers should support. Navigating forms, images,
and links with JavaScript has always been supported by DOM 0 and is still widely
used.
11 The getElementById() method returns a reference to the HTML element by the id
that was assigned to it on line 1. In most of the examples, the name and id are the
same, but in this example, they are different to make it clear that the id, not the
name, is used to get a reference to the element. The variable, f1, is a reference to
the first form.
12 Now that we have a reference to the form, we can use it and the dot notation to
get its name.
Figure 11.13 Name those forms!
EXPLANATION
From the Library of WoweBook.Com
ptg
11.4 JavaScript and the form Object 353
The elements and properties of the HTML <form> tag are shown in Table 11.8.
How JavaScript References the Form Elements by Name. Each form object
is an element of the forms[] array and each form contains input types such as buttons,
textboxes, checkboxes, and so on. Each of the input types is also stored in an array called
elements[] in the order in which the input device is found in the document. In the fol-
lowing example, there is one form, called myform. It contains two elements, button
input types, named button1 and button2, respectively. The JavaScript program gets access
to the form and button properties by using names to reference them. An object can be
referenced by using the numeric array notation, or referenced by its name with the dot
notation; that is, object first, then dot and name, or by putting the name as a string in
square brackets (associative array). If there are a number of forms and buttons, using the
associative array notation, rather than the numerically indexed array notation, might
make it easier to locate the object. For instance, if one of the forms or input devices has
been moved or deleted, the numeric index values for all of the objects on the page would
Table 11.8 <form> Tag Elements and Properties
Object Property Purpose
button name, type, value A general-purpose GUI button.
checkbox checked, defaultChecked, name,
type, value
A set of (or one) clickable boxes allowing multiple
selections.
FileUpLoad name, type, value A field allowing a file to be submitted as part of a
form.
hidden name, type, value A field where the content is not shown in the
form.
password defaultValue, name, value A field for entering a password, masking the real
characters typed.
radio checked, defaultChecked, name,
type, value
A set of (or one) clickable boxes allowing only one
selection.
reset name, type, value A button that clears and resets the form fields.
select length, name, options,
selectedIndex, type, value
A popup or scrolling list of items from which to
choose.
submit name, type, value, A button used for submitting form data.
text defaultValue, name, type, value A rectangular field allowing one line of input.
textarea defaultValue, name, type, value A rectangular box allowing multiple lines of input
value.
From the Library of WoweBook.Com
ptg
354 Chapter 11 • Working with Forms and Input Devices
need to be changed. Writing document[“form3”][“button2”] in place of docu-
ment.forms[2].elements[1] would make the change easier.
If the first form on the page is named “myForm”, there are several ways to reference it:
document.forms[0]
document.forms.myForm
document.forms["myForm"]
And to name a form’s input element:
document.forms[0].elements[0]
document.myform.button1
document["myForm"]["button1"]
EXAMPLE 11.7
</html>
<head><title>Naming Buttons</title></head>
<body bgcolor="cyan"><font face="arial">
<strong>Naming Forms and Buttons<br />
<big>
1 <form name="myform">
2 <input type="button" name="button1" id="button1"
value="red" />
3 <input type="button" name="button2" id="button2"
value="blue" />
4 </form>
<script type="text/javascript">
document.write("<b><br />Form name is: </b><em>" +
5 document.myform.name + "</em>");
document.write("<b><br />Form name is: </b><em>" +
6 document["myform"].name +"</em>");
document.write("<b><br />Name of first button is:</b><em> " +
7 document["myform"]["button1"].name
+ "</em>and its type is<em>"
+ document.myform.button1.type);
document.write("</em><b><br />Value of button1 field:</b><em> " +
8 document["myform"]["button1"].value);
document.write("</em><b><br />Name of second button is:</b><em> "
+ document.myform.button2.name);
document.write("</em><b><br />Value of button2 field:</b><em> "
+ document.myform.button2.value);
</script>
</big>
</strong>
</body>
</html>
From the Library of WoweBook.Com
ptg
11.4 JavaScript and the form Object 355
EXPLANATION
1 The HTML form starts here. It is named myform. JavaScript can now reference the
form by its name.
2 The input type is a button named button1 and assigned a value of red. JavaScript
can now reference the button by its name. The id attribute will not be used in this
example. It is here because it is common to use both a name and id for the form
and its elements. The id gives JavaScript another way to get access to the object,
which will be covered in detail in later chapters.
3 The input type is a button named button2 and assigned a value of blue.
4 The form ends here.
5 Within the JavaScript program the form is referenced by its name. It is a property
of the document object. Without naming the form, it would be referenced as doc-
ument.forms[0].name.
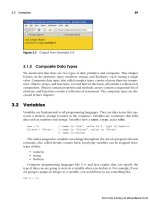
6 The name assigned to the first button is displayed. Putting the name as a string in
square brackets (associative array) is a common approach to naming forms and
their elements. Without naming the form or the button, it would be referenced as
document.forms[0].elements[0].value. It is easy to make typos here. Spelling my-
form.name as myform1.name causes the output to be myform1 is undefined. See Fig-
ures 11.14 and 11.15.
7 Using the associative array notation, the name for the form is a string inserted in
the first set of brackets, and the second element, a string name for button1 is in-
serted in the second set of square brackets. We use the dot notation to retrieve the
value of the type property for the form’s button.
8 Using the two-dimensional associative array notation, we retrieve the value that
was assigned to button1, which is red.
Figure 11.14 Name that button!
From the Library of WoweBook.Com
ptg
356 Chapter 11 • Working with Forms and Input Devices
11.4.4 Submitting Fillout Forms
Submitting an HTML Form Without JavaScript. When the user clicks a submit
button, the form is normally sent to the server for further processing by another appli-
cation such as a PHP, ASP.NET, or CGI script. Before the server gets the form, its content
is gathered by the browser, URL encoded, and then sent to the address supplied in the
action attribute of the form. (In the previous examples, the action attribute was not used
because there was no reason to process the user input in the sample forms.) The appli-
cation on the server side decodes and processes the form information. From there, an
acknowledgment can be sent back to the user, an e-mail delivered, the processed infor-
mation sent to a database, or whatever else we define. Now let’s look at an example of
an HTML form and how it is submitted to a server application. After the user fills out
the form, he or she will click the Submit button. The form data will be collected by the
browser as name/value pairs and sent to the server. The method attribute determines how
the data is sent (as a query string or message body) and the action attribute determines
where it will be sent (the URL of a server).
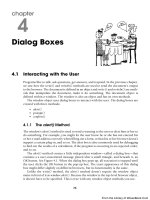
Figure 11.15 What went wrong? Watch your spelling! We tried to reference a form
by the wrong name!
EXAMPLE 11.8
<html>
<head><title>An HTML Form</title></head>
<body><big><strong>
1 <form action="/cgi-bin/bookstuff/form1.cgi" method="post"><p>
<fieldset><legend>All About You</legend>
<p>
Type your name here:
2 <input type="text" name="namestring" size="50" />
</p>
<b>Choose a work place:</b><br />
3 <input type="checkbox" name="place"
value="LA">Los Angeles<br />
<input type="checkbox" name="place" value="SJ">San Jose<br />
<input type="checkbox" name="place"
value="SF" checked>San Francisco <br />
From the Library of WoweBook.Com