Hướng dẫn tạo themes cho wordpress part 6 docx
Bạn đang xem bản rút gọn của tài liệu. Xem và tải ngay bản đầy đủ của tài liệu tại đây (1.09 MB, 10 trang )
Chapter 3
55
<div class="sticky-announcer">
<p>This post is sticky.</p>
</div>
<?php
}
?>
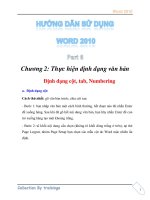
Create a sticky post on your test blog and take a look at your site's front page. You should see
text appended to the sticky post, and the post should be moved to the top of The Loop. You
can see this in the following screenshot:
How it works
The is_sticky function checks the currently-active post to see if it is a sticky post. It does
this by examining the value retrieved by calling get_option('sticky_posts'), which is
an array, and trying to nd the active post's ID in that array.
The Loop
56
In this case, if the post is sticky then the sticky-announcer div is output with a message.
However, there is no limit to what you can do once you've determined if a post is sticky.
Some ideas include:
Displaying a special icon for sticky posts
Changing the background color of sticky posts
Adding content dynamically to sticky posts
Displaying post content differently for sticky posts
Creating multiple loops in a single template
In advanced themes, there are often situations where you would want to display multiple
Loops consisting of posts with different criteria. When doing so, you should make sure not
to alter the normal default Loop or else some template tags will not work appropriately.
How to do it
First, decide what kind of Loops you want to create. Perhaps you want to create two Loops,
based on different categories. Perhaps one Loop should have featured posts while the other
has the default posts based on the page URL. For this example, we're going to create two
category Loops.
To create the two category Loops, you need to create two separate instances of the
WP_Query class. Copy the following code snippet into one of your template les:
<?php
$query1 = new WP_Query(array('cat'=>get_cat_ID('aciform')));
if( $query1->have_posts() ) {
?><h1>Aciform Posts</h1><?php
while($query1->have_posts()) {
$query1->the_post();
?><h2><?php the_title(); ?></h2><?php
}
}
echo '<hr />';
$query2 = new WP_Query(array('cat'=>get_cat_ID('Cat B')));
if( $query2->have_posts() ) {
?><h1>Cat B Posts</h1><?php
while($query2->have_posts()) {
$query2->the_post();
?><h2><?php the_title(); ?></h2><?php
}
}
?>
Chapter 3
57
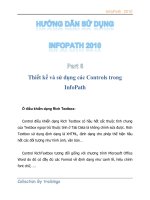
The above snippet renders output that looks something like the example shown in
following screenshot:
You can see in the above image that there are two major sections. The rst consists of the
titles of all posts with the category aciform. The second section consists of the titles of all
posts with the category Cat B
How it works
In the above code sample, two new instances of the WP_Query class are created. The rst
instance is created with parameters specifying that it should contain posts in the category
Aciform. The second instance is created with parameters specifying that it should contain
posts in the category Cat B
The parameters passed in each case direct the content of the SQL query, which is passed
to the underlying WordPress database. You don't really need to know about all of that, but
you can learn a lot by looking at how WordPress constructs the query inside of the
WP_Query class.
After the instances are created, the basic Loop construct is used. However, you should note
that all Loop functions are prexed with the new object's name. So, when you're using the rst
WP_Query object that contains posts in Aciform, each Loop function call is preceded with
the string $myquery1->. This ensures that the new query object's data is used instead of
the global $wp_query object's data.
The Loop
58
There's more…
The WP_Query constructor takes a variety of parameters as an array or formatted query
string. The parameters are the same as those for the query_posts and get_posts
WordPress functions, but there are far too many to even begin to dive into in this recipe. For
more information on the available parameters, please see dpress.
org/Template_Tags/query_posts#Parameters
.
Displaying only posts in a particular
category
Often there will be a category that needs to be called on specically in your WordPress
theme. If you don't know the category's ID, you can use the category name to retrieve
the correct posts.
How to do it
First, open the template le that you wish to insert the category Loop into. If you want
to highlight a certain category in your theme's sidebar, for example, you would open
sidebar.php. Insert your cursor at the appropriate spot, and then add the following code:
<?php
$cat_name = 'My Category Name';
query_posts(array('category_name'=>$cat_name));
if(have_posts() ) {
while(have_posts() ) {
the_post();
}
}
?>
How it works
The available parameters for the query_posts function are varied and many. In this instance,
you take advantage of the category_name parameter to ensure that only posts in the specied
category (in this instance, My Category Name) are returned for the Loop. Want to use a
different category? Change the value of the $cat_name parameter.
Chapter 3
59
Styling every other post differently
Styling every other post differently is a powerful technique for creating interest in your theme
and leading a visitor's eye down the page. The options for styling are endless, but some of
the most popular and pervasive options include changing background images, colors, layout
items, and more.
How to do it
Open the template le in which you wish to style posts differently as they are iterated over.
In general, you'll insert this functionality into a template like index.php or category.php.
Place your cursor where you wish to insert The Loop. Insert the following code:
<?php
if( have_posts() ) {
$alt_post = 'alt-post';
while( have_posts() ) {
the_post();
$alt_post = $alt_post == 'alt-post' ? '' : 'alt-post';
?>
<div class="post <?php echo $alt_post; ?>">
<h2><?php the_title(); ?></h2>
</div>
<?php
}
}
?>
Now open your theme's stylesheet, style.css, and insert the following styles:
/** Styling for alternating posts **/
.post {
background: #990000;
color: #ffffff;
padding: 5px;
}
.alt-post {
background: #000099;
}
The Loop
60
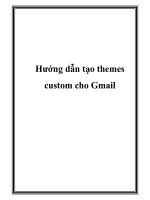
Assuming that your stylesheet is linked to your theme appropriately, you should see something
like the example shown in the following screenshot:
How it works
Each time The Loop is iterated over, PHP checks to see if the $alt_post variable indicates
whether an alternate post was rendered on the previous run. If it does, it switches the
variable back to the empty string. Otherwise, it sets the variable to alt-post.
When the post container is being printed, it includes a class of post by default, and then
prints out the value of the $alt_post variable. If the $alt_post variable was set, the
post container then has a class of alt-post in addition to post.
In the theme's stylesheet, you can change the style for the alternate post. In this instance,
the background of a regular post will be dark red whereas every alternate post will have a
background of royal blue.
Chapter 3
61
Styling posts in a particular category
differently
In WordPress, one of the best ways to differentiate content is via the use of categories. In your
theme, styling posts from different categories in unique ways will help visitors nd what they
want quickly and easily.
How to do it
Decide where you want to check for a particular category. For this example, you'll be checking
for the Featured category and appending a little snippet of text. Insert your cursor inside of
your Loop, and then add the following code:
<?php
$category_name = 'Featured';
if(in_category($category_name)) {
echo '<div class="featured-icon">Featured</div>';
}
?>
After you detect the special category and print the extra piece of content, you can style it
however you want. In this particular case, you may want to use absolute positioning to add a
star icon or badge to the post's main content container. Alternatively, you could add a large
header that makes the post stand out. There is no limit to what you can do.
How it works
The in_category function operates on the currently-active post in The Loop. In this
instance, you are checking to see if the post is in a category named Featured. If it is, then
an extra piece of HTML markup is displayed. This piece of markup could be styled in a way
that makes it readily apparent that the post is a featured piece of content.
This technique can be easily adopted for use with other content types: highlighted posts, code
snippets, and more. The limit is your imagination.
The Loop
62
Showing every post in a category on a
category archive page
If you want your category pages to operate as a complete archive of all posts in that category
(basically removing any type of pagination), you can make some simple changes to the
basic Loop.
How to do it
Open or create your theme's category.php le. This template le is used to display your
category archives. Create a basic Loop by following the directions from the recipe Creating
a basic Loop.
Above your Loop, insert the following code:
global $wp_query;
query_posts(
array_merge(
array('nopaging' => true),
$wp_query->query
)
);
How it works
In the above code snippet, the query_posts function is used to modify the global query object.
To ensure that all of the appropriate query parameters are preserved from the original query, the
new parameters are merged with the old parameters. The old parameters are kept in the array
$wp_query->query.
The nopaging parameter is set to true to indicate that all posts should be returned, and any
post limit should be ignored.
See also
Creating a basic Loop
4
Template Tags
In this chapter, we will cover:
Displaying the post title
Automatically limiting the number of words of content
Determining if the user is on a specic page
Determining if the user is viewing a post in a particular category
Displaying the post date for each post
Highlighting search terms in post content
Displaying login/logout links
Adding navigation through older/newer posts
Displaying an edit link for posts
Displaying custom eld content
Displaying a post author's avatar
Introduction
The most important part of any website is its content. Your content and its presentation is the
reason people visit and stick around, the thing that search engines index, and the way you get
your unique message out to the world.
Luckily for you, WordPress offers a variety of interesting ways to display content for all of the
data it manages. As a theme developer, you can also modify the content before WordPress
displays it, allowing you to produce some pretty interesting effects, such as search term
highlighting, automatic appending of static content to all posts, or truncation of content for
non-logged-in users.
Template Tags
64
In this chapter, you'll learn about some of WordPress' built-in content display functions, create
your own unique content mashups, and learn how to exploit the power of WordPress to display
the data that you want to display where you want to display it.
Displaying the post title
For a blog, one of the most important pieces of content that you can display is a post's
title. The title should be interesting; it should grab attention, it should provide great linking
material, and it should make your readers want more. In this recipe, we'll start talking about
template tags by describing how you would display a post's title.
How to do it
First, open a template le for your theme that contains a variation on The Loop. You can learn
more about The Loop in Chapter 3. As a reminder, it looks something like this:
<?php
if(have_posts()) {
while(have_posts()) {
// Display content here
}
}
Inside of your instance of The Loop, insert the following code, in order to display each
post's title:
<?php the_title(); ?>
To see this in action, you can refer back to the recipe Creating a basic Loop. There you
used the_title inside of The Loop, successfully displaying the title of each of the posts.
How it works
the_title is one of a variety of functions that are used to display information about the
post data currently held in the global $post object. To do this, they look at the value of the
$post variable and apply the necessary lters to the appropriate content before sending it
to the browser. In the function the_title, WordPress looks at the post_title property of
the $post object and applies all of the lters hooked to the_title. The application of these
lters allows the WordPress core code, as well as third-party plugins, to modify the title value
for any post.
If you're interested in diving deeper into the template tag function denitions, you can nd
most of them inside a le contained in your WordPress installation at wp-includes/post-
template.php
. This is something that I highly recommend, as it can help you tremendously
as you try to do more and more complex things with WordPress.