Phát triển ứng dụng cho iPhone và iPad - part 6 pptx
Bạn đang xem bản rút gọn của tài liệu. Xem và tải ngay bản đầy đủ của tài liệu tại đây (2.3 MB, 10 trang )
The iPhone and iPad
Database: SQLite
WHAT ’ S IN THIS CHAPTER?
Creating an SQLite database
Connecting your application to a database and displaying its data
Running SQL statements against an SQLite database to insert and
select data
Building a database and an iPhone application to view master - detail
relationships
As an application developer, you have several options when it comes to storing the data
used by your iPhone application. You could use plist fi les, XML, or plain text. While any of
these solutions are acceptable in certain situations, they may not provide the best effi ciency
for your application. None of these formats allows you to query for specifi c data quickly,
nor do they provide an effi cient way to sort your data. If your application is designed to work
with a large data set and you would like the ability to query and sort it, you should consider
using SQLite.
In the last chapter, you learned how to display a small dataset that was stored in a simple
array. As you move on to build more complicated applications, chances are that your data set
will grow. Hard - coded arrays will probably not meet the demanding requirements of a more
complicated application. You will fi nd as you progress with your iPhone development that you
need a data storage solution more robust than a simple array.
In this chapter, you will learn about the database engine that backs many iPhone applications,
SQLite. By the end of this chapter, you will be able to build an application that uses SQLite as
its backing data store.
➤
➤
➤
➤
2
CH002.indd 19CH002.indd 19 9/20/10 2:31:19 PM9/20/10 2:31:19 PM
20
❘
CHAPTER 2 THE IPHONE AND IPAD DATABASE: SQLITE
To use SQLite, you will fi rst learn to create a database using the command - line application provided
with Mac OS X. This tool will enable you to create the schema of your database, populate it with
data, and perform queries.
Next, you will learn how to deploy your database with an iPhone application, connect to it in code,
and display the results or your SQL queries.
By the end of the chapter, you will know how to build a fully functional database application that
can be used to view data that has a master - detail relationship: in this case, a product catalog.
WHAT IS SQLITE?
SQLite is an open source library, written in C, that implements a self - contained SQL relational
database engine. You can use SQLite to store large amounts of relational data, and it is optimized
for use on embedded devices like the iPhone.
While the Core Data API is also designed to store data on the iPhone, its primary purpose is to
persist objects created by your application. SQLite excels when pre - loading your application with a
large amount of data, whereas Core Data excels at managing data created on the device.
The SQLite Library
SQLite is an open source library, written in C, that implements a fully self - contained SQL database
engine. All of the data required to implement the database is stored in a single, cross - platform disk
fi le. Because SQLite is self - contained, it requires few external libraries and little support from the
operating system. This is the prime reason that it is ideal for a mobile platform like the iPhone.
SQLite has been adopted for use on the iPhone for other reasons as well, including its very small
footprint. Weighing in at less than 300K, the library is small enough to use effectively on mobile
devices with limited memory. What ’ s more, SQLite requires no confi guration fi les, has no setup
procedure, and needs no administration. You can just drop your database fi le on the iPhone, include
the SQLite library in your iPhone project, and you are ready to roll.
Because SQLite implements most of the SQL92 standard, you will fi nd working with an SQLite
database intuitive if you already know SQL. You should keep in mind that there are some features
of SQL92 that are not currently supported in SQLite. These include
RIGHT and FULL OUTER JOIN ,
complete support for
ALTER TABLE , FOR EACH STATEMENT triggers, writeable VIEW s, and GRANT
and
REVOKE permissions. For more detail on unsupported functionality, take a look at the SQLite
web site
.
Because the interface to SQLite is written in C, and Objective - C is a superset of C, you can easily
incorporate SQLite into your Objective - C – based iPhone projects.
SQLite and Core Data
When starting a data - centric application for the iPhone, there is a signifi cant architectural decision
that you need to make. Should you use SQLite or Core Data for your data management needs?
CH002.indd 20CH002.indd 20 9/20/10 2:31:23 PM9/20/10 2:31:23 PM
Let ’ s take a quick look at what Core Data is and isn ’ t. First, Core Data is not a relational database like
SQLite. Core Data is an object persistence framework. Its primary purpose is to provide the developer
with a framework to persist objects created by the application. Core Data allows you to model your
data as objects using a convenient graphical interface built into Xcode. You can then manipulate
those objects in code with an extensive set of APIs. Designing and defi ning your data objects using the
graphical interface can simplify the creation of the Model portion of the MVC architecture.
Core Data can use SQLite, among other storage types, as a backing store for its data. This causes
some confusion for developers. It is a common misconception that because Core Data can use
SQLite to store data, Core Data is a relational database. This is not correct. As mentioned, Core
Data is not an implementation of a relational database. Although Core Data uses SQLite in the
background to store your data, it does not store the data in a way that is directly accessible to the
developer. In fact, you should never attempt to manually modify the backing database structure or
its data. Only the Core Data framework should manipulate the structure of the database and the
data itself. You can feel free to open the SQLite database and take a look at it if you are curious,
but making any modifi cations to the data or database structure will likely invalidate it and cause
problems when trying to access it using Core Data.
While Core Data is the preferred framework for dealing with data that is created on the iPhone,
SQLite remains a useful tool for iPhone developers. If you need the functionality provided by a
relational database, you should strongly consider using SQLite directly. However, if you only need
to persist objects created during the use of your application, you should consider using Core Data.
You explore the Core Data framework in detail in Part II of the book.
While Core Data is the recommended framework for creating data on the iPhone, you may want to
forego Core Data and use the SQLite API directly for several reasons.
First, if you are targeting devices that could be running a version of the iPhone OS prior to 3.0, you
cannot use Core Data. Core Data became available with the 3.0 release of the iPhone OS.
You might also choose to use the SQLite database directly if you need to preload a large amount of
data on the device. Take, for example, a GPS navigation application. Navigation applications need
a great deal of data, including points of interest and the maps themselves. A good option for the
architectural design is to create an SQLite database that contains all of the POI and map data. You
can then deploy that database with your application and use SQLite APIs to access the database.
It is easy to create an SQLite database using desktop tools. You can then use the same tools, scripts,
or a desktop application to load your data into the database. Then, you can simply deploy the
database to the device with your application.
In this chapter, you are going to build the database for a catalog application that could be used by
a mobile sales force. The catalog will need to be preloaded with data, not populated on the iPhone
itself, so SQLite will be used as the back - end data store.
BUILDING A SIMPLE DATABASE
In this section, you will build the back - end database for your sales catalog application. Before you start
designing the database and the application, it is important to understand what the application will do.
In the real world, you will (or should) get a detailed specifi cation defi ning what the application should
Building a Simple Database
❘
21
CH002.indd 21CH002.indd 21 9/20/10 2:31:24 PM9/20/10 2:31:24 PM
22
❘
CHAPTER 2 THE IPHONE AND IPAD DATABASE: SQLITE
do and how it should look. Of course the implementation, or how it should work, is up to the designer
and developer. So, let ’ s lay out some simple requirements for the catalog application.
The purpose of the application is to display your company ’ s catalog of widgets. Each widget will
have a manufacturer, a product name, some details about the product, the price of the product, the
quantity on hand, the country of origin, and a picture of the product.
The application should start up by showing a list of products. Tapping on a product should bring up
a detail page showing detailed information about the product.
It is often helpful to mock up the user interface and design the database on paper as a fi rst
step in the design of an application. Often, the interface itself can help drive decisions about
how to organize the data in the database. I like to use OmniGraffl e by the Omni Group
(
e/ ) to do my design work. It is an
easy - to - use yet powerful vector graphics application for the Mac that allows me to quickly do
my design work. Additionally, the output of the application is good enough to use in presentations
to managers and other stakeholders who may not be technically inclined. It is far easier to explain
an application design with pictures than words!
I suspect that the database gurus out there are pulling their hair out right now because it is common
wisdom that the user interface and the data should be completely decoupled and that the data
should be normalized independently. However, when developing applications that are designed to
run on an embedded device like the iPhone, performance is a very important concern. Data that is
fully normalized, with no duplicated data, can have
a negative impact on performance. Sometimes the
cost to execute a complicated query is higher than
the cost of maintaining the same data in two tables.
I ’ m not suggesting that you should not normalize
your data at all, just keep in mind how the data will
be displayed while working through the database
design process.
Designing the Database
If you don ’ t know, normalization is the process
of breaking down your data in a way that makes
it easy to query. Normalization helps to avoid
common problems in database storage such as
duplication of data. For example, when creating
your database, a designer may want to store all of
the data in a single table, as in Figure 2 - 1.
For those unfamiliar with the Entity - Relationship
Diagram (ERD), the box represents an entity or
table in the database. The ovals that are connected
to the entity are the attributes of that entity or the
fi elds of the table. So, this diagram shows one table
with each attribute as a fi eld in the table.
Name
Manufacturer
Details
Price
Product
QuantityOnHand
CountryOfOrigin
Image
ID
FIGURE 2 - 1: Storing the data in a single table
CH002.indd 22CH002.indd 22 9/20/10 2:31:24 PM9/20/10 2:31:24 PM
The problem with this database design is that it is not normalized. There will be duplication of
data if there is more than one product in the catalog manufactured by the same manufacturer or if
there is more than one product manufactured in a specifi c country. In that case, the data may look
something like Figure 2 - 2.
FIGURE 2 - 2: Data in a single table
You can see that the same manufacturer has more than one product in the database. Also, there
is more than one product made in a specifi c country. This design is a maintenance problem. What
happens if the data entry person populating the database types in “ Spirit Industries ” for item 1 and
“ Spit Industries ” for item 3? It will appear in the application that two different companies make
these products, when in reality they are both manufactured by “ Spirit Industries. ” This is a data
integrity problem that can be avoided by normalizing the data. You can remove the manufacturer
and country of origin from the product table and create new tables for these fi elds. Then, in the
product table, you can just reference the value in the related tables.
Additionally, this new design could allow you to add more detail about the manufacturer such as
address, contact name, and so on. For the sake of simplicity, you won ’ t be doing that, but proper
normalization helps make this type of fl exibility possible.
The new design should look something like Figure 2 - 3.
Name
Name
Price
Product
Has
Manufacturer
Country
1
1
QuantityOnHand
Image
ProductID
ManufacturerID
Details
Country
CountryID
1
FIGURE 2 - 3: Normalized database tables
Building a Simple Database
❘
23
CH002.indd 23CH002.indd 23 9/20/10 2:31:25 PM9/20/10 2:31:25 PM
24
❘
CHAPTER 2 THE IPHONE AND IPAD DATABASE: SQLITE
Figure 2 - 4 shows what the new normalized database will look like.
FIGURE 2 - 4: Data in normalized tables
You can see that instead of specifying the manufacture and origin explicitly in the main Products
table, you just reference the ID in the related tables. The fact that you can relate data in one table to
data in another gives a relational database both its name and its power.
While normalization is important, it is possible to take it too far and over - normalize your data. For
instance, you could create a separate table for price. In that case, all products that cost $1 would
reference a row in a Price table that contains the value $1. While doing this would eliminate the
duplication of data for all products that cost $1, it would be painful to write the code to maintain
the relationship between the Product and Price tables. This would be considered over - normalized
and should be avoided.
As important as normalization is, you should know that laying out the data in a way that optimizes
its display is important as well. Optimizing the user experience on the iPhone is often a diffi cult and
tedious process. Users expect a very fast and smooth user experience. If the data is over - normalized,
it may be an optimal data storage strategy, but if accessing the data for display at runtime is too
costly, the performance of the application will suffer. Remember that you are writing applications
for a mobile platform with limited CPU capability. You will pay a penalty for using overly complex
SQL to access your data. You are better off in some instances repeating data instead of using
relationships. I am not advocating not normalizing your data at all; just keep in mind how the data
will be used on the device as you design your database.
Creating the Database
You can use a couple of different methods to create, modify, and populate your SQLite database.
Let ’ s fi rst look at is the command - line interface.
Using a command - line interface may not seem optimal in these days of graphical interfaces, but
the command line does have its advantages. One feature that stands out is that you can create and
populate a database using the command - line interface and scripts. For example, you could write a
CH002.indd 24CH002.indd 24 9/20/10 2:31:25 PM9/20/10 2:31:25 PM
PERL script that gets data out of an enterprise database such as Oracle or MySQL and then creates
an SQLite database with a subset of the data. While scripting is beyond the scope of this book, I
will show you how to create and populate a database using the command - line tool.
The command - line interface can also be used to import data from a fi le into a table, read in and
execute a fi le that contains SQL, and output data from a database in a variety of formats including:
Comma - separated values
Left - aligned columns
HTML
< table > code
SQL insert statements for
TABLE
One value per line
Values delimited by
.separator string
Tab - separated values
TCL list elements
To start the command - line tool, you ’ ll need to bring up a terminal window. Next, change to the
directory where you want to store your database fi le. For this example, you create the database in
the root of your home directory and then copy it into the Xcode project that you will create later.
Start the command - line tool and create your new database by typing sqlite3 catalog.db at
the command prompt. This command will start the command - line tool and attach the database
catalog.db . The ATTACH DATABASE command will either attach an existing database to the SQLite
tool or create a new database if the specifi ed fi le doesn ’ t already exist. You can attach multiple
databases to a single instance of the command - line tool and reference data in each database using
dot notation in the form
database - name.table - name . This powerful feature can be used to
migrate data from one database to another.
Aside from being able to execute SQL at the command line, the command - line interface tool has
various metacommands that are used to control the tool itself. These can be displayed by typing
.help from the command line. You can see what databases you have attached to the current
instance of the tool by typing
.databases at the command line. You can quit the command - line
tool by typing
.exit or .quit .
To create your main Product table, type the
CREATE TABLE statement at the SQLite command
prompt as follows:
CREATE TABLE “main”.”Product”
(“ID” INTEGER PRIMARY KEY AUTOINCREMENT NOT NULL ,
“Name” TEXT, “ManufacturerID” INTEGER, “Details” TEXT,
“Price” DOUBLE, “QuantityOnHand” INTEGER,
“CountryOfOriginID” INTEGER, “Image” TEXT );
A full discussion of the SQL language is beyond the scope of this book. You should pick up a copy
of SQL For Dummies by Allen Taylor (Wiley, 2010) if you are interested in learning more about the
SQL language.
➤
➤
➤
➤
➤
➤
➤
➤
Building a Simple Database
❘
25
CH002.indd 25CH002.indd 25 9/20/10 2:31:26 PM9/20/10 2:31:26 PM
26
❘
CHAPTER 2 THE IPHONE AND IPAD DATABASE: SQLITE
The previous SQL statement creates a table called Product in the main database. It adds the fi elds
that you designed in your ERD. Finally, it specifi es that the ID fi eld is the
PRIMARY KEY and that it is
an
AUTOINCREMENT fi eld. This means that you do not have to supply ID values; the database engine
will generate them for you.
Now that you have created the Product table, let ’ s move on to creating the Manufacturer and
CountryOfOrigin tables. Type the following SQL commands at the command prompt:
CREATE TABLE “main”.”Manufacturer”
(“ManufacturerID” INTEGER PRIMARY KEY AUTOINCREMENT NOT NULL ,
“Name” TEXT NOT NULL );
CREATE TABLE “main”.”Country”
(“CountryID” INTEGER PRIMARY KEY AUTOINCREMENT NOT NULL ,
“Country” TEXT NOT NULL );
At the time of this writing, the SQLite engine provided with the Snow Leopard operating system is
version 3.6.12. This version does not implement foreign key constraints. Foreign key constraints are
planned for inclusion in SQLite version 3.6.19, but this is only a draft proposal. Thus, the developer
is responsible for enforcing these constraints.
You have just successfully created your database. You should have a database fi le that contains three
tables:
Product , Manufacturer , and CountryOfOrigin . Now, let ’ s get some data into the tables.
Populating the Database
Having a database is great, but the data is what really counts. You can populate your database one
item at a time from the command line using
INSERT SQL statements.
Creating Records with the INSERT Command
Figure 2 - 5 shows the syntax for the INSERT statement.
INSERT
REPLACE
REPLACE
IGNORE
INTO database-name
select-stmt
VALUESDEFAULT
,
.
,
table-name
OR ROLLBACK
ABORT
FAIL
(
column-name VALUES
expr
)()
FIGURE 2 - 5: The Insert statement syntax
CH002.indd 26CH002.indd 26 9/20/10 2:31:26 PM9/20/10 2:31:26 PM
In case you aren ’ t sure, I ’ ll quickly go over how to read SQL syntax diagrams.
The open circles at the beginning and end are terminators. They show where the SQL statement
starts and ends. The arrow that comes out of the terminator indicates the main branch of the
statement.
Keywords are indicated in all caps. Keywords on the main branch are required. So, for the
INSERT
statement,
INSERT , INTO , and VALUES are required for an INSERT statement to be valid SQL.
Anything that is not on the main branch is optional. Choices for optional keywords are left - aligned.
For example, the
OR after INSERT is optional. If you do use OR , you must pick one and only one of
the options
ROLLBACK , ABORT , REPLACE , FAIL , or IGNORE .
Text that is not in all caps is data provided by the user. So, the
INSERT SQL Figure 2 - 5 indicates that
the user needs to specify the database name and table name into which the data will be inserted.
Additionally, the user must specify the columns into which the data will be inserted and, fi nally, the
values to be inserted.
You can insert a row into the
Product table using the following INSERT statement:
INSERT INTO “main”.”Product”
(“Name”,”ManufacturerID”,”Details”,”Price”,”QuantityOnHand”,
“CountryOfOriginID”,”Image”)
VALUES (‘Widget A’,’1’,’Details of Widget A’,’1.29’,’5’,’1’, ‘Canvas_1’)
While it is possible, inserting data one row at a time using SQL is not very effi cient. I mentioned
earlier that the command - line tool has the ability to import text fi les into the database. This can
come in very handy when dumping data from another database, Microsoft Excel, or simply a text
fi le. Instead of typing in each
INSERT statement, you can create a text fi le for each of the database
tables and then use the import functionality to get the data into the database.
Create a text fi le in your home directory called
products.txt and include the following data. Note
that tabs are used between each fi eld as a delimiter. You can also download the fi le from this book ’ s
companion web site.
1 Widget A 1 Details of Widget A 1.29 5 1 Canvas_1
2 Widget B 1 Details of Widget B 4.29 15 2 Canvas_2
3 Widget X 1 Details of Widget X 0.29 25 3 Canvas_3
4 Widget Y 1 Details of Widget Y 1.79 5 3 Canvas_4
5 Widget Z 1 Details of Widget Z 6.26 15 4 Canvas_5
6 Widget R 1 Details of Widget R 2.29 45 1 Canvas_6
7 Widget S 1 Details of Widget S 3.29 55 1 Canvas_7
8 Widget T 1 Details of Widget T 4.29 15 2 Canvas_8
9 Widget L 1 Details of Widget L 5.29 50 3 Canvas_9
10 Widget N 1 Details of Widget N 6.29 50 3 Canvas_10
11 Widget E 1 Details of Widget E 17.29 25 4 Canvas_11
12 Part Alpha 2 Details of Part Alpha 1.49 25 1 Canvas_12
Building a Simple Database
❘
27
CH002.indd 27CH002.indd 27 9/20/10 2:31:27 PM9/20/10 2:31:27 PM
28
❘
CHAPTER 2 THE IPHONE AND IPAD DATABASE: SQLITE
13 Part Beta 2 Details of Part Beta 1.89 35 1 Canvas_13
14 Part Gamma 2 Details of Part Gamma 3.46 45 2 Canvas_14
15 Device N 3 Details of Device N 9.29 15 3 Canvas_15
16 Device O 3 Details of Device O 21.29 15 3 Canvas_16
17 Device P 3 Details of Device P 51.29 15 4 Canvas_17
18 Tool A 4 Details of Tool A 14.99 5 1 Canvas_18
19 Tool B 4 Details of Tool B 44.79 5 1 Canvas_19
20 Tool C 4 Details of Tool C 6.59 5 1 Canvas_20
21 Tool D 4 Details of Tool D 8.29 5 1 Canvas_21
products.txt
Each column, separated by a tab in the text fi le, represents a fi eld in the database. The fi elds
must be in the order that they were created using the
CREATE TABLE command. So the order of
the fi elds is
ID , Name , ManufacturerID , Details , Price , QuantityOnHand , CountryOfOriginID ,
and
Image .
To import your data fi le into the database, open up the SQLite command prompt if you do not still
have it open. Type the command
.separator “ \t “ to specify that you are using the tab character
\t as the fi eld separator in the data fi le. Then, type . import “ products.txt ” Product to import
the fi le
products.txt into the Product table. Your data should have been successfully imported
into the database.
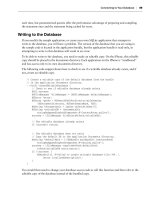
Reading Your Rows with the SELECT Command
To verify that your data was successfully imported, you can display it using the SQL SELECT
statement. The syntax for the
SELECT statement appears in Figure 2 - 6:
SELECT
FROM
DISTINCT
ALL
BY
result-column
,
,
ordering-term
join-source
WHERE
expr
expr
GROUP HAVING
FIGURE 2 - 6: The Select statement syntax
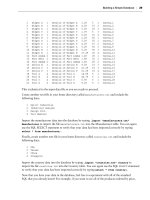
Type select * from Product; to see all of the rows in your product table. The output should
look like this:
CH002.indd 28CH002.indd 28 9/20/10 2:31:28 PM9/20/10 2:31:28 PM