Phát triển ứng dụng cho iPhone và iPad - part 10 pps
Bạn đang xem bản rút gọn của tài liệu. Xem và tải ngay bản đầy đủ của tài liệu tại đây (2.88 MB, 10 trang )
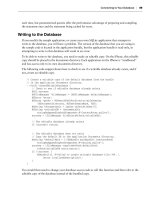
(a) UITableViewCellStyleDefault (b) UITableViewCellStyleValue1
(c) UITableViewCellStyleValue2 (d) UITableViewCellStyleSubtitle
FIGURE 3 - 1: TableView Cell Styles
On the line where you initialize the cell, change the code to use UITableViewCellStyleValue1 :
cell = [[[UITableViewCell alloc] initWithStyle:
UITableViewCellStyleValue1
reuseIdentifier:CellIdentifier] autorelease];
The table now displays the part name and the manufacturer as shown in Figure 3 - 1 (b).
Customizing the TableView
❘
59
CH003.indd 59CH003.indd 59 9/18/10 9:26:17 AM9/18/10 9:26:17 AM
60
❘
CHAPTER 3 DISPLAYING YOUR DATA: THE UITABLEVIEW
Changing the default to UITableViewCellStyleValue2 results in a table that looks like
Figure 3 - 1 (c).
Changing the default to
UITableViewCellStyleSubtitle results in a table that looks like
Figure 3 - 1 (d).
Now, you add some images to the catalog items. You can obtain the images used in the example
from the book ’ s web site. Add the images to your application by right - clicking on the Resources
folder in the left - hand pane of Xcode and select Add Existing Files. Next, you should add code to
the
tableView:cellForRowAtIndexPath: method that will look for the image in the application
bundle using the image name from the database.
NSString *filePath = [[NSBundle mainBundle] pathForResource:product.image
ofType:@”png”];
UIImage *image = [UIImage imageWithContentsOfFile:filePath];
cell.imageView.image = image;
RootViewController.m
Finally, you can add an accessory to each cell. The accessory is the little arrow on the right side
of a cell that tells the user that selecting the cell will take him or her to another screen. To add the
accessory, you need to add a line of code to the
tableView:cellForRowAtIndexPath: method to
confi gure the cell ’ s
accessoryType :
cell.accessoryType = UITableViewCellAccessoryDisclosureIndicator;
There are a few different accessory types that you can use:
UITableViewCellAccessoryDisclosureIndicator is the gray
arrow that you have added. This control doesn ’ t respond to
touches and is used to indicate that selecting this cell will bring
the user to a detail screen or the next screen in a navigation
hierarchy.
UITableViewCellAccessoryDetailDisclosureButton presents
a blue button with an arrow in it. This control can respond
to touches and is used to indicate that selecting it will lead to
confi gurable properties.
UITableViewCellAccessoryCheckmark displays a checkmark
on the right side of the cell. This control doesn ’ t respond to
touches.
Figure 3 - 2 shows how a catalog looks after adding the images and a
disclosure indicator accessory.
➤
➤
➤
FIGURE 3 - 2: Catalog
application with images
CH003.indd 60CH003.indd 60 9/18/10 9:26:18 AM9/18/10 9:26:18 AM
The fi nal code for the cellForRowAtIndexPath: method should look like this:
- (UITableViewCell *)tableView:(UITableView *)tableView
cellForRowAtIndexPath:(NSIndexPath *)indexPath {
static NSString *CellIdentifier = @”Cell”;
UITableViewCell *cell = [tableView
dequeueReusableCellWithIdentifier:CellIdentifier];
if (cell == nil) {
cell = [[[UITableViewCell alloc]
initWithStyle:UITableViewCellStyleSubtitle
reuseIdentifier:CellIdentifier] autorelease];
}
// Configure the cell.
// Get the Product object
Product* product = [self.products objectAtIndex:[indexPath row]];
cell.textLabel.text = product.name;
cell.detailTextLabel.text = product.manufacturer;
cell.accessoryType = UITableViewCellAccessoryDisclosureIndicator;
NSString *filePath = [[NSBundle mainBundle] pathForResource:product.image
ofType:@”png”];
UIImage *image = [UIImage imageWithContentsOfFile:filePath];
cell.imageView.image = image;
return cell;
}
RootViewController.m
There are also other properties that you can use to provide additional customization for the
TableViewCell . You can use the backgroundView property to assign another view as the
background of a cell, set the
selectionStyle to control how a cell looks when selected, and set
the indentation of text with the
indentationLevel property.
You can further customize a cell by modifying properties that are exposed in the
UIView class
because
UITableViewCell is a subclass of UIView . For instance, you can set the background color
of a cell by using the
backgroundColor property of the UIView .
Adding Subviews to the contentView
If none of the existing TableViewCell styles work for your application, it is possible to customize
the
TableViewCell by adding subviews to the contentView of the TableViewCell . This approach
is effective when the OS can perform the cell layout using autoresizing and the default behavior of
the cell is appropriate for your application. If you need full control of how the cell is drawn or wish
to change the behavior of the cell from the default, you will need to create a custom subclass of
UITableViewCell . You will learn how to create this subclass in the next section.
Customizing the TableView
❘
61
CH003.indd 61CH003.indd 61 9/18/10 9:26:19 AM9/18/10 9:26:19 AM
62
❘
CHAPTER 3 DISPLAYING YOUR DATA: THE UITABLEVIEW
Because UITableViewCell inherits from UIView , a cell has a content
view, accessible through the
contentView property. You can add
your own subviews to this
contentView and lay them out using the
superview ’ s coordinate system either programmatically or with IB. When
implementing customization this way, you should make sure to avoid
making your subviews transparent. Transparency causes compositing to
occur, which is quite time - consuming. Compositing takes time and will
result in degraded TableView scrolling speed. You look at this in more
detail at the end of this chapter in the section on performance.
Suppose that your customer is not happy with the table in the current
application. He wants to see all of the existing information plus an
indication of where the product was made, and the price. You could use a
fl ag icon to represent the country of origin on the right - hand side and add
a label to display the price, as shown in the mockup in Figure 3 - 3. It ’ s not
a beautiful design, but it ’ s what the customer wants.
It is impossible to achieve this layout using any of the default cell styles.
To build this customized cell, you will hand - code the layout of the cell.
Because you will be modifying the cell you display in the table,
you will be working in the
RootViewController.m fi le and modifying the tableView:
cellForRowAtIndexPath:
method.
First, you need variables for the two images and three labels that you plan to display. At the
beginning of the method, add the declarations for these items:
UILabel *nameLabel, *manufacturerLabel, *priceLabel;
UIImageView *productImage, *flagImage;
Next, declare an NSString for the CellIdentifier and try to dequeue a cell using that identifi er:
static NSString *CellIdentifier = @”Cell”;
UITableViewCell *cell = [tableView
dequeueReusableCellWithIdentifier:CellIdentifier];
You have seen this code before in previous examples, but until now I haven ’ t explained how it works.
Creating
TableViewCells is a relatively time - consuming process. In addition, memory is scarce on
an embedded device such as the iPhone or iPad. It is ineffi cient to create all of the cells and have them
hanging around using memory while off - screen and not viewable. Conversely, because it takes time to
create cells, it would be a performance hit to create them dynamically each time they were needed.
In order to solve these problems, the engineers at Apple came up with a very good solution. They
gave the
TableView a queue of TableViewCells from which you can get a reference to an existing
cell object. When you need a cell, you can try and pull one from the queue. If you get one, you can
reuse it; if you don ’ t, you have to create a new cell to use that will eventually be added to the queue.
The framework handles the control logic by determining which cells are queued and available, and
which are currently being used.
FIGURE 3 - 3: Catalog
mockup with fl ags
CH003.indd 62CH003.indd 62 9/18/10 9:26:19 AM9/18/10 9:26:19 AM
All you need to do as a developer is try to dequeue a cell and check the return. If the return is nil ,
you have to create the cell. If it is not, you have a valid cell that you can use. The type of cell that is
dequeued is based on the cell identifi er that you pass in when trying to dequeue. Remember that you
set this identifi er when you initialized a new cell with the
reuseIdentifier .
The preceding code attempts to dequeue a cell using the
reuseIdentifier , Cell . The following if
(cell==nil)
block either creates a new cell with the Cell reuseIdentifier or it goes on to work
with the cell that was dequeued.
If the cell needs to be created, the following code is executed:
if (cell == nil) {
// Create a new cell object since the dequeue failed
cell = [[[UITableViewCell alloc] initWithStyle:UITableViewCellStyleSubtitle
reuseIdentifier:CellIdentifier] autorelease];
// Set the accessoryType to the grey disclosure arrow
cell.accessoryType = UITableViewCellAccessoryDisclosureIndicator;
// Configure the name label
nameLabel = [[[UILabel alloc]
initWithFrame:CGRectMake(45.0, 0.0, 120.0, 25.0)]
autorelease];
nameLabel.tag = NAMELABEL_TAG;
// Add the label to the cell’s content view
[cell.contentView addSubview:nameLabel];
// Configure the manufacturer label
manufacturerLabel = [[[UILabel alloc]
initWithFrame:CGRectMake(45.0, 25.0, 120.0, 15.0)]
autorelease];
manufacturerLabel.tag = MANUFACTURERLABEL_TAG;
manufacturerLabel.font = [UIFont systemFontOfSize:12.0];
manufacturerLabel.textColor = [UIColor darkGrayColor];
// Add the label to the cell’s content view
[cell.contentView addSubview:manufacturerLabel];
// Configure the price label
priceLabel = [[[UILabel alloc]
initWithFrame:CGRectMake(200.0, 10.0, 60.0, 25.0)]
autorelease];
priceLabel.tag = PRICELABEL_TAG;
// Add the label to the cell’s content view
[cell.contentView addSubview:priceLabel];
// Configure the product Image
productImage = [[[UIImageView alloc]
initWithFrame:CGRectMake(0.0, 0.0, 40.0, 40.0)]
autorelease];
productImage.tag = PRODUCTIMAGE_TAG;
// Add the Image to the cell’s content view
Customizing the TableView
❘
63
CH003.indd 63CH003.indd 63 9/18/10 9:26:20 AM9/18/10 9:26:20 AM
64
❘
CHAPTER 3 DISPLAYING YOUR DATA: THE UITABLEVIEW
[cell.contentView addSubview:productImage];
// Configure the flag Image
flagImage = [[[UIImageView alloc]
initWithFrame:CGRectMake(260.0, 10.0, 20.0, 20.0)]
autorelease];
flagImage.tag = FLAGIMAGE_TAG;
// Add the Image to the cell’s content view
[cell.contentView addSubview:flagImage];
}
RootViewController.m
The fi rst line allocates a new cell and initializes it with the Cell reuseIdentifier . You have to do
this because
cell==nil indicates that no existing cells are available for reuse.
Each block thereafter is similar. You fi rst create the object to be added to the cell, either a
UILabel
or
UIImage . Then, you confi gure it with the attributes that you want such as fonts and text colors.
You assign a tag to the object that you can use to get the instance of the label or image if you are
reusing an existing cell. Finally, you add the control to the
contentView of the cell.
The tag values for each control must be integers and are commonly defi ned using
#define
statements. Put the following
#define statements before the tableView:cellForRowAtIndexPath:
method defi nition:
#define NAMELABEL_TAG 1
#define MANUFACTURERLABEL_TAG 2
#define PRICELABEL_TAG 3
#define PRODUCTIMAGE_TAG 4
#define FLAGIMAGE_TAG 5
RootViewController.m
The position of each UI element is set in the initWithFrame method call. The method takes a CGRect
struct that you create using the
CGRectMake function. This function returns a CGRect struct with the
x, y, width , and height values set.
Next, code the
else clause that gets called if you successfully dequeue a reusable cell:
else {
nameLabel = (UILabel *)[cell.contentView
viewWithTag:NAMELABEL_TAG];
manufacturerLabel = (UILabel *)[cell.contentView
viewWithTag:MANUFACTURERLABEL_TAG];
priceLabel = (UILabel *)[cell.contentView
viewWithTag:PRICELABEL_TAG];
productImage = (UIImageView *)[cell.contentView
viewWithTag:PRODUCTIMAGE_TAG];
flagImage = (UIImageView *)[cell.contentView
viewWithTag:FLAGIMAGE_TAG];
}
RootViewController.m
CH003.indd 64CH003.indd 64 9/18/10 9:26:20 AM9/18/10 9:26:20 AM
You can now see how you use tags. The viewWithTag function of the contentView returns a
pointer to the UI object that was defi ned with the specifi ed tag. So, when you create a new cell, you
defi ne the UI objects with those tags. When you dequeue a reusable cell, the tags are used to get
pointers back to those UI objects. You need these pointers to be able to set the text and images used
in the UI objects in the fi nal section of the method:
// Configure the cell.
// Get the Product object
Product* product = [self.products objectAtIndex:[indexPath row]];
nameLabel.text = product.name;
manufacturerLabel.text = product.manufacturer;
priceLabel.text = [[NSNumber numberWithFloat: product.price] stringValue];
NSString *filePath = [[NSBundle mainBundle] pathForResource:product.image
ofType:@”png”];
UIImage *image = [UIImage imageWithContentsOfFile:filePath];
productImage.image = image;
filePath = [[NSBundle mainBundle] pathForResource:product.countryOfOrigin
ofType:@”png”];
image = [UIImage imageWithContentsOfFile:filePath];
flagImage.image = image;
return cell;
RootViewController.m
In this fi nal section, you get an instance of the Product object for the row
that you have been asked to display. Then, you use the
product object to
set the text in the labels and the images in the
UIImage objects. To fi nish
the method off, you return the cell object.
If you add the fl ag images to the project ’ s resources folder, you should
be able to build and run your application. The catalog should look like
the mockup shown in Figure 3 - 3. You can see the running application
in Figure 3 - 4.
Now that you know how to add subviews to the
contentView for a
TableViewCell , you have opened up a whole new world of customization
of the
TableViewCell . You can add any class that inherits from UIView to
a cell. Now would be a good time to take some time to explore all of the
widgets that are available to you and to think about how you could use
them in
TableView s to develop great new interfaces.
Subclassing UITableViewCell
If you need full control of how the cell is drawn or wish to change
the behavior of the cell from the default, you will want to create a
custom subclass of
UITableViewCell . It is also possible to eke out some additional performance,
particularly when dealing with problems with table scrolling, by subclassing the
UITableViewCell .
FIGURE 3 - 4: Running
catalog application
Customizing the TableView
❘
65
CH003.indd 65CH003.indd 65 9/18/10 9:26:21 AM9/18/10 9:26:21 AM
66
❘
CHAPTER 3 DISPLAYING YOUR DATA: THE UITABLEVIEW
There are a couple of ways to implement the subclass. One is to implement it just as you did in the
previous section by adding subviews to the
contentView . This is a good solution when there are
only three or four subviews. If you need to use more than four subviews, scrolling performance
could be poor.
If you need to use more than four subviews to implement your cell, or if the scrolling performance of
your
TableView is poor, it is best to manually draw the contents of the cell. This is done in a subview
of the
contentView by creating a custom view class and implementing its drawRect: method.
There are a couple of issues with the approach of implementing
drawRect . First, performance will
suffer if you need to reorder controls due to the cell going into editing mode. Custom drawing
during animation, which happens when transitioning into editing mode or reordering cells, is not
recommended. Second, if you need the controls that are embedded in the cell to respond to user
actions, you cannot use this method. You could not use this method if, for example, you had some
buttons embedded in the cell and needed to take different action based on which button was pressed.
In the example, you will be drawing text and images in the view, so implementing
drawRect is a viable
option. The cell will look like it contains image and label controls, but will in fact contain only a single
view with all of the UI controls drawn in. Therefore, the individual controls are not able to respond to
touches.
Because the
TableViewCell will have more than four controls, is not editable and doesn ’ t have sub
controls that need to respond to touches, you will implement the cell using
drawRect . You will fi nd
that most, if not all, of the tables that you create to display data will fall into this category, making
this a valuable technique to learn.
Getting Started
To work along with this example, download a copy of the original catalog project from the
book ’ s web site. You will use that as the starting point to build the custom subclass version of the
application.
In the project, you will fi rst add a new Objective - C class. In the Add class dialog, select subclass
of
UITableViewCell from the drop - down in the center of the dialog box. Call the new class
CatalogTableViewCell . This will be your custom subclass of the TableViewCell .
In the header for
CatalogTableViewCell , add an #import statement to import the Product.h
header:
#import “Product.h”
The subclass will implement a method that sets the Product to be used to display the cell.
Add a
setProduct method that users will call to set the Product to be used for the cell:
- (void)setProduct:(Product *)theProduct;
Create a new Objective - C class that is a subclass of UIView , called CatalogProductView . This
will be the custom view that is used by your cell subclass to draw the text and images that you will
display. This view will be the only subview added to the cell.
CH003.indd 66CH003.indd 66 9/18/10 9:26:22 AM9/18/10 9:26:22 AM
In the CatalogProductView header, add an import statement and instance variable for the
Product object. Also, add a function setProduct . The cell uses this function to pass the product
along to the view. The view will then use the product to get the data used to draw in the view. The
CatalogProductView header should look like this:
#import < UIKit/UIKit.h >
#import “Product.h”
@interface CatalogProductView : UIView {
Product* theProduct;
}
- (void)setProduct:(Product *)inputProduct;
@end
CatalogProductView.h
Switch back to the CatalogTableViewCell header and add a reference, instance variable, and
property for your custom view. The
CatalogTableViewCell header should look like this:
#import < UIKit/UIKit.h >
#import “Product.h”
#import “CatalogProductView.h”
@interface CatalogTableViewCell : UITableViewCell {
CatalogProductView* catalogProductView;
}
@property (nonatomic,retain) CatalogProductView* catalogProductView;
- (void)setProduct:(Product *)theProduct;
@end
CatalogTableViewCell.h
In the CatalogTableViewCell implementation fi le, below the @implementation line, add a line to
synthesize the
catalogProductView property:
@synthesize catalogProductView;
Continuing in the CatalogTableViewCell implementation, you ’ ll add code to initWithStyle:
reuseIdentifier:
to initialize the custom view to the size of the container and add the subview to
the cell ’ s content view:
- (id)initWithStyle:(UITableViewCellStyle)style
reuseIdentifier:(NSString *)reuseIdentifier {
if (self = [super initWithStyle:style reuseIdentifier:reuseIdentifier]) {
// Create a frame that matches the size of the custom cell
Customizing the TableView
❘
67
CH003.indd 67CH003.indd 67 9/18/10 9:26:22 AM9/18/10 9:26:22 AM
68
❘
CHAPTER 3 DISPLAYING YOUR DATA: THE UITABLEVIEW
CGRect viewFrame = CGRectMake(0.0, 0.0,
self.contentView.bounds.size.width,
self.contentView.bounds.size.height);
// Allocate and initialize the custom view with the dimenstions
// of the custom cell
catalogProductView = [[CatalogProductView alloc]
initWithFrame:viewFrame];
// Add our custom view to the cell
[self.contentView addSubview:catalogProductView];
}
return self;
}
CatalogTableViewCell.m
You will now implement the setProduct: method. All it will do is call the view ’ s setProduct
method:
- (void)setProduct:(Product *)theProduct
{
[catalogProductView setProduct:theProduct];
}
CatalogTableViewCell.m
Now, let ’ s get back to implementing the CatalogProductView . First, you need to implement the
initWithFrame: method to initialize the view:
- (id)initWithFrame:(CGRect)frame {
if (self = [super initWithFrame:frame]) {
// Initialization code
self.opaque = YES;
self.backgroundColor = [UIColor whiteColor];
}
return self;
}
CatalogProductView.m
Here, you set the view to be opaque because there is a severe performance hit for using transparent
views. If at all possible, always use opaque views when working with table cells. The next line sets
the background color of the view to white.
CH003.indd 68CH003.indd 68 9/18/10 9:26:23 AM9/18/10 9:26:23 AM