Phát triển ứng dụng cho iPhone và iPad - part 11 pdf
Bạn đang xem bản rút gọn của tài liệu. Xem và tải ngay bản đầy đủ của tài liệu tại đây (2.81 MB, 10 trang )
Next, you implement the method setProduct that is called from the custom cell:
- (void)setProduct:(Product *)inputProduct
{
// If a different product is passed in
if (theProduct != inputProduct)
{
// Clean up the old product
[theProduct release];
theProduct = inputProduct;
// Hang on to the new product
[theProduct retain];
}
// Mark the view to be redrawn
[self setNeedsDisplay];
}
CatalogProductView.m
This method does a couple of things. First, it sets the product to be displayed, and then it marks
the view to be redrawn. You should never directly call the
drawRect method to redraw a view.
The proper way to trigger a redraw is to tell the framework that a view needs to be redrawn. The
framework will then call
drawRect for you when it is time to redraw.
Implementing drawRect:
Now you get to the real meat of this example, drawing the view. This is done in the drawRect
function and is relatively straightforward:
- (void)drawRect:(CGRect)rect {
// Drawing code
// Draw the product text
[theProduct.name drawAtPoint:CGPointMake(45.0,0.0)
forWidth:120
withFont:[UIFont systemFontOfSize:18.0]
minFontSize:12.0
actualFontSize:NULL
lineBreakMode:UILineBreakModeTailTruncation
baselineAdjustment:UIBaselineAdjustmentAlignBaselines];
// Set to draw in dark gray
[[UIColor darkGrayColor] set];
// Draw the manufacturer label
[theProduct.manufacturer drawAtPoint:CGPointMake(45.0,25.0)
forWidth:120
withFont:[UIFont systemFontOfSize:12.0]
minFontSize:12.0
actualFontSize:NULL
Customizing the TableView
❘
69
CH003.indd 69CH003.indd 69 9/18/10 9:26:23 AM9/18/10 9:26:23 AM
70
❘
CHAPTER 3 DISPLAYING YOUR DATA: THE UITABLEVIEW
lineBreakMode:UILineBreakModeTailTruncation
baselineAdjustment:UIBaselineAdjustmentAlignBaselines];
// Set to draw in black
[[UIColor blackColor] set];
// Draw the price label
[[[NSNumber numberWithFloat: theProduct.price] stringValue]
drawAtPoint:CGPointMake(200.0,10.0)
forWidth:60
withFont:[UIFont systemFontOfSize:16.0]
minFontSize:10.0
actualFontSize:NULL
lineBreakMode:UILineBreakModeTailTruncation
baselineAdjustment:UIBaselineAdjustmentAlignBaselines];
// Draw the images
NSString *filePath = [[NSBundle mainBundle]
pathForResource:theProduct.image ofType:@”png”];
UIImage *image = [UIImage imageWithContentsOfFile:filePath];
[image drawInRect:CGRectMake(0.0, 0.0, 40.0, 40.0)];
filePath = [[NSBundle mainBundle]
pathForResource:theProduct.countryOfOrigin ofType:@”png”];
image = [UIImage imageWithContentsOfFile:filePath];
[image drawInRect:CGRectMake(260.0, 10.0, 20.0, 20.0)];
}
CatalogProductView.m
Basically, you render each string using the drawAtPoint:forWidth:withFont:minFontSize:
actualFontSize:lineBreakMode:baselineAdjustment:
method. Boy, that ’ s a mouthful! This
function accepts a series of parameters and renders the string to the current drawing context using
those parameters.
So, for the product name, you draw it at the point (45,0) with a width of 120 pixels using the
system font with a size of 18. You force a minimum font size of 12 because the renderer will
shrink the text to fi t within the width specifi ed. You won ’ t specify an actual font size because you
specifi ed that in the
withFont parameter. The lineBreakMode sets how the lines will be broken
for multiline text. Here, you just truncate the tail, meaning that the renderer will just show “ . . . ” if
the text size is reduced to 12 and still cannot fi t in the 120 pixels that you ’ ve allotted. Finally, the
baselineAdjustment specifi es how to vertically align the text.
Now that you ’ ve drawn the product name, you set the drawing color to dark gray to draw the
manufacturer name. The next
drawAtPoint: call does just that.
Next, you set the color back to black and draw the price string. Notice that you need to get a string
representation of the fl oating - point price fi eld. You do that by using the
stringValue method of the
NSNumber class.
CH003.indd 70CH003.indd 70 9/18/10 9:26:24 AM9/18/10 9:26:24 AM
Finally, you obtain the product image and the fl ag image just as you did in the previous example.
Then you render the images using the
drawInRect: method of the UIImage class.
Finishing Up
Now that you ’ ve got the new cell subclass and custom view implemented, it ’ s time to put them to
use. In the
RootViewController header, add a #include for the custom cell:
#import “CatalogTableViewCell.h”
In the RootViewController implementation, change the tableView:cellForRowAtIndexPath:
method to use the new cell control:
- (UITableViewCell *)tableView:(UITableView *)tableView
cellForRowAtIndexPath:(NSIndexPath *)indexPath {
static NSString *CellIdentifier = @”Cell”;
CatalogTableViewCell *cell = (CatalogTableViewCell *)
[tableView dequeueReusableCellWithIdentifi er:CellIdentifi er];
if (cell == nil) {
cell = [[[CatalogTableViewCell alloc]
initWithStyle:UITableViewCellStyleDefault
reuseIdentifi er:CellIdentifi er] autorelease];
}
// Configure the cell.
cell.accessoryType = UITableViewCellAccessoryDisclosureIndicator;
// Get the Product object
Product* product = [self.products objectAtIndex:[indexPath row]];
// Set the product to be used to draw the cell
[cell setProduct:product];
return cell;
}
RootViewController.m
In this method, you replace the UITableViewCell with the new CatalogTableViewCell . When
you try to dequeue the reusable cell, you must cast the return to a
CatalogTableViewCell* because
dequeueReusableCellWithIdentifier: returns a UITableViewCell* . If you are unsuccessful with
the dequeue, you create a new
CatalogTableViewCell just as you did with the UITableViewCell .
Then, just as in the previous example, you set the accessory type and get the
Product object that you
want to display. Finally, you set the
product in the custom cell object to be displayed and return the
cell object.
Now all you have to do is add the fl ag images to the resources folder of your project, build, and run.
You should get something that looks just like the previous example and Figure 3 - 4.
Customizing the TableView
❘
71
CH003.indd 71CH003.indd 71 9/18/10 9:26:24 AM9/18/10 9:26:24 AM
72
❘
CHAPTER 3 DISPLAYING YOUR DATA: THE UITABLEVIEW
IMPLEMENTING SECTIONS AND AN INDEX
Now that you have the ability to create fantastic table
cells, you need a better way to organize them. In this
section, you learn to partition your data into sections,
display them with section headers, and provide the user
the ability to navigate them using an index.
If you have ever used the Contacts application on the
iPhone, you should be familiar with section headers
and the index. In Contacts, each letter of the alphabet
is represented as a section header, the gray bar with the
letter. Every contact whose name starts with that letter is
grouped under the section header. The index on the right
hand side of the screen can be used to quickly navigate
to a section by tapping on the letter in the index that
corresponds to the section.
You will be adding section headers and an index to the
catalog application. When you are fi nished, your catalog
application should look like Figure 3 - 5.
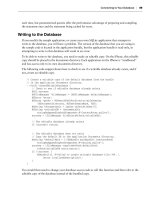
The data that you use to populate your indexed table
needs to be organized such that you can easily build
the sections. That is, the data should be an array of
arrays where each inner array represents a section of
the table. The scheme that you will use in the catalog
application is shown in Figure 3 - 6.
These section arrays are then ordered in the outer
array based on criteria that you provide. Typically,
this ordering is alphabetical but you can customize
it in any way that you wish.
You could take care of sorting and organizing
the table data yourself, but there is a helper class
in the iPhone SDK framework that has been
specifi cally designed to help you with this task:
UILocalizedIndexedCollation .
The
UILocalizedIndexedCollation class is a
helper class that assists with organizing, sorting,
and localizing your table view data. The table view
datasource can then use the collation object to
obtain the section and index titles.
You will implement the indexed table using the
UILocalizedIndexedCollation class. If you use
this class, the data model object that you want
to display in the table needs to have a method
Section Header
Index
FIGURE 3 - 5: Catalog application with
sections and index
sectionArray
singleSectionArray
Device N
Device O
Device P
singleSectionArray
Part Alpha
Part Beta
Part Gamma
singleSectionArray
Tool A
Tool B
Tool C
Tool D
FIGURE 3 - 6: Data scheme for sectioned tables
CH003.indd 72CH003.indd 72 9/18/10 9:26:25 AM9/18/10 9:26:25 AM
or property that the UILocalizedIndexedCollation can call when creating its arrays. It is also
helpful for your data model class to have a property that maintains the index of the object in the
section array. Because the product model class already has a name property, you can use that to
defi ne the sections. You will need to add a property to hold the section number. Add the section
instance variable and property to the
Product.h header like this:
@interface Product : NSObject {
int ID;
NSString* name;
NSString* manufacturer;
NSString* details;
float price;
int quantity;
NSString* countryOfOrigin;
NSString* image;
NSInteger section;
}
@property (nonatomic) int ID;
@property (retain, nonatomic) NSString *name;
@property (retain, nonatomic) NSString *manufacturer;
@property (retain, nonatomic) NSString *details;
@property (nonatomic) float price;
@property (nonatomic) int quantity;
@property (retain, nonatomic) NSString *countryOfOrigin;
@property (retain, nonatomic) NSString *image;
@property NSInteger section;
Product.h
Add the synthesize statement to the implementation:
@implementation Product
@synthesize ID;
@synthesize name;
@synthesize manufacturer;
@synthesize details;
@synthesize price;
@synthesize quantity;
@synthesize countryOfOrigin;
@synthesize image;
@synthesize section;
Product.m
The next thing that you need to do is load all of the data from your datasource into your model
objects. In the case of the catalog application, you are already doing that in the
getAllProducts
method of the
DBAccess class. If you recall, that method queries the SQLite database, creates a
Product object for each row that is returned, and adds each Product object to an array.
You will use this array along with the
UILocalizedIndexedCollation object to create the sections.
To create the necessary data arrays, you will have to make some changes to the
viewDidLoad
method of the
RootViewController.m implementation.
Implementing Sections and an Index
❘
73
CH003.indd 73CH003.indd 73 9/18/10 9:26:26 AM9/18/10 9:26:26 AM
74
❘
CHAPTER 3 DISPLAYING YOUR DATA: THE UITABLEVIEW
Here is the new implementation of viewDidLoad :
- (void)viewDidLoad {
[super viewDidLoad];
self.products = [NSMutableArray arrayWithCapacity:1];
NSMutableArray *productsTemp;
// Get the DBAccess object;
DBAccess *dbAccess = [[DBAccess alloc] init];
// Get the products array from the database
productsTemp = [dbAccess getAllProducts];
// Close the database because you are finished with it
[dbAccess closeDatabase];
// Release the dbAccess object to free its memory
[dbAccess release];
UILocalizedIndexedCollation *indexedCollation =
[UILocalizedIndexedCollation currentCollation];
// Iterate over the products, populating their section number
for (Product *theProduct in productsTemp) {
NSInteger section = [indexedCollation sectionForObject:theProduct
collationStringSelector:@selector(name)];
theProduct.section = section;
}
// Get the count of the number of sections
NSInteger sectionCount = [[indexedCollation sectionTitles] count];
// Create an array to hold the sub arrays
NSMutableArray *sectionsArray = [NSMutableArray
arrayWithCapacity:sectionCount];
// Iterate over each section, creating each sub array
for (int i=0; i < =sectionCount; i++) {
NSMutableArray *singleSectionArray = [NSMutableArray
arrayWithCapacity:1];
[sectionsArray addObject:singleSectionArray];
}
// Iterate over the products putting each product into the correct sub-array
for (Product *theProduct in productsTemp) {
[(NSMutableArray *)[sectionsArray objectAtIndex:theProduct.section]
addObject:theProduct];
}
// Iterate over each section array to sort the items in the section
for (NSMutableArray *singleSectionArray in sectionsArray) {
// Use the UILocalizedIndexedCollation sortedArrayFromArray: method to
// sort each array
NSArray *sortedSection = [indexedCollation
sortedArrayFromArray:singleSectionArray
CH003.indd 74CH003.indd 74 9/18/10 9:26:27 AM9/18/10 9:26:27 AM
collationStringSelector:@selector(name)];
[self.products addObject:sortedSection];
}
}
RootViewController.m
The fi rst part of the method is largely the same as the previous example, except that now you have
added code to initialize the new
products property. You then proceed to get the array of Products
from the database access class, just as before.
After you release the
DBAccess object, you move on to getting a reference to the
UILocalizedIndexedCollation object:
UILocalizedIndexedCollation *indexedCollation = [UILocalizedIndexedCollation
currentCollation];
Next, you iterate over all of the products to populate the section index property:
for (Product *theProduct in productsTemp) {
NSInteger section = [indexedCollation sectionForObject:theProduct
collationStringSelector:@selector(name)];
theProduct.section = section;
}
RootViewController.m
You determine the section index using the UILocalizedIndexedCollation ’ s sectionForObject:
collationStringSelector:
method. This method uses the property or method that is passed in as
the
collationStringSelector parameter to determine in which section the sectionForObject
parameter belongs. So, in this case, the method uses the
name property to determine the correct section for
theProduct . You could use any method or property to organize your sections, as long as it returns a string.
The next section of code gets a count of all of the sections that you will need, creates the main array
to hold all of the section sub - arrays, and creates each sub - array:
// Get the count of the number of sections
NSInteger sectionCount = [[indexedCollation sectionTitles] count];
// Create an array to hold the sub arrays
NSMutableArray *sectionsArray = [NSMutableArray
arrayWithCapacity:sectionCount];
// Iterate over each section, creating each sub array
for (int i=0; i < =sectionCount; i++) {
NSMutableArray *singleSectionArray = [NSMutableArray arrayWithCapacity:1];
[sectionsArray addObject:singleSectionArray];
}
RootViewController.m
Implementing Sections and an Index
❘
75
CH003.indd 75CH003.indd 75 9/18/10 9:26:27 AM9/18/10 9:26:27 AM
76
❘
CHAPTER 3 DISPLAYING YOUR DATA: THE UITABLEVIEW
Next, you loop through each product again, placing it into the correct sub - array. Remember that the
index to the correct sub - array was determined before and stored in the new section property of the
Product object:
// Iterate over the products putting each product into the correct sub-array
for (Product *theProduct in productsTemp) {
[(NSMutableArray *)[sectionsArray objectAtIndex:theProduct.section]
addObject:theProduct];
}
RootViewController.m
Finally, the last section of the code goes back over each sub-array, sorts the data within the array
using the
UILocalizedIndexedCollation ’ s sortedArrayFromArray:collationStringSelector:
method, and then adds the array to the
products array:
// Iterate over each section array to sort the items in the section
for (NSMutableArray *singleSectionArray in sectionsArray) {
// Use the UILocalizedIndexedCollation sortedArrayFromArray:
// method to sort each array
NSArray *sortedSection = [indexedCollation
sortedArrayFromArray:singleSectionArray
collationStringSelector:@selector(name)];
[self.products addObject:sortedSection];
}
RootViewController.m
Now you have the products array set up as you need it. It is now organized as an array of arrays,
each of which contains a sorted list of Product objects, as shown in Figure 3 - 6.
The next thing that you need to do is confi gure the
TableView to show the newly created
sections. There are two
TableView delegate methods that you need to implement:
numberOfSectionsInTableView: and numberOfRowsInSection: .
The
numberOfSectionsInTableView: method should return the number of sections that you will show
in the
TableView . You implement this by simply returning the count of objects in the products array:
- (NSInteger)numberOfSectionsInTableView:(UITableView *)tableView {
return [self.products count];
}
The tableView: numberOfRowsInSection: method is used to return the number of rows in the
requested section. To implement this, you just return the count of rows for the particular section
that was requested:
- (NSInteger)tableView:(UITableView *)tableView
numberOfRowsInSection:(NSInteger)section {
return [[self.products objectAtIndex:section] count];
}
CH003.indd 76CH003.indd 76 9/18/10 9:26:28 AM9/18/10 9:26:28 AM
You also need to modify the tableView:cellForRowAtIndexPath: method to get the product
from the products array by section and row. If you recall, when you had only the single array,
you just indexed into it directly to get the
Product that you wanted to display. Now, you need to
get the
Product object that corresponds with the section and row that you are being asked
to display:
Product* product = [[self.products objectAtIndex:[indexPath section]]
objectAtIndex:[indexPath row]];
You can see that you get the section from the indexPath and use that to index into the outer array.
Then, you use the row as the index to the sub - array to get the
Product .
Another modifi cation that you will need to make in
cellForRowAtIndexPath: is to change the
cell ’ s
accessoryType to UITableViewCellAccessoryNone . You need to remove the accessory view
because the index will obscure the accessory and it will look bad:
cell.accessoryType = UITableViewCellAccessoryNone;
Now that you will be using headers in the table, you need to implement the method tableView:
titleForHeaderInSection:
. This method returns a string that will be used as the header text
for the section. You obtain the title from the
UILocalizedIndexedCollation by using the
sectionTitles property:
- (NSString *)tableView:(UITableView *)tableView
titleForHeaderInSection:(NSInteger)section {
// Make sure that the section will contain some data
if ([[self.products objectAtIndex:section] count] > 0) {
// If it does, get the section title from the
// UILocalizedIndexedCollation object
return [[[UILocalizedIndexedCollation currentCollation] sectionTitles]
objectAtIndex:section];
}
return nil;
}
RootViewController.m
Likewise, because you are implementing an index, you need to provide the text to use in the index.
Again, the
UILocalizedIndexedCollation helps out. The property sectionIndexTitles returns
an array of the index titles:
- (NSArray *)sectionIndexTitlesForTableView:(UITableView *)tableView {
// Set up the index titles from the UILocalizedIndexedCollation
return [[UILocalizedIndexedCollation currentCollation] sectionIndexTitles];
}
RootViewController.m
Implementing Sections and an Index
❘
77
CH003.indd 77CH003.indd 77 9/18/10 9:26:28 AM9/18/10 9:26:28 AM
78
❘
CHAPTER 3 DISPLAYING YOUR DATA: THE UITABLEVIEW
Once you ’ ve set up the index, you have to link the index to the section titles by implementing
the
tableView:sectionForSectionIndexTitle: atIndex: method. Again, using the
UILocalizedIndexedCollation greatly simplifi es this implementation:
- (NSInteger)tableView:(UITableView *)tableView
sectionForSectionIndexTitle:(NSString *)title atIndex:(NSInteger)index {
// Link the sections to the labels in the index
return [[UILocalizedIndexedCollation currentCollation]
sectionForSectionIndexTitleAtIndex:index];
}
RootViewController.m
If you build and run the application, it should run and the table should be displayed with sections
and an index. However, if you select a row, the application will not take you to the detail page.
Because you modifi ed how the data is stored, you need to go back and modify the
tableView:
didSelectRowAtIndexPath:
method to use the new scheme. This is as simple as changing the line
of code that obtains the product object to use in the detail view like this:
Product* product = [[self.products objectAtIndex:[indexPath section]]
objectAtIndex:[indexPath row]];
Now, if you build and run again, all should be well. You should be able to navigate the application
just as before, except that now you have a well - organized and indexed table for easy navigation.
IMPLEMENTING SEARCH
The sample application now has all of the items in the corporate catalog neatly organized into
sections based on the product name, with an index for quick access to each section. The fi nal piece
of functionality that you will add is a search capability. Users should be able to search for particular
products within the catalog, without having to scroll through the entire catalog.
You will implement functionality that is similar to the search capabilities of the built - in Contacts
application. You will add a
UISearchBar control at the top of the table and then fi lter the products list
based on user input. The fi nal interface will look like Figure 3 - 7.
When the user starts a search, you will remove the side index list and only show rows that meet the
search criteria, as shown in Figure 3 - 8.
Implementing search requires two controls, the
UISearchBar and the UISearchDisplay
Controller
, which was introduced in iPhone SDK 3.0. The UISearchBar is the UI widget that
you will put at the top of the table to accept search text input. The
UISearchDisplayController
is used to fi lter the data provided by another View Controller based on the search text in the
UISearchBar .
CH003.indd 78CH003.indd 78 9/18/10 9:26:29 AM9/18/10 9:26:29 AM