Phát triển ứng dụng cho iPhone và iPad - part 12 ppsx
Bạn đang xem bản rút gọn của tài liệu. Xem và tải ngay bản đầy đủ của tài liệu tại đây (2.94 MB, 10 trang )
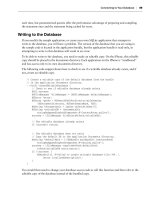
The UISearchDisplayController is initialized with a search bar and the View Controller
containing the content to be searched. When a search begins, the search display controller overlays
the search interface above the original View Controller ’ s view to display a subset of the original
data. The results display is a table view that is created by the search display controller.
The fi rst step is to create the
UISearchBar and add it to the table. In the RootViewController
header, add an instance variable and associated property for the search bar:
@interface RootViewController : UITableViewController {
NSMutableArray *products;
UISearchBar* searchBar;
}
@property (retain, nonatomic) NSMutableArray *products;
@property (retain, nonatomic) UISearchBar* searchBar;
RootViewController.h
In the RootViewController implementation fi le, synthesize the searchBar :
@synthesize searchBar;
You can now add the code to create the SearchBar and add it to the header of the TableView at the
end of the
viewDidLoad method:
// Create search bar
self.searchBar = [[[UISearchBar alloc] initWithFrame:
CGRectMake(0.0f, 0.0f, 320.0f, 44.0f)] autorelease];
self.tableView.tableHeaderView = self.searchBar;
RootViewController.m
FIGURE 3 - 8: Search in
progress
FIGURE 3 - 7: Catalog with
search interface
Implementing Search
❘
79
CH003.indd 79CH003.indd 79 9/18/10 9:26:29 AM9/18/10 9:26:29 AM
80
❘
CHAPTER 3 DISPLAYING YOUR DATA: THE UITABLEVIEW
Next, you will create and confi gure the UISearchDisplayController . This controller
will be used to fi lter and display the data in the
RootViewController ’ s TableView . In the
header for
RootViewController , add an instance variable and associated property for the
SearchDisplayController :
@interface RootViewController : UITableViewController {
NSMutableArray *products;
UISearchBar* searchBar;
UISearchDisplayController* searchController;
}
@property (retain, nonatomic) NSMutableArray *products;
@property (retain, nonatomic) UISearchBar* searchBar;
@property (retain, nonatomic) UISearchDisplayController* searchController;
RootViewController.h
Synthesize the property in the RootViewController ’ s implementation fi le:
@synthesize searchController;
Add the code to viewDidLoad to create and confi gure the display controller:
// Create and configure the search controller
self.searchController = [[[UISearchDisplayController alloc]
initWithSearchBar:self.searchBar
contentsController:self] autorelease];
self.searchController.searchResultsDataSource = self;
self.searchController.searchResultsDelegate = self;
RootViewController.m
Because you are going to be creating a new, fi ltered table, you need to create an array to hold the
fi ltered product list. Add an instance variable and property to the
RootViewController header:
@interface RootViewController : UITableViewController {
NSMutableArray *products;
NSArray *fi lteredProducts;
UISearchBar* searchBar;
UISearchDisplayController* searchController;
}
@property (retain, nonatomic) NSMutableArray *products;
@property (retain, nonatomic) NSArray *fi lteredProducts;
@property (retain, nonatomic) UISearchBar* searchBar;
@property (retain, nonatomic) UISearchDisplayController* searchController;
RootViewController.h
CH003.indd 80CH003.indd 80 9/18/10 9:26:30 AM9/18/10 9:26:30 AM
Synthesize the property in the RootViewController ’ s implementation fi le:
@synthesize filteredProducts;
You have now completed adding the additional controls and properties that you need to implement
the search feature. The next step is to modify the
UITableView methods that are used to populate
the
UITableView .
In each function you need to determine if you are working with the normal table or the fi ltered
table. Then, you need to proceed accordingly. You can determine which
UITableView you are
dealing with by comparing the
UITableView passed into the function to the View Controller ’ s
tableView property, which holds the normal UITableView .
The fi rst method that you will modify is
numberOfSectionsInTableView :
- (NSInteger)numberOfSectionsInTableView:(UITableView *)tableView {
// Is the request for numberOfRowsInSection for the regular table?
if (tableView == self.tableView)
{
// Just return the count of the products like before
return [self.products count];
}
return 1;
}
RootViewController.m
The fi rst thing that you do is compare the tableView that was passed into the method with the
RootViewController ’ s tableView . If they are the same, you are dealing with the normal TableView
and you will determine the number of sections just as you did in the previous example. If you are dealing
with the fi ltered table, you return 1 because you do not want to use sections in the fi ltered table.
Next, you ’ ll modify the
tableView:numberOfRowsInSection: method to check to see which table
you are working with and then return the appropriate row count. You will use
NSPredicate to
fi lter the data. Predicates will be covered in detail in Part II of this book on Core Data. For now, the
only thing that you need to understand about predicates is that they are a mechanism for providing
criteria used to fi lter data. Predicates work like the
WHERE clause in a SQL statement. Before you
can use the predicate, you need to fl atten the array of arrays that contains the data. You fl atten the
array, and then use the
NSPredicate to fi lter the array:
- (NSInteger)tableView:(UITableView *)tableView
numberOfRowsInSection:(NSInteger)section {
// Is the request for numberOfRowsInSection for the regular table?
if (tableView == self.tableView)
{
// Just return the count of the products like before
return [[self.products objectAtIndex:section] count];
Implementing Search
❘
81
CH003.indd 81CH003.indd 81 9/18/10 9:26:31 AM9/18/10 9:26:31 AM
82
❘
CHAPTER 3 DISPLAYING YOUR DATA: THE UITABLEVIEW
}
// You need the count for the filtered table
// First, you have to flatten the array of arrays self.products
NSMutableArray *flattenedArray = [[NSMutableArray alloc]
initWithCapacity:1];
for (NSMutableArray *theArray in self.products)
{
for (int i=0; i < [theArray count];i++)
{
[flattenedArray addObject:[theArray objectAtIndex:i]];
}
}
// Set up an NSPredicate to filter the rows
NSPredicate *predicate = [NSPredicate predicateWithFormat:
@”name beginswith[c] %@”, self.searchBar.text];
self.filteredProducts = [flattenedArray
filteredArrayUsingPredicate:predicate];
// Clean up flattenedArray
[flattenedArray release];
return self.filteredProducts.count;
}
RootViewController.m
This code uses the same methodology as the previous method for determining which TableView you
are dealing with. If you are working with the normal
TableView , you return the product count as in
the previous example. If not, you need to determine the count of fi ltered products.
To accomplish this, you fi rst fl atten the
products array of arrays into a single array. Remember
that to implement sections, you should store your data as an array of arrays. Well, you need to
fl atten that structure down to a one - dimensional array in order to fi lter it with the
NSPredicate .
In order to fl atten the
products array, you simply loop over each array and put the contents of the
sub - array into a new array called
flattenedArray .
Next, you set up the
NSPredicate object to fi lter out only rows that begin with the text that is input
into the
SearchBar . Then, you apply the predicate to the flattenedArray and put the result into the
filteredProducts array. The filteredProducts array will be used from here on out when dealing
with the fi ltered
TableView . You then release the flattenedArray because you are fi nished with it
and should free the memory. Finally, you return the count of items in the
filteredProducts array.
Now that you have the correct row counts, you need to modify the
tableView:
cellForRowAtIndexPath:
method to display the correct rows:
- (UITableViewCell *)tableView:(UITableView *)tableView
cellForRowAtIndexPath:(NSIndexPath *)indexPath {
static NSString *CellIdentifier = @”Cell”;
CatalogTableViewCell *cell = (CatalogTableViewCell *)
CH003.indd 82CH003.indd 82 9/18/10 9:26:32 AM9/18/10 9:26:32 AM
[tableView dequeueReusableCellWithIdentifier:CellIdentifier];
if (cell == nil) {
cell = [[[CatalogTableViewCell alloc]
initWithStyle:UITableViewCellStyleDefault
reuseIdentifier:CellIdentifier] autorelease];
}
// Configure the cell.
cell.accessoryType = UITableViewCellAccessoryNone;
// Is the request for cellForRowAtIndexPath for the regular table?
if (tableView == self.tableView)
{
// Get the Product object
Product* product = [[self.products
objectAtIndex:[indexPath section]]
objectAtIndex:[indexPath row]];
// Set the product to be used to draw the cell
[cell setProduct:product];
return cell;
}
// Get the Product object
Product* product = [self.filteredProducts objectAtIndex:[indexPath row]];
// Set the product to be used to draw the cell
[cell setProduct:product];
return cell;
}
RootViewController.m
In this method, you do the same type of thing as you have done in the previous two methods. You
create the cell just as you did in the previous example. The difference here is that if you are dealing
with the normal table, you get the
Product object from the self.products array, but if you are
dealing with the fi ltered table, you get the
Product object from the self.filteredProducts array.
Now you will modify the
didSelectRowAtIndexPath: method to use either the normal or fi ltered table:
- (void)tableView:(UITableView *)tableView
didSelectRowAtIndexPath:(NSIndexPath *)indexPath {
Product* product;
if (tableView == self.tableView)
{
// Get the product that corresponds with the touched cell
product = [[self.products objectAtIndex:[indexPath section]]
objectAtIndex:[indexPath row]];
}
Implementing Search
❘
83
CH003.indd 83CH003.indd 83 9/18/10 9:26:32 AM9/18/10 9:26:32 AM
84
❘
CHAPTER 3 DISPLAYING YOUR DATA: THE UITABLEVIEW
else {
product = [self.filteredProducts objectAtIndex:[indexPath row]];
}
// Initialize the detail view controller from the NIB
ProductDetailViewController *productDetailViewController =
[[ProductDetailViewController alloc]
initWithNibName:@”ProductDetailViewController” bundle:nil];
// Set the title of the detail page
[productDetailViewController setTitle:product.name];
// Push the detail controller on to the stack
[self.navigationController pushViewController:productDetailViewController
animated:YES];
// Populate the details
[productDetailViewController setLabelsForProduct:product];
// release the view controller becuase it is retained by the Navigation
// Controller
[productDetailViewController release];
}
RootViewController.m
Again, in this method, you do the same thing that you did in the previous method. If you are dealing
with the normal table, you get the
Product object from the self.products array, but if you are
dealing with the fi ltered table, you get the
Product object from the self.filteredProducts array.
Finally, modify the
sectionIndexTitlesForTableView: method to return the regular index for
the normal table but
nil for the fi ltered table because you don ’ t want to show the index while
displaying the fi ltered table:
- (NSArray *)sectionIndexTitlesForTableView:(UITableView *)tableView {
if (tableView == self.tableView)
{
// Set up the index titles from the UILocalizedIndexedCollation
return [[UILocalizedIndexedCollation currentCollation]
sectionIndexTitles];
}
return nil;
}
RootViewController.m
You should now be able to build and run the code and have full searching capabilities. In a
nutshell, you implement search by adding a
SearchBar and a SearchDisplayController to your
CH003.indd 84CH003.indd 84 9/18/10 9:26:33 AM9/18/10 9:26:33 AM
ViewController and then modify your TableView methods to handle dealing with either the
normal or fi ltered data.
OPTIMIZING TABLEVIEW PERFORMANCE
In this chapter, you have explored how to use the TableView in detail. You have learned how
to customize the
TableView to look exactly as you want by using styles, adding subviews to the
contentView , and creating your own cells by subclassing the UITableViewCell class. You have also
learned how to organize your table and make it easy to use by adding sections, an index, and search
capability. The fi nal aspect of the
TableView that you will look at is how to optimize performance.
The iPhone and iPad are amazing devices, and users expect an amazing experience from their
apps. Apple has set the standard with the pre - installed applications. You should strive to get your
applications to function as fl uidly and elegantly as the default applications.
The primary problem that you will encounter when building an application with a
TableView is poor
scrolling performance. This can be caused by several factors, as you will see in the following sections.
Reusing Existing Cells
Creating objects at runtime can be an expensive operation in terms of how much processor time
is used to create the object. Additionally, objects that contain a hierarchy of views, such as the
TableViewCell , can consume a signifi cant amount of memory.
On embedded devices like the iPhone and iPad, the processors are generally not as fast as those
on desktop and laptop computers so you must try to do whatever you can to optimize your code
for execution on these slower machines. Also, on devices such as the iPhone and iPad, memory is
at a premium. If you use too much memory, the OS on the device will notify you to release some
memory. If you fail to release enough memory, the OS will terminate your application. Random
termination of your application does not lead to happy customers.
One step that you can take to optimize the code of your
TableViews is to reuse existing cells when
appropriate. The fi rst step in debugging scrolling problems with the
TableView is to look at object
allocations. If objects are being allocated as you scroll, there is a problem.
The designers at Apple have provided us with a private queue that can be used to store
TableViewCells for reuse. In the cellForRowAtIndexPath: method, you can access this queue to
get an existing cell from the queue instead of creating a new one. In fact, you have done this in the
code examples in this chapter.
If you want to see the difference that this optimization makes in your sample code, change the
following line in
cellForRowAtIndexPath:
UITableViewCell *cell = [tableView
dequeueReusableCellWithIdentifier:CellIdentifier];
to this:
UITableViewCell *cell = nil;
Optimizing TableView Performance
❘
85
CH003.indd 85CH003.indd 85 9/18/10 9:26:33 AM9/18/10 9:26:33 AM
86
❘
CHAPTER 3 DISPLAYING YOUR DATA: THE UITABLEVIEW
Now the code will not try to use a cell from the queue; it will create a new cell each time the TableView
asks for a cell. The performance difference may not be too noticeable with a table with only a few rows,
but imagine creating all of these cells if your data consisted of thousands of rows. Additionally, the
fi nal project is using subclassing and custom - drawn cells. Try going back and making this change to the
code where you added subviews to the
contentView . You should notice a signifi cant slowdown
in scrolling speed.
A common point of confusion with cell reuse is the cell identifi er. The string that you provide in
dequeueReusableCellWithIdentifier: is the identifi er. This identifi er does not defi ne the cell ’ s
contents, only its style. When you plan on re - using the style of a cell, assign a string to the reuse
identifi er, and then pass that string into
dequeueReusableCellWithIdentifier: . This allows
you to create cells with different styles, store them with different identifi ers, and queue them up for
quick access.
When you call
dequeueReusableCellWithIdentifier: the method returns either a cell that you
can use, or
nil . If the return is nil , you need to create a new cell to use in your table.
A fi nal note about the
cellForRowAtIndexPath: method. Do not do anything in cellForRowAt
IndexPath
that takes a long time. I recently saw an example of a developer downloading an image
from the Web each time
cellForRowAtIndexPath was called. This is a very bad idea! You need to
make sure that
cellForRowAtIndexPath returns very quickly as it is called each time the TableView
needs to show a cell in your table. In the case where it will take a long time to create the content for
a cell, consider pre - fetching the content and caching it.
Opaque Subviews
When you are using the technique of programmatically adding subviews to a cell ’ s content view, you
should ensure that all of the subviews that you add are opaque. Transparent subviews detract from
scrolling performance because the compositing of transparent layers is an expensive operation. The
UITableViewCell inherits the opaque property from UIView . This property defaults to YES . Do not
change it unless you absolutely must have a transparent view.
Additionally, you should ensure that the subviews that you add to the
UITableViewCell have
the same background color as the cell. Not doing this detracts from the performance of the
TableView .
It is possible to view layers that are being composited by using the Instruments application,
which Apple provides for free as a part of Xcode. The tool is very useful in debugging applications
and can be used to do a lot of helpful things including tracking memory leaks and logging all
memory allocations. The Core Animation tool in Instruments can be used to show layers that
are being composited. The Core Animation tool can only be used when running your application
on a device.
In order to see where compositing is occurring in your application, start the Instruments tool.
Instruments can be found in
/Developer/Applications . When the tool, starts, it will ask you to
choose a template for the trace document. In the left - hand pane, choose iPhone/All.
In this dialog, select Core Animation. This will open the Instruments interface with a Core
Animation instrument. Click on the third icon from the left at the bottom of the screen to expand
the detail view. In the debug options, select Color Blended Layers, as shown in Figure 3 - 9.
CH003.indd 86CH003.indd 86 9/18/10 9:26:34 AM9/18/10 9:26:34 AM
Now, when you run your application on the device, layers that are not composited are overlaid with
green, while composited layers are red.
To see the difference, you can make a change to the
RootViewController . In the
cellForRowAtIndexPath: method, add a line to set productImage.alpha = 0.9 under the line
productImage.tag = PRODUCTIMAGE_TAG . The snippet of code should look like this:
// Configure the product Image
productImage = [[[UIImageView alloc]
initWithFrame:CGRectMake(0.0, 0.0, 40.0, 40.0)] autorelease];
productImage.tag = PRODUCTIMAGE_TAG;
productImage.alpha = 0.9;
// Add the Image to the cell’s content view
[cell.contentView addSubview:productImage];
RootViewController.m
Now run the application. You should see all of the product images overlaid with red. This means
that these images are being composited, and that is not good. Remember that compositing takes a
long time and should be avoided if possible.
There is an issue that you should be aware of with PNG images. If you are using PNG fi les, as
in the sample, they should be created without an Alpha layer. Including the Alpha layer causes
compositing to occur regardless of how the opaque property is set on the
UIImageView .
You examine how to use Instruments in more detail in Appendix A.
FIGURE 3 - 9: Instruments tool
Optimizing TableView Performance
❘
87
CH003.indd 87CH003.indd 87 9/18/10 9:26:34 AM9/18/10 9:26:34 AM
88
❘
CHAPTER 3 DISPLAYING YOUR DATA: THE UITABLEVIEW
Custom Drawn Cells with drawRect
You have examined this technique in the “ Subclassing UITableViewCell ” section of this chapter.
The fastest way to render a cell is by manually drawing it in the
drawRect method. It may take more
work from the developer, but there is a large payoff. If a cell will contain more than three subviews,
consider subclassing and drawing the contents manually. This can dramatically increase scrolling
performance.
The technique basically boils down to collapsing multi - view
TableCells down to one view that
knows how to draw itself.
A subclass of
UITableViewCell may reset attributes of the cell by overriding prepareForReuse .
This method is called just before the
TableView returns a cell to the datasource in dequeueReusable
CellWithIdentifier:
. If you do override this method to reset the cell ’ s attributes, you should only
reset attributes that are not related to content such as alpha, editing, and selection state.
UI Conventions for Accessory Views
You should abide by the following conventions when adding accessory views to cells in your table:
The
UITableViewCellAccessoryDisclosureIndicator is a disclosure indicator. The control does
not respond to touches and is used to indicate that touching the row will bring the user to a detail
screen based on the selected row.
The
UITableViewCellAccessoryDetailDisclosureButton does respond to touches and is used to
indicate that confi guration options for the selected row will be presented.
The
UITableViewCellAccessoryCheckmark is used to display a checkmark indicating that the row
is selected. The checkmark does not respond to touches.
For more information, you should read the iPhone Human Interface Guidelines located at:
MOVING FORWARD
In this chapter, you have learned how to use the UITableView to display data in your
application. Then, you learned how to customize the display of your data by building custom
UITableViewCells . Next, you learned how to allow your user to manipulate the display of his
data by searching and fi ltering the results. Finally, you learned how to avoid and troubleshoot
performance problems with the
UITableView .
In the next chapter, you will learn how to display and navigate your data using some of the unique
UI elements that are available for use on the iPad. Then, in Part II of the book, you will move on to
learn how to create and query data using the Core Data framework.
CH003.indd 88CH003.indd 88 9/18/10 9:26:35 AM9/18/10 9:26:35 AM