Phát triển ứng dụng cho iPhone và iPad - part 21 docx
Bạn đang xem bản rút gọn của tài liệu. Xem và tải ngay bản đầy đủ của tài liệu tại đây (3.14 MB, 10 trang )
The RootViewController header fi le should look like Listing 7 - 1.
LISTING 7 - 1: RootViewController.h
@interface RootViewController :
UIViewController < NSFetchedResultsControllerDelegate > {
NSFetchedResultsController *fetchedResultsController;
NSManagedObjectContext *managedObjectContext;
UITableView* taskTableView;
}
-(IBAction)toolbarSortOrderChanged:(id)sender;
-(IBAction)toolbarFilterHiPri:(id)sender;
-(IBAction)toolbarFilterAll:(id)sender;
-(IBAction)locationButtonPressed:(id)sender;
@property (nonatomic, retain)
NSFetchedResultsController *fetchedResultsController;
@property (nonatomic, retain) NSManagedObjectContext *managedObjectContext;
@property (nonatomic, retain) IBOutlet UITableView* taskTableView;
@end
Now that the interface and header are ready, you need to get in and modify the
RootViewController.m implementation fi le. First, you ’ ll need to synthesize the new
taskTableView property. You can just add the taskTableView to the existing synthesize
statement:
@synthesize fetchedResultsController, managedObjectContext,taskTableView;
In the controllerDidChangeContent method, change the reference from self.tableview
to
self.taskTableView . If you recall, this class used to inherit from UITableViewController .
In
UITableViewController , there is a property called tableview . Because you are no longer
inheriting from
UITableViewController , you had to create your own taskTableView property.
You are changing the code to refl ect this change. The
controllerDidChangeContent method
should now look like this:
- (void)controllerDidChangeContent:(NSFetchedResultsController *)controller {
[self.taskTableView reloadData];
}
Next, although you are not ready to implement the full functionality, you should add stub
implementations of the action methods that you declared in the header fi le. The stubs use the
NSLog function to log a message when the user presses a button. This is helpful in debugging
issues with Interface Builder because it proves that you have linked the buttons to the methods in
Interface Builder. On more than one occasion, I have found myself searching for an elusive bug
only to realize that I did not hook up the control to the action method in Interface Builder. Using
RootViewController and the Basic UI
❘
169
CH007.indd 169CH007.indd 169 9/18/10 9:48:35 AM9/18/10 9:48:35 AM
170
❘
CHAPTER 7 BUILDING A CORE DATA APPLICATION
this easy method, you can see a message in the console any time a button is pressed. The stub code
should look like this:
-(IBAction)toolbarSortOrderChanged:(id)sender;
{
NSLog(@”toolbarSortOrderChanged”);
}
-(IBAction)toolbarFilterHiPri:(id)sender{
NSLog(@”toolbarFilterHiPri”);
}
-(IBAction)toolbarFilterAll:(id)sender
{
NSLog(@”toolbarFilterAll”);
}
-(IBAction)locationButtonPressed:(id)sender
{
NSLog(@”locationButtonPressed”);
}
The RootViewController will be displaying data from the Task entity. Therefore, you need to
modify the
fetchedResultsController accessor method to use the Task entity instead of the
default
Event entity:
NSEntityDescription *entity =
[NSEntityDescription entityForName:@”Task”
inManagedObjectContext:managedObjectContext];
RootViewController.m
You will also need to change the sort descriptor to use the Task entity ’ s text attribute instead of
timestamp :
NSSortDescriptor *sortDescriptor =
[[NSSortDescriptor alloc] initWithKey:@”text” ascending:YES];
RootViewController.m
The last thing that you will need to do in the implementation fi le is implement the cleanup methods
dealloc and viewDidUnload . It is important to set your properties to nil in viewDidUnload to
avoid the possibility of sending messages to objects that you have released. Sending messages to
nil
is not an error in Objective - C, so setting released pointers to
nil is a good thing to do to ensure that
your application doesn ’ t crash from sending a message to an invalid pointer.
Because Objective - C on the iPhone is not a garbage - collected language, you are responsible
for managing memory yourself. You should release the memory for any properties that you are
CH007.indd 170CH007.indd 170 9/18/10 9:48:36 AM9/18/10 9:48:36 AM
retaining in the dealloc method. Here is the implementation for the viewDidUnload and dealloc
methods:
- (void)viewDidUnload {
self.managedObjectContext=nil;
self.fetchedResultsController = nil;
self.taskTableView=nil;
[super viewDidUnload];
}
- (void)dealloc {
[fetchedResultsController release];
[managedObjectContext release];
[taskTableView release];
[super dealloc];
}
RootViewController.m
You are fi nished with the RootViewController for now. The fi nal step is to go back into Interface
Builder and hook up the actions and outlets that you created in the
RootViewController header to
the appropriate interface items.
Open the
RootViewController.xib and select File ’ s Owner in the Document window. Using the
Connections Inspector window, link the
view outlet in File ’ s Owner to the View in the xib. Next,
link the
taskTableView outlet in File ’ s Owner to the Table View nested under the View. Last, go
through each button bar nested under the toolbar and link the selectors in the button bar items to
the correct methods in File ’ s Owner. The All button selector should point to the
toolbarFilterAll
action method, Location should point to
locationButtonPressed , Hi - Pri should point to
toolbarFilterHiPri , and the Asc and Dsc buttons should point to toolbarSortOrderChanged .
You should now be able to build and run the application. Verify that you receive no errors or
warnings during the build process. Once the application comes up in the simulator, click all of
the toolbar buttons. Because you added those stub action methods with the
NSLog statement, you
should be able to quickly verify that you have hooked up the buttons properly in IB by examining
the Xcode console. Each time you press a button, the appropriate log message should print.
GENERATING THE MANAGED OBJECT SUBCLASSES
Now that you have built the RootViewController , the next task is to generate your custom
NSManagedObject subclasses from the data model. Open the Tasks.xcdatamodel fi le.
From the File menu, select New File. In the New File dialog box, you should see an option that is
not usually there to create a Managed Object Class. Xcode shows this option only when you open
this dialog while using the data modeler. After selecting Managed Object Class, click Next. You
will see a screen that lets you pick the data model entities for which you want to generate code.
Select the Location entity. Make sure that you have selected the “ Generate accessors ” and
“ Generate Obj - C 2.0 Properties ” checkboxes and click Finish.
Generating the Managed Object Subclasses
❘
171
CH007.indd 171CH007.indd 171 9/18/10 9:48:36 AM9/18/10 9:48:36 AM
172
❘
CHAPTER 7 BUILDING A CORE DATA APPLICATION
Repeat the process to create the Task object. You would think that you could just check both the
Task and Location entities the fi rst time through to generate classes for both entities. Generally, you
would be correct. However, because there is a dependency between the Task and Location objects,
if you generate both classes at the same time and Xcode generates the Task class fi rst, the tool will
not create the correct reference in the Task header for the type (
Location* ) of the location property.
This appears to be a bug in the tool.
When you have fi nished generating the classes, go back into Xcode. In the left pane, create a new
group under Classes called Managed Objects. Groups are like folders and can help you to keep
your project organized. Move the
Task.m , Task.h , Location.m , and Location.h fi les into the
new Managed Objects group.
Open the header for the
Task class, Task.h . Add a property for the highPriTasks fetched property
and the
isOverdue dynamic property:
@property (nonatomic,retain) NSArray* highPriTasks;
@property (nonatomic, retain) NSNumber * isOverdue;
Task.h
Finally, in Task.m , add an @dynamic statement for the highPriTasks fetched property and
isOverdue property to tell the compiler that the framework will dynamically generate these
properties at runtime:
@dynamic highPriTasks;
@dynamic isOverdue;
Task.m
Add a method stub for the isOverdue getter function to return NO . You
will implement the actual function later on in the chapter:
- (NSNumber*) isOverdue
{
BOOL isTaskOverdue = NO;
return [NSNumber numberWithBool:isTaskOverdue];
}
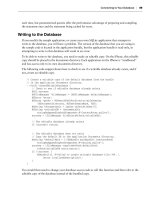
ADDING AND VIEWING TASKS
Now that you have built the main screen where a user can add and
select tasks, you need to build a way for your users to view
and edit tasks. You will implement this functionality with
the
ViewTaskController . You can see the interface for the
ViewTaskController in Figure 7 - 5.
FIGURE 7 - 5: The
ViewTaskController
CH007.indd 172CH007.indd 172 9/18/10 9:48:37 AM9/18/10 9:48:37 AM
Building the ViewTaskController
In Xcode, create a new UIViewController subclass called ViewTaskController . Make sure that
the
UITableViewController subclass option is selected and that “ With XIB for user interface ” is
not selected.
In the
ViewTaskController.h header fi le, add imports for the Task.h and Location.h headers:
#import “Task.h”
#import “Location.h”
ViewTaskController.h
In the interface section, add a member variable to hold an instance of the managed object context.
Add another member to hold a
Task object:
NSManagedObjectContext *managedObjectContext;
Task* managedTaskObject;
ViewTaskController.h
Add properties for both of the member variables that you added previously:
@property (nonatomic, retain) NSManagedObjectContext *managedObjectContext;
@property (nonatomic, retain) Task* managedTaskObject;
ViewTaskController.h
The completed header should look like Listing 7 - 2.
LISTING 7 - 2: ViewTaskController.h
#import < UIKit/UIKit.h >
#import “Task.h”
#import “Location.h”
@interface ViewTaskController : UITableViewController {
NSManagedObjectContext *managedObjectContext;
Task* managedTaskObject;
}
@property (nonatomic, retain) NSManagedObjectContext *managedObjectContext;
@property (nonatomic, retain) Task* managedTaskObject;
@end
You will add code to the RootViewController to create an instance of the ViewTaskController
when a user selects a row in the table or when a user clicks the plus sign to add a new task. You will
Adding and Viewing Tasks
❘
173
CH007.indd 173CH007.indd 173 9/18/10 9:48:37 AM9/18/10 9:48:37 AM
174
❘
CHAPTER 7 BUILDING A CORE DATA APPLICATION
then populate the ViewTaskController properties with a pointer to the managed object context
and a pointer to the
Task object that the ViewTaskController will display.
This design prevents the
ViewTaskController from having to know anything about the class that
is calling it. The
ViewTaskController doesn ’ t need to know how to fi nd the Task object that it will
display. This prevents the
ViewTaskController from needing a reference to the context. In general,
it is a good practice to pass in all of the data that an object needs to function. This loosely couples
the class to other classes in the application.
Sure, the
ViewTaskController could have obtained a pointer to the managed object context from
the app delegate, but that would tightly couple it to this application. A more generic and reusable
design is to build the controller such that it has all of the information that it needs to operate
without having to look outside of the class.
Now that you have the
ViewTaskController header coded, it ’ s time to move on to the
implementation. Open the
ViewTaskController.m implementation fi le. Synthesize the properties
that you declared in the header fi le:
@synthesize managedObjectContext, managedTaskObject;
Next, uncomment the viewDidLoad method and add a line of code to set the title of the screen.
The Nav Bar control displays this title at the top of the screen as well as in the Back button on
subsequent screens. The
viewDidLoad method should look like this:
- (void)viewDidLoad {
[super viewDidLoad];
// Uncomment the following line to display an Edit button in the navigation
// bar for this view controller.
self.navigationItem.title = @”Task Detail”;
}
ViewTaskController.m
Now, uncomment the viewWillAppear method and add a line of code to reload the data in the
tableView . The viewWillAppear method should look like this:
- (void)viewWillAppear:(BOOL)animated {
[super viewWillAppear:animated];
// Reload the data for the table to refresh from the context
[self.tableView reloadData];
}
ViewTaskController.m
You need to add code to clean up the memory used by the instance variables and properties defi ned
in the
ViewTaskController just as you did in RootViewController . Implement viewDidUnload
and
dealloc to free the memory and set the properties used by the class to nil :
CH007.indd 174CH007.indd 174 9/18/10 9:48:38 AM9/18/10 9:48:38 AM
- (void)viewDidUnload {
self.managedObjectContext=nil;
self.managedTaskObject = nil;
[super viewDidUnload];
}
- (void)dealloc {
[managedObjectContext release];
[managedTaskObject release];
[super dealloc];
}
ViewTaskController.m
Because you implemented the ViewTaskController as a UITableViewController , you need
to implement the
TableView methods as you learned in the previous chapters on using the
UITableView control.
You can leave the
numberOfSectionsInTableView method alone because the table will display only
one section.
You will need to modify the
tableView:numberOfRowsInSection: method to return six rows. You
will populate each of these six rows with data in the
tableView:cellForRowAtIndexPath: method.
The
tableView:numberOfRowsInSection: method should look like this:
// Customize the number of rows in the table view.
- (NSInteger)tableView:(UITableView *)tableView
numberOfRowsInSection:(NSInteger)section {
return 6;
}
ViewTaskController.m
Next, you will implement the tableView:cellForRowAtIndexPath: method to display the
appropriate content for each row in the table. Building this table will be a little different from what
you have seen before, as you are not building each row dynamically based on its content as you have
done in the past. Each row will have a static label based on the row number and will have some
dynamic content taken from the Task object that corresponds with that row.
Here is the code for the
TableView:cellForRowAtIndexPath: method:
// Customize the appearance of table view cells.
- (UITableViewCell *)tableView:(UITableView *)tableView
cellForRowAtIndexPath:(NSIndexPath *)indexPath {
static NSString *CellIdentifier = @”Cell”;
UITableViewCell *cell =
[tableView dequeueReusableCellWithIdentifier:CellIdentifier];
if (cell == nil) {
cell = [[[UITableViewCell alloc]
initWithStyle:UITableViewCellStyleValue2
Adding and Viewing Tasks
❘
175
CH007.indd 175CH007.indd 175 9/18/10 9:48:39 AM9/18/10 9:48:39 AM
176
❘
CHAPTER 7 BUILDING A CORE DATA APPLICATION
reuseIdentifier:CellIdentifier] autorelease];
}
// Set up the cell
switch (indexPath.row) {
case 0:
cell.textLabel.text = @”Text”;
cell.detailTextLabel.text = managedTaskObject.text;
break;
case 1:
cell.textLabel.text = @”Priority”;
// Get the priority number and convert it to a string
NSString* priorityString=nil;
switch ([managedTaskObject.priority intValue]) {
case 0:
priorityString = @”None”;
break;
case 1:
priorityString = @”Low”;
break;
case 2:
priorityString = @”Medium”;
break;
case 3:
priorityString = @”High”;
break;
default:
break;
}
cell.detailTextLabel.text = priorityString;
[priorityString release];
break;
case 2:
cell.textLabel.text = @”Due Date”;
// Create a date formatter to format the date from the picker
NSDateFormatter* df = [[NSDateFormatter alloc] init];
[df setDateStyle:NSDateFormatterLongStyle];
cell.detailTextLabel.text =
[df stringFromDate:managedTaskObject.dueDate ];
[df release];
break;
case 3:
cell.textLabel.text = @”Location”;
Location* locationObject = managedTaskObject.location;
if (locationObject!=nil)
{
cell.detailTextLabel.text = locationObject.name;
}
CH007.indd 176CH007.indd 176 9/18/10 9:48:39 AM9/18/10 9:48:39 AM
else {
cell.detailTextLabel.text = @”Not Set”;
}
break;
case 4:
// Show hi-pri tasks alert
cell.detailTextLabel.text = @”Hi-Pri Tasks”;
break;
case 5:
// Show sooner tasks alert
cell.detailTextLabel.text = @”Tasks due sooner than this one”;
break;
default:
break;
}
return cell;
}
ViewTaskController.m
The fi rst portion of this code should be familiar. It tries to dequeue a cell, and if it cannot, it creates
a new cell.
The rest of the code executes a
switch statement to determine the content of the row based on
which row the
TableView requests.
The fi rst row of the table will display a label that says “ Text ” and the text attribute from the
Task
object.
Row two displays the label “ Priority ” and then converts the integer priority from the
Task object
into a
priority string that the TableView displays in the cell.
The next row displays the “ Due Date ” label and uses an
NSDateFormatter to convert the NSDate
object stored in the managed object into a string. You can use one of the pre - defi ned formats or you
can defi ne your own. For more information on using
NSDateFormatter , look at the Xcode SDK
documentation or browse to
/>Cocoa/Reference/Foundation/Classes/NSDateFormatter_Class/Reference/Reference.html
.
The fourth row displays the Location label. Then, the code tries to get a
Location object from the
Task ’ s location property. The code displays the name property of the Location object, if it exists.
If not, the code displays “ Not Set. ”
The fi nal two cases display labels to inform the user that tapping these cells will bring up a list of high -
priority tasks or a list of tasks that are due sooner than the currently displayed task. You will implement
didSelectRowAtIndexPath to do something when the user taps these rows later in the chapter.
Leave the default implementation of the
tableView:commitEditingStyle:forRowAtIndexPath:
and
tableView:canMoveRowAtIndexPath: methods.
Adding and Viewing Tasks
❘
177
CH007.indd 177CH007.indd 177 9/18/10 9:48:40 AM9/18/10 9:48:40 AM
178
❘
CHAPTER 7 BUILDING A CORE DATA APPLICATION
Changes to the RootViewController
Now that you have built the ViewTaskController , you need to make some changes to the
RootViewController to access the new screen.
First, you will confi gure the
RootViewController navigation bar. In the viewDidLoad method
of the
RootViewController.m implementation fi le, remove the line:
self.navigationItem.leftBarButtonItem = self.editButtonItem;
This screen will not be using the Edit button.
At the end of
viewDidLoad , add the following line of code to set the title of the screen in the
navigation bar:
self.title = @”Tasks”;
You will also need to add import statements to import the headers for the Location and
Task objects as well as the ViewTaskController . Add the following imports to the top of the
RootViewController implementation fi le:
#import “ViewTaskController.h”
#import “Location.h”
#import “Task.h”
RootViewController.m
Next, you need to implement the insertNewObject method. This method creates a new Task object and
then passes control off to the
ViewTaskController to edit the new task. Tapping the plus button in the
navigation bar calls the
insertNewObject method. Here is the insertNewObject method:
- (void)insertNewObject {
NSManagedObjectContext *context = self.managedObjectContext;
Task *newTask =
[NSEntityDescription insertNewObjectForEntityForName:@”Task”
inManagedObjectContext:context];
ViewTaskController* taskController =
[[ViewTaskController alloc] initWithStyle:UITableViewStyleGrouped];
taskController.managedTaskObject=newTask;
taskController.managedObjectContext = self.managedObjectContext;
[self.navigationController pushViewController:taskController animated:YES];
[taskController release];
RootViewController.m
This method is straightforward. First, you use the context to create a new Task object. Then,
you create an instance of the
ViewTaskController and populate its managedTaskObject and
CH007.indd 178CH007.indd 178 9/18/10 9:48:40 AM9/18/10 9:48:40 AM