Microsoft SQL Server 2008 R2 Unleashed- P25 pps
Bạn đang xem bản rút gọn của tài liệu. Xem và tải ngay bản đầy đủ của tài liệu tại đây (990.72 KB, 10 trang )
ptg
194
CHAPTER 8 Installing SQL Server 2008
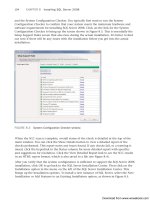
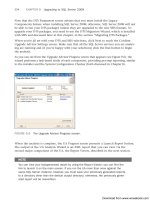
FIGURE 8.3 System Configuration Checker window
and the System Configuration Checker. You typically first want to run the System
Configuration Checker to confirm that your system meets the minimum hardware and
software requirements for installing SQL Server 2008. Click on the link for the System
Configuration Checker to bring up the screen shown in Figure 8.3. This is essentially the
Setup Support Rules screen that also runs during the actual installation. It’s better to find
out now if there will be any issues with the installation before you get into the actual
installation.
When the SCC scan is complete, overall status of the check is detailed at the top of the
main window. You can click the Show Details button to view a detailed report of the
checks performed. This report notes any issues found. If any checks fail, or a warning is
raised, click the hyperlink in the Status column for more detailed report with specifics
and suggestions for resolution. Click the View Detailed Report link to see the SCC results
in an HTML report format, which is also saved to a file (see Figure 8.4).
After you verify that the system configuration is sufficient to support the SQL Server 2008
installation, click OK to go back to the SQL Server Installation Center. Then click on the
Installation option in the menu on the left of the SQL Server Installation Center. This
brings up the installation options. To install a new instance of SQL Server, select the New
Installation or Add Features to an Existing Installation option, as shown in Figure 8.5.
Download from www.wowebook.com
ptg
195
Installation Walkthrough
8
FIGURE 8.4 System Configuration Checker HTML report.
FIGURE 8.5 SQL Server Installation menu.
Download from www.wowebook.com
ptg
196
CHAPTER 8 Installing SQL Server 2008
NOTE
The following installation steps and screenshots are based on the installation of SQL
Server 2008 R2. For SQL Server 2008 installations, the order of the install screens
and options may be slightly different, but the screen contents and options are similar.
The first step of the installation is to run the Setup Support Rules to identify any potential
issues that might occur when the installer installs the SQL Server Setup support files and
lists any items that may need to be corrected before Setup can continue. These checks
include the following:
. Operating system version
. Whether there are any reboots pending from other installers
. Whether the logged-in user is a system administrator (a must)
. Whether there is support for long pathnames where the installation media resides
. The consistency of any SQL Server Registry keys
After the Setup Support Rules run for the Setup Support Files, you can click on the Show
Details button to display a window like that shown in Figure 8.6.
If any tests fail, you can click on the View Detailed Report link to see a more detailed
report file. You can also click on the hyperlink in the Status column of the failed rule to
FIGURE 8.6 Setup Support Rules for Setup Support Files Detail.
Download from www.wowebook.com
ptg
197
Installation Walkthrough
8
view specifics on the failed rule. If there are no failed Setup Support Rules to hinder instal-
lation, click OK to continue to the installation of the Setup Support Files (see Figure 8.7).
The Setup Support Files are components that need to be installed so that the actual SQL
Server product installation can proceed. Click Install to initiate the installation of the
Setup Support Files.
After the installation of the Setup Support Files has completed successfully, the Installer
reruns the Setup Support Rules, this time running additional checks to verify that the
system will support the installation of SQL Server and its features. Again, if any of the tests
fail or a warning is generated, you typically need to address this situation before continu-
ing to ensure a successful SQL Server installation. For example, Figure 8.8 shows a warning
regarding Windows Firewall. Clicking on the Warning hyperlink in the Status column
brings up a dialog with more information about the warning. In this case, the warning
indicates that if Windows Firewall is enabled, the network ports for SQL Server need to be
opened to allow remote clients to access SQL Server on this machine.
If no tests have failed and all warnings have been reviewed or resolved, click Next to bring
up the Product Key page to enter any necessary product keys if you are installing a version
of SQL Server 2008 that is not free (see Figure 8.9).
After entering the product key (if needed), click Next to review the License Terms for SQL
Server 2008 R2 (see Figure 8.10). Note that you need to accept the license agreement that
follows; otherwise, you can’t proceed. Click the check box indicating your acceptance of
the license terms and click Next to bring up the Setup Role page, as shown in Figure 8.11.
FIGURE 8.7 Setup Support Files installation screen.
Download from www.wowebook.com
ptg
198
CHAPTER 8 Installing SQL Server 2008
FIGURE 8.8 Setup Support Rules for SQL Server installation detail.
FIGURE 8.9 Product Key entry page.
Download from www.wowebook.com
ptg
199
Installation Walkthrough
8
FIGURE 8.10 License Terms page.
FIGURE 8.11 Setup Role page.
Download from www.wowebook.com
ptg
200
CHAPTER 8 Installing SQL Server 2008
The Setup Role page is new with SQL Server 2008 R2. This page was not available in SQL
Server 2008. The Setup Role page lets you specify whether to use the Feature Selection
page to select individual features to be installed or to install using a setup role. A setup role
is a fixed selection of all the features and shared components required to implement a
predefined SQL Server configuration. For example, in Figure 8.11, you are presented with
three options. The SQL Server Feature Installation option lets you select individual features
and shared components to be installed, such as Database Engine Services, Analysis Services
(native mode), Reporting Services, and Service Broker. The Analysis Services with
SharePoint Integration option allows you to install Analysis Services server components in
a Microsoft Office SharePoint Server farm. This option enables large-scale query and data
processing for published Excel workbooks that contain embedded PowerPivot data. The All
Features with Defaults option skips the Feature Selection screen and installs all SQL Server
2008 R2 features available for the current release. All services are installed with the default
system accounts, and the current user running the install is provisioned as a member of
the SQL Server
sysadmin role.
In most cases, you choose the SQL Server Feature Installation option. After selecting this
option, click Next to display the Feature Selection window (see Figure 8.12). Here, you can
select which SQL Server features you want to install. For example, if you want to install
only the SQL Server Client Tools, this is the place you specify that choice.
Following are the most commonly available features (detailed in subsequent chapters of
this book):
FIGURE 8.12 The Feature Selection page.
Download from www.wowebook.com
ptg
201
Installation Walkthrough
8
. Database Engine Services—Includes the core Database Engine services, optional
replication (see Chapter 19, “Replication”), and Full-Text Search (see Chapter 50,
“SQL Server Full-Text Search”) services.
. Analysis Services—Includes the engine used to create business intelligence solu-
tions that rely on OLAP and data mining (see Chapter 51, “SQL Server 2008 Analysis
Services”).
. Reporting Services—Includes the engine and tools used to generate and deploy
data-centric reports (see Chapter 53, “SQL Server 2008 Reporting Services”).
. Shared Features—Includes optional features shared among multiple SQL Server
instances on the same system, such as Business Intelligence Development Studio,
Client Tools Connectivity components, Integration Services, SQL Server Books
Online, SQL Server Management Tools, and the Microsoft Sync Framework.
If you are uncertain about the need for a specific feature, when you click on it in this
window, a description of the feature and what will be installed is displayed in the
Description pane on the right.
The Feature Selection page is also the place where you can change the installation location
for the shared features (if this is the first time any of the shared features are being installed
on the system). The default location is
C:\Program Files\Microsoft SQL Server. In most
production installations, you’ll most likely want the shared features to remain in the
Program Files folder.
After you finish making your selections, click Next to move on to the Installation Rules
page (see Figure 8.13).
NOTE
In versions of SQL Server 2008 prior to R2, the installation rules were not run until
later in the installation process.
The Installation Rules page runs a check to determine whether there are any issues that
will block the installation of the selected features. From this page, you can address any
issues and rerun the rules until they all pass or only warning messages are displayed. Like
the Setup Support Rules page, this page enables you to get detailed information on the
rule checks performed by clicking on the Show Details button. You can get more informa-
tion on a specific rule by clicking the hyperlink in the Status column. A detailed HTML
report can be generated as well by clicking on the View Detailed Report hyperlink.
When no errors are displayed on the Installation Rules page, click Next to proceed to the
Instance Configuration page.
You can choose to install SQL Server as the default instance (if a default instance has not
already been installed) or as a named instance. SQL Server supports multiple instances of
SQL Server on a single server or workstation, but only one instance can be the default
instance. The default instance can be an installation of SQL Server 2000, SQL Server 2005,
or SQL Server 2008. All other instances must be named instances. The named instances
Download from www.wowebook.com
ptg
202
CHAPTER 8 Installing SQL Server 2008
FIGURE 8.13 The Installation Rules page.
can be different versions and/or editions of SQL Server. You can run multiple instances of
SQL Server concurrently on the same machine with each instance running independently
of other instances. You can also install SQL Server as a named instance without installing
a default instance first. If any instances are already installed, they are listed in the
Installed Instances list. (For example, Figure 8.14 shows that an instance of the Shared
Components from SQL Server 2005 is already installed.)
Another option you can specify on this screen is the Instance Root Directory. This deter-
mines where the data files for the system databases for the SQL Server instance will be
installed. The installation path for SQL Server 2008 defaults to the system drive of the
machine to which you are installing, followed by the root default folder:
[system drive
letter]:Program Files\Microsoft SQL Server. From here, two main subfolders branch
out:
. 100—This is the version-specific parent folder (SQL Server 2008 is version 10.0,
hence 100) for shared features such as Integration Services (under DTS), client tools
(under Tools), shared tools (under Shared), and COM components (under COM).
. MSSQL10_50.InstanceName—This is the parent folder for Database Engine compo-
nents (under MSSQL/Binn) and data files (under MSSQL/Data). InstanceName is deter-
mined by the value specified during the installation process.
. MSAS10_50.InstanceName—This is the parent folder for Analysis Services compo-
nents.
Download from www.wowebook.com
ptg
203
Installation Walkthrough
8
FIGURE 8.14 Instance Configuration page.
. MSRS10_50.InstanceName—This is the parent folder for Reporting Services
components.
After you finish configuring the instance, click Next to bring up the Disk Space
Requirements page. This information screen shows only the disk space requirements for
the features you’ve chosen to install and the available space in the drives you selected to
install to. If you want to change the install locations, click on the Back button to return to
the screen where the installation directory you want to change is specified. When you are
satisfied with your selections, click Next to move onto the Server Configuration page (see
Figure 8.15).
On the Server Configuration page, you can specify the specific user accounts and pass-
words to use for the selected SQL Server services you chose to install. To simplify matters,
you can click the Use the Same Account for All SQL Server Services button to specify a
single local or domain account dedicated for SQL Server 2008 R2 use and assign it to all
services. However, for improved security, it is recommended that you create multiple
accounts, one for each service. This helps reinforce the least-privileged user account
approach, which states that a user should have only the privileges required to get the job
done—and no more. Having multiple accounts also makes it clearer for network adminis-
trators to determine which SQL Server services (as opposed to the multitude of other
running services) are requesting access to a resource. If you don’t specify a user account,
the services are set up to run under the Local System account, which is an account with
local admin privileges that does not have access to any network resources. The Installer
provides warnings if you specify an account with insufficient privileges or credentials.
Download from www.wowebook.com